Page 1531 of 1943
A12954
11 0
mm
EM7639
Z00064
Z00065
A01185
EM±74
± ENGINE MECHANICALCYLINDER BLOCK
2001 PRIUS (RM778U)
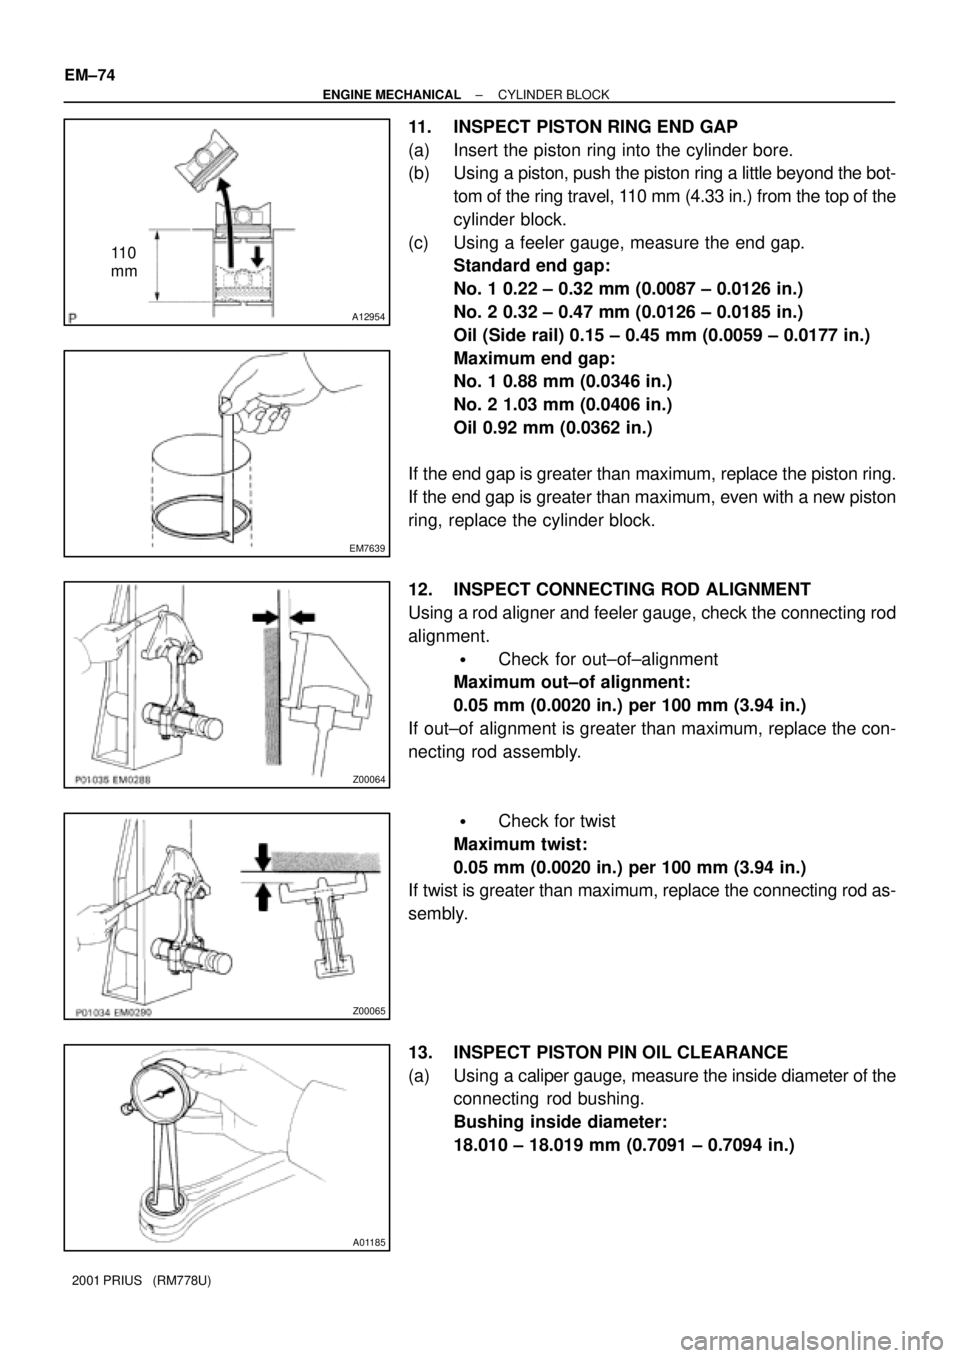
11. INSPECT PISTON RING END GAP
(a) Insert the piston ring into the cylinder bore.
(b) Using a piston, push the piston ring a little beyond the bot-
tom of the ring travel, 110 mm (4.33 in.) from the top of the
cylinder block.
(c) Using a feeler gauge, measure the end gap.
Standard end gap:
No. 1 0.22 ± 0.32 mm (0.0087 ± 0.0126 in.)
No. 2 0.32 ± 0.47 mm (0.0126 ± 0.0185 in.)
Oil (Side rail) 0.15 ± 0.45 mm (0.0059 ± 0.0177 in.)
Maximum end gap:
No. 1 0.88 mm (0.0346 in.)
No. 2 1.03 mm (0.0406 in.)
Oil 0.92 mm (0.0362 in.)
If the end gap is greater than maximum, replace the piston ring.
If the end gap is greater than maximum, even with a new piston
ring, replace the cylinder block.
12. INSPECT CONNECTING ROD ALIGNMENT
Using a rod aligner and feeler gauge, check the connecting rod
alignment.
�Check for out±of±alignment
Maximum out±of alignment:
0.05 mm (0.0020 in.) per 100 mm (3.94 in.)
If out±of alignment is greater than maximum, replace the con-
necting rod assembly.
�Check for twist
Maximum twist:
0.05 mm (0.0020 in.) per 100 mm (3.94 in.)
If twist is greater than maximum, replace the connecting rod as-
sembly.
13. INSPECT PISTON PIN OIL CLEARANCE
(a) Using a caliper gauge, measure the inside diameter of the
connecting rod bushing.
Bushing inside diameter:
18.010 ± 18.019 mm (0.7091 ± 0.7094 in.)
Page 1533 of 1943
A11242
EM±76
± ENGINE MECHANICALCYLINDER BLOCK
2001 PRIUS (RM778U)
16. INSPECT MAIN JOURNALS AND CRANK PINS
(a) Using a micrometer, measure the diameter of each main
journal and crank pin.
Main journal diameter:
45.988 ± 46.000 mm (1.81054 ± 1.81102 in.)
Crank pin diameter:
39.992 ± 40.000 mm (1.5745 ± 1.5748 in.)
If the diameter is not as specified, check the oil clearance.
(See page EM±64)
If necessary, replace the crankshaft.
(b) Check each main journal and crank pin for taper and out±
of±round as shown.
Maximum taper and out±of±round:
0.02 mm (0.0008 in.)
If the taper and out±of round is greater than maximum, replace
the crankshaft.
Page 1536 of 1943
A01205
A10456
EM±80
± ENGINE MECHANICALCYLINDER BLOCK
2001 PRIUS (RM778U)
(c) Install and uniformly tighten the 10 bolts of the bearing
cap is several passes, in the sequence shown.
Torque:
1ST 22 N´m (220 kgf´cm, 16 ft´lbf)
2ND Turn 90 °
(d) Check that the crankshaft turns smoothly.
7. CHECK CRANKSHAFT THRUST CLEARANCE
(See page EM±64)
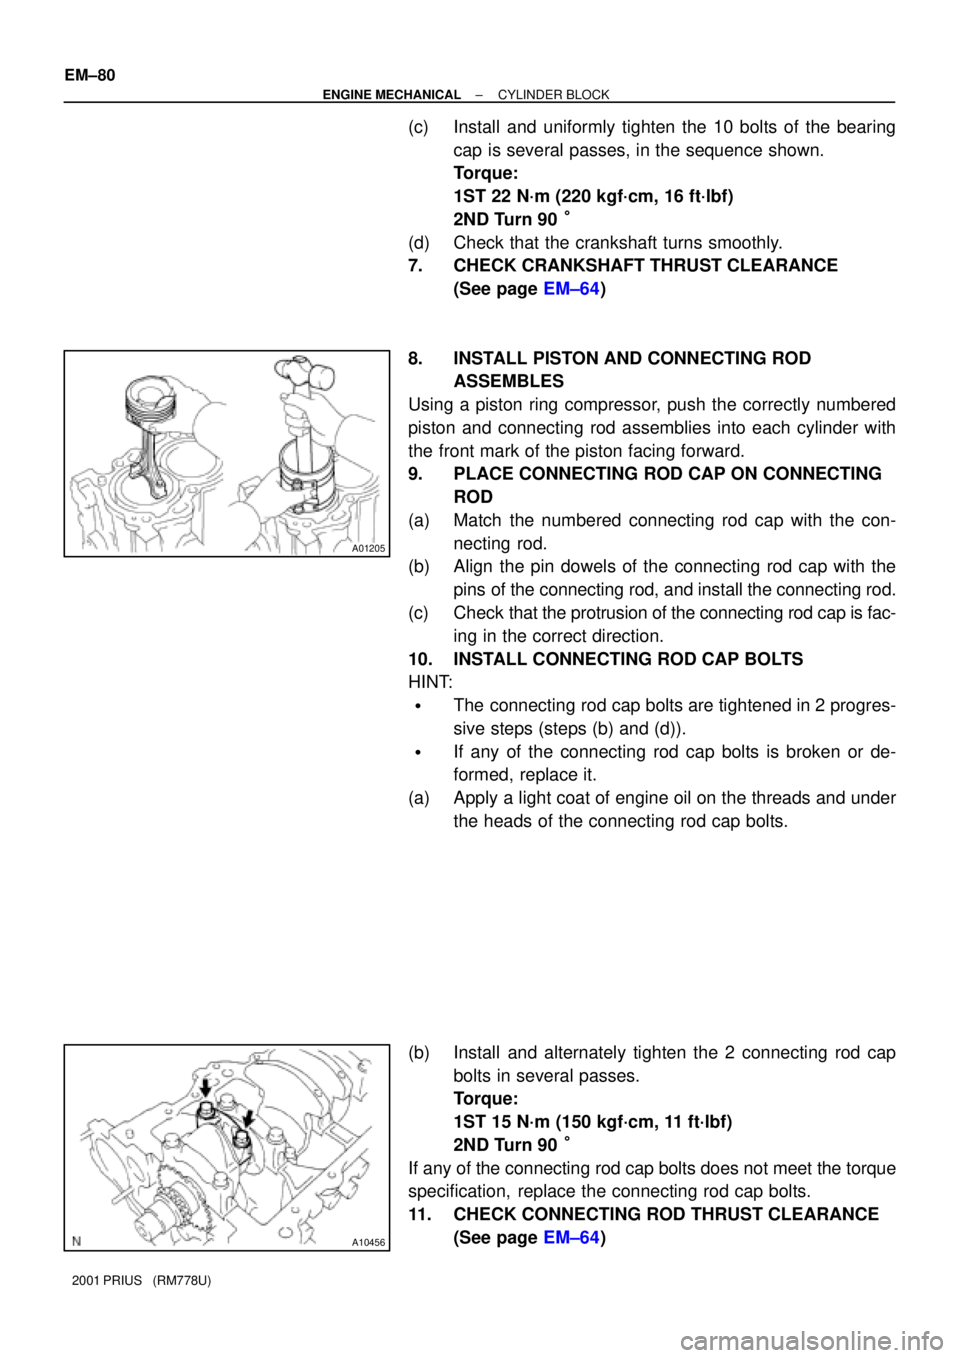
8. INSTALL PISTON AND CONNECTING ROD
ASSEMBLES
Using a piston ring compressor, push the correctly numbered
piston and connecting rod assemblies into each cylinder with
the front mark of the piston facing forward.
9. PLACE CONNECTING ROD CAP ON CONNECTING
ROD
(a) Match the numbered connecting rod cap with the con-
necting rod.
(b) Align the pin dowels of the connecting rod cap with the
pins of the connecting rod, and install the connecting rod.
(c) Check that the protrusion of the connecting rod cap is fac-
ing in the correct direction.
10. INSTALL CONNECTING ROD CAP BOLTS
HINT:
�The connecting rod cap bolts are tightened in 2 progres-
sive steps (steps (b) and (d)).
�If any of the connecting rod cap bolts is broken or de-
formed, replace it.
(a) Apply a light coat of engine oil on the threads and under
the heads of the connecting rod cap bolts.
(b) Install and alternately tighten the 2 connecting rod cap
bolts in several passes.
Torque:
1ST 15 N´m (150 kgf´cm, 11 ft´lbf)
2ND Turn 90 °
If any of the connecting rod cap bolts does not meet the torque
specification, replace the connecting rod cap bolts.
11. CHECK CONNECTING ROD THRUST CLEARANCE
(See page EM±64)
Page 1542 of 1943
EC0HV±01
B04812
Gasket
B06544
Vacuum
Gauge
F12396
TOYOTA Hand±held Tester
B11799
± EMISSION CONTROLEVAPORATIVE EMISSION (EVAP) CONTROL SYSTEM
EC±7
2001 PRIUS (RM778U)
INSPECTION
1. REMOVE EXHAUST TAIL PIPE AND HEATED INSULA-
TOR (See page EM±84)
2. INSPECT LINES AND CONNECTORS
Visually check for loose connections, sharp bends or damage.
3. INSPECT FUEL TANK FILLER PIPE
Visually check for deformation, cracks or fuel leakage.
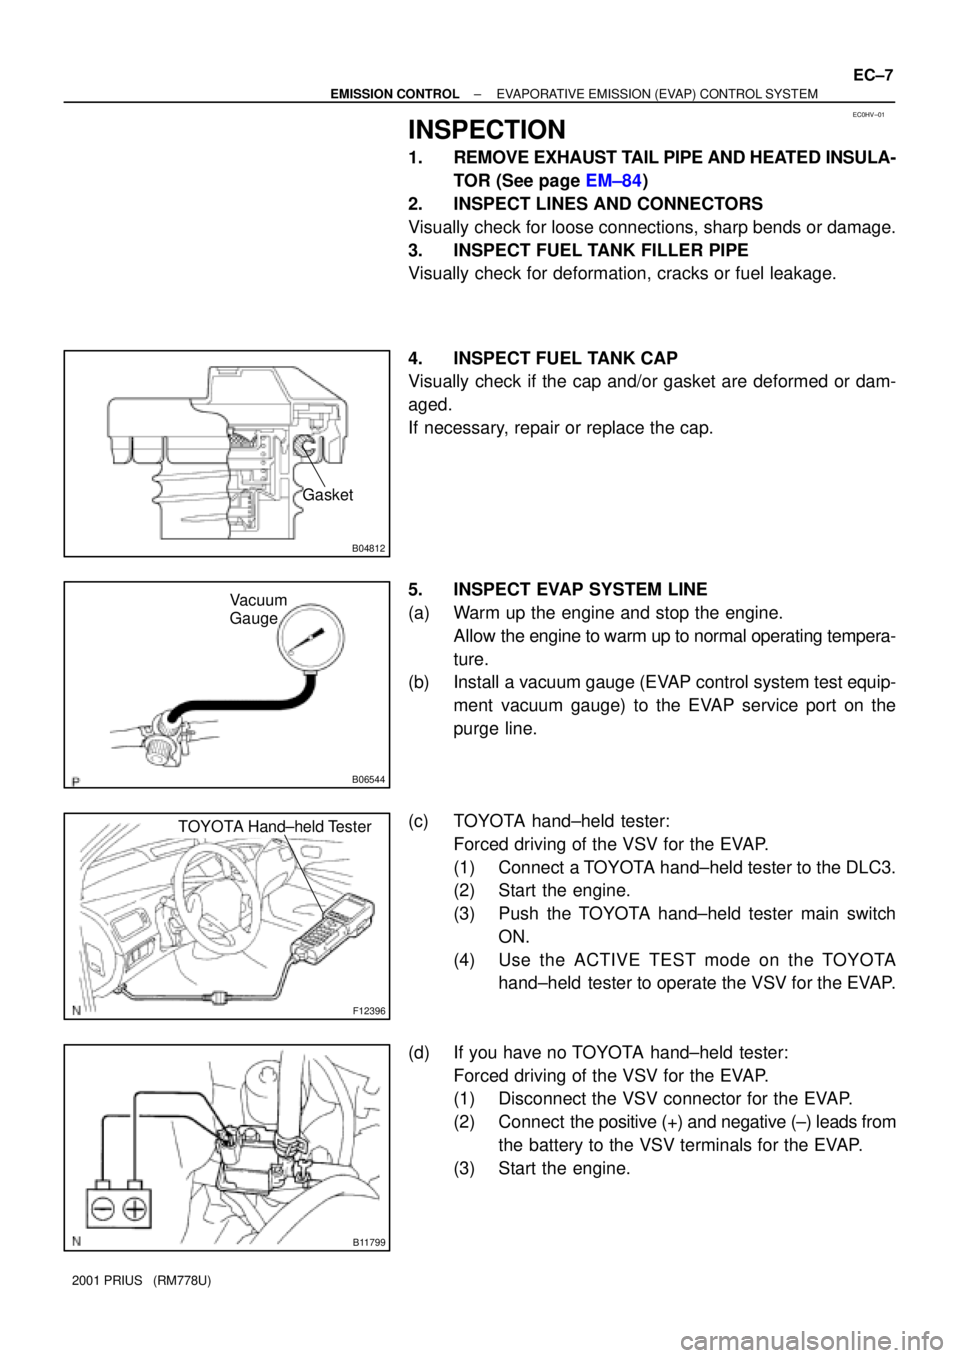
4. INSPECT FUEL TANK CAP
Visually check if the cap and/or gasket are deformed or dam-
aged.
If necessary, repair or replace the cap.
5. INSPECT EVAP SYSTEM LINE
(a) Warm up the engine and stop the engine.
Allow the engine to warm up to normal operating tempera-
ture.
(b) Install a vacuum gauge (EVAP control system test equip-
ment vacuum gauge) to the EVAP service port on the
purge line.
(c) TOYOTA hand±held tester:
Forced driving of the VSV for the EVAP.
(1) Connect a TOYOTA hand±held tester to the DLC3.
(2) Start the engine.
(3) Push the TOYOTA hand±held tester main switch
ON.
(4) Use the ACTIVE TEST mode on the TOYOTA
hand±held tester to operate the VSV for the EVAP.
(d) If you have no TOYOTA hand±held tester:
Forced driving of the VSV for the EVAP.
(1) Disconnect the VSV connector for the EVAP.
(2) Connect the positive (+) and negative (±) leads from
the battery to the VSV terminals for the EVAP.
(3) Start the engine.
Page 1543 of 1943
B06545
B11800
B06546
Pressure
Gauge
Pressure EC±8
± EMISSION CONTROLEVAPORATIVE EMISSION (EVAP) CONTROL SYSTEM
2001 PRIUS (RM778U)
(e) Check the vacuum at idle.
Vacuum:
Maintain at 0.368 ± 19.713 in. Hg (5 ± 268 in.Aq) for
over 5 seconds
HINT:
If the vacuum does not change, you can conclude that the hose
connecting the VSV to the service port has come loose or is
blocked, or the VSV is malfunctioning.
(f) If you have TOYOTA hand±held tester:
Conclude forced driving of the VSV for the EVAP.
(1) Stop the engine.
(2) Disconnect the TOYOTA hand±held tester from the
DLC3.
(g) If you have no TOYOTA hand±held tester:
Conclude forced driving of the VSV for the EVAP.
(1) Stop the engine.
(2) Disconnect the positive (+) and negative (±) leads
from the battery, and from the VSV terminals for the
EVAP.
(3) Connect the VSV connector for the EVAP.
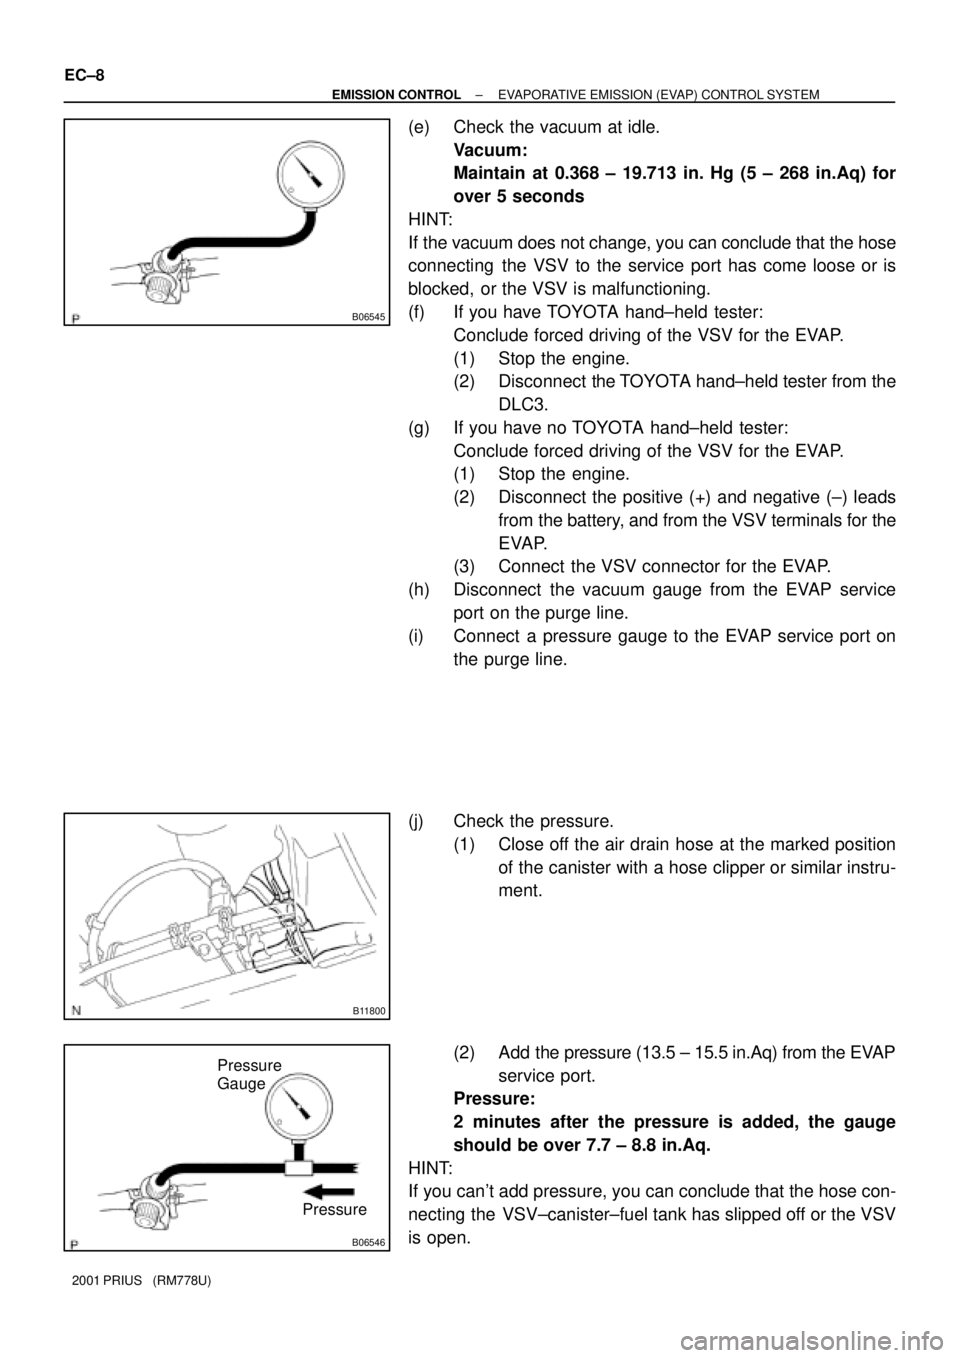
(h) Disconnect the vacuum gauge from the EVAP service
port on the purge line.
(i) Connect a pressure gauge to the EVAP service port on
the purge line.
(j) Check the pressure.
(1) Close off the air drain hose at the marked position
of the canister with a hose clipper or similar instru-
ment.
(2) Add the pressure (13.5 ± 15.5 in.Aq) from the EVAP
service port.
Pressure:
2 minutes after the pressure is added, the gauge
should be over 7.7 ± 8.8 in.Aq.
HINT:
If you can't add pressure, you can conclude that the hose con-
necting the VSV±canister±fuel tank has slipped off or the VSV
is open.
Page 1548 of 1943
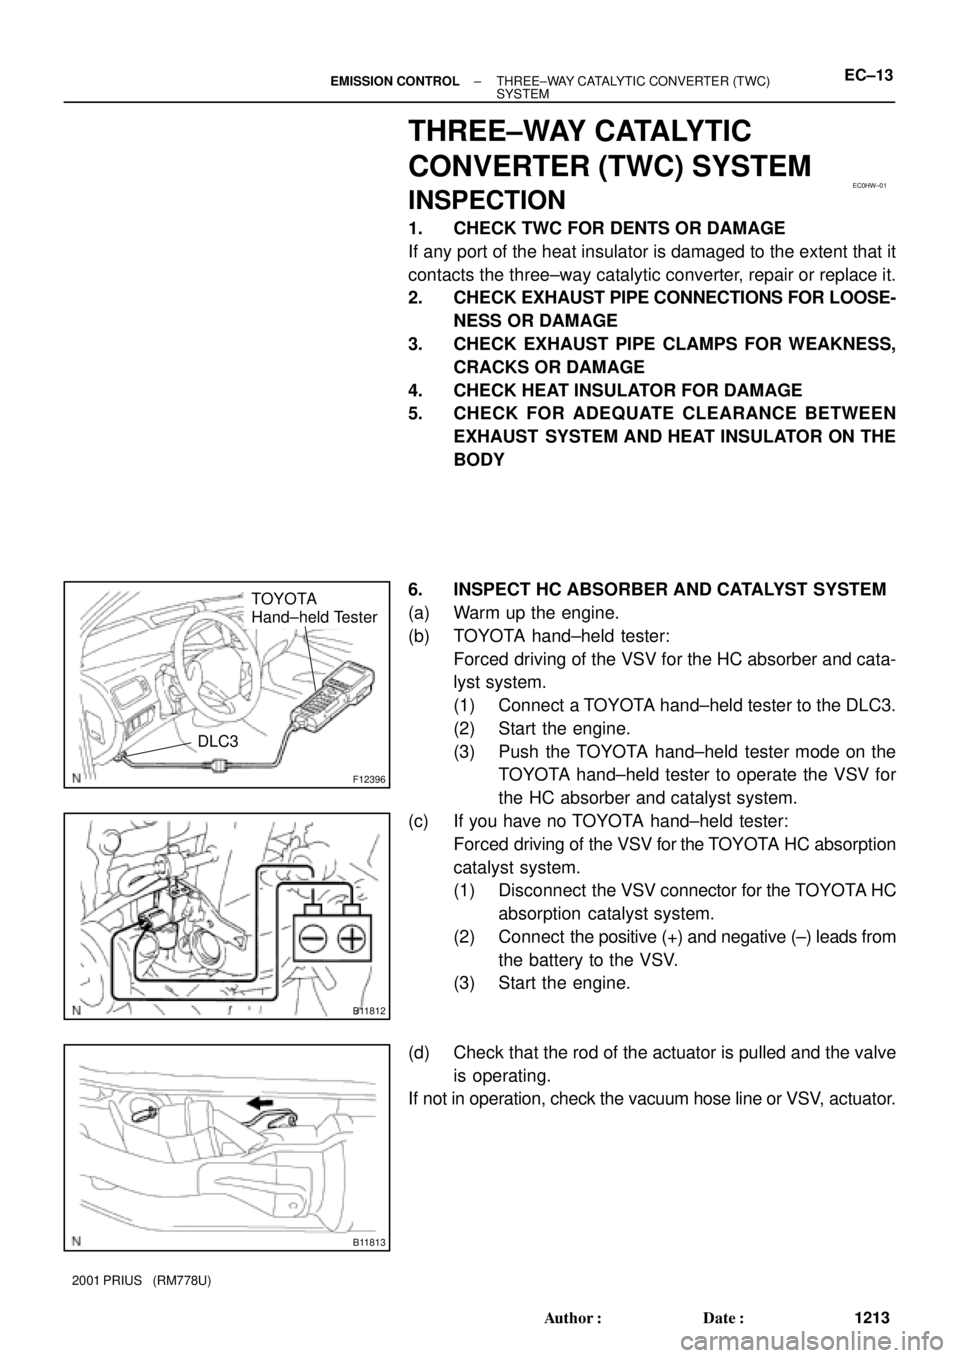
EC0HW±01
F12396
TOYOTA
Hand±held Tester
DLC3
B11812
B11813
± EMISSION CONTROLTHREE±WAY CATALYTIC CONVERTER (TWC)
SYSTEMEC±13
1213 Author�: Date�:
2001 PRIUS (RM778U)
THREE±WAY CATALYTIC
CONVERTER (TWC) SYSTEM
INSPECTION
1. CHECK TWC FOR DENTS OR DAMAGE
If any port of the heat insulator is damaged to the extent that it
contacts the three±way catalytic converter, repair or replace it.
2. CHECK EXHAUST PIPE CONNECTIONS FOR LOOSE-
NESS OR DAMAGE
3. CHECK EXHAUST PIPE CLAMPS FOR WEAKNESS,
CRACKS OR DAMAGE
4. CHECK HEAT INSULATOR FOR DAMAGE
5. CHECK FOR ADEQUATE CLEARANCE BETWEEN
EXHAUST SYSTEM AND HEAT INSULATOR ON THE
BODY
6. INSPECT HC ABSORBER AND CATALYST SYSTEM
(a) Warm up the engine.
(b) TOYOTA hand±held tester:
Forced driving of the VSV for the HC absorber and cata-
lyst system.
(1) Connect a TOYOTA hand±held tester to the DLC3.
(2) Start the engine.
(3) Push the TOYOTA hand±held tester mode on the
TOYOTA hand±held tester to operate the VSV for
the HC absorber and catalyst system.
(c) If you have no TOYOTA hand±held tester:
Forced driving of the VSV for the TOYOTA HC absorption
catalyst system.
(1) Disconnect the VSV connector for the TOYOTA HC
absorption catalyst system.
(2) Connect the positive (+) and negative (±) leads from
the battery to the VSV.
(3) Start the engine.
(d) Check that the rod of the actuator is pulled and the valve
is operating.
If not in operation, check the vacuum hose line or VSV, actuator.
Page 1550 of 1943

SF1KN±01
± SFISFI SYSTEM
SF±1
1215 Author�: Date�:
2001 PRIUS (RM778U)
SFI SYSTEM
PRECAUTION
1. BEFORE WORKING ON THE FUEL SYSTEM , DIS-
CONNECT THE NEGATIVE (±) TERMINAL CABLE
FROM THE BATTERY AND HV BATTERY SERVICE
PLUG
HINT:
Any diagnostic trouble code retained by the computer will be
erased when the negative (±) terminal cable is removed from
the battery. Therefore, if necessary, read the diagnosis before
removing the negative (±) terminal cable from the battery.
2. DO NOT SMOKE OR WORK NEAR AN OPEN FLAME
WHEN WORKING ON THE FUEL SYSTEM
3. KEEP GASOLINE AWAY FROM RUBBER OR
LEATHER PARTS
4. MAINTENANCE PRECAUTIONS
(a) In event of engine misfire, these precautions should be
taken.
(1) Check proper connection to battery terminals, etc.
(2) After repair work, check that the ignition coil termi-
nals and all other ignition system lines are recon-
nected securely.
(3) When cleaning the engine compartment, be espe-
cially careful to protect the electrical system from
water.
(b) Precautions when handling oxygen sensor.
(1) Do not allow oxygen sensor to drop or hit against an
object.
(2) Do not allow the sensor to come into contact with
water.
If vehicle is Equipped with Mobile Radio System (HAM, CB,
etc.)
If the vehicle is equipped with a mobile communication system,
refer to the precaution in the IN section.
5. AIR INDUCTION SYSTEM
(a) Separation of the engine oil dipstick, oil filler cap, PCV
hose, etc. may cause the engine to run out of turn.
(b) Disconnection, looseness or cracks in the parts of the air
induction system between the throttle body and cylinder
head will allow air suction and cause the engine to run out
of turn.
6. ELECTRONIC CONTROL SYSTEM
(a) Before removing SFI wiring connectors, terminals, etc.,
first disconnect the power by either turning the ignition
switch to LOCK or disconnecting the negative (±) terminal
cable from the battery.
HINT:
Always check the diagnostic trouble code before disconnecting
the negative (±) terminal cable from the battery.
Page 1551 of 1943
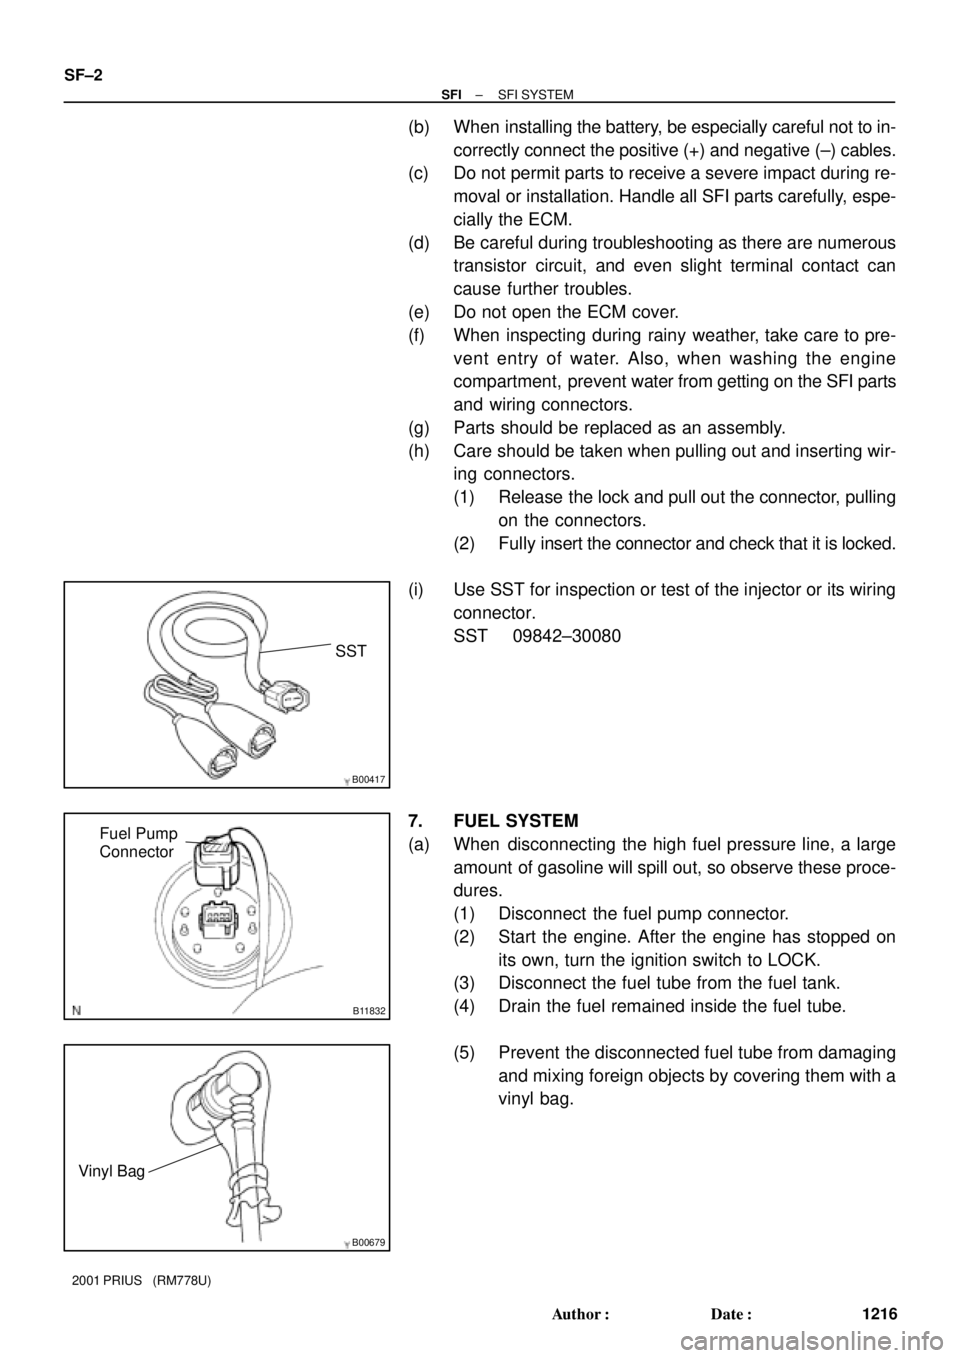
B00417
SST
B11832
Fuel Pump
Connector
B00679
Vinyl Bag
SF±2
± SFISFI SYSTEM
1216 Author�: Date�:
2001 PRIUS (RM778U)
(b) When installing the battery, be especially careful not to in-
correctly connect the positive (+) and negative (±) cables.
(c) Do not permit parts to receive a severe impact during re-
moval or installation. Handle all SFI parts carefully, espe-
cially the ECM.
(d) Be careful during troubleshooting as there are numerous
transistor circuit, and even slight terminal contact can
cause further troubles.
(e) Do not open the ECM cover.
(f) When inspecting during rainy weather, take care to pre-
vent entry of water. Also, when washing the engine
compartment, prevent water from getting on the SFI parts
and wiring connectors.
(g) Parts should be replaced as an assembly.
(h) Care should be taken when pulling out and inserting wir-
ing connectors.
(1) Release the lock and pull out the connector, pulling
on the connectors.
(2) Fully insert the connector and check that it is locked.
(i) Use SST for inspection or test of the injector or its wiring
connector.
SST 09842±30080
7. FUEL SYSTEM
(a) When disconnecting the high fuel pressure line, a large
amount of gasoline will spill out, so observe these proce-
dures.
(1) Disconnect the fuel pump connector.
(2) Start the engine. After the engine has stopped on
its own, turn the ignition switch to LOCK.
(3) Disconnect the fuel tube from the fuel tank.
(4) Drain the fuel remained inside the fuel tube.
(5) Prevent the disconnected fuel tube from damaging
and mixing foreign objects by covering them with a
vinyl bag.