Page 1507 of 1943
± ENGINE MECHANICALCYLINDER HEAD
EM±49
2001 PRIUS (RM778U)
29. ROAD TEST VEHICLE
Check for abnormal noises, shock slippage, correct shift points
and smooth operation.
30. RECHECK ENGINE COOLANT AND HV COOLANT
Page 1515 of 1943
EM1J2±02
P08755
A13917
SSTSST
1
2
3
4
6
5
A13940
SST
A13917
SSTSST
1
2
3
4
6
5
EM±58
± ENGINE MECHANICALENGINE UNIT
2001 PRIUS (RM778U)
INSTALLATION
1. INSTALL FLYWHEEL
(a) Apply adhesive to 2 or 3 threads of the bolt end.
Adhesive: Part No. 08833±00070, THREE BOND 1324
or equivalent
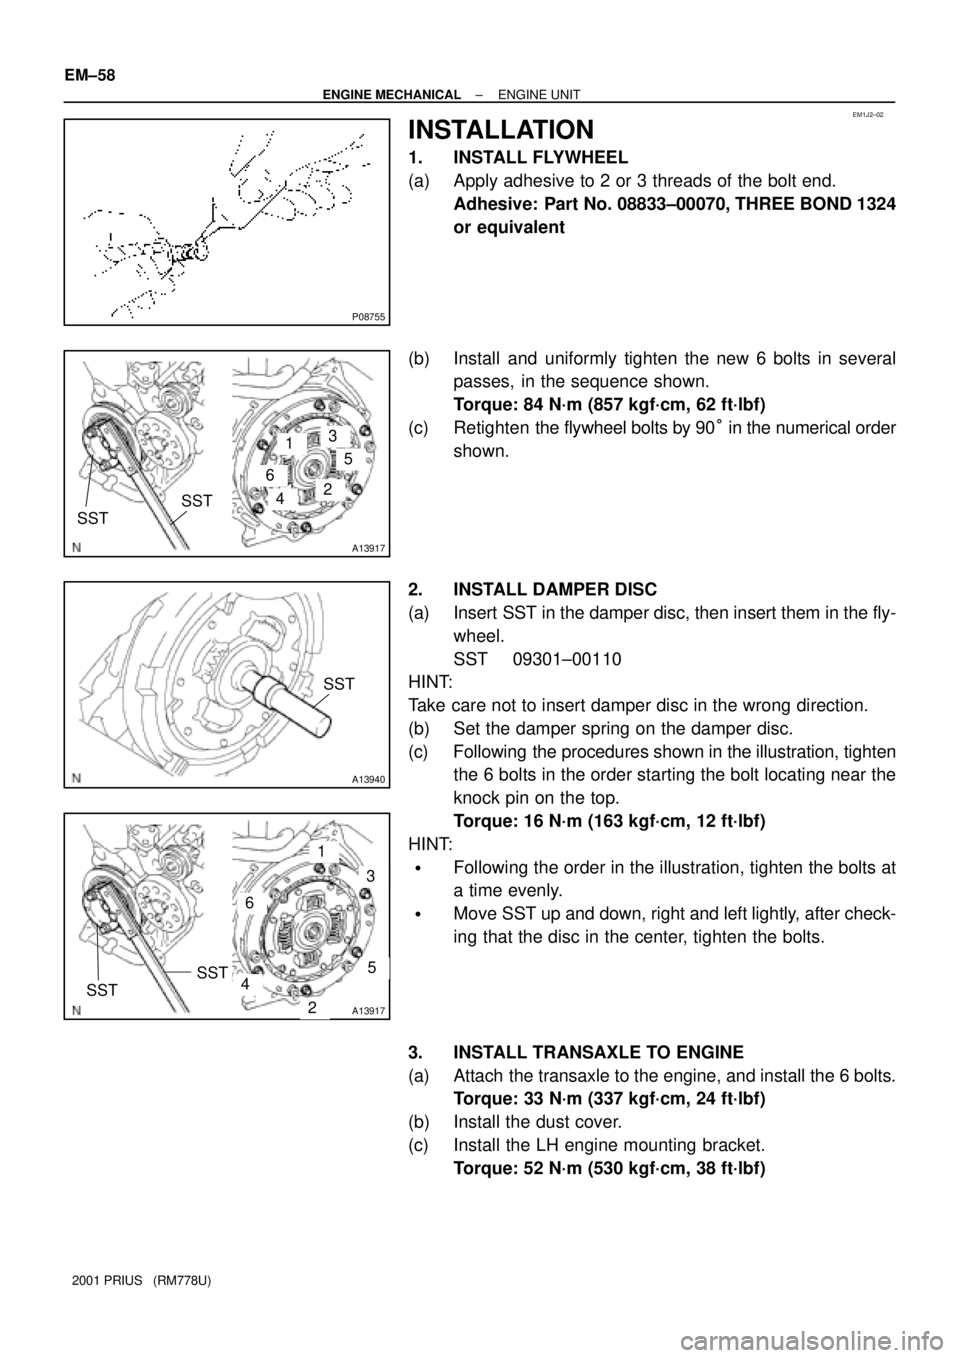
(b) Install and uniformly tighten the new 6 bolts in several
passes, in the sequence shown.
Torque: 84 N´m (857 kgf´cm, 62 ft´lbf)
(c) Retighten the flywheel bolts by 90° in the numerical order
shown.
2. INSTALL DAMPER DISC
(a) Insert SST in the damper disc, then insert them in the fly-
wheel.
SST 09301±00110
HINT:
Take care not to insert damper disc in the wrong direction.
(b) Set the damper spring on the damper disc.
(c) Following the procedures shown in the illustration, tighten
the 6 bolts in the order starting the bolt locating near the
knock pin on the top.
Torque: 16 N´m (163 kgf´cm, 12 ft´lbf)
HINT:
�Following the order in the illustration, tighten the bolts at
a time evenly.
�Move SST up and down, right and left lightly, after check-
ing that the disc in the center, tighten the bolts.
3. INSTALL TRANSAXLE TO ENGINE
(a) Attach the transaxle to the engine, and install the 6 bolts.
Torque: 33 N´m (337 kgf´cm, 24 ft´lbf)
(b) Install the dust cover.
(c) Install the LH engine mounting bracket.
Torque: 52 N´m (530 kgf´cm, 38 ft´lbf)
Page 1518 of 1943
A13943
A13907
± ENGINE MECHANICALENGINE UNIT
EM±61
2001 PRIUS (RM778U)
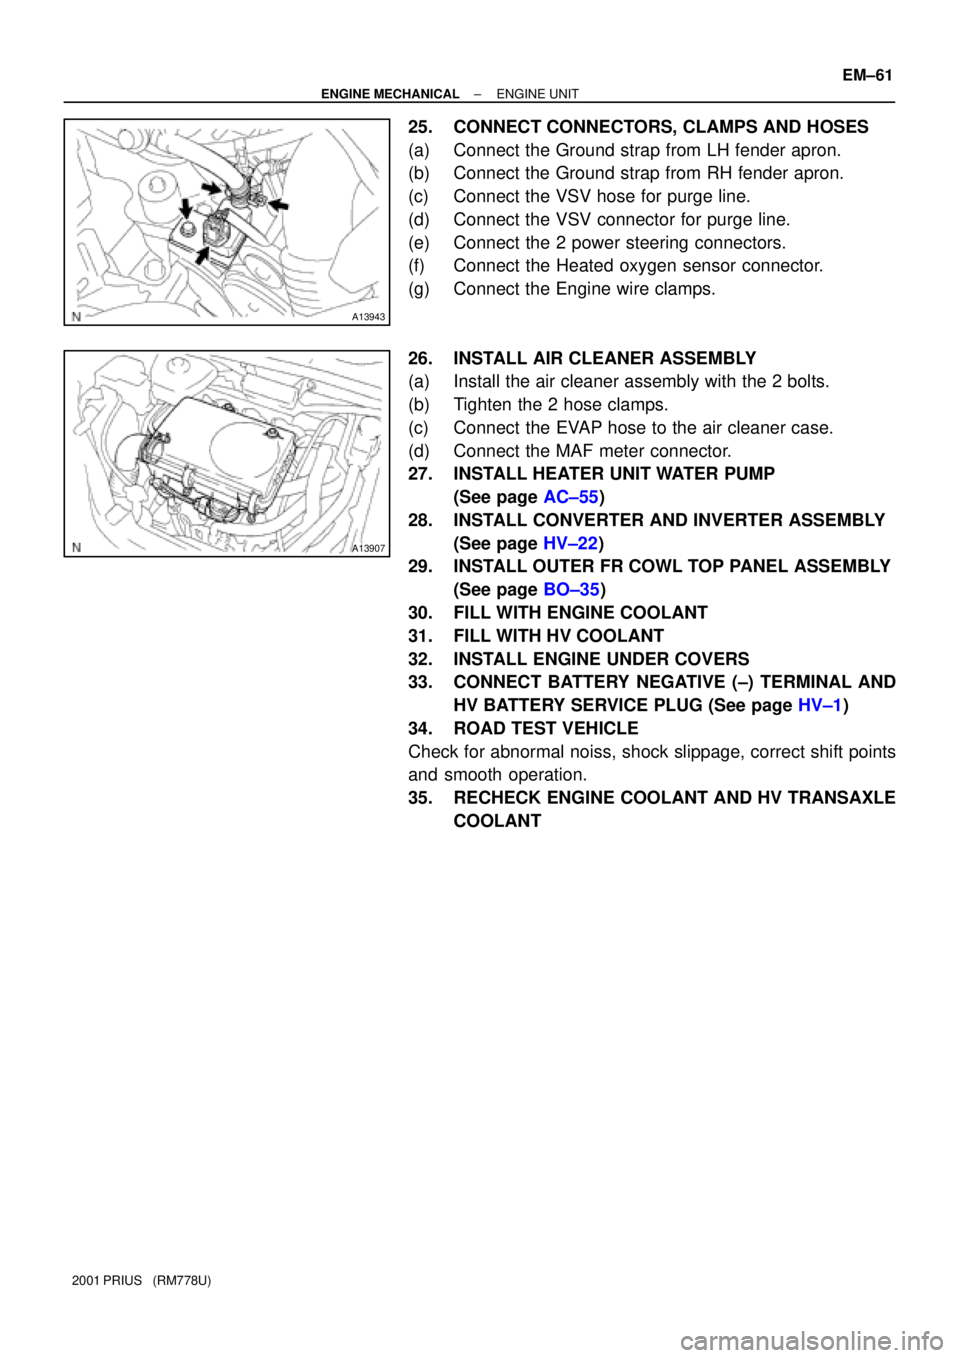
25. CONNECT CONNECTORS, CLAMPS AND HOSES
(a) Connect the Ground strap from LH fender apron.
(b) Connect the Ground strap from RH fender apron.
(c) Connect the VSV hose for purge line.
(d) Connect the VSV connector for purge line.
(e) Connect the 2 power steering connectors.
(f) Connect the Heated oxygen sensor connector.
(g) Connect the Engine wire clamps.
26. INSTALL AIR CLEANER ASSEMBLY
(a) Install the air cleaner assembly with the 2 bolts.
(b) Tighten the 2 hose clamps.
(c) Connect the EVAP hose to the air cleaner case.
(d) Connect the MAF meter connector.
27. INSTALL HEATER UNIT WATER PUMP
(See page AC±55)
28. INSTALL CONVERTER AND INVERTER ASSEMBLY
(See page HV±22)
29. INSTALL OUTER FR COWL TOP PANEL ASSEMBLY
(See page BO±35)
30. FILL WITH ENGINE COOLANT
31. FILL WITH HV COOLANT
32. INSTALL ENGINE UNDER COVERS
33. CONNECT BATTERY NEGATIVE (±) TERMINAL AND
HV BATTERY SERVICE PLUG (See page HV±1)
34. ROAD TEST VEHICLE
Check for abnormal noiss, shock slippage, correct shift points
and smooth operation.
35. RECHECK ENGINE COOLANT AND HV TRANSAXLE
COOLANT
Page 1522 of 1943
A11271
A11272
A10452
A10453
A10454
± ENGINE MECHANICALCYLINDER BLOCK
EM±65
2001 PRIUS (RM778U)
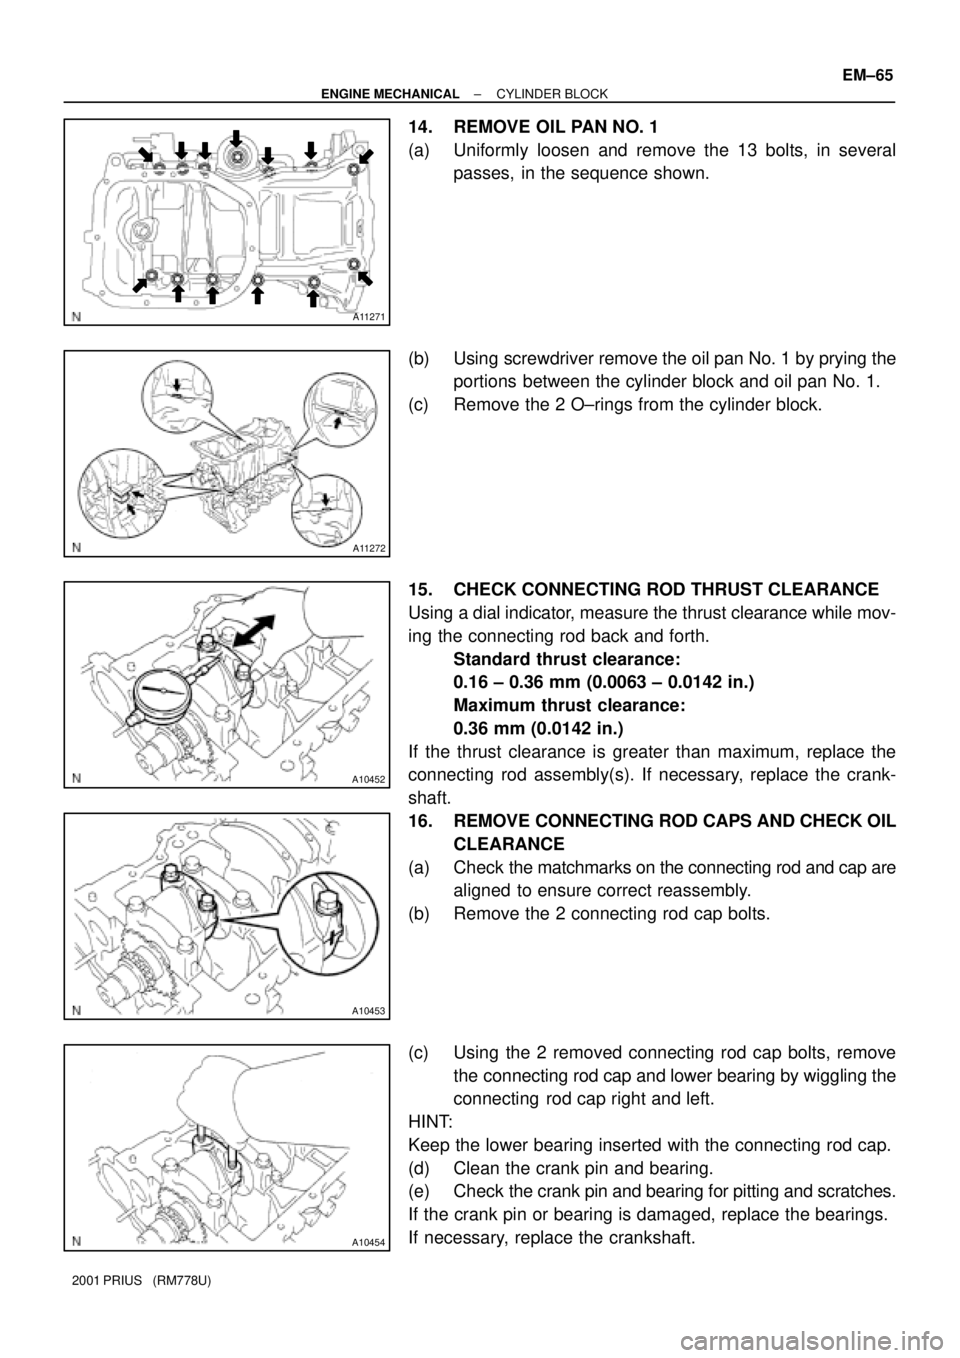
14. REMOVE OIL PAN NO. 1
(a) Uniformly loosen and remove the 13 bolts, in several
passes, in the sequence shown.
(b) Using screwdriver remove the oil pan No. 1 by prying the
portions between the cylinder block and oil pan No. 1.
(c) Remove the 2 O±rings from the cylinder block.
15. CHECK CONNECTING ROD THRUST CLEARANCE
Using a dial indicator, measure the thrust clearance while mov-
ing the connecting rod back and forth.
Standard thrust clearance:
0.16 ± 0.36 mm (0.0063 ± 0.0142 in.)
Maximum thrust clearance:
0.36 mm (0.0142 in.)
If the thrust clearance is greater than maximum, replace the
connecting rod assembly(s). If necessary, replace the crank-
shaft.
16. REMOVE CONNECTING ROD CAPS AND CHECK OIL
CLEARANCE
(a) Check the matchmarks on the connecting rod and cap are
aligned to ensure correct reassembly.
(b) Remove the 2 connecting rod cap bolts.
(c) Using the 2 removed connecting rod cap bolts, remove
the connecting rod cap and lower bearing by wiggling the
connecting rod cap right and left.
HINT:
Keep the lower bearing inserted with the connecting rod cap.
(d) Clean the crank pin and bearing.
(e) Check the crank pin and bearing for pitting and scratches.
If the crank pin or bearing is damaged, replace the bearings.
If necessary, replace the crankshaft.
Page 1524 of 1943
A01166
A10458
A10459
A10460
± ENGINE MECHANICALCYLINDER BLOCK
EM±67
2001 PRIUS (RM778U)
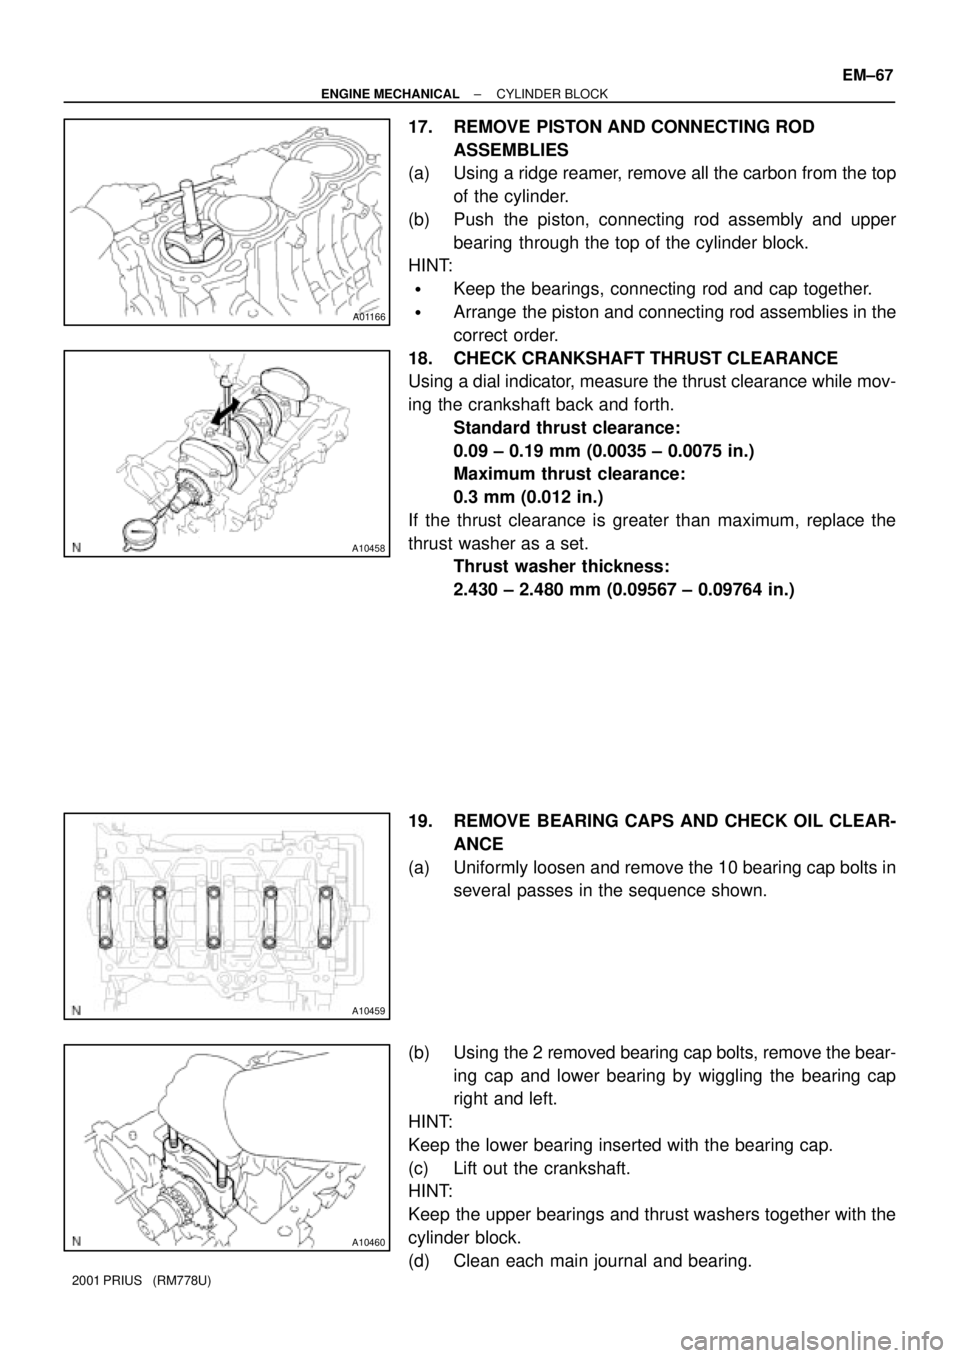
17. REMOVE PISTON AND CONNECTING ROD
ASSEMBLIES
(a) Using a ridge reamer, remove all the carbon from the top
of the cylinder.
(b) Push the piston, connecting rod assembly and upper
bearing through the top of the cylinder block.
HINT:
�Keep the bearings, connecting rod and cap together.
�Arrange the piston and connecting rod assemblies in the
correct order.
18. CHECK CRANKSHAFT THRUST CLEARANCE
Using a dial indicator, measure the thrust clearance while mov-
ing the crankshaft back and forth.
Standard thrust clearance:
0.09 ± 0.19 mm (0.0035 ± 0.0075 in.)
Maximum thrust clearance:
0.3 mm (0.012 in.)
If the thrust clearance is greater than maximum, replace the
thrust washer as a set.
Thrust washer thickness:
2.430 ± 2.480 mm (0.09567 ± 0.09764 in.)
19. REMOVE BEARING CAPS AND CHECK OIL CLEAR-
ANCE
(a) Uniformly loosen and remove the 10 bearing cap bolts in
several passes in the sequence shown.
(b) Using the 2 removed bearing cap bolts, remove the bear-
ing cap and lower bearing by wiggling the bearing cap
right and left.
HINT:
Keep the lower bearing inserted with the bearing cap.
(c) Lift out the crankshaft.
HINT:
Keep the upper bearings and thrust washers together with the
cylinder block.
(d) Clean each main journal and bearing.
Page 1525 of 1943
A10461
A10462
A10463
No. 1No. 2
No. 3
No. 4No. 5
No. 5
No. 4
No. 3
No. 2
No. 1
Number
Mark
Total number º º: Number mark
Cylinder block (A)
+
Crankshaft (B)
Use bearing0 ± 2 3 ± 5 6 ± 8 9 ±11
º1º
EXAMPLE: Cylinder block º4º (A)
+ Crankshaft º3º (B)
= Total number 7 (Use bearing º3º)º2º º3º º4º EM±68
± ENGINE MECHANICALCYLINDER BLOCK
2001 PRIUS (RM778U)
(e) Check each main journal and bearing for pitting and
scratches.
If the journal or bearing is damaged, replace the bearing.
If necessary, grind or replace the crankshaft.
(f) Place the crankshaft on the cylinder block.
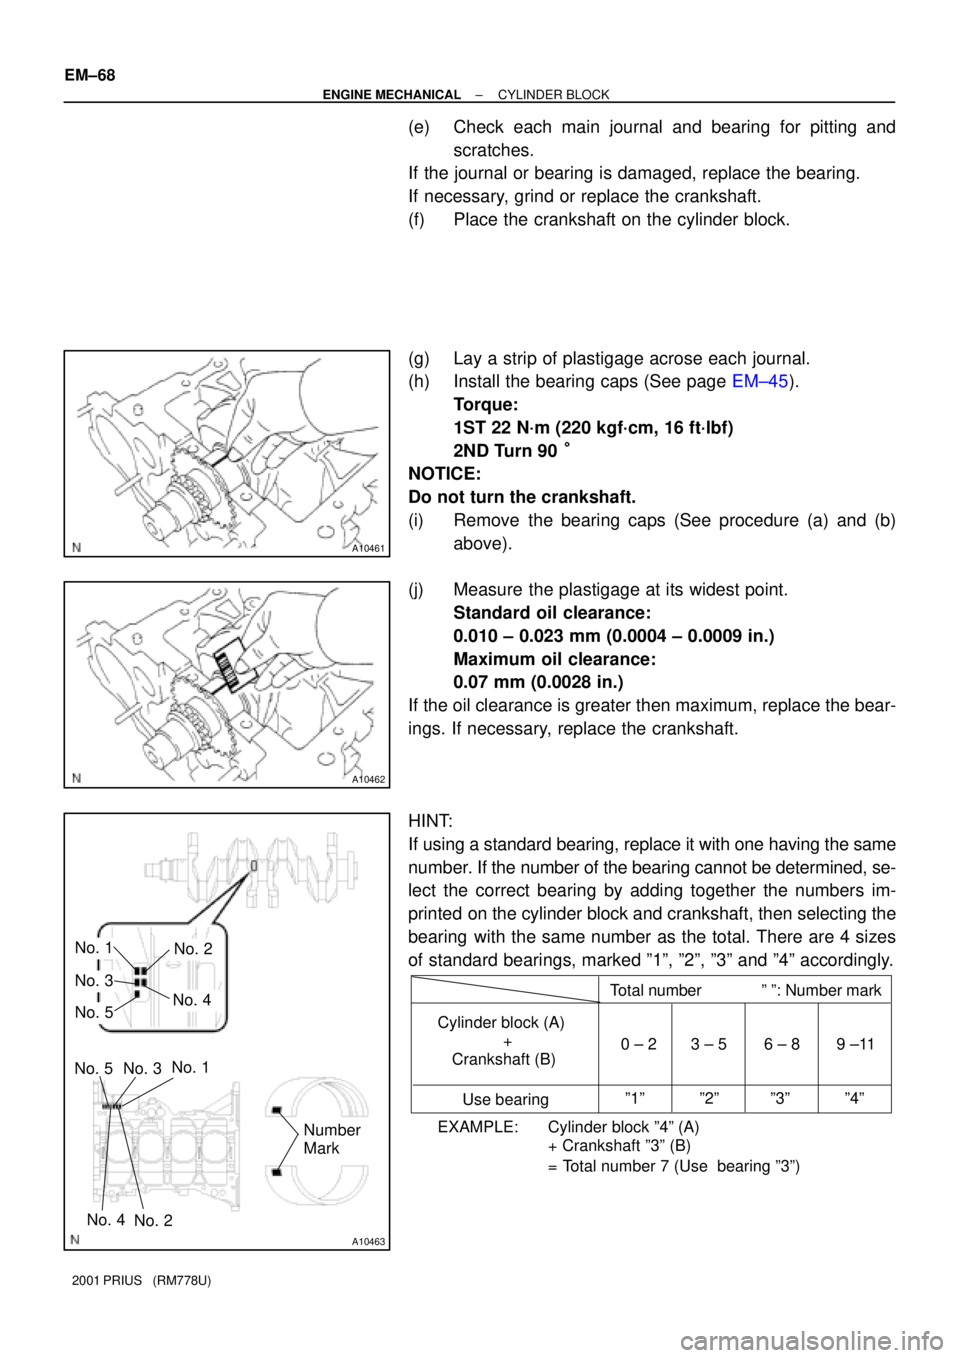
(g) Lay a strip of plastigage acrose each journal.
(h) Install the bearing caps (See page EM±45).
Torque:
1ST 22 N´m (220 kgf´cm, 16 ft´lbf)
2ND Turn 90 °
NOTICE:
Do not turn the crankshaft.
(i) Remove the bearing caps (See procedure (a) and (b)
above).
(j) Measure the plastigage at its widest point.
Standard oil clearance:
0.010 ± 0.023 mm (0.0004 ± 0.0009 in.)
Maximum oil clearance:
0.07 mm (0.0028 in.)
If the oil clearance is greater then maximum, replace the bear-
ings. If necessary, replace the crankshaft.
HINT:
If using a standard bearing, replace it with one having the same
number. If the number of the bearing cannot be determined, se-
lect the correct bearing by adding together the numbers im-
printed on the cylinder block and crankshaft, then selecting the
bearing with the same number as the total. There are 4 sizes
of standard bearings, marked º1º, º2º, º3º and º4º accordingly.
Page 1526 of 1943
A12947
A12948
± ENGINE MECHANICALCYLINDER BLOCK
EM±69
2001 PRIUS (RM778U)
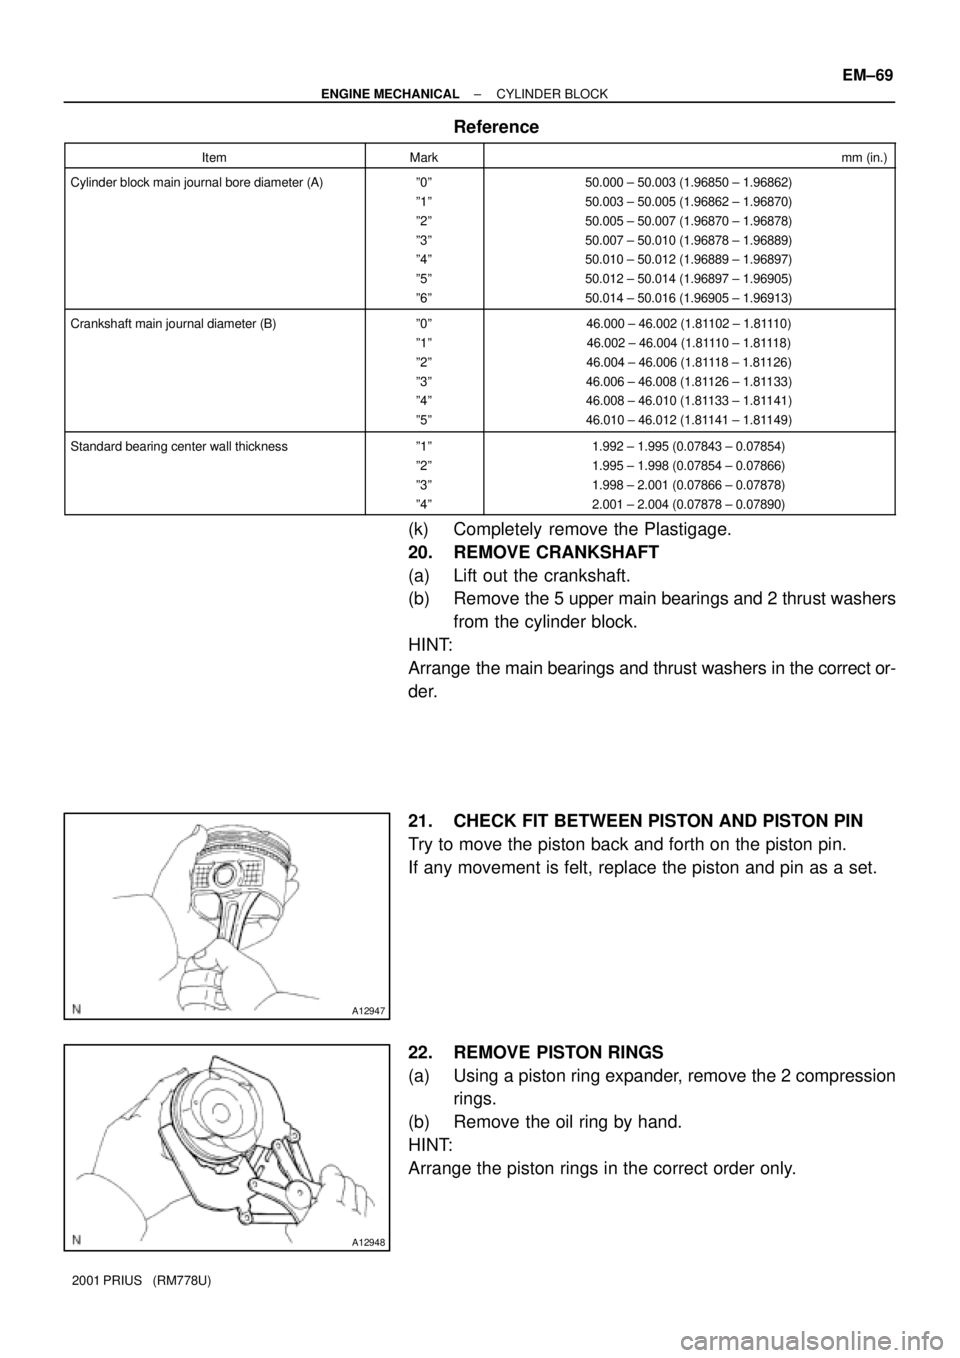
Reference
ItemMarkmm (in.)
Cylinder block main journal bore diameter (A)º0º
º1º
º2º
º3º
º4º
º5º
º6º50.000 ± 50.003 (1.96850 ± 1.96862)
50.003 ± 50.005 (1.96862 ± 1.96870)
50.005 ± 50.007 (1.96870 ± 1.96878)
50.007 ± 50.010 (1.96878 ± 1.96889)
50.010 ± 50.012 (1.96889 ± 1.96897)
50.012 ± 50.014 (1.96897 ± 1.96905)
50.014 ± 50.016 (1.96905 ± 1.96913)
Crankshaft main journal diameter (B)º0º
º1º
º2º
º3º
º4º
º5º46.000 ± 46.002 (1.81102 ± 1.81110)
46.002 ± 46.004 (1.81110 ± 1.81118)
46.004 ± 46.006 (1.81118 ± 1.81126)
46.006 ± 46.008 (1.81126 ± 1.81133)
46.008 ± 46.010 (1.81133 ± 1.81141)
46.010 ± 46.012 (1.81141 ± 1.81149)
Standard bearing center wall thicknessº1º
º2º
º3º
º4º1.992 ± 1.995 (0.07843 ± 0.07854)
1.995 ± 1.998 (0.07854 ± 0.07866)
1.998 ± 2.001 (0.07866 ± 0.07878)
2.001 ± 2.004 (0.07878 ± 0.07890)
(k) Completely remove the Plastigage.
20. REMOVE CRANKSHAFT
(a) Lift out the crankshaft.
(b) Remove the 5 upper main bearings and 2 thrust washers
from the cylinder block.
HINT:
Arrange the main bearings and thrust washers in the correct or-
der.
21. CHECK FIT BETWEEN PISTON AND PISTON PIN
Try to move the piston back and forth on the piston pin.
If any movement is felt, replace the piston and pin as a set.
22. REMOVE PISTON RINGS
(a) Using a piston ring expander, remove the 2 compression
rings.
(b) Remove the oil ring by hand.
HINT:
Arrange the piston rings in the correct order only.
Page 1528 of 1943
EM17D±03
A01165
A01169
A01167
± ENGINE MECHANICALCYLINDER BLOCK
EM±71
2001 PRIUS (RM778U)
INSPECTION
1. REMOVE GASKET MATERIAL
Using a gasket scraper, remove all the gasket material from the
top surface of the cylinder block.
2. CLEAN CYLINDER BLOCK
Using a soft brush and solvent, thoroughly clean the cylinder
block.
NOTICE:
If the cylinder is washed at high temperatures, the cylinder
liner sticks out beyond the cylinder block, so always wash
the cylinder block at a temperature of 45°C (133°F) or less.
3. INSPECT TOP SURFACE OF CYLINDER BLOCK FOR
FLATNESS
Using a precision straight edge and feeler gauge, measure the
surface contacting the cylinder head gasket for warpage.
Maximum warpage: 0.05 mm (0.0020 in.)
If warpage is greater than maximum, replace the cylinder block.
4. INSPECT CYLINDER BORE DIAMETER
Visually check the cylinder for vertical scratches.
If deep scratches are present, replace the cylinder block.