Page 1022 of 1943
F12684
Brake Fluid Level
Warning Switch
IG1
Relay FL Block No. 2
Body ECU
Multiplex Communication CircuitR±Y
BrakePKB
E
83
GAUGE5
WJ12
J/C Parking
Brake Switch
2 1
1C10
2A7
LG±R
A 4BRL Brake ECU
W±GB12
6
Battery
IE LBL B12 B1113
R±Y R±Y
R±Y E
J7
J/C
J1
J/C
J11
J/C 2D2B
2H2K
2K5
23 15
2A7 AM1
C10C11C11
143
2
22 2
W±BB±Y
L
BRA A
A
W±BW±B 21 IA2 18
MAIN
B±GFL Block No. 1
111
DC/DC
F13 F11
B8 B8 15 164 Instrument
Panel J/B
LGR GR±B Ignition Switch
Instrument
Panel J/B
Commbination Meter
2B6
IH ID DI±446
± DIAGNOSTICSANTI±LOCK BRAKE SYSTEM WITH EBD & RBS
2001 PRIUS (RM778U)
BRAKE Warning Light Circuit
CIRCUIT DESCRIPTION
The BRAKE warning light lights up when the brake fluid is insufficient, the parking brake is applied or the
EBD is defective.
The BRAKE warning light also lights up when DTC No. C1213/63 or C1259/59 is detected, however, the EBD
is not inhibited in this case.
WIRING DIAGRAM
DI29G±14
Page 1023 of 1943

± DIAGNOSTICSANTI±LOCK BRAKE SYSTEM WITH EBD & RBS
DI±447
2001 PRIUS (RM778U)
INSPECTION PROCEDURE
HINT:
Start the inspection from step 1 in case of using the TOYOTA hand±held tester and start from step 2 in case
of not using the TOYOTA hand±held tester.
1 Check operation of the BRAKE warning light.
PREPARATION:
(a) Release the parking brake pedal.
(b) Connect the TOYOTA hand±held tester to the DLC3.
(c) Turn the ignition switch ON, and push the TOYOTA hand±held tester main switch ON.
(d) Select the ACTIVE TEST mode on the TOYOTA hand±held tester.
CHECK:
Check that ºONº and ºOFFº of BRAKE warning light can be shown on the combination meter by the TOYOTA
hand±held tester.
OK Check and replace brake ECU.
NG
2 Check parking brake switch circuit (See page BE±2).
NG Repair or replace parking brake switch circuit.
OK
3 Check brake fluid level warning switch circuit (See page BE±2).
NG Repair or replace brake fluid level warning
switch circuit.
OK
4 Is DTC output for ABS ?
Yes Repair circuit indicated by the output code.
No
Page 1024 of 1943
DI±448
± DIAGNOSTICSANTI±LOCK BRAKE SYSTEM WITH EBD & RBS
2001 PRIUS (RM778U)
5 Check BRAKE warning light.
See combination meter troubleshooting on page BE±2.
NG Repair or replace combination meter.
OK
6 Check multiplex communication system (See page DI±752).
NG Repair or replace multiplex communication cir-
cuit.
OK
Check and replace brake ECU.
Page 1028 of 1943
F12686
DLC3
2DTc 3
Tc
8
4 CG13ID1 P±B P±B
B11
W±B
AJ11
J/C
A
ID C
Instrument Panel J/BBrake ECU
J16
J/C J26
J/C
J24
J/CP±B P±B
E E
C
W±B W±B
A2K 82
F09678
CG TcDLC3 ON
(+) (±)
DI±452
± DIAGNOSTICSANTI±LOCK BRAKE SYSTEM WITH EBD & RBS
2001 PRIUS (RM778U)
Tc Terminal Circuit
CIRCUIT DESCRIPTION
Connecting terminals Tc and CG of the DLC3 causes the ECU to display the DTC by flashing the ABS warn-
ing light.
WIRING DIAGRAM
INSPECTION PROCEDURE
1 Check voltage between terminals Tc and CG of DLC3.
PREPARATION:
Turn the ignition switch ON.
CHECK:
Measure voltage between terminal Tc and CG of DLC3.
OK:
Voltage: 10 ± 14 V
OK If ABS warning light does not blink even after Tc
and CG are connected, the ECU may be defec-
tive.
NG
DI29I±13
Page 1031 of 1943
F09679
ON
DLC3 (+) (±)
Ts
CG
± DIAGNOSTICSANTI±LOCK BRAKE SYSTEM WITH EBD & RBS
DI±455
2001 PRIUS (RM778U)
INSPECTION PROCEDURE
1 Check voltage between terminals Ts and CG of DLC3.
CHECK:
(a) Turn the ignition switch ON.
(b) Measure voltage between terminals Ts and CG of DLC3.
OK:
Voltage: 10 ± 14 V
OK If ABS warning light does not blink even after Ts
and CG are connected, the ECU may be defec-
tive.
NG
2 Check for open and short circuit in harness and connector between brake ECU
and DLC3, DLC3 and body ground (See page IN±41).
NG Repair or replace harness or connector.
OK
Check and replace brake ECU.
Page 1032 of 1943
DI7QW±01
F12845
F12874
F12846
Tc
CG
F12873
WL
PGND
± DIAGNOSTICSELECTRIC MOTOR POWER STEERING
DI±459
2001 PRIUS (RM778U)
PRE±CHECK
1. DIAGNOSIS SYSTEM
(a) Check the indicator.
When the ignition switch is turned ON, check that the PS
warning light goes on for 1.5 seconds.
HINT:
�If the indicator check result is not normal, proceed to trou-
bleshooting for the PS warning light circuit (See page
DI±486).
�When the EMPS system is faulty, the master warning light
in the combination meter and the PS warning light in the
multiinformation display lights up.
(b) In case of not using TOYOTA hand±held tester:
Check the DTC.
(1) Using SST, connect terminals Tc and CG of the
DLC3.
SST 09843±18040
(2) Remove the EMPS ECU with connector still con-
nected.
(3) Connect the both terminals of the 1kW resistance
and LED (Light Emitting Diode) circuit to terminals
WL and PGND of the EMPS ECU.
(4) Turn the ignition switch ON.
(5) Read the DTC from the PS warning light.
Page 1033 of 1943

F12870
Normal Code
0.25 sec.
0.25 sec.
ON
OFF
ON
OFF0.5 sec.
0.5 sec.
Codes 21 and 22
1.5 sec.2.5 sec.
Code 21Code 22
4 sec.0.5 sec.
F12396
TOYOTA
Hand±held Tester
DLC3
F12861
Ts
CG
DI±460
± DIAGNOSTICSELECTRIC MOTOR POWER STEERING
2001 PRIUS (RM778U)
HINT:
�If no code appears, inspect the diagnostic circuit and PS
warning light circuit (See page DI±491 or DI±486).
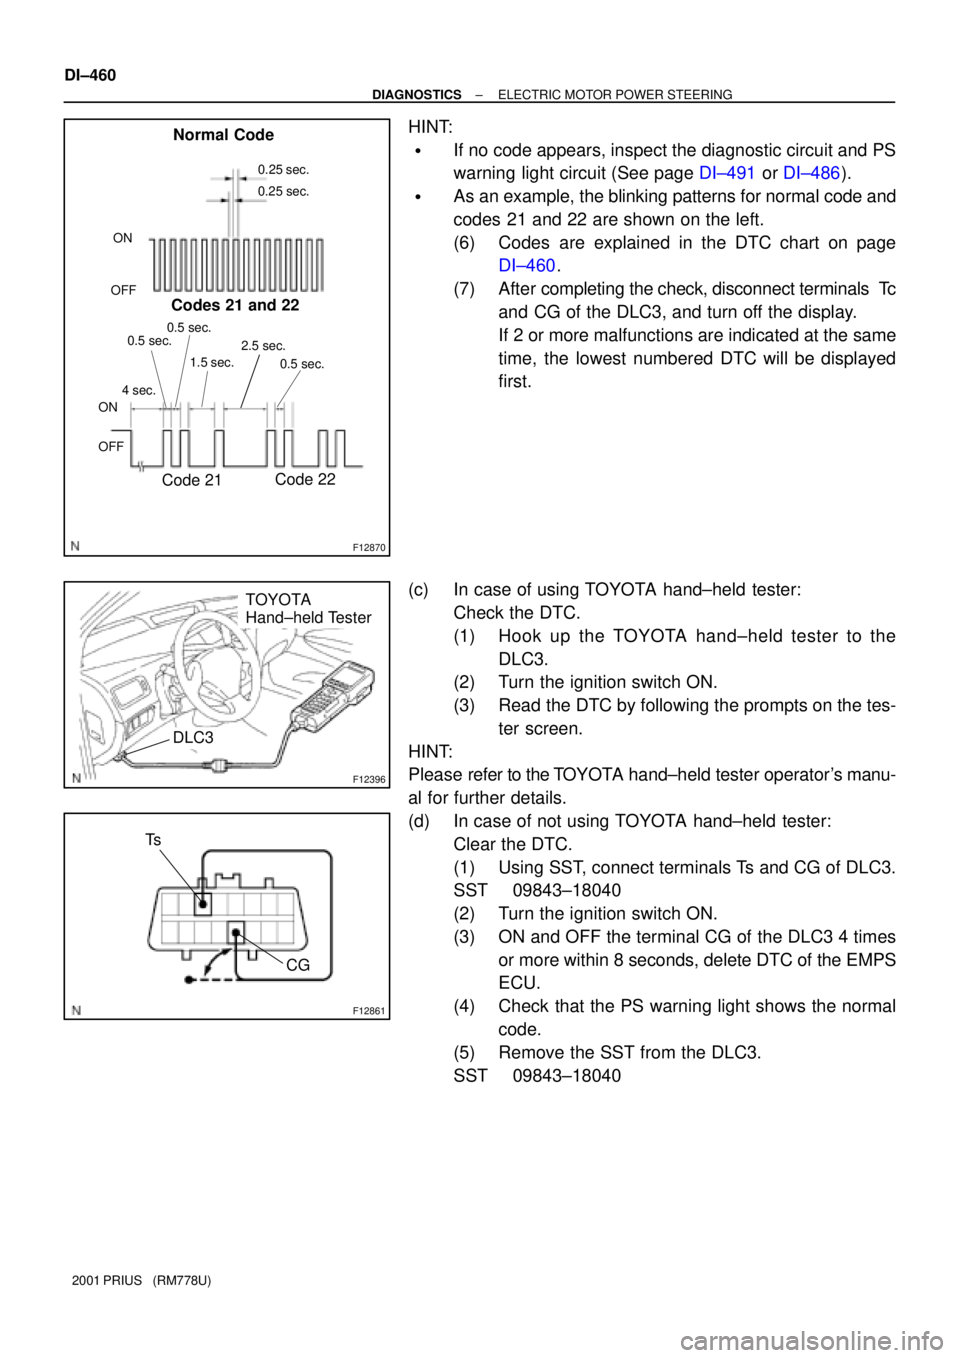
�As an example, the blinking patterns for normal code and
codes 21 and 22 are shown on the left.
(6) Codes are explained in the DTC chart on page
DI±460.
(7) After completing the check, disconnect terminals Tc
and CG of the DLC3, and turn off the display.
If 2 or more malfunctions are indicated at the same
time, the lowest numbered DTC will be displayed
first.
(c) In case of using TOYOTA hand±held tester:
Check the DTC.
(1) Hook up the TOYOTA hand±held tester to the
DLC3.
(2) Turn the ignition switch ON.
(3) Read the DTC by following the prompts on the tes-
ter screen.
HINT:
Please refer to the TOYOTA hand±held tester operator's manu-
al for further details.
(d) In case of not using TOYOTA hand±held tester:
Clear the DTC.
(1) Using SST, connect terminals Ts and CG of DLC3.
SST 09843±18040
(2) Turn the ignition switch ON.
(3) ON and OFF the terminal CG of the DLC3 4 times
or more within 8 seconds, delete DTC of the EMPS
ECU.
(4) Check that the PS warning light shows the normal
code.
(5) Remove the SST from the DLC3.
SST 09843±18040
Page 1034 of 1943

F12396
TOYOTA
Hand±held Tester
DLC3
F12848
Tc
CG
Ts
F12871
Malfunction Code (Example Code 72)
7
2
ON
OFF
0.5 sec. 0.5 sec.
0.5 sec.
1.5 sec.4 sec.
Repeat
0.5 sec. ON
OFF
0.25 sec.
0.25 sec. Normal Code
A Cycle
± DIAGNOSTICSELECTRIC MOTOR POWER STEERING
DI±461
2001 PRIUS (RM778U)
(e) In case of using TOYOTA hand±held tester:
Clear the DTC.
(1) Hook up the TOYOTA hand±held tester to the
DLC3.
(2) Turn the ignition switch ON.
(3) Operate the TOYOTA hand±held tester to erase the
codes. (See TOYOTA hand±held tester operator's
manual.)
2. INPUT SIGNAL CHECK (TEST MODE)
(a) In case of not using TOYOTA hand±held tester:
Check the input signal.
(1) Turn the ignition switch OFF.
(2) Using SST, connect terminals Ts and CG of DLC3.
SST 09843±18040
(3) Check the warning light goes off with driving more
than 20 km/h (12 mph).
HINT:
If the warning light goes off during driving, the sensor can be
judged to normal.
(4) Stop the vehicle.
(5) Using SST, connect terminals Tc and CG of DLC3.
SST 09843±18040
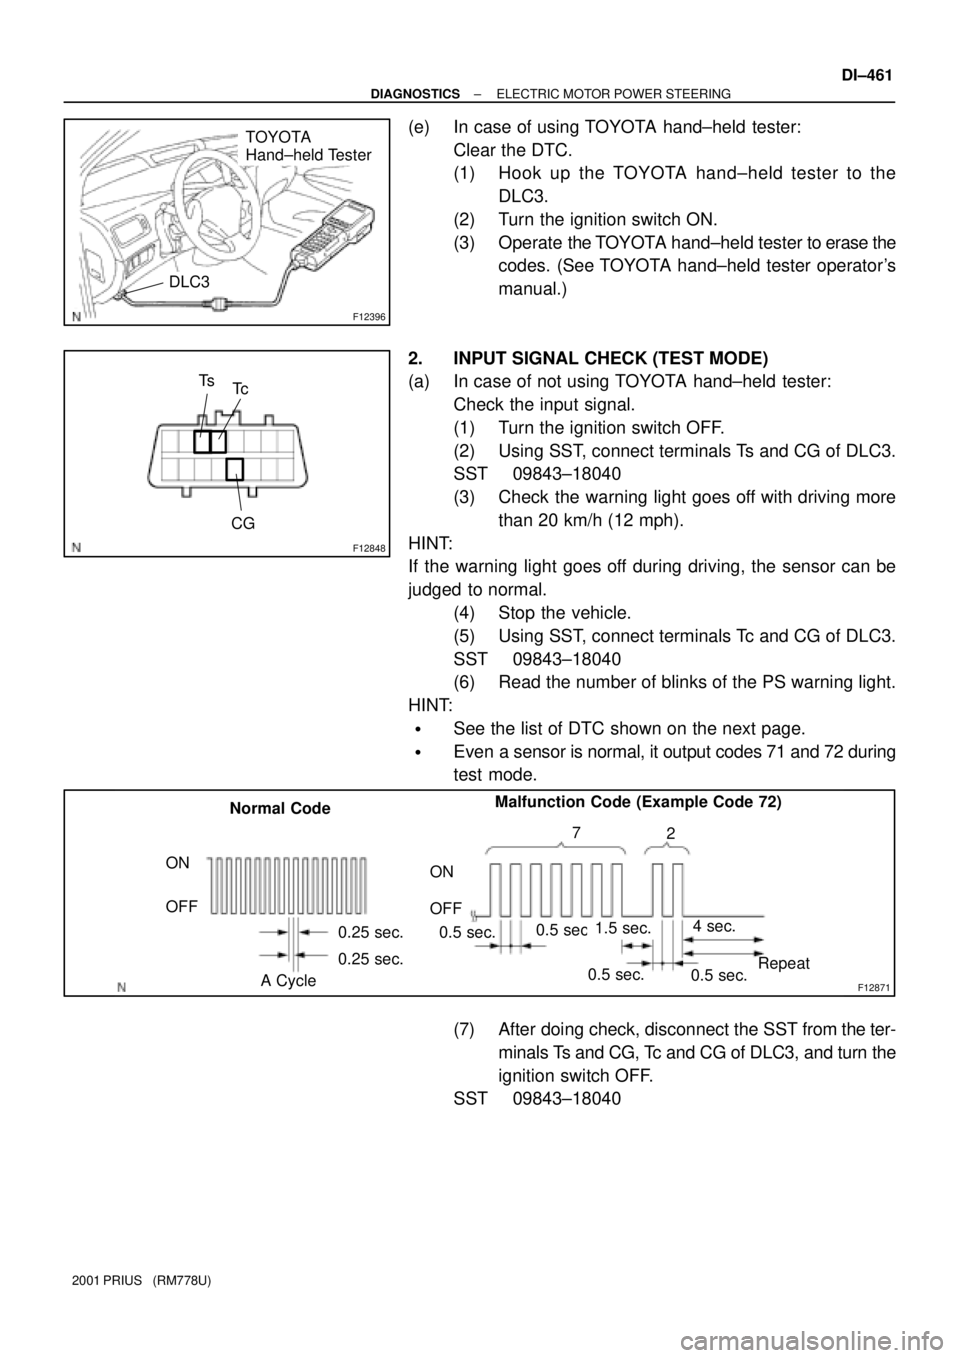
(6) Read the number of blinks of the PS warning light.
HINT:
�See the list of DTC shown on the next page.
�Even a sensor is normal, it output codes 71 and 72 during
test mode.
(7) After doing check, disconnect the SST from the ter-
minals Ts and CG, Tc and CG of DLC3, and turn the
ignition switch OFF.
SST 09843±18040