Page 307 of 1897
- BODY ELECTRICALTROUBLESHOOTING
BE-3
1607 Author�: Date�:
2001 AVALON (RM808U)
INTERIOR LIGHT SYSTEM:
This system uses the multiplex communication system, so check diagnosis system of the multiplex commu-
nication system before checking the body control system.
BACK-UP LIGHT SYSTEM:
SymptomSuspect AreaSee page
Back-Up Light does not light up.
1. GAUGE Fuse
2. Ignition Switch
3. Park/Neutral Position Switch
4. Back-up Light Relay (Column Shift)
5. Bulb
6. Wire Harness-
BE-16
DI-199
BE-34
-
-
Back-Up Light remains always ON.
1. Park/Neutral Position Switch
2. Back-up Light Relay (Column Shift)
3. Wire HarnessDI-199
BE-34
-
Only one light does not light up.1. Bulb
2. Wire Harness-
-
STOP LIGHT SYSTEM:
SymptomSuspect AreaSee page
Stop light does not light up.
1. STOP Fuse
2. GAUGE Fuse
3. Stop Light Switch
4. Light Failure Sensor
5. Wire Harness-
-
BE-36
BE-53
-
Only one light always lights up.1. Wire Harness-
Only one light does not light.1. Bulb
2. Wire Harness-
-
WIPER AND WASHER SYSTEM:
SymptomSuspect AreaSee page
Wiper and washers do not operate.
1. IG 1 Relay
2. WIPER Fuse
3. Wiper Switch
4. Wiper Motor
5. Wire Harness-
-
BE-38
BE-38
-
Wipers do not operate in LO or HI.
1. Wiper Switch
2. Wiper Motor
3. Wire HarnessBE-38
BE-38
-
Wipers do not operate in INT.
1. Wiper Fuse
2. Wiper Switch
3. Wiper Motor
4. Wire Harness-
BE-38
BE-38
-
Washer motor does not operate.
1. Washer Switch
2. Washer Motor
3. Wire HarnessBE-38
BE-38
-
Wipers do not operate when washer switch in ON.1. Washer Motor
2. Wire HarnessBE-38
-
Washer fluid does not operate.1. Washer Hose and Nozzle-
� In wiper switch HI position, the wiper blade is in contact with
the body.
� When the wiper switch is OFF, the wiper blade does not
retract or the retract position is wrong.1. *1Wiper Switch
2. Wire HarnessBE-38
-
*1: Inspect wiper arm and blade set position
Page 370 of 1897
BO2P5-01
BE3367
2 - 2.5 mm
(0.028 - 0.030 in.)0.7 - 0.75 mm(0.079 - 0.098 in.)
- BODYFRONT WIPER AND WASHER
BO-41
1826 Author�: Date�:
2001 AVALON (RM808U)
ADJUSTMENT
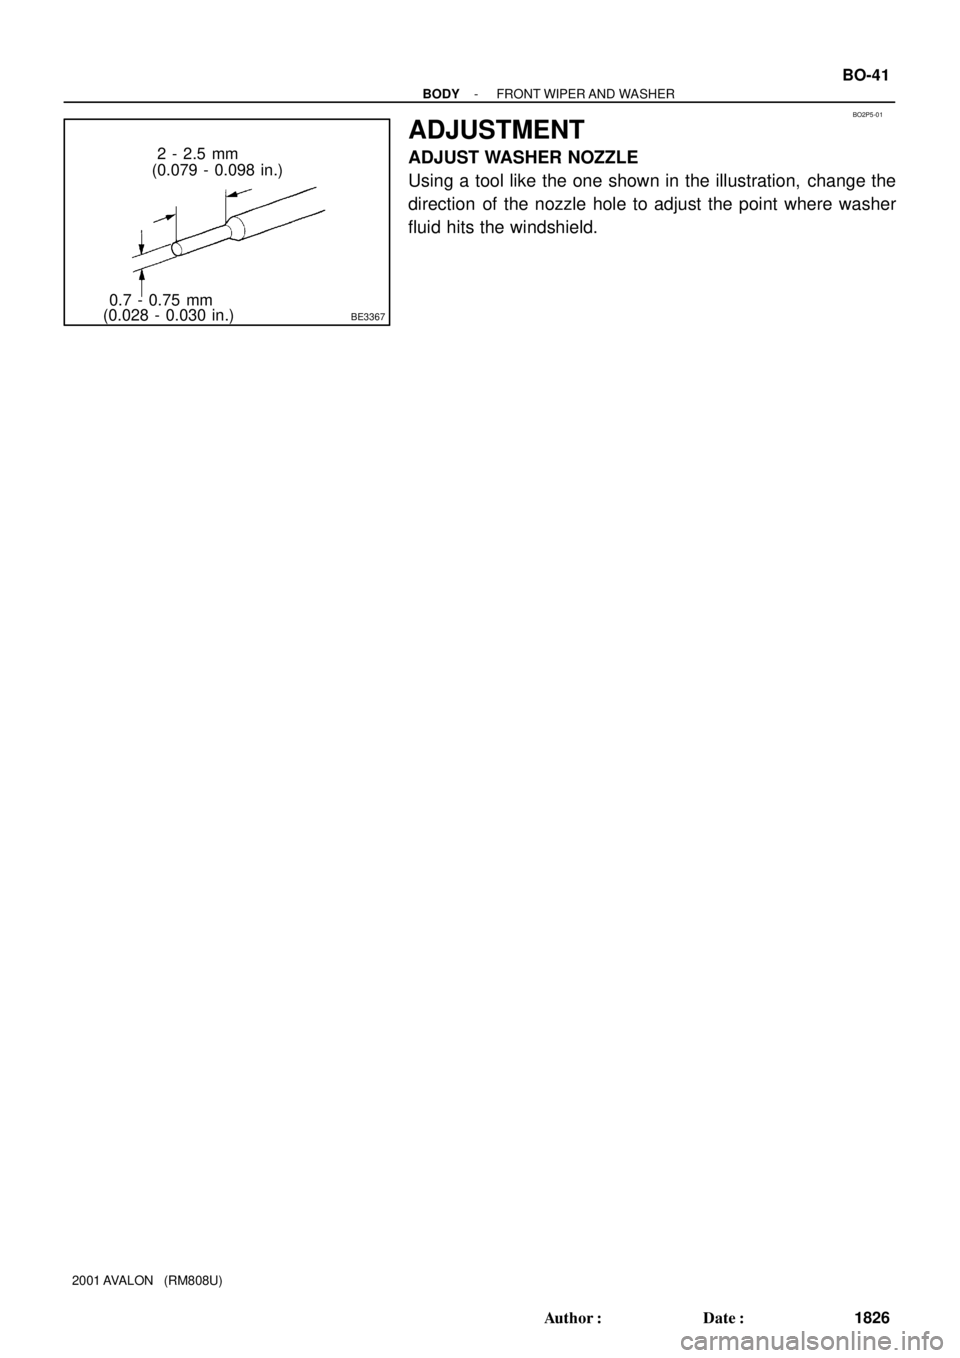
ADJUST WASHER NOZZLE
Using a tool like the one shown in the illustration, change the
direction of the nozzle hole to adjust the point where washer
fluid hits the windshield.
Page 372 of 1897
BO2P4-01
H12132H12133H12807
2 Jet nozzle:
3 Jet nozzle:
ABB
BB
B
B F
GC
E
IJ
H
LK
O
N
M
P
UST RQ D
V
W
BO-40
- BODYFRONT WIPER AND WASHER
1825 Author�: Date�:
2001 AVALON (RM808U)
INSPECTION
INSPECT FRONT WASHER NOZZLE
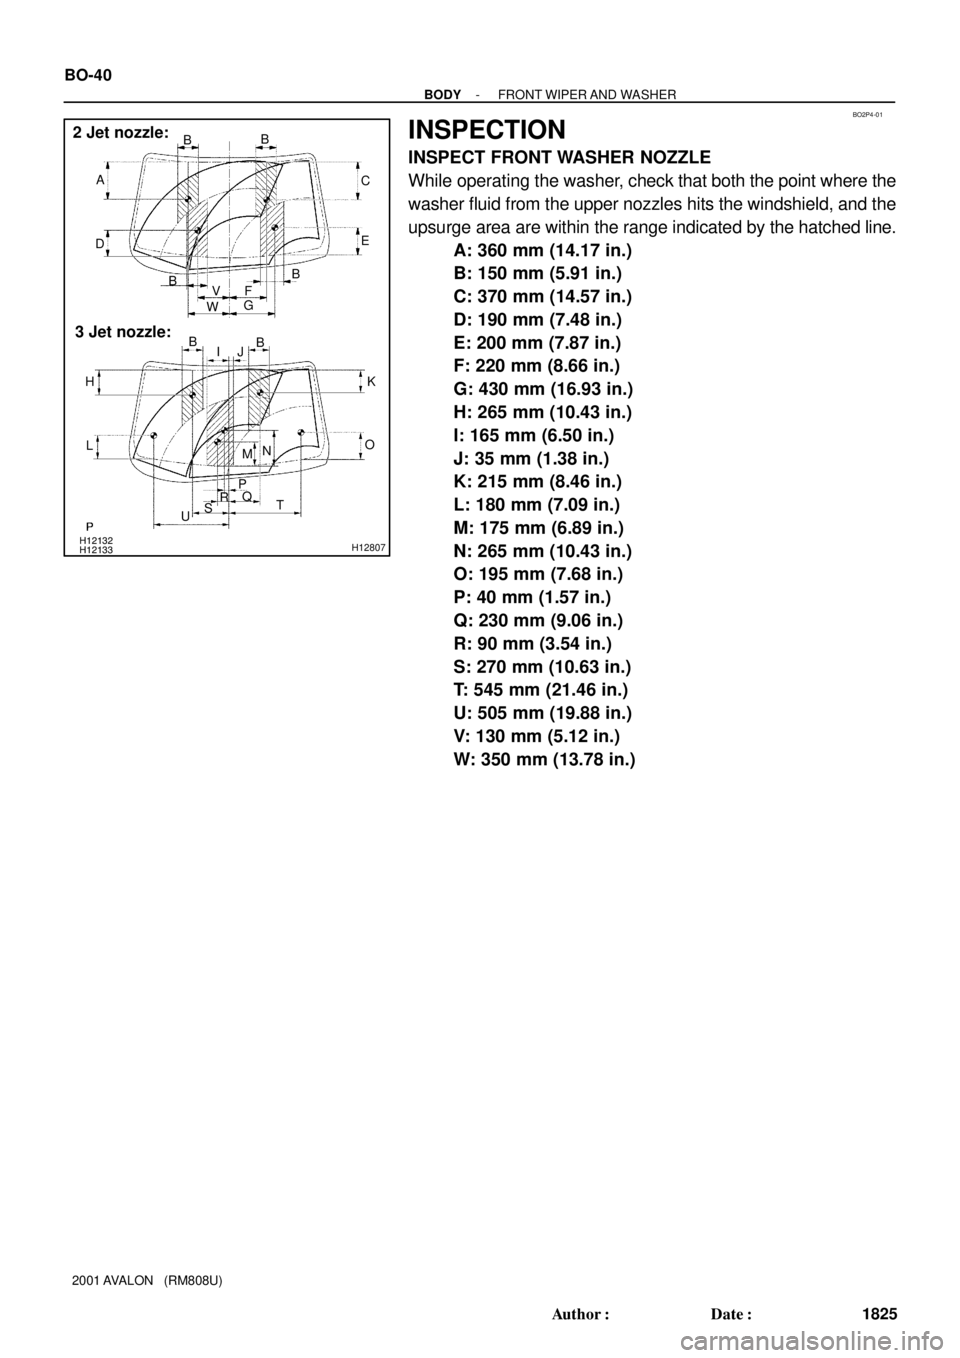
While operating the washer, check that both the point where the
washer fluid from the upper nozzles hits the windshield, and the
upsurge area are within the range indicated by the hatched line.
A: 360 mm (14.17 in.)
B: 150 mm (5.91 in.)
C: 370 mm (14.57 in.)
D: 190 mm (7.48 in.)
E: 200 mm (7.87 in.)
F: 220 mm (8.66 in.)
G: 430 mm (16.93 in.)
H: 265 mm (10.43 in.)
I: 165 mm (6.50 in.)
J: 35 mm (1.38 in.)
K: 215 mm (8.46 in.)
L: 180 mm (7.09 in.)
M: 175 mm (6.89 in.)
N: 265 mm (10.43 in.)
O: 195 mm (7.68 in.)
P: 40 mm (1.57 in.)
Q: 230 mm (9.06 in.)
R: 90 mm (3.54 in.)
S: 270 mm (10.63 in.)
T: 545 mm (21.46 in.)
U: 505 mm (19.88 in.)
V: 130 mm (5.12 in.)
W: 350 mm (13.78 in.)
Page 1474 of 1897
MA001-12
- MAINTENANCEOUTSIDE VEHICLE
MA-1
43 Author�: Date�:
2001 AVALON (RM808U)
OUTSIDE VEHICLE
GENERAL MAINTENANCE
These are maintenance and inspection items which are considered to be the owner's responsibility.
They can be done by the owner or they can have them done at a service shop.
These items include those which should be checked on a daily basis, those which, in most cases, do not
require (special) tools and those which are considered to be reasonable for the owner to do.
Items and procedures for general maintenance are as follows.
1. GENERAL NOTES
�Maintenance items may vary from country to country. Check the owner's manual supplement in which
the maintenance schedule is shown.
�Every service item in the periodic maintenance schedule must be performed.
�Periodic maintenance service must be performed according to whichever interval in the periodic main-
tenance schedule occurs first, the odometer reading (miles) or the time interval (months).
�Maintenance service after the last period should be performed at the same interval as before unless
otherwise noted.
�Failure to do even one item an cause the engine to run poorly and increase exhaust emissions.
2. TIRES
(a) Check the pressure with a gauge. If necessary, adjust.
(b) Check for cuts, damage or excessive wear.
3. WHEEL NUTS
When checking the tires, check the nuts for looseness or for missing nuts. If necessary, tighten them.
4. TIRE ROTATION
Check the owner's manual supplement in which the maintenance schedule is shown.
5. WINDSHIELD WIPER BLADES
Check for wear or cracks whenever they do not wipe clean. If necessary, replace.
6. FLUID LEAKS
(a) Check underneath for leaking fuel, oil, water or other fluid.
(b) If you smell gasoline fumes or notice any leak, have the cause found and corrected.
7. DOORS AND ENGINE HOOD
(a) Check that all doors including the trunk lid operate smoothly, and that all latches lock securely.
(b) Check that the engine hood secondary latch secures the hood from opening when the primary latch
is released.