Page 2619 of 3833
SIDE OIL SEAL
TF-9
C
E
F
G
H
I
J
K
L
MA
B
TF
SIDE OIL SEALPFP:33142
Removal and InstallationEDS0004S
REMOVAL
1. Remove the drive shaft.
2. Remove the side shaft.
3. Remove oil seal with a flat-bladed screwdriver.
CAUTION:
Be careful not to damage the adapter case.
INSTALLATION
1. Apply multi-purpose grease to oil seal lips. As shown in the fig-
ure, using a drift, install the oil seal so that it becomes flush with
the case end surface.
CAUTION:
●Discard old oil seals; replace with new ones.
●When installing, do not incline the oil seal.
2. Install the side shaft.
CAUTION:
Be careful not to damage the oil seal lips.
3. Install the drive shaft.
4. Check oil level.
TFB0202D
SDIA0515E
Page 2622 of 3833
TF-12
TRANSFER ASSEMBLY
●When installing the transfer to the transaxle, install the mounting
bolts following the standard below.
CAUTION:
When installing the transfer to the transaxle, be careful not
to damage the oil seals.
●When installing transfer gusset, tighten mounting bolts to the following torque (vehicles with YD22ET
engine only):
●After the installation, check the oil level and oil leakage.
Bolt No. 1 2
Quantity 4 2
Nominal length mm (in) 65 (2.56) 40 (1.57)
Tightening torque [N·m
(kg·mfg.-lb.)]30 - 39 (3.0 - 4.0,22-28)
SDIA1178E
Tightening torque : 31 - 40 N·m (3.1 - 4.1 kg-m, 23 - 29 ft.-lb.)
Page 2627 of 3833

TRANSFER ASSEMBLY
TF-17
C
E
F
G
H
I
J
K
L
MA
B
TF
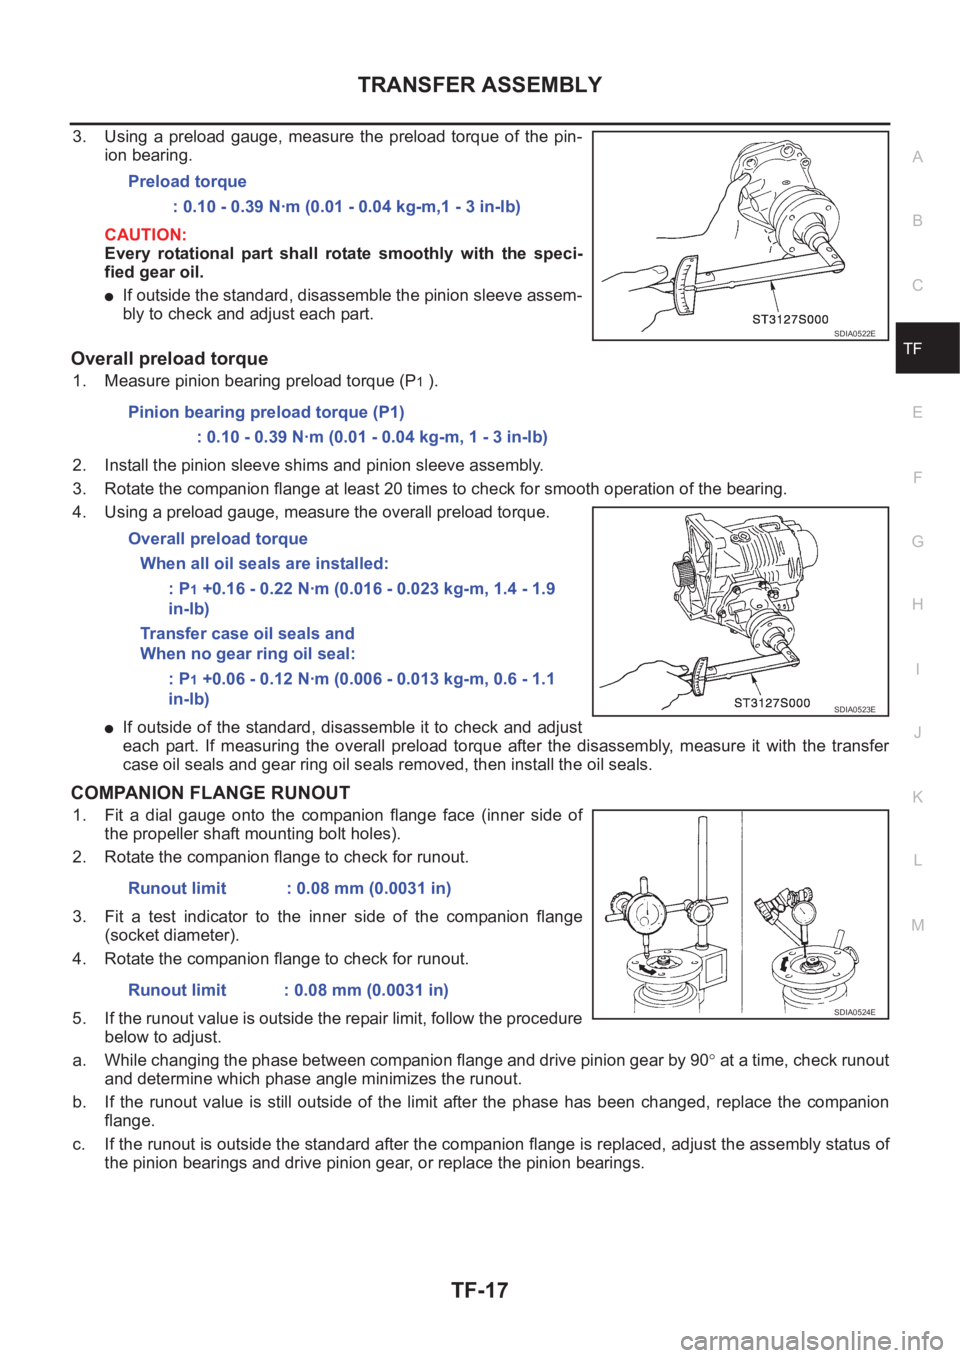
3. Using a preload gauge, measure the preload torque of the pin-
ion bearing.
CAUTION:
Every rotational part shall rotate smoothly with the speci-
fied gear oil.
●If outside the standard, disassemble the pinion sleeve assem-
bly to check and adjust each part.
Overall preload torque
1. Measure pinion bearing preload torque (P1 ).
2. Install the pinion sleeve shims and pinion sleeve assembly.
3. Rotate the companion flange at least 20 times to check for smooth operation of the bearing.
4. Using a preload gauge, measure the overall preload torque.
●If outside of the standard, disassemble it to check and adjust
each part. If measuring the overall preload torque after the disassembly, measure it with the transfer
case oil seals and gear ring oil seals removed, then install the oil seals.
COMPANION FLANGE RUNOUT
1. Fit a dial gauge onto the companion flange face (inner side of
the propeller shaft mounting bolt holes).
2. Rotate the companion flange to check for runout.
3. Fit a test indicator to the inner side of the companion flange
(socket diameter).
4. Rotate the companion flange to check for runout.
5. If the runout value is outside the repair limit, follow the procedure
below to adjust.
a. While changing the phase between companion flange and drive pinion gear by 90° at a time, check runout
and determine which phase angle minimizes the runout.
b. If the runout value is still outside of the limit after the phase has been changed, replace the companion
flange.
c. If the runout is outside the standard after the companion flange is replaced, adjust the assembly status of
the pinion bearings and drive pinion gear, or replace the pinion bearings. Preload torque
: 0.10 - 0.39 N·m (0.01 - 0.04 kg-m,1 - 3 in-lb)
SDIA0522E
Pinion bearing preload torque (P1)
: 0.10 - 0.39 N·m (0.01 - 0.04 kg-m, 1 - 3 in-lb)
Overall preload torque
When all oil seals are installed:
: P
1 +0.16 - 0.22 N·m (0.016 - 0.023 kg-m, 1.4 - 1.9
in-lb)
Transfer case oil seals and
When no gear ring oil seal:
: P
1 +0.06 - 0.12 N·m (0.006 - 0.013 kg-m, 0.6 - 1.1
in-lb)
SDIA0523E
Runout limit : 0.08 mm (0.0031 in)
Runout limit : 0.08 mm (0.0031 in)
SDIA0524E
Page 2628 of 3833
TF-18
TRANSFER ASSEMBLY
Disassembly and Assembly
EDS0004X
DISASSEMBLY
Pinion sleeve assembly
1. Remove 7 pinion sleeve mounting bolts.
2. Temporarily tighten 2 bolts. Using a plastic hammer, tap com-
panion flange to remove pinion sleeve assembly.
3. Remove the pinion sleeve shim.
4. Remove the pinion nut.
5. Using a drift, remove drive pinion from pinion sleeve with a
press.
6. Remove the drive pinion gear assembly.
7. Remove the O-ring.
8. Using a flat-bladed screwdriver, remove the oil seal.
CAUTION:
Be careful not to damage the pinion sleeve.
9. Remove the pinion rear bearing inner race.
TFB0302D
TFB0284D
SDIA0525E
TFB0286D
Page 2630 of 3833
TF-20
TRANSFER ASSEMBLY
2. Using a plastic hammer, tap the adapter case to remove.
3. Remove the O-ring.
4. Using a flat-bladed screwdriver, remove the oil seal.
CAUTION:
Be careful not to damage the adapter case.
5. Using a brass rod, tap the adjusting shim from the cutout on the
adapter case to remove the adjusting shim and gear ring bear-
ing outer race.
6. Remove the oil gutter.
7. Remove the drain plug.
Drive gear assembly
1. Remove the adapter case.
2. Remove the drive gear assembly from the transfer case.
TFB0290D
TFB0291D
SDIA0529E
SDIA0530E
Page 2631 of 3833
TRANSFER ASSEMBLY
TF-21
C
E
F
G
H
I
J
K
L
MA
B
TF
3. Using a drift and replacer, remove the gear ring bearing inner
race on the adapter case.
4. Using a drift and puller, remove the gear ring bearing inner race
on the transfer case.
5. Remove the drive gear mounting bolts.
6. Using a plastic hammer, tap the drive gear to remove the drive
gear from the gear ring.
7. Using a puller, remove the oil seal from the gear ring.
Transfer case
1. Remove the pinion sleeve assembly.
2. Remove the adapter case.
3. Remove the drive gear assembly from the transfer case.
SDIA0531E
SDIA1157E
TFB0295D
SDIA0534E
Page 2632 of 3833

TF-22
TRANSFER ASSEMBLY
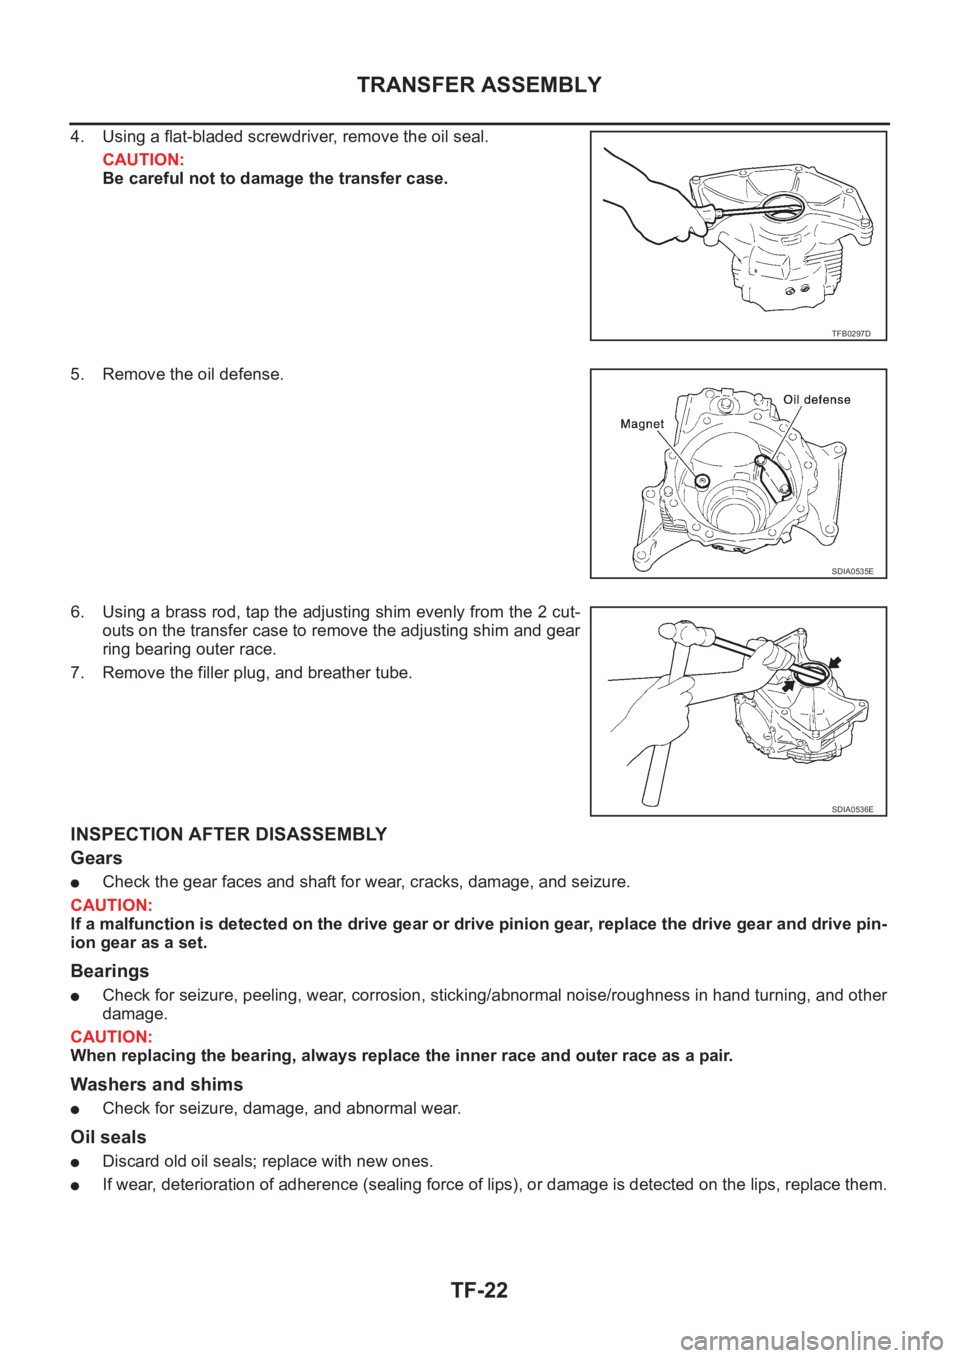
4. Using a flat-bladed screwdriver, remove the oil seal.
CAUTION:
Be careful not to damage the transfer case.
5. Remove the oil defense.
6. Using a brass rod, tap the adjusting shim evenly from the 2 cut-
outs on the transfer case to remove the adjusting shim and gear
ring bearing outer race.
7. Remove the filler plug, and breather tube.
INSPECTION AFTER DISASSEMBLY
Gears
●Check the gear faces and shaft for wear, cracks, damage, and seizure.
CAUTION:
If a malfunction is detected on the drive gear or drive pinion gear, replace the drive gear and drive pin-
ion gear as a set.
Bearings
●Check for seizure, peeling, wear, corrosion, sticking/abnormal noise/roughness in hand turning, and other
damage.
CAUTION:
When replacing the bearing, always replace the inner race and outer race as a pair.
Washers and shims
●Check for seizure, damage, and abnormal wear.
Oil seals
●Discard old oil seals; replace with new ones.
●If wear, deterioration of adherence (sealing force of lips), or damage is detected on the lips, replace them.
TFB0297D
SDIA0535E
SDIA0536E
Page 2635 of 3833

TRANSFER ASSEMBLY
TF-25
C
E
F
G
H
I
J
K
L
MA
B
TF
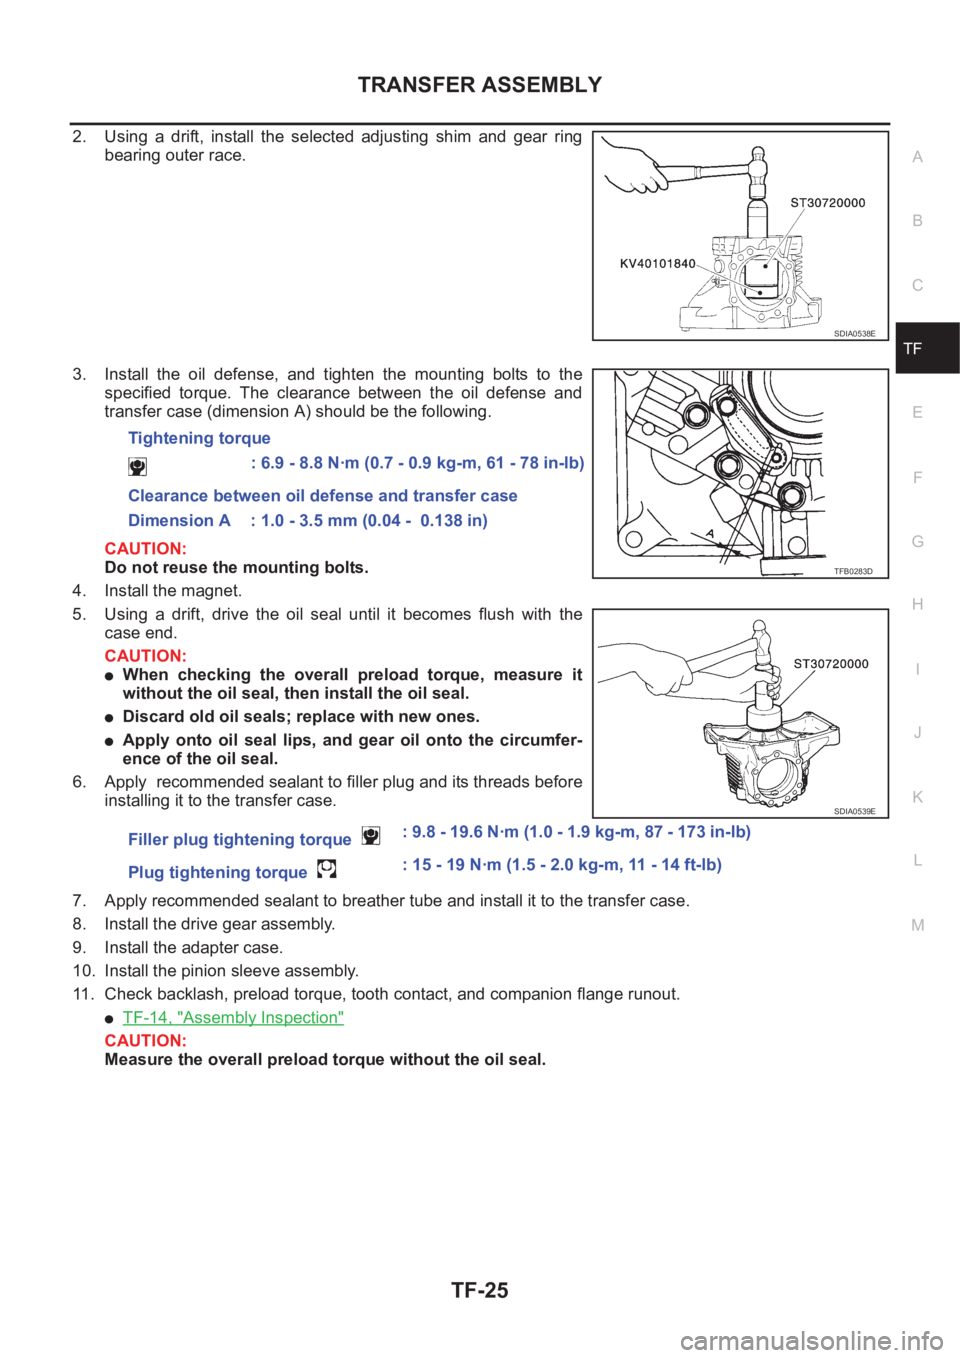
2. Using a drift, install the selected adjusting shim and gear ring
bearing outer race.
3. Install the oil defense, and tighten the mounting bolts to the
specified torque. The clearance between the oil defense and
transfer case (dimension A) should be the following.
CAUTION:
Do not reuse the mounting bolts.
4. Install the magnet.
5. Using a drift, drive the oil seal until it becomes flush with the
case end.
CAUTION:
●When checking the overall preload torque, measure it
without the oil seal, then install the oil seal.
●Discard old oil seals; replace with new ones.
●Apply onto oil seal lips, and gear oil onto the circumfer-
ence of the oil seal.
6. Apply recommended sealant to filler plug and its threads before
installing it to the transfer case.
7. Apply recommended sealant to breather tube and install it to the transfer case.
8. Install the drive gear assembly.
9. Install the adapter case.
10. Install the pinion sleeve assembly.
11. Check backlash, preload torque, tooth contact, and companion flange runout.
●TF-14, "Assembly Inspection"
CAUTION:
Measure the overall preload torque without the oil seal.
SDIA0538E
Tightening torque
: 6.9 - 8.8 N·m (0.7 - 0.9 kg-m, 61 - 78 in-lb)
Clearance between oil defense and transfer case
Dimension A : 1.0 - 3.5 mm (0.04 - 0.138 in)
Filler plug tightening torque : 9.8 - 19.6 N·m (1.0 - 1.9 kg-m, 87 - 173 in-lb)
Plug tightening torque : 15 - 19 N·m (1.5 - 2.0 kg-m, 11 - 14 ft-lb)
TFB0283D
SDIA0539E