Page 3497 of 3833

HEADLAMP
LT-7
C
D
E
F
G
H
I
J
L
MA
B
LT
CAUTION:
Be sure aiming switch is set to “0” when performing aiming adjustment.
LOW BEAM
1. Turn headlamp low beam on.
LHD models
RHD models
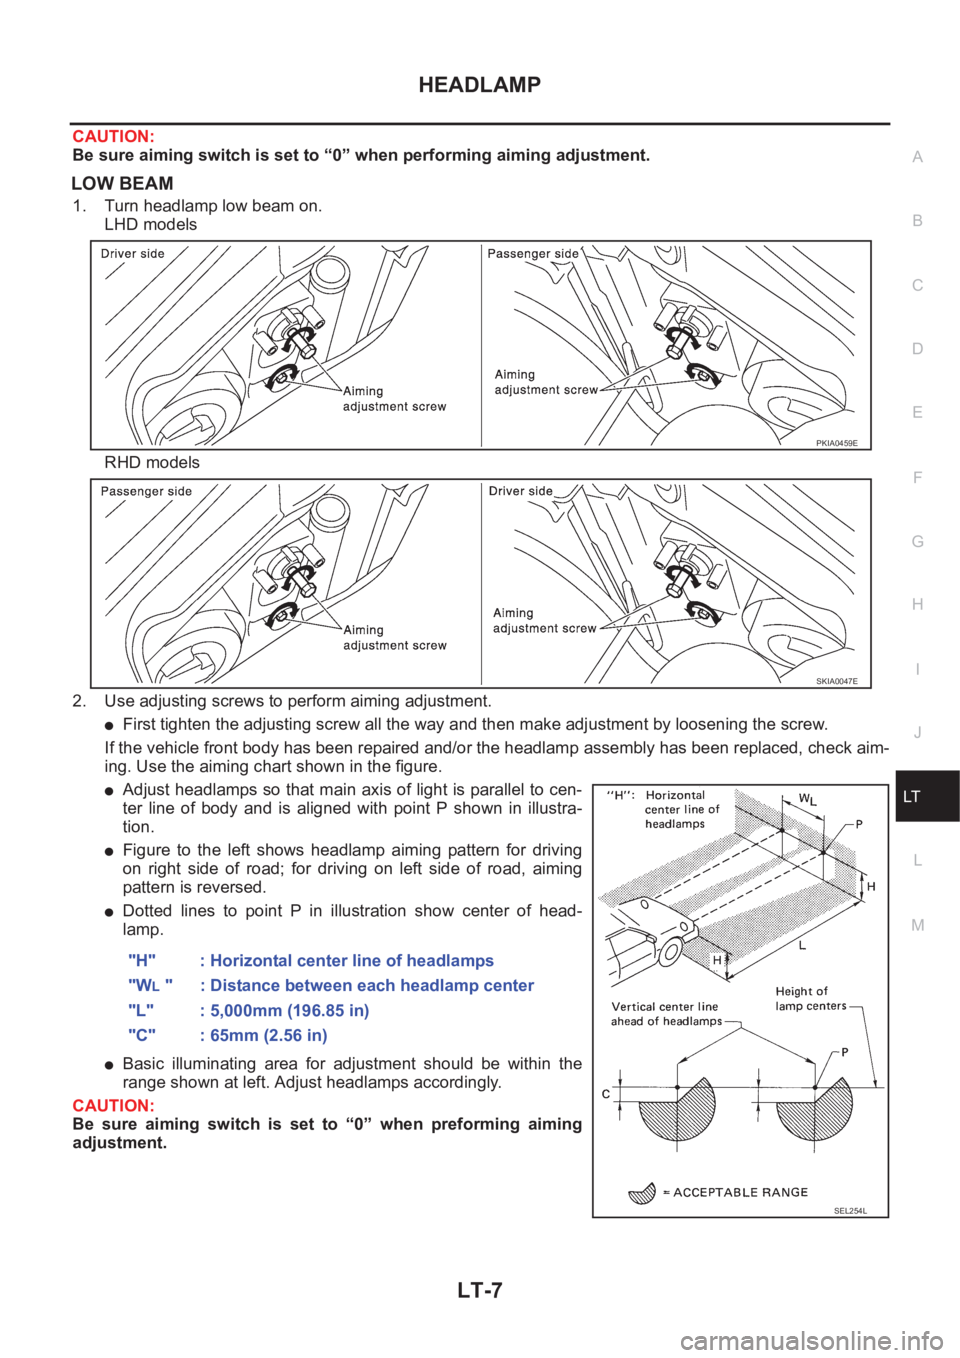
2. Use adjusting screws to perform aiming adjustment.
●First tighten the adjusting screw all the way and then make adjustment by loosening the screw.
If the vehicle front body has been repaired and/or the headlamp assembly has been replaced, check aim-
ing. Use the aiming chart shown in the figure.
●Adjust headlamps so that main axis of light is parallel to cen-
ter line of body and is aligned with point P shown in illustra-
tion.
●Figure to the left shows headlamp aiming pattern for driving
on right side of road; for driving on left side of road, aiming
pattern is reversed.
●Dotted lines to point P in illustration show center of head-
lamp.
●Basic illuminating area for adjustment should be within the
range shown at left. Adjust headlamps accordingly.
CAUTION:
Be sure aiming switch is set to “0” when preforming aiming
adjustment."H" : Horizontal center line of headlamps
"W
L " : Distance between each headlamp center
"L" : 5,000mm (196.85 in)
"C" : 65mm (2.56 in)
PKIA0459E
SKIA0047E
SEL254L
Page 3499 of 3833

HEADLAMP - DAYTIME LIGHT SYSTEM -
LT-9
C
D
E
F
G
H
I
J
L
MA
B
LT
HEADLAMP - DAYTIME LIGHT SYSTEM -PFP:26010
System DescriptionEKS003BB
DESCRIPTION
The headlamp system on vehicles for North Europe contains a daytime light control unit. The unit activates the
following whenever the engine is running with the lighting switch in the OFF position:
●Low beam headlamps
●Parking, license, tail and illumination lamps
Power is supplied at all times
●through 10A fuse (No. 31, located in the fuse and fusible link box)
●to daytime light control unit terminal 1 and
●to lighting switch terminal 11.
Power is also supplied at all times
●through 15A fuse (No. 41, located in the fuse and fusible link box)
●to daytime light control unit terminal 3 and
●to lighting switch terminal 5.
Power is also supplied at all times
●through 15A fuse (No. 40, located in the fuse and fusible link box)
●to daytime light control unit terminal 2 and
●to lighting switch terminal 8.
With the ignition switch in the ON or START position, power is supplied
●through 10A fuse [No. 13, located in the fuse block (J/B)]
●to daytime light control unit terminal 7.
With the ignition switch in the START position, power is supplied
●through 10A fuse [No. 7, located in the fuse block (J/B)]
●to daytime light control unit terminal 6.
HEADLAMP OPERATION (DAYTIME LIGHT CANCEL OPERATION)
When the lighting switch is turned to the 1st or 2nd position, power is supplied
●through lighting switch terminal 12,
●to daytime light control unit terminal 11.
Then daytime light will be canceled. And the lighting system operation will be the same as no daytime light
system.
DAYTIME LIGHT OPERATION
With the engine running and the lighting switch in the OFF position, power is supplied
●from alternator terminal 3
●to daytime light control unit terminal 8,
●through daytime light control unit terminal 5
●to terminal 3 of headlamp LH,
●through daytime light control unit terminal 4
●to terminal 3 of headlamp RH and
●through daytime light control unit terminal 10
●to tail lamp and illumination.
Ground is supplied to terminal 2 of each headlamp through body grounds E24 and E50.
SMA for models with roof mounted driving lamp
Page 3500 of 3833
LT-10
HEADLAMP - DAYTIME LIGHT SYSTEM -
Schematic
EKS003BC
TKWA0060E
Page 3501 of 3833
HEADLAMP - DAYTIME LIGHT SYSTEM -
LT-11
C
D
E
F
G
H
I
J
L
MA
B
LT
Wiring Diagram -DTRL-EKS003BD
TKWA0061E
Page 3502 of 3833
LT-12
HEADLAMP - DAYTIME LIGHT SYSTEM -
TKWA0062E
Page 3503 of 3833
HEADLAMP - DAYTIME LIGHT SYSTEM -
LT-13
C
D
E
F
G
H
I
J
L
MA
B
LT
TKWA0063E
Page 3504 of 3833
LT-14
HEADLAMP - DAYTIME LIGHT SYSTEM -
Trouble Diagnoses
EKS003CO
DAYTIME LIGHT CONTROL UNIT INSPECTION TABLE
*: Daytime light operating: Lighting switch in “OFF” position with engine running.
Bulb ReplacementEKS003CP
Refer toLT-4, "HEADLAMP"
Aiming AdjustmentEKS003BE
Refer toLT-4, "HEADLAMP"
Terminal
No.WIRE
COLORConnectionsINPUT (I)/
OUTPUT
(O)Operated conditionVoltage (V)
(Approximate val-
ues)
1 G/WPower source for illumi-
nation & tail lamp—— 12
2LGPower source for head-
lamp LH—— 12
3R/WPower source for head-
lamp RH—— 12
4 G/Y Headlamp RH OON (daytime light operating*) 12
OFF 0
5 Y/G Headlamp LH OON (daytime light operating*) 12
OFF 0
6 B/Y Start signal I Ignition switchSTART 12
ON, ACC or OFF 0
7 BR IGN power supply — Ignition switchON or START 12
ACC or OFF 0
8 Y/R Alternator “L” terminal I EngineRunning 12
Stopped 0
9 B Ground — — —
10 R/L Illumination & tail lamp OON (daytime light operating*) 12
OFF 0
11 R/L Lighting switch I1ST·2ND position 12
OFF 0
Page 3514 of 3833
LT-24
LIGHTING AND TURN SIGNAL SWITCH
LIGHTING AND TURN SIGNAL SWITCH
PFP:25540
Removal and InstallationEKS0034F
1. Remove the steering column cover. Refer to PS-9, "STEERING
COLUMN" in “POWER STEERING SYSTEM (PS)” section.
2. Remove lighting and turn signal switch fixing pawls and remove
the lighting and turn signal switch from the spiral cable.
3. Disconnect the lighting and turn signal switch connector.
Switch Circuit InspectionEKS0034G
Using circuit tester, check continuity between the lighting and turn signal switch connector terminals in each
operation status of the switch.
Lighting switch is refer toLT- 5 , "
Wiring Diagram — H/LAMP —"
Turn signal lamp switch is refer toLT-19, "Wiring Diagram — TURN —"
Front fog lamp switch is refer toLT-34, "Wiring Diagram — F/FOG —"
Rear fog lamp switch is refer toLT- 3 7 , "Wiring Diagram -R/FOG-/Without Front Fog Lamp" ,LT-38, "Wiring Dia-
gram -R/FOG-/With Front Fog Lamp"
SKIA4168E