Page 1986 of 3833

MT-10
M/T OIL
M/T OIL
PFP:KLD20
Changing M/T OilECS008BR
DRAINING
1. Start the engine and let it run to warm up the transaxle.
2. Stop the engine. Remove drain plug and drain oil.
3. Set a gasket on the drain plug and install it to the transaxle.
CAUTION:
Do not reuse gasket.
FILLING
1. Remove filler plug. Fill with new oil until oil level reaches the specified limit near filler plug mounting hole.
2. After refilling oil, check oil level. Assemble gasket to filler plug, then install it to transaxle body.
CAUTION:
Do not reuse gasket.
Checking M/T OilECS008BS
OIL LEAKAGE AND OIL LEVEL
●Check that oil is not leaking from transaxle or around it.
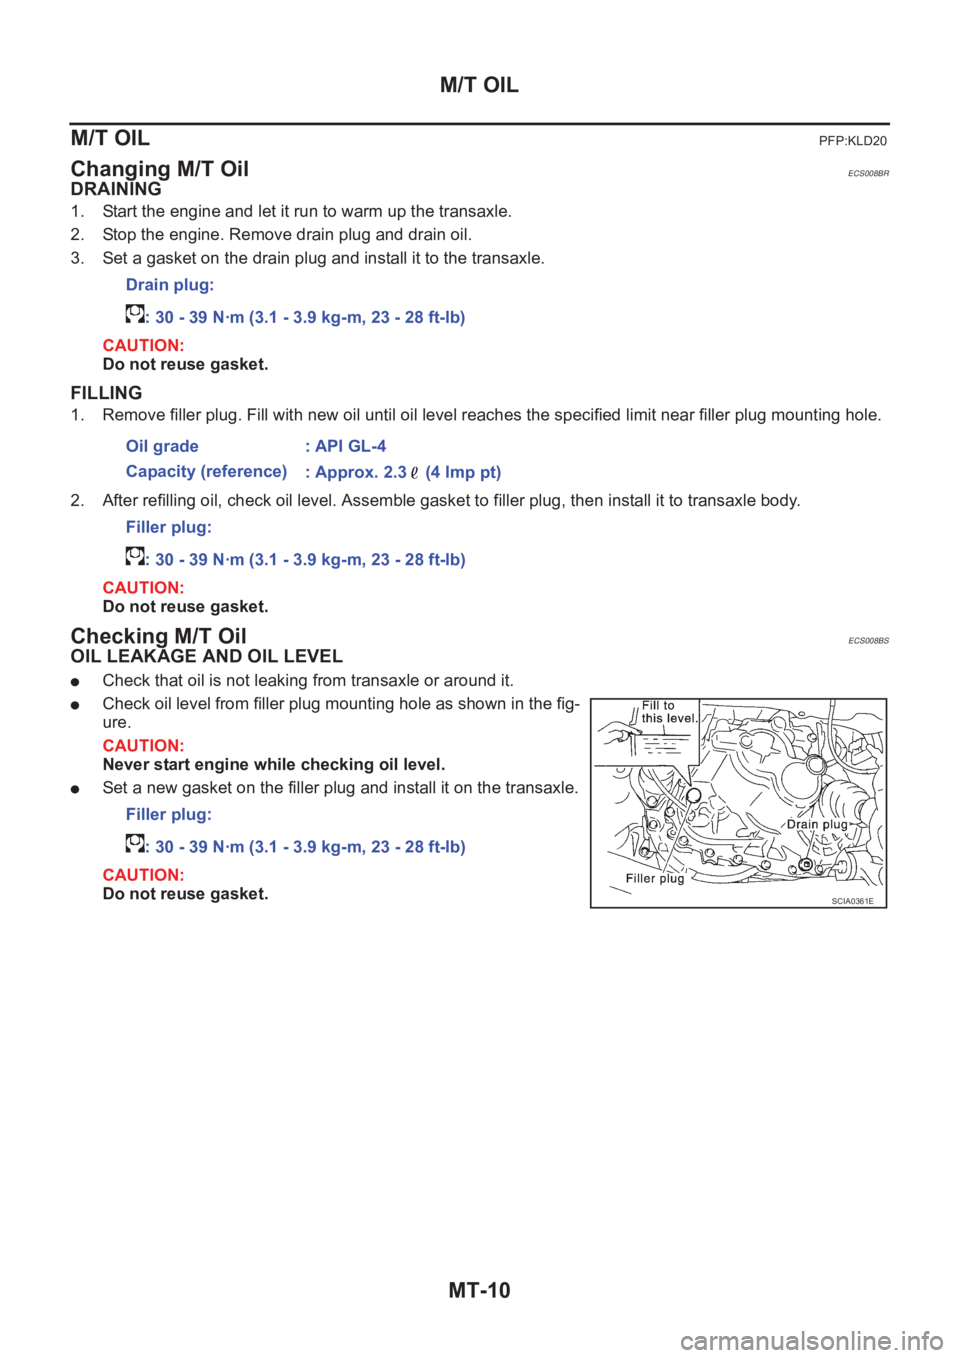
●Check oil level from filler plug mounting hole as shown in the fig-
ure.
CAUTION:
Never start engine while checking oil level.
●Set a new gasket on the filler plug and install it on the transaxle.
CAUTION:
Do not reuse gasket.Drain plug:
: 30 - 39 N·m (3.1 - 3.9 kg-m, 23 - 28 ft-lb)
Oil grade : API GL-4
Capacity (reference)
: Approx. 2.3 (4 lmp pt)
Filler plug:
: 30 - 39 N·m (3.1 - 3.9 kg-m, 23 - 28 ft-lb)
Filler plug:
: 30 - 39 N·m (3.1 - 3.9 kg-m, 23 - 28 ft-lb)
SCIA0361E
Page 1987 of 3833
SIDE OIL SEAL
MT-11
D
E
F
G
H
I
J
K
L
MA
B
MT
SIDE OIL SEALPFP:32113
Removal and InstallationECS008BT
REMOVAL
●Clutch housing side oil seal used on 4WD vehicles is attached to the transfer. Be sure to replace it
when transfer is removed.
1. Remove the drive shaft from the transaxle.
2. Remove oil seal with flat tip screwdriver.
CAUTION:
Be careful not to damage the case surface when removing
the oil seal.
INSTALLATION
1. Using a drift (special service tool), drive the oil seal straight until
it protrudes from the case end equal to dimension A shown in
the figure.
CAUTION:
●When installing oil seals, apply multi-purpose grease to oil seal lips.
●Oil seals are not reusable. Never reuse them.
2. Install all parts in reverse order of removal and check oil level after installation.
SCIA0824E
Dimension "A":
Within 0.5 mm (0.020 in) of flush with the case.
Drift to be used:
Transaxle case side: ST30720000
Clutch housing side: ST30720000
SCIA0352E
Page 1992 of 3833
MT-16
TRANSAXLE ASSEMBLY
15. Remove transaxle from vehicle.
INSTALLATION
Paying attention to the following items, install in the reverse order of removal.
●When installing the transaxle to the engine, tighten to the specified torque.
CAUTION:
When installing transaxle, be careful not to bring transaxle input shaft into contact with the clutch
cover.
QR engine models:
*: Tightening the bolt for 4WD models.
YD engine models:
●After installation, check oil level, and look for leaks and loose
mechanisms.
MTD0062D
Bolt No. 1 2 3* 4 5 6
Quantity 2 1 1 2 2 2
“ ” mm (in)40
(1.57)75
(2.95)45
(1.77)40
(1.57)30
(1.18)40
(1.57)
Tightening torque
N·m (kg - m, ft- lb)69.6 - 79.4
(7.1 - 8.1, 52 - 58)39.2 - 46.1
(4.0 - 4.7, 29 - 34)30.4 - 40.2
(3.1 - 4.1,
23 - 29)
Bolt No. 1 2 3 4 5 6
Quantity 2 2 1 1 3 1
“ ” mm (in)55
(2.17)70
(2.76)120
(4.72)45
(1.77)40
(1.57)35
(1.38)
Tightening torque
N·m (kg - m, ft- lb)40 - 49
(4.0 - 5.0, 29 - 36)31 - 36
(3.1 - 3.7, 23 - 26)
SCIA0353E
SCIA0748E
Page 2003 of 3833
TRANSAXLE ASSEMBLY
MT-27
D
E
F
G
H
I
J
K
L
MA
B
MT
4. Remove check plugs (3 pieces), check springs (3 pieces), check
balls (3 pieces) and shift check sleeve (1 piece).
5. Remove transaxle case fixing bolts.
6. Remove bore plug.
CAUTION:
Be careful not to damage transaxle case.
7. While spreading the snap ring of mainshaft rear bearing located
at bore plug hole, remove transaxle case.
8. Remove oil gutter, baffle plate.
9. Remove snap ring, mainshaft rear bearing adjusting shim and
input shaft rear bearing adjusting shim from transaxle case.
10. Remove differential side bearing outer race (transaxle case
side) and then adjust shim.
11. Remove welch plug.
12. Remove differential oil seal (tansaxle case side).
13. Remove magnet from clutch housing.
SCIA0396E
SCIA0983E
SCIA0897E
SCIA0402E
SCIA0397E
Page 2009 of 3833

TRANSAXLE ASSEMBLY
MT-33
D
E
F
G
H
I
J
K
L
MA
B
MT
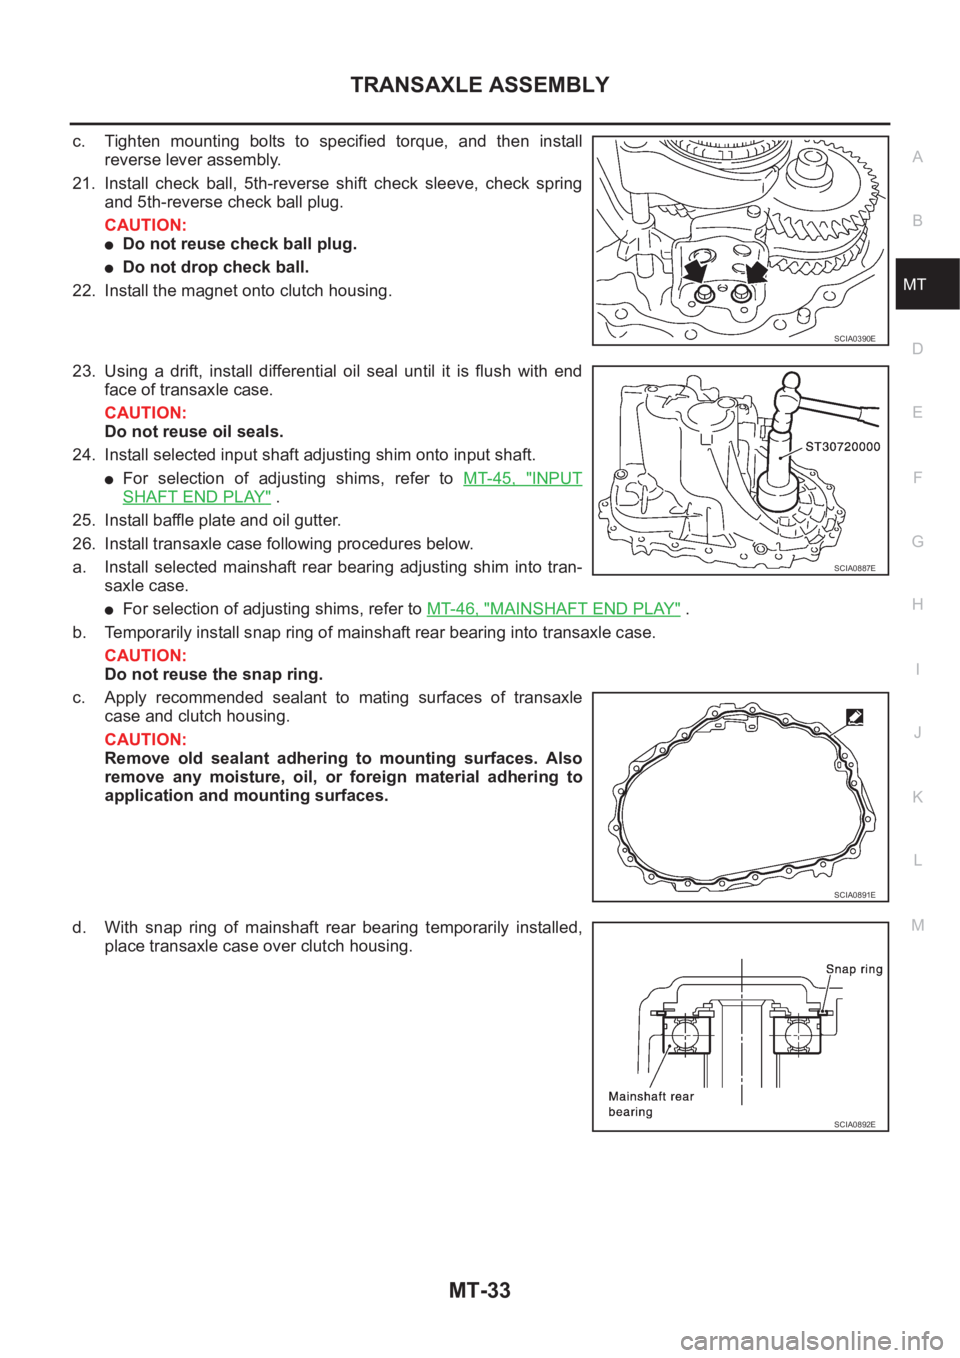
c. Tighten mounting bolts to specified torque, and then install
reverse lever assembly.
21. Install check ball, 5th-reverse shift check sleeve, check spring
and 5th-reverse check ball plug.
CAUTION:
●Do not reuse check ball plug.
●Do not drop check ball.
22. Install the magnet onto clutch housing.
23. Using a drift, install differential oil seal until it is flush with end
face of transaxle case.
CAUTION:
Do not reuse oil seals.
24. Install selected input shaft adjusting shim onto input shaft.
●For selection of adjusting shims, refer to MT-45, "INPUT
SHAFT END PLAY" .
25. Install baffle plate and oil gutter.
26. Install transaxle case following procedures below.
a. Install selected mainshaft rear bearing adjusting shim into tran-
saxle case.
●For selection of adjusting shims, refer to MT-46, "MAINSHAFT END PLAY" .
b. Temporarily install snap ring of mainshaft rear bearing into transaxle case.
CAUTION:
Do not reuse the snap ring.
c. Apply recommended sealant to mating surfaces of transaxle
case and clutch housing.
CAUTION:
Remove old sealant adhering to mounting surfaces. Also
remove any moisture, oil, or foreign material adhering to
application and mounting surfaces.
d. With snap ring of mainshaft rear bearing temporarily installed,
place transaxle case over clutch housing.
SCIA0390E
SCIA0887E
SCIA0891E
SCIA0892E
Page 2011 of 3833
TRANSAXLE ASSEMBLY
MT-35
D
E
F
G
H
I
J
K
L
MA
B
MT
28. Using a drift, install welch plug.
CAUTION:
Do not reuse welch plug.
29. Install 2 check balls, 2 check springs and 2 check ball plugs.
CAUTION:
Do not reuse check ball plug.
30. Apply recommended sealant to threads of neutral switch and
reverse lamp switch. Then install them into transaxle case.
31. Install gaskets onto drain plug and filler plug, and then install
them into transaxle case.
CAUTION:
●Do not reuse gasket.
●After oil is filled, tighten filler plug to specified torque.
Disassembly and Assembly (RS6F51A)ECS008C1
DISASSEMBLY
1. Remove drain plug and filler plug.
2. Remove park/neutral position switch and back-up lamp switch.
3. After removing shift check and stopper bolt, remove control
assembly.
SCIA0403E
SCIA1668J
SCIA0895E
SCIA0389E
Page 2012 of 3833
MT-36
TRANSAXLE ASSEMBLY
4. Remove check plugs (4 pieces), check springs (4 pieces), check
balls (4 pieces) and shift check sleeve (2 pieces).
5. Remove transaxle case fixing bolts.
6. Remove bore plug.
CAUTION:
Be careful not to damage transaxle case.
7. While spreading the snap ring of mainshaft rear bearing located
at bore plug hole, remove transaxle case.
8. Remove oil gutter, baffle plate.
9. Remove snap ring, mainshaft rear bearing adjusting shim and
input shaft rear bearing adjusting shim from transaxle case.
10. Remove differential side bearing outer race (transaxle case
side) and then adjusting shim.
11. Remove welch plug.
12. Remove differential oil seal (transaxle case side).
13. Remove magnet from clutch housing.
SCIA0959E
SCIA0983E
SCIA0897E
SCIA0402E
SCIA0397E
Page 2018 of 3833

MT-42
TRANSAXLE ASSEMBLY
22. Install retaining pin onto reverse bracket.
CAUTION:
Do not reuse retaining pin.
23. Install reverse shift fork and reverse fork rod.
24. Install reverse lever assembly following procedures below.
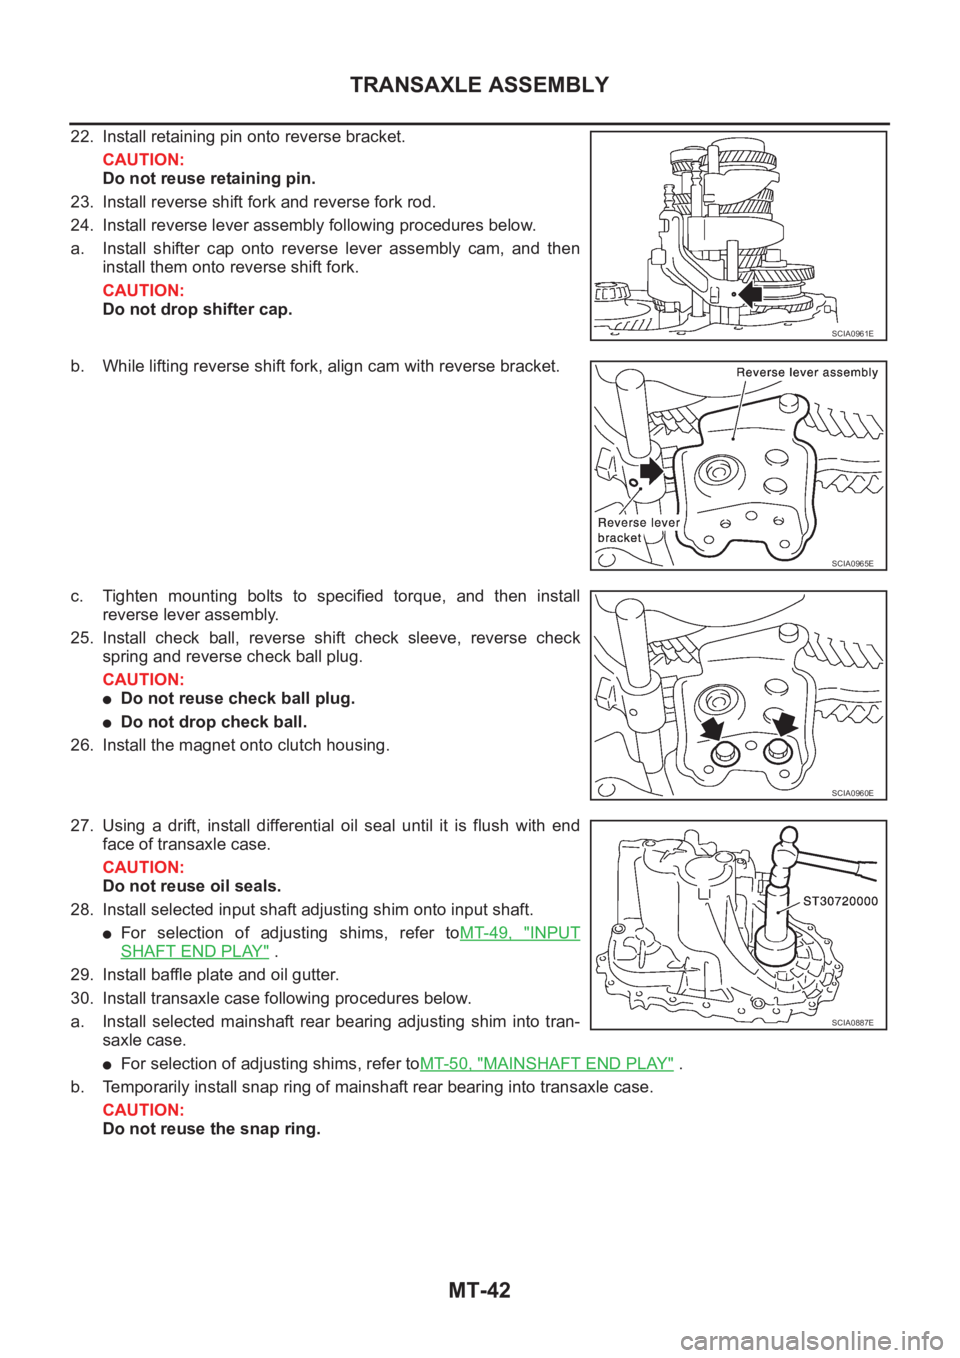
a. Install shifter cap onto reverse lever assembly cam, and then
install them onto reverse shift fork.
CAUTION:
Do not drop shifter cap.
b. While lifting reverse shift fork, align cam with reverse bracket.
c. Tighten mounting bolts to specified torque, and then install
reverse lever assembly.
25. Install check ball, reverse shift check sleeve, reverse check
spring and reverse check ball plug.
CAUTION:
●Do not reuse check ball plug.
●Do not drop check ball.
26. Install the magnet onto clutch housing.
27. Using a drift, install differential oil seal until it is flush with end
face of transaxle case.
CAUTION:
Do not reuse oil seals.
28. Install selected input shaft adjusting shim onto input shaft.
●For selection of adjusting shims, refer toMT-49, "INPUT
SHAFT END PLAY" .
29. Install baffle plate and oil gutter.
30. Install transaxle case following procedures below.
a. Install selected mainshaft rear bearing adjusting shim into tran-
saxle case.
●For selection of adjusting shims, refer toMT-50, "MAINSHAFT END PLAY" .
b. Temporarily install snap ring of mainshaft rear bearing into transaxle case.
CAUTION:
Do not reuse the snap ring.
SCIA0961E
SCIA0965E
SCIA0960E
SCIA0887E