Page 103 of 2493
SEM008G
20. Remove cylinder head bolts at engine front side.
SEM879F
21. Remove oil pan. Refer to EM-19, ªRemovalº.
22. Remove oil strainer.
SEM880F
23. Remove starter motor, and set ring gear stopper using mount-
ing bolt holes.
SEM881F
24. Loosen crankshaft pulley bolt.
25. Remove crankshaft pulley with a suitable puller.
SEM103G
26. Remove RH engine mounting.
TIMING CHAINQG
Removal (Cont'd)
EM-25
Page 107 of 2493

SEM896F
12. Install front cover.
Bolt No. Tightening torque N´m (kg-m, in-lb) ª!º mm (in)
a. 6.9 - 9.5 (0.70 - 0.97, 61 - 84) 20 (0.79)
b. 6.9 - 9.5 (0.70 - 0.97, 61 - 84) 40 (1.57)
c. 17 - 24 (1.7 - 2.4, 148 - 208*) 70 (2.76)
d. 6.9 - 9.5 (0.70 - 0.97, 61 - 84) 72.8 (2.866)
e. 6.9 - 9.5 (0.70 - 0.97, 61 - 84) 12 (0.47)
*: 12 - 17 ft-lb
SEM897F
+Make sure two O-rings are present.
+Be careful not to damage oil seal when installing front
cover.
SEM009G
13. Install cylinder head bolts at engine front side.
+Tightening procedure
Tightening bolts (1 - 4) to 6.3 to 8.3 N´m (0.64 to 0.85 kg-m,
55.8 to 73.5 in-lb).
SEM945F
14. Install oil pump drive spacer.
SEM104G
15. Install water pump and water pump pulley.
Refer to LC-14, ªWater Pumpº.
16. Install idler pulley and bracket.
17. Install RH engine mounting bracket.
18. Install RH engine mounting.
19. Install oil strainer.
20. Install oil pan. Refer to EM-20, ªInstallationº.
21. Install crankshaft pulley.
22. Remove ring gear stopper.
23. Install starter motor.
TIMING CHAINQG
Installation (Cont'd)
EM-29
Page 569 of 2493

On Board Diagnosis LogicNJEC0553
DTC No. Malfunction is detected when ... Check Items (Possible Cause)
P0335
0802+The 10É signal is not entered to ECM for the first few
seconds during engine cranking.
+The 10É signal is not entered to ECM during engine run-
ning.
+The 10É signal is not in the normal pattern at each
engine revolution.+Harness or connectors
(The crankshaft position sensor (POS) circuit is
open or shorted.)
+Crankshaft position sensor (POS)
+Starter motor (Refer to EL section.)
+Starting system circuit (Refer to EL section.)
+Dead (Weak) battery
SEF058Y
DTC Confirmation ProcedureNJEC0554NOTE:
If ªDTC Confirmation Procedureº has been previously conducted,
always turn ignition switch ªOFFº and wait at least 9 seconds
before conducting the next test.
With CONSULT-II
1) Turn ignition switch ªONº and select ªDATA MONITORº mode
with CONSULT-II.
2) Start engine and run it for at least 2 seconds at idle speed.
3) If 1st trip DTC is detected, go to ªDiagnostic Procedureº,
EC-275.
With GST
Follow the procedure ªWith CONSULT-IIº above.
DTC P0335 CRANKSHAFT POSITION SENSOR (POS)QG
On Board Diagnosis Logic
EC-273
Page 575 of 2493

On Board Diagnosis LogicNJEC0222
DTC No. Malfunction is detected when ... Check Items (Possible Cause)
P0340
0340+The cylinder No. signal is not entered to ECM for the first
few seconds during engine cranking.
+The cylinder No. signal is not entered to ECM during
engine running.
+The cylinder No. signal is not in the normal pattern dur-
ing engine running.+Harness or connectors
(The camshaft position sensor (PHASE) circuit is
open or shorted.)
+Camshaft position sensor (PHASE)
+Starter motor (Refer to EL section.)
+Starting system circuit (Refer to EL section.)
DTC Confirmation ProcedureNJEC0223NOTE:
If ªDTC Confirmation Procedureº has been previously conducted,
always turn ignition switch ªOFFº and wait at least 9 seconds
before conducting the next test.
TESTING CONDITION:
Before performing the following procedure, confirm that bat-
tery voltage is more than 10.5V.
SEF013Y
With CONSULT-II
1) Turn ignition switch ªONº.
2) Select ªDATA MONITORº mode with CONSULT-II.
3) Crank engine for at least 2 seconds.
4) If 1st trip DTC is detected, go to ªDiagnostic Procedureº,
EC-281.
With GST
Follow the procedure ªWith CONSULT-IIº above.
DTC P0340 CAMSHAFT POSITION SENSOR (CMPS) (PHASE)QG
On Board Diagnosis Logic
EC-279
Page 577 of 2493
Diagnostic ProcedureNJEC0225
1 CHECK STARTING SYSTEM
Does the engine turn over?
(Does the starter motor operate?)
YesorNo
Ye s©GO TO 2.
No©Check starting system. (Refer to EL section.)
2 RETIGHTEN GROUND SCREWS
1. Turn ignition switch ªOFFº.
2. Loosen and retighten engine ground screws.
JEF104Y
©GO TO 3.
DTC P0340 CAMSHAFT POSITION SENSOR (CMPS) (PHASE)QG
Diagnostic Procedure
EC-281
Page 976 of 2493
Diagnostic ProcedureNJEC0763
1 INSPECTION START
Check fuel level, fuel supplying system, starter motor, etc.
OK or NG
OK©GO TO 2.
NG©Correct.
2 CHECK INSTALLATION
Check that glow plug nut and all glow plug connecting plate nuts are installed properly.
SEF392YA
OK or NG
OK (With CONSULT-II)©GO TO 3.
OK (Without CONSULT-
II)©GO TO 4.
NG©Install properly.
3 CHECK GLOW INDICATOR LAMP OPERATION
With CONSULT-II
1. Turn ignition switch ªONº.
2. Select ªCOOLAN TEMP/Sº in ªDATA MONITORº mode with CONSULT-II.
3. Confirm that ªCOOLAN TEMP/Sº indicates below 75ÉC (167ÉF). If it indicates above 75ÉC (167ÉF), cool down engine.
SEF013Y
4. Turn ignition switch ªOFFº, wait at least 5 seconds and then turn ªONº.
5. Make sure that glow indicator lamp is turned ªONº for 1.5 seconds or more after turning ignition switch ªONº, and then
turned ªOFFº.
OK or NG
OK©GO TO 5.
NG©GO TO 6.
GLOW CONTROL SYSTEMYD
Diagnostic Procedure
EC-680
Page 1073 of 2493

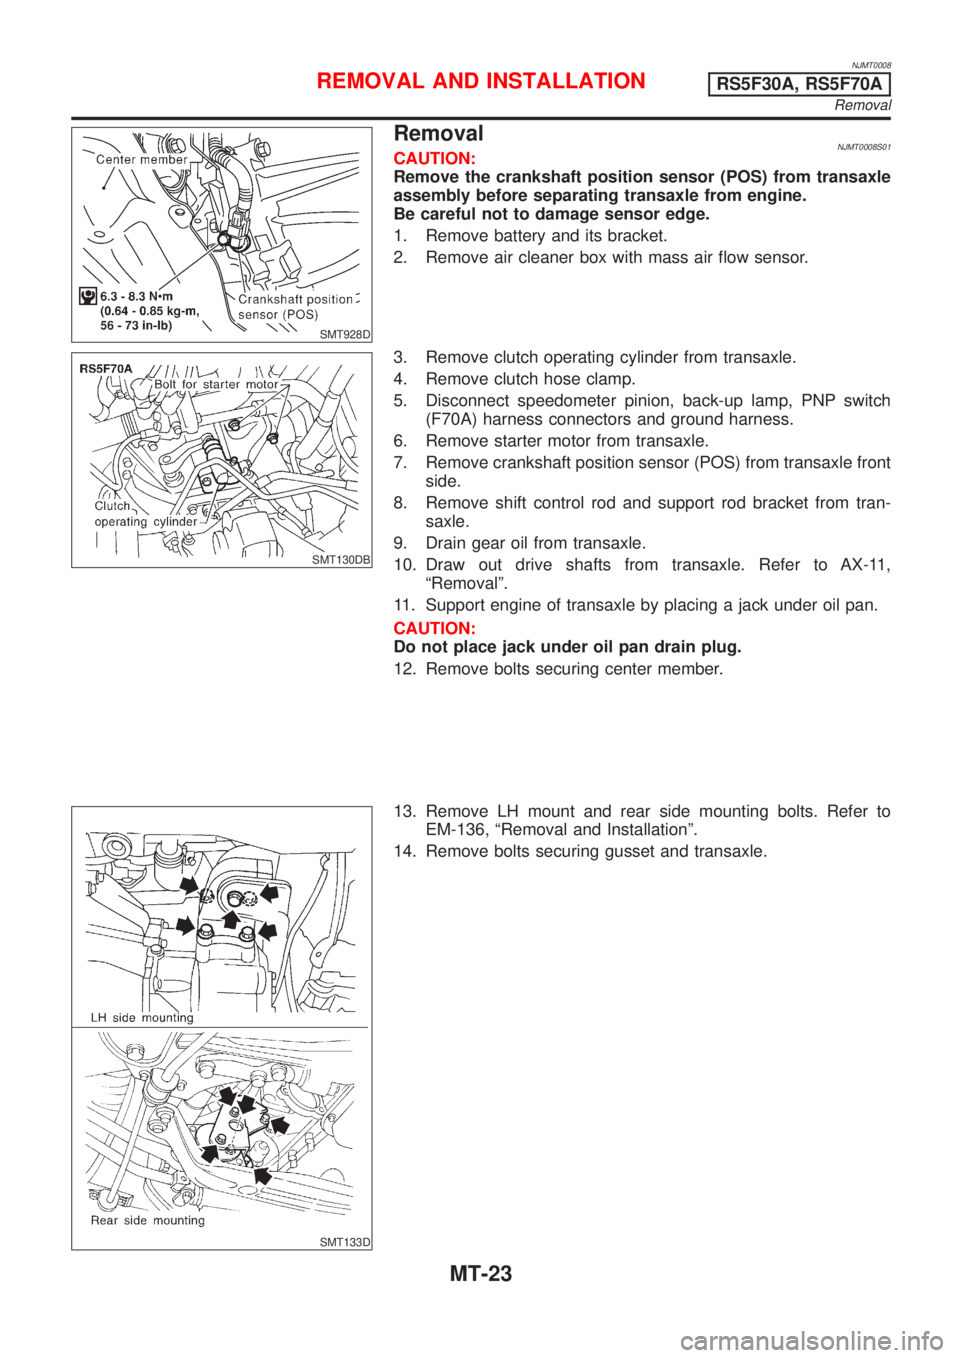
NJMT0008
SMT928D
RemovalNJMT0008S01CAUTION:
Remove the crankshaft position sensor (POS) from transaxle
assembly before separating transaxle from engine.
Be careful not to damage sensor edge.
1. Remove battery and its bracket.
2. Remove air cleaner box with mass air flow sensor.
SMT130DB
3. Remove clutch operating cylinder from transaxle.
4. Remove clutch hose clamp.
5. Disconnect speedometer pinion, back-up lamp, PNP switch
(F70A) harness connectors and ground harness.
6. Remove starter motor from transaxle.
7. Remove crankshaft position sensor (POS) from transaxle front
side.
8. Remove shift control rod and support rod bracket from tran-
saxle.
9. Drain gear oil from transaxle.
10. Draw out drive shafts from transaxle. Refer to AX-11,
ªRemovalº.
11. Support engine of transaxle by placing a jack under oil pan.
CAUTION:
Do not place jack under oil pan drain plug.
12. Remove bolts securing center member.
SMT133D
13. Remove LH mount and rear side mounting bolts. Refer to
EM-136, ªRemoval and Installationº.
14. Remove bolts securing gusset and transaxle.
REMOVAL AND INSTALLATIONRS5F30A, RS5F70A
Removal
MT-23
Page 1074 of 2493
SMT652C
15. Lower transaxle while supporting it with a jack.
InstallationNJMT0008S02+Tighten LH mount, rear side mount and center member bolts.
Refer to EM-136, ªRemoval and Installationº.
+Tighten clutch operating cylinder bolts. Refer to CL-15, ªInstal-
lationº.
+Tighten starter motor bolts. Refer to SC-19, ªRemoval and
Installationº.
+Install drive shafts. Refer to AX-12, ªInstallationº.
+Tighten all transaxle bolts and any part removed.
SMT930D
MODEL QG15DE ENGINENJMT0008S0201
Bolt No. Tightening torque N´m (kg-m, ft-lb) ª!º mm (in)
130 - 40 (3.1 - 4.1, 22 - 30) 70 (2.76)
230 - 40 (3.1 - 4.1, 22 - 30) 80 (3.15)
330 - 40 (3.1 - 4.1, 22 - 30) 30 (1.18)
4*1 16 - 21 (1.6 - 2.1, 12 - 15) 25 (0.98)
Front gusset A to
engine30 - 40 (3.1 - 4.1, 22 - 30) 20 (0.79)
Rear gusset B to
engine16 - 21 (1.6 - 2.1, 12 - 15) 16 (0.63)
*1: With gussets
REMOVAL AND INSTALLATIONRS5F30A, RS5F70A
Removal (Cont'd)
MT-24