Page 1707 of 2395
SEM024AA
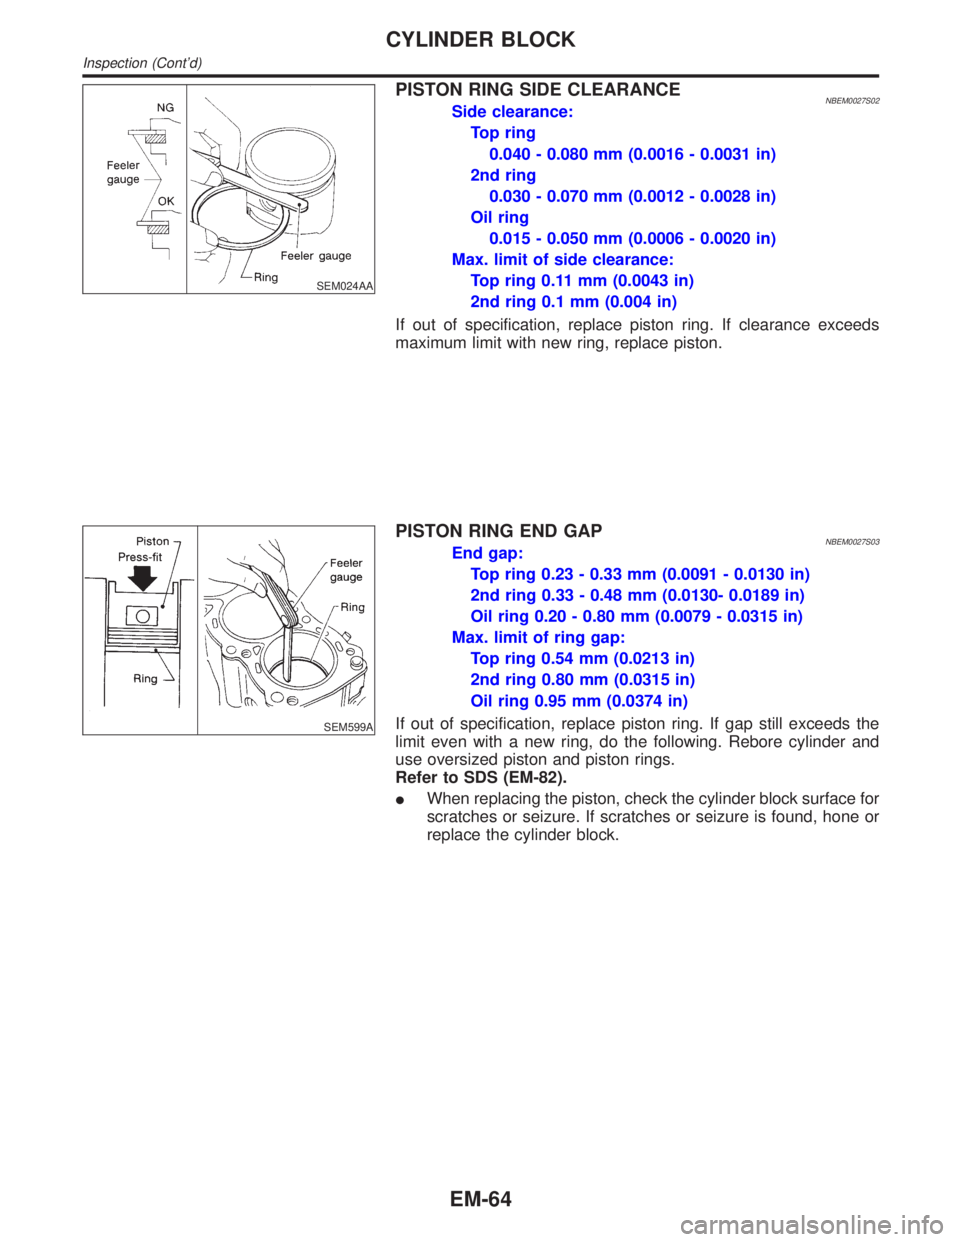
PISTON RING SIDE CLEARANCENBEM0027S02Side clearance:
Top ring
0.040 - 0.080 mm (0.0016 - 0.0031 in)
2nd ring
0.030 - 0.070 mm (0.0012 - 0.0028 in)
Oil ring
0.015 - 0.050 mm (0.0006 - 0.0020 in)
Max. limit of side clearance:
Top ring 0.11 mm (0.0043 in)
2nd ring 0.1 mm (0.004 in)
If out of specification, replace piston ring. If clearance exceeds
maximum limit with new ring, replace piston.
SEM599A
PISTON RING END GAPNBEM0027S03End gap:
Top ring 0.23 - 0.33 mm (0.0091 - 0.0130 in)
2nd ring 0.33 - 0.48 mm (0.0130- 0.0189 in)
Oil ring 0.20 - 0.80 mm (0.0079 - 0.0315 in)
Max. limit of ring gap:
Top ring 0.54 mm (0.0213 in)
2nd ring 0.80 mm (0.0315 in)
Oil ring 0.95 mm (0.0374 in)
If out of specification, replace piston ring. If gap still exceeds the
limit even with a new ring, do the following. Rebore cylinder and
use oversized piston and piston rings.
Refer to SDS (EM-82).
IWhen replacing the piston, check the cylinder block surface for
scratches or seizure. If scratches or seizure is found, hone or
replace the cylinder block.
CYLINDER BLOCK
Inspection (Cont'd)
EM-64
Page 1708 of 2395
SEM038F
SEM003F
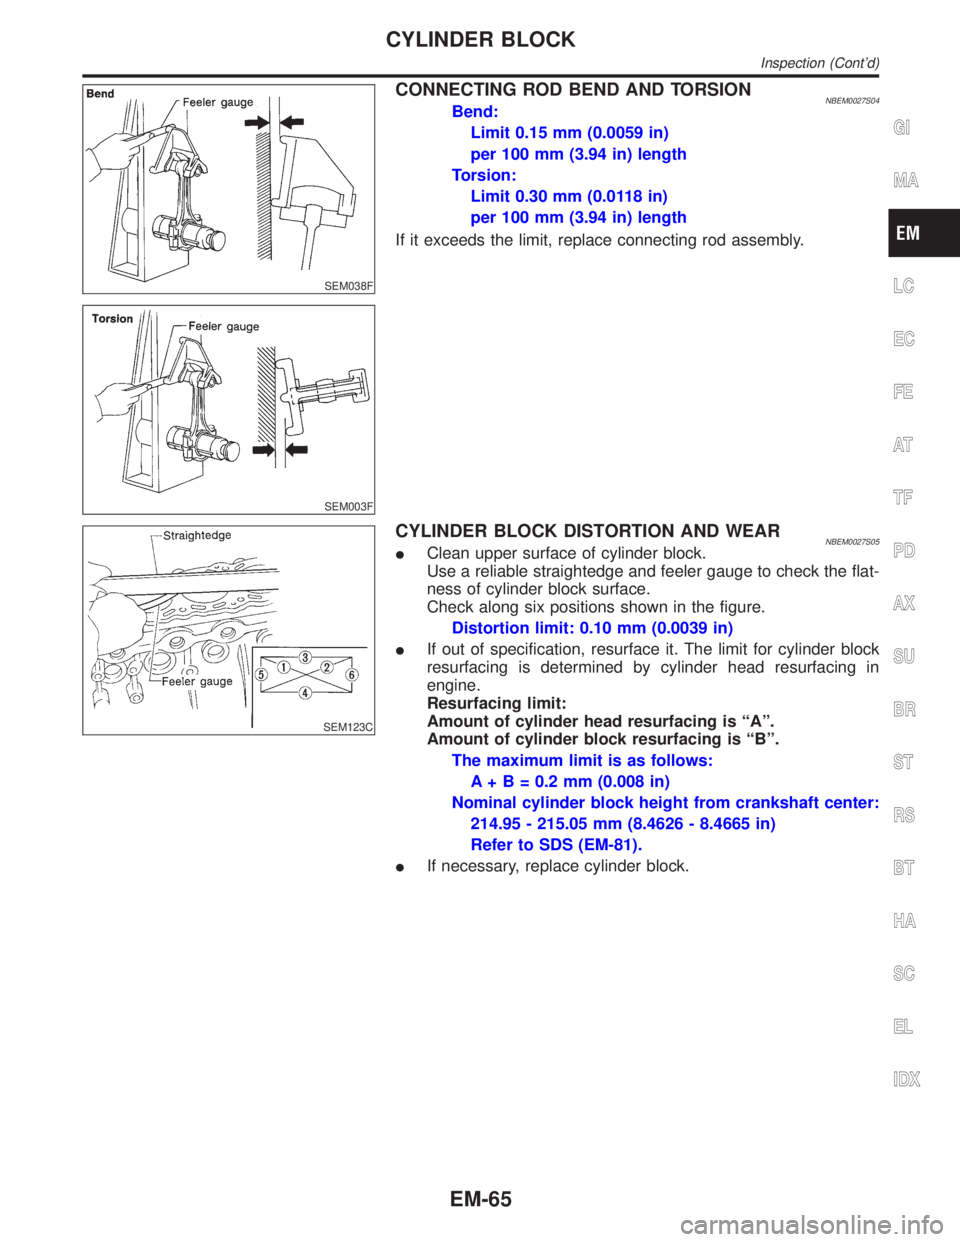
CONNECTING ROD BEND AND TORSIONNBEM0027S04Bend:
Limit 0.15 mm (0.0059 in)
per 100 mm (3.94 in) length
Torsion:
Limit 0.30 mm (0.0118 in)
per 100 mm (3.94 in) length
If it exceeds the limit, replace connecting rod assembly.
SEM123C
CYLINDER BLOCK DISTORTION AND WEARNBEM0027S05IClean upper surface of cylinder block.
Use a reliable straightedge and feeler gauge to check the flat-
ness of cylinder block surface.
Check along six positions shown in the figure.
Distortion limit: 0.10 mm (0.0039 in)
IIf out of specification, resurface it. The limit for cylinder block
resurfacing is determined by cylinder head resurfacing in
engine.
Resurfacing limit:
Amount of cylinder head resurfacing is ªAº.
Amount of cylinder block resurfacing is ªBº.
The maximum limit is as follows:
A + B = 0.2 mm (0.008 in)
Nominal cylinder block height from crankshaft center:
214.95 - 215.05 mm (8.4626 - 8.4665 in)
Refer to SDS (EM-81).
IIf necessary, replace cylinder block.
GI
MA
LC
EC
FE
AT
TF
PD
AX
SU
BR
ST
RS
BT
HA
SC
EL
IDX
CYLINDER BLOCK
Inspection (Cont'd)
EM-65
Page 1709 of 2395
SEM843E
SEM321AA
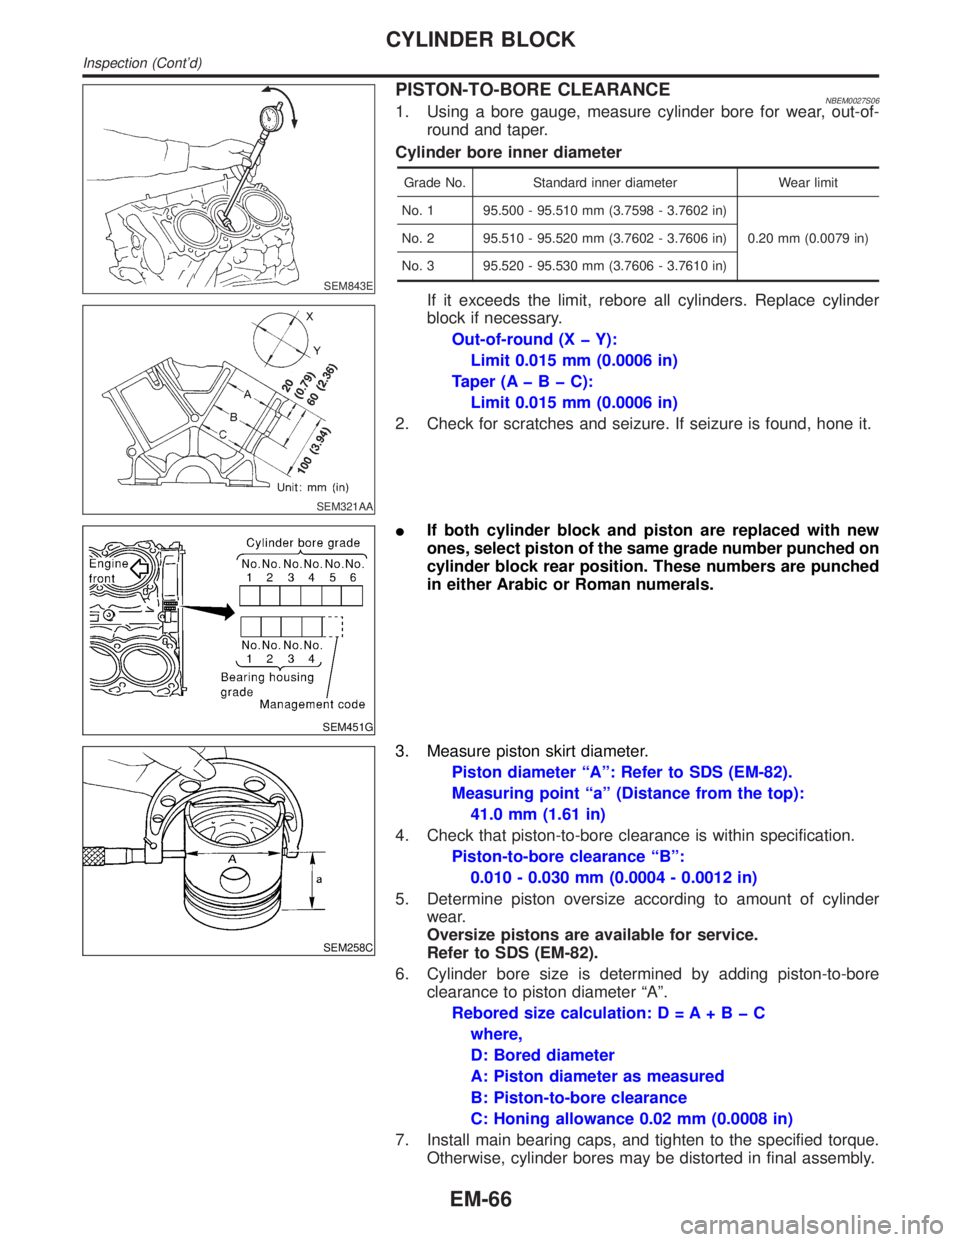
PISTON-TO-BORE CLEARANCENBEM0027S061. Using a bore gauge, measure cylinder bore for wear, out-of-
round and taper.
Cylinder bore inner diameter
Grade No. Standard inner diameter Wear limit
No. 1 95.500 - 95.510 mm (3.7598 - 3.7602 in)
0.20 mm (0.0079 in) No. 2 95.510 - 95.520 mm (3.7602 - 3.7606 in)
No. 3 95.520 - 95.530 mm (3.7606 - 3.7610 in)
If it exceeds the limit, rebore all cylinders. Replace cylinder
block if necessary.
Out-of-round (X þ Y):
Limit 0.015 mm (0.0006 in)
Taper (AþBþC):
Limit 0.015 mm (0.0006 in)
2. Check for scratches and seizure. If seizure is found, hone it.
SEM451G
IIf both cylinder block and piston are replaced with new
ones, select piston of the same grade number punched on
cylinder block rear position. These numbers are punched
in either Arabic or Roman numerals.
SEM258C
3. Measure piston skirt diameter.
Piston diameter ªAº: Refer to SDS (EM-82).
Measuring point ªaº (Distance from the top):
41.0 mm (1.61 in)
4. Check that piston-to-bore clearance is within specification.
Piston-to-bore clearance ªBº:
0.010 - 0.030 mm (0.0004 - 0.0012 in)
5. Determine piston oversize according to amount of cylinder
wear.
Oversize pistons are available for service.
Refer to SDS (EM-82).
6. Cylinder bore size is determined by adding piston-to-bore
clearance to piston diameter ªAº.
Rebored size calculation: D = A+BþC
where,
D: Bored diameter
A: Piston diameter as measured
B: Piston-to-bore clearance
C: Honing allowance 0.02 mm (0.0008 in)
7. Install main bearing caps, and tighten to the specified torque.
Otherwise, cylinder bores may be distorted in final assembly.
CYLINDER BLOCK
Inspection (Cont'd)
EM-66
Page 1710 of 2395
8. Cut cylinder bores.
IWhen any cylinder needs boring, all other cylinders must
also be bored.
IDo not cut too much out of cylinder bore at a time. Cut
only 0.05 mm (0.0020 in) or so in diameter at a time.
9. Hone cylinders to obtain specified piston-to-bore clearance.
10. Measure finished cylinder bore for out-of-round and taper.
IMeasurement should be done after cylinder bore cools
down.
SEM316A
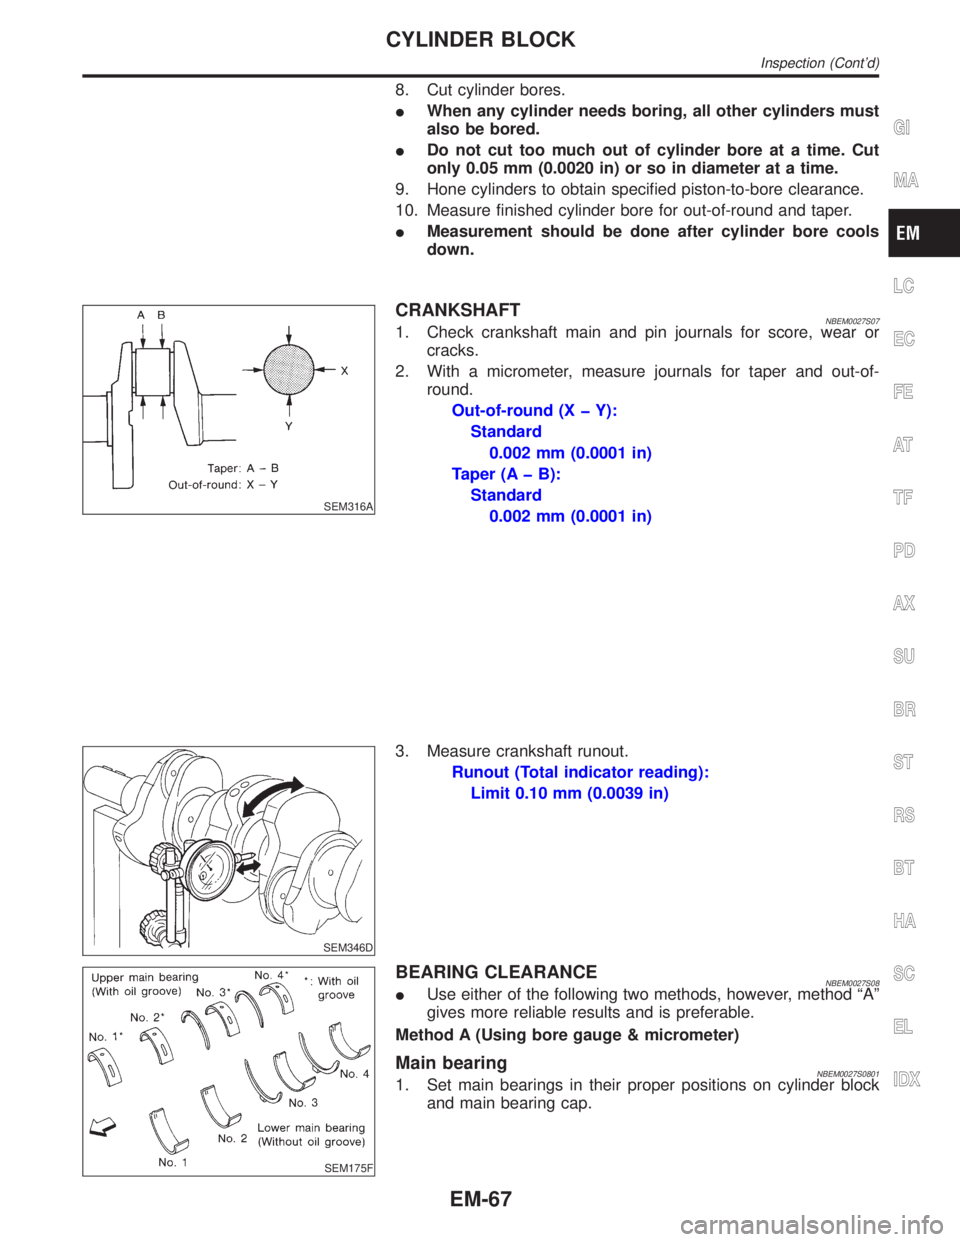
CRANKSHAFTNBEM0027S071. Check crankshaft main and pin journals for score, wear or
cracks.
2. With a micrometer, measure journals for taper and out-of-
round.
Out-of-round (X þ Y):
Standard
0.002 mm (0.0001 in)
Taper (A þ B):
Standard
0.002 mm (0.0001 in)
SEM346D
3. Measure crankshaft runout.
Runout (Total indicator reading):
Limit 0.10 mm (0.0039 in)
SEM175F
BEARING CLEARANCENBEM0027S08IUse either of the following two methods, however, method ªAº
gives more reliable results and is preferable.
Method A (Using bore gauge & micrometer)
Main bearingNBEM0027S08011. Set main bearings in their proper positions on cylinder block
and main bearing cap.
GI
MA
LC
EC
FE
AT
TF
PD
AX
SU
BR
ST
RS
BT
HA
SC
EL
IDX
CYLINDER BLOCK
Inspection (Cont'd)
EM-67
Page 1711 of 2395
SEM845E
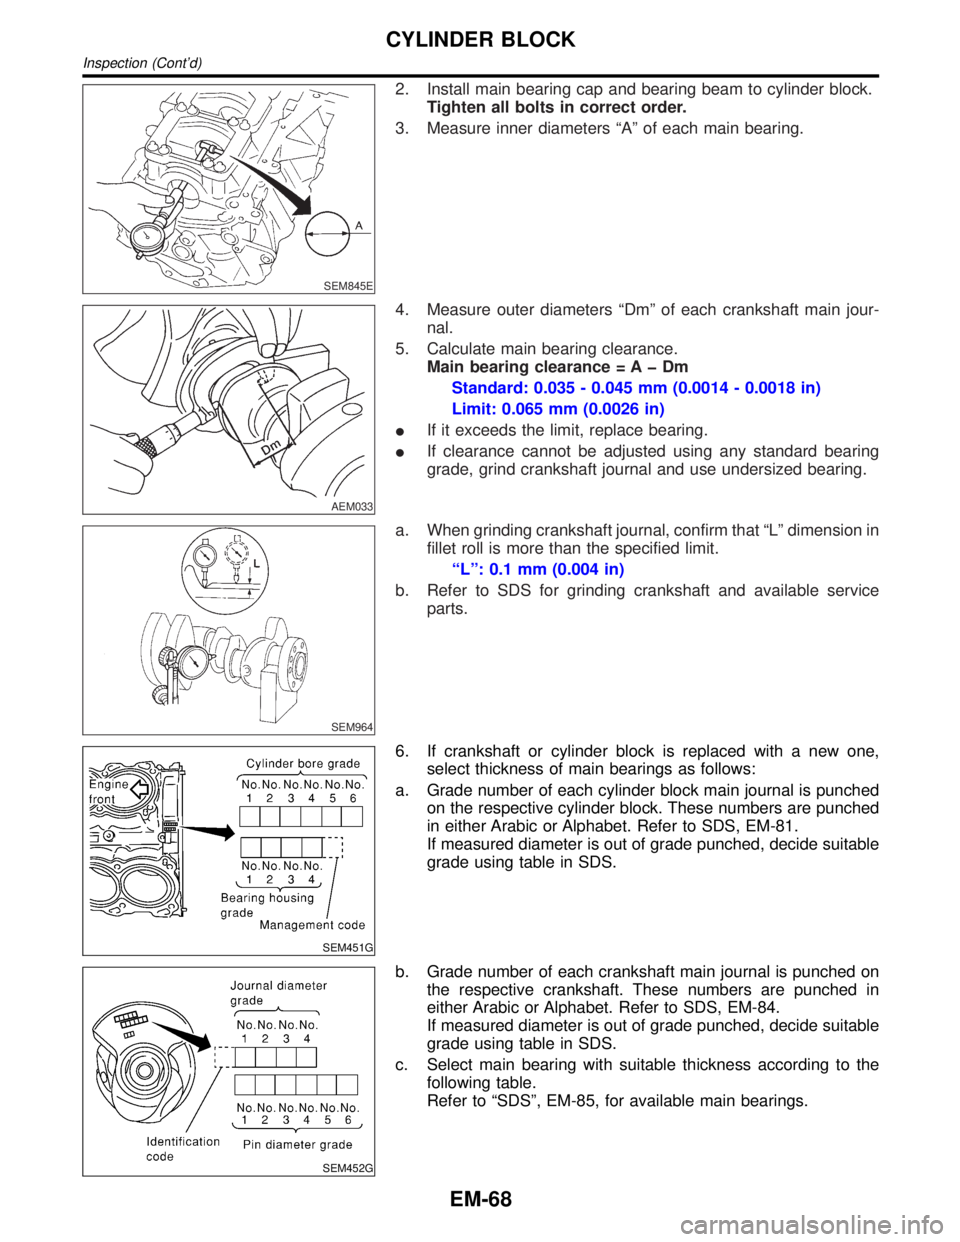
2. Install main bearing cap and bearing beam to cylinder block.
Tighten all bolts in correct order.
3. Measure inner diameters ªAº of each main bearing.
AEM033
4. Measure outer diameters ªDmº of each crankshaft main jour-
nal.
5. Calculate main bearing clearance.
Main bearing clearance = A þ Dm
Standard: 0.035 - 0.045 mm (0.0014 - 0.0018 in)
Limit: 0.065 mm (0.0026 in)
IIf it exceeds the limit, replace bearing.
IIf clearance cannot be adjusted using any standard bearing
grade, grind crankshaft journal and use undersized bearing.
SEM964
a. When grinding crankshaft journal, confirm that ªLº dimension in
fillet roll is more than the specified limit.
ªLº: 0.1 mm (0.004 in)
b. Refer to SDS for grinding crankshaft and available service
parts.
SEM451G
6. If crankshaft or cylinder block is replaced with a new one,
select thickness of main bearings as follows:
a. Grade number of each cylinder block main journal is punched
on the respective cylinder block. These numbers are punched
in either Arabic or Alphabet. Refer to SDS, EM-81.
If measured diameter is out of grade punched, decide suitable
grade using table in SDS.
SEM452G
b. Grade number of each crankshaft main journal is punched on
the respective crankshaft. These numbers are punched in
either Arabic or Alphabet. Refer to SDS, EM-84.
If measured diameter is out of grade punched, decide suitable
grade using table in SDS.
c. Select main bearing with suitable thickness according to the
following table.
Refer to ªSDSº, EM-85, for available main bearings.
CYLINDER BLOCK
Inspection (Cont'd)
EM-68
Page 1712 of 2395
SEM280G
AEM027
Connecting Rod Bearing (Big end)NBEM0027S08021. Install connecting rod bearing to connecting rod and cap.
2. Install connecting rod cap to connecting rod.
Tighten bolts to the specified torque.
3. Measure inner diameter ªCº of connecting rod.
AEM034
4. Measure outer diameter ªDpº of each crankshaft pin journal.
5. Calculate connecting rod bearing clearance.
Connecting rod bearing clearance=CþDp
Standard: 0.034 - 0.059 mm (0.0013 - 0.0023 in)
Limit: 0.070 mm (0.0028 in)
6. If it exceeds the limit, replace bearing.
7. If clearance cannot be adjusted within the standard of any
bearing, grind crankshaft journal and use undersized bearing.
Refer to ªBEARING CLEARANCE Ð Main bearingº, EM-67.
GI
MA
LC
EC
FE
AT
TF
PD
AX
SU
BR
ST
RS
BT
HA
SC
EL
IDX
CYLINDER BLOCK
Inspection (Cont'd)
EM-69
Page 1713 of 2395
SEM452G
EM142
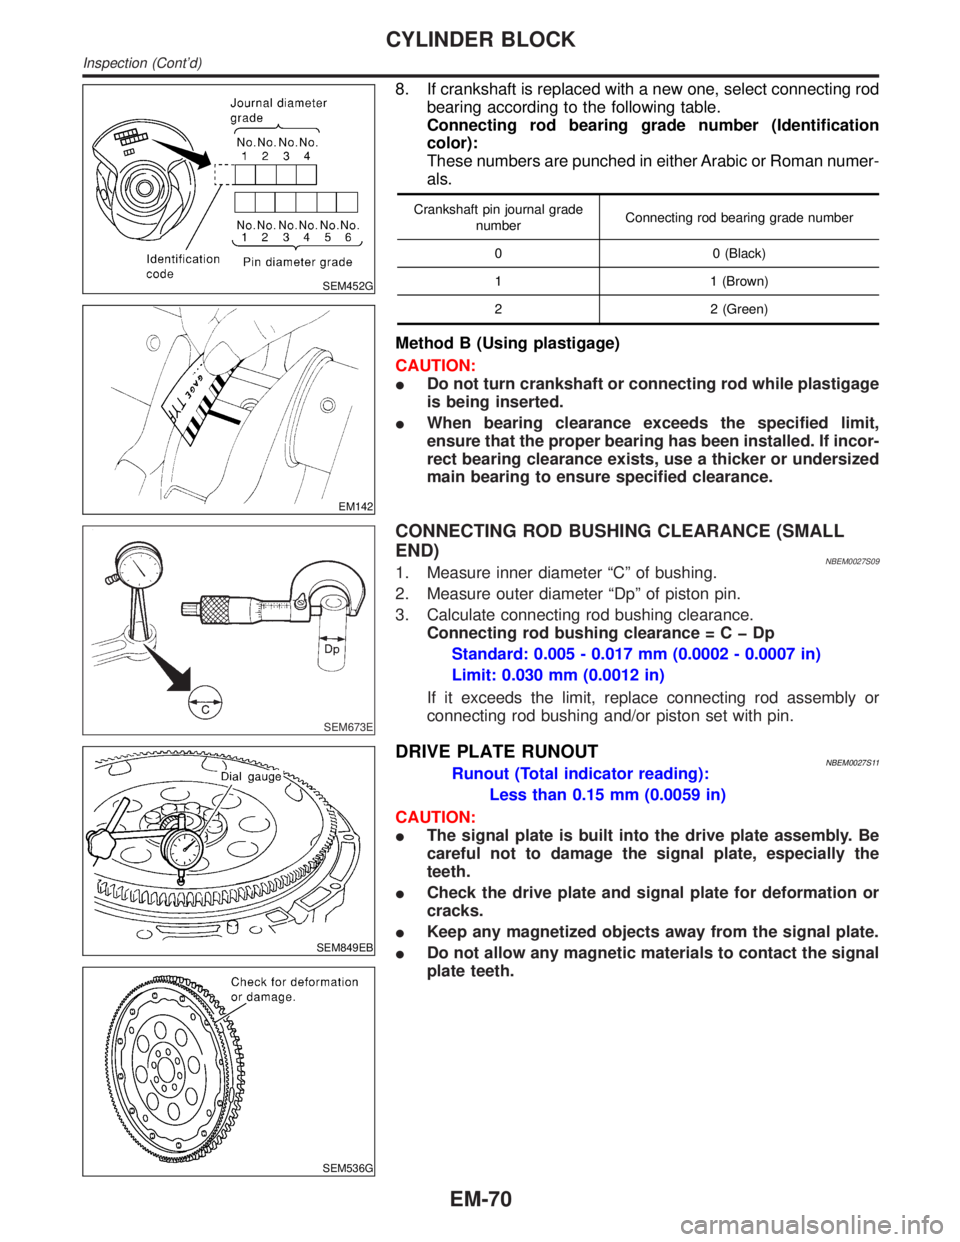
8. If crankshaft is replaced with a new one, select connecting rod
bearing according to the following table.
Connecting rod bearing grade number (Identification
color):
These numbers are punched in either Arabic or Roman numer-
als.
Crankshaft pin journal grade
numberConnecting rod bearing grade number
0 0 (Black)
1 1 (Brown)
2 2 (Green)
Method B (Using plastigage)
CAUTION:
IDo not turn crankshaft or connecting rod while plastigage
is being inserted.
IWhen bearing clearance exceeds the specified limit,
ensure that the proper bearing has been installed. If incor-
rect bearing clearance exists, use a thicker or undersized
main bearing to ensure specified clearance.
SEM673E
CONNECTING ROD BUSHING CLEARANCE (SMALL
END)
NBEM0027S091. Measure inner diameter ªCº of bushing.
2. Measure outer diameter ªDpº of piston pin.
3. Calculate connecting rod bushing clearance.
Connecting rod bushing clearance=CþDp
Standard: 0.005 - 0.017 mm (0.0002 - 0.0007 in)
Limit: 0.030 mm (0.0012 in)
If it exceeds the limit, replace connecting rod assembly or
connecting rod bushing and/or piston set with pin.
SEM849EB
SEM536G
DRIVE PLATE RUNOUTNBEM0027S11Runout (Total indicator reading):
Less than 0.15 mm (0.0059 in)
CAUTION:
IThe signal plate is built into the drive plate assembly. Be
careful not to damage the signal plate, especially the
teeth.
ICheck the drive plate and signal plate for deformation or
cracks.
IKeep any magnetized objects away from the signal plate.
IDo not allow any magnetic materials to contact the signal
plate teeth.
CYLINDER BLOCK
Inspection (Cont'd)
EM-70
Page 1714 of 2395
SEM838F
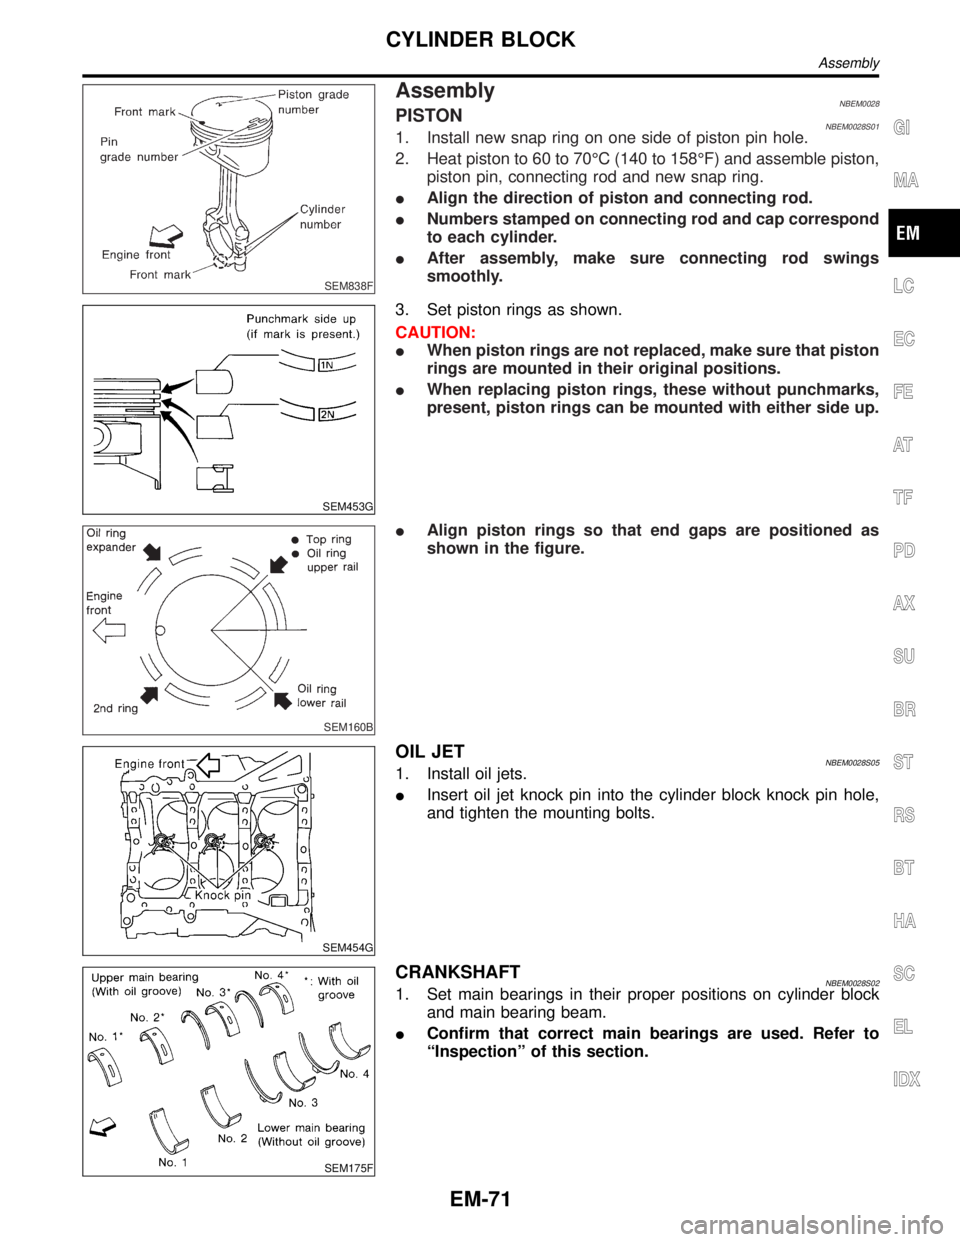
AssemblyNBEM0028PISTONNBEM0028S011. Install new snap ring on one side of piston pin hole.
2. Heat piston to 60 to 70ÉC (140 to 158ÉF) and assemble piston,
piston pin, connecting rod and new snap ring.
IAlign the direction of piston and connecting rod.
INumbers stamped on connecting rod and cap correspond
to each cylinder.
IAfter assembly, make sure connecting rod swings
smoothly.
SEM453G
3. Set piston rings as shown.
CAUTION:
IWhen piston rings are not replaced, make sure that piston
rings are mounted in their original positions.
IWhen replacing piston rings, these without punchmarks,
present, piston rings can be mounted with either side up.
SEM160B
IAlign piston rings so that end gaps are positioned as
shown in the figure.
SEM454G
OIL JETNBEM0028S051. Install oil jets.
IInsert oil jet knock pin into the cylinder block knock pin hole,
and tighten the mounting bolts.
SEM175F
CRANKSHAFTNBEM0028S021. Set main bearings in their proper positions on cylinder block
and main bearing beam.
IConfirm that correct main bearings are used. Refer to
ªInspectionº of this section.
GI
MA
LC
EC
FE
AT
TF
PD
AX
SU
BR
ST
RS
BT
HA
SC
EL
IDX
CYLINDER BLOCK
Assembly
EM-71