Page 264 of 2395
3 CHECK PNP SWITCH CIRCUIT (Without CONSULT-II)
Without CONSULT-II
1. Turn ignition switch to ªONº position.
(Do not start engine.)
2. Check voltage between TCM terminals 26, 27, 34, 35, 36 and ground while moving selector lever through each posi-
tion.
MTBL0205
SAT517J
Does battery voltage exist (B) or non-existent (0)?
Ye s©GO TO 5.
No©GO TO 4.
4 DETECT MALFUNCTIONING ITEM
Check the following items:
IPNP switch
Refer to ªComponent Inspectionº, AT-263.
IHarness for short or open between ignition switch and PNP switch (Main harness)
IHarness for short or open between PNP switch and TCM (Main harness)
OK or NG
OK©GO TO 5.
NG©Repair or replace damaged parts.
GI
MA
EM
LC
EC
FE
TF
PD
AX
SU
BR
ST
RS
BT
HA
SC
EL
IDX
TROUBLE DIAGNOSES FOR SYMPTOMS
21. TCM Self-diagnosis Does Not Activate (PNP, Overdrive Control and Throttle Position Switches Circuit Checks) (Cont'd)
AT-259
Page 265 of 2395

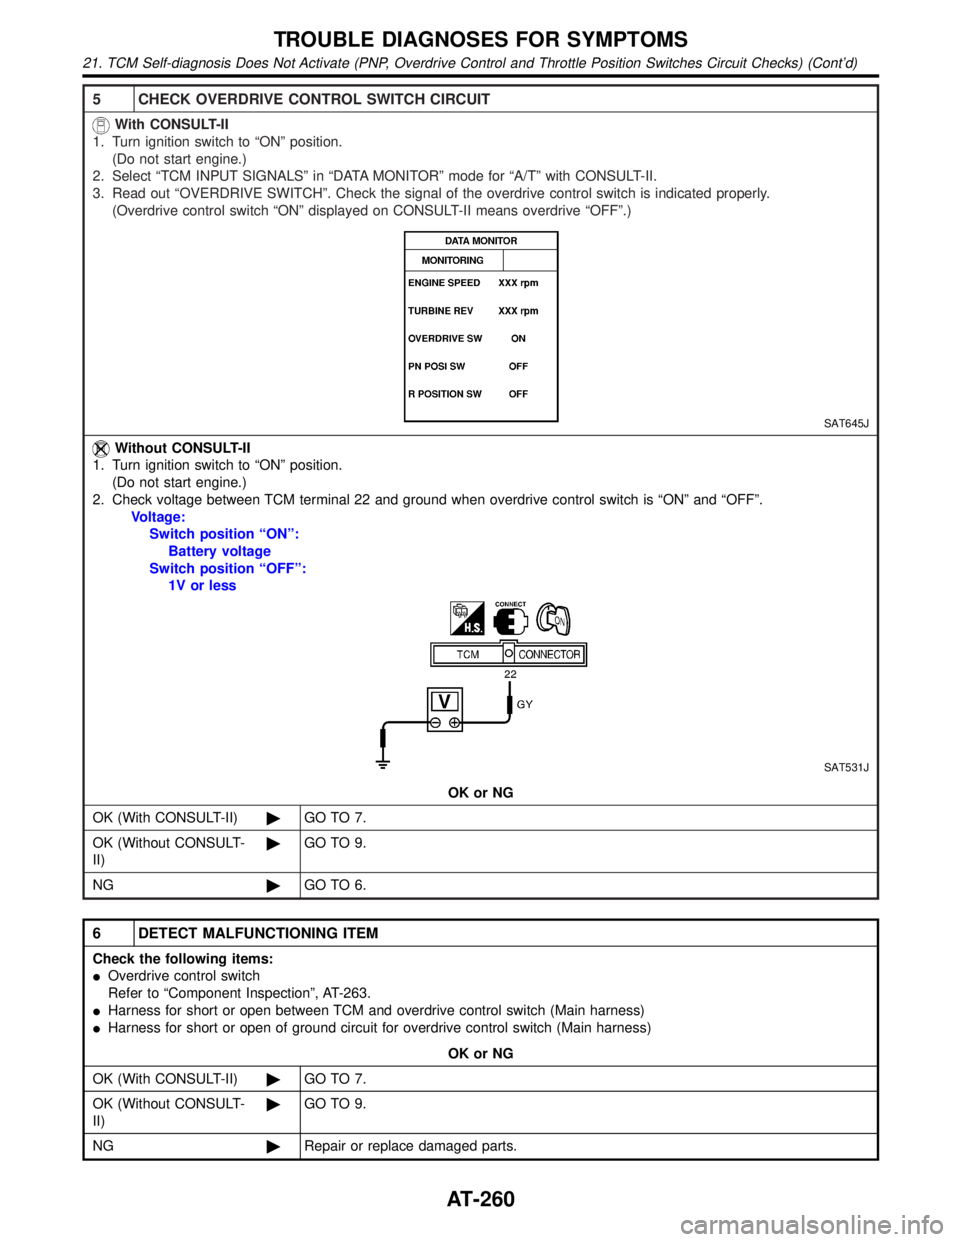
5 CHECK OVERDRIVE CONTROL SWITCH CIRCUIT
With CONSULT-II
1. Turn ignition switch to ªONº position.
(Do not start engine.)
2. Select ªTCM INPUT SIGNALSº in ªDATA MONITORº mode for ªA/Tº with CONSULT-II.
3. Read out ªOVERDRIVE SWITCHº. Check the signal of the overdrive control switch is indicated properly.
(Overdrive control switch ªONº displayed on CONSULT-II means overdrive ªOFFº.)
SAT645J
Without CONSULT-II
1. Turn ignition switch to ªONº position.
(Do not start engine.)
2. Check voltage between TCM terminal 22 and ground when overdrive control switch is ªONº and ªOFFº.
Voltage:
Switch position ªONº:
Battery voltage
Switch position ªOFFº:
1V or less
SAT531J
OK or NG
OK (With CONSULT-II)©GO TO 7.
OK (Without CONSULT-
II)©GO TO 9.
NG©GO TO 6.
6 DETECT MALFUNCTIONING ITEM
Check the following items:
IOverdrive control switch
Refer to ªComponent Inspectionº, AT-263.
IHarness for short or open between TCM and overdrive control switch (Main harness)
IHarness for short or open of ground circuit for overdrive control switch (Main harness)
OK or NG
OK (With CONSULT-II)©GO TO 7.
OK (Without CONSULT-
II)©GO TO 9.
NG©Repair or replace damaged parts.
TROUBLE DIAGNOSES FOR SYMPTOMS
21. TCM Self-diagnosis Does Not Activate (PNP, Overdrive Control and Throttle Position Switches Circuit Checks) (Cont'd)
AT-260
Page 273 of 2395
![INFINITI QX4 2001 Factory Service Manual 4 DETECT MALFUNCTIONING ITEM
Check the following items:
1. Harness for short or open between ignition switch and A/T device harness terminal 5
2. 7.5A fuse [No. 11, located in the fuse block (J/B)]
3. INFINITI QX4 2001 Factory Service Manual 4 DETECT MALFUNCTIONING ITEM
Check the following items:
1. Harness for short or open between ignition switch and A/T device harness terminal 5
2. 7.5A fuse [No. 11, located in the fuse block (J/B)]
3.](/manual-img/42/57027/w960_57027-272.png)
4 DETECT MALFUNCTIONING ITEM
Check the following items:
1. Harness for short or open between ignition switch and A/T device harness terminal 5
2. 7.5A fuse [No. 11, located in the fuse block (J/B)]
3. Ignition switch (Refer to EL-9, ªSchematicº.)
OK or NG
OK©GO TO 5.
NG©Repair or replace damaged parts.
5 CHECK INPUT SIGNAL A/T DEVICE
Turn ignition switch to OFF position.
ICheck voltage between A/T device harness terminal 7 and ground.
SAT179K
OK or NG
OK©GO TO 7.
NG©GO TO 6.
6 DETECT MALFUNCTIONING ITEM
Check the following items:
1. Harness for short or open between battery and stop lamp switch harness connector 1
2. Harness for short or open between stop lamp switch harness connector 2 and A/T device harness connector 7
3. Diode
4. 10A fuse [No. 14, located in the fuse block (J/B)]
5. Stop lamp switch
a. Check continuity between terminals 1 and 2.
SAT146K
Check stop lamp switch after adjusting brake pedal Ð refer to BR-14, ªAdjustmentº.
OK or NG
OK©GO TO 7.
NG©Repair or replace damaged parts.
A/T SHIFT LOCK SYSTEM
Diagnostic Procedure (Cont'd)
AT-268
Page 275 of 2395
10 CHECK SHIFT LOCK SOLENOID
ICheck operation by applying battery voltage shift lock solenoid harness terminals 1 and 3.
SAT762J
OK or NG
OK©GO TO 11.
NG©Replace shift lock solenoid.
11 CHECK SHIFT LOCK OPERATION
1. Reconnect shift lock harness connector.
2. Turn ignition switch from OFF to ON position. (Do not start engine.)
3. Recheck shift lock operation.
OK or NG
OK©INSPECTION END
NG©GO TO 12.
12 CHECK A/T DEVICE INSPECTION
1. Perform A/T device input/output signal inspection test.
2. If NG, recheck harness connector connection.
OK or NG
OK©INSPECTION END
NG©Repair or replace damaged parts.
A/T SHIFT LOCK SYSTEM
Diagnostic Procedure (Cont'd)
AT-270
Page 283 of 2395

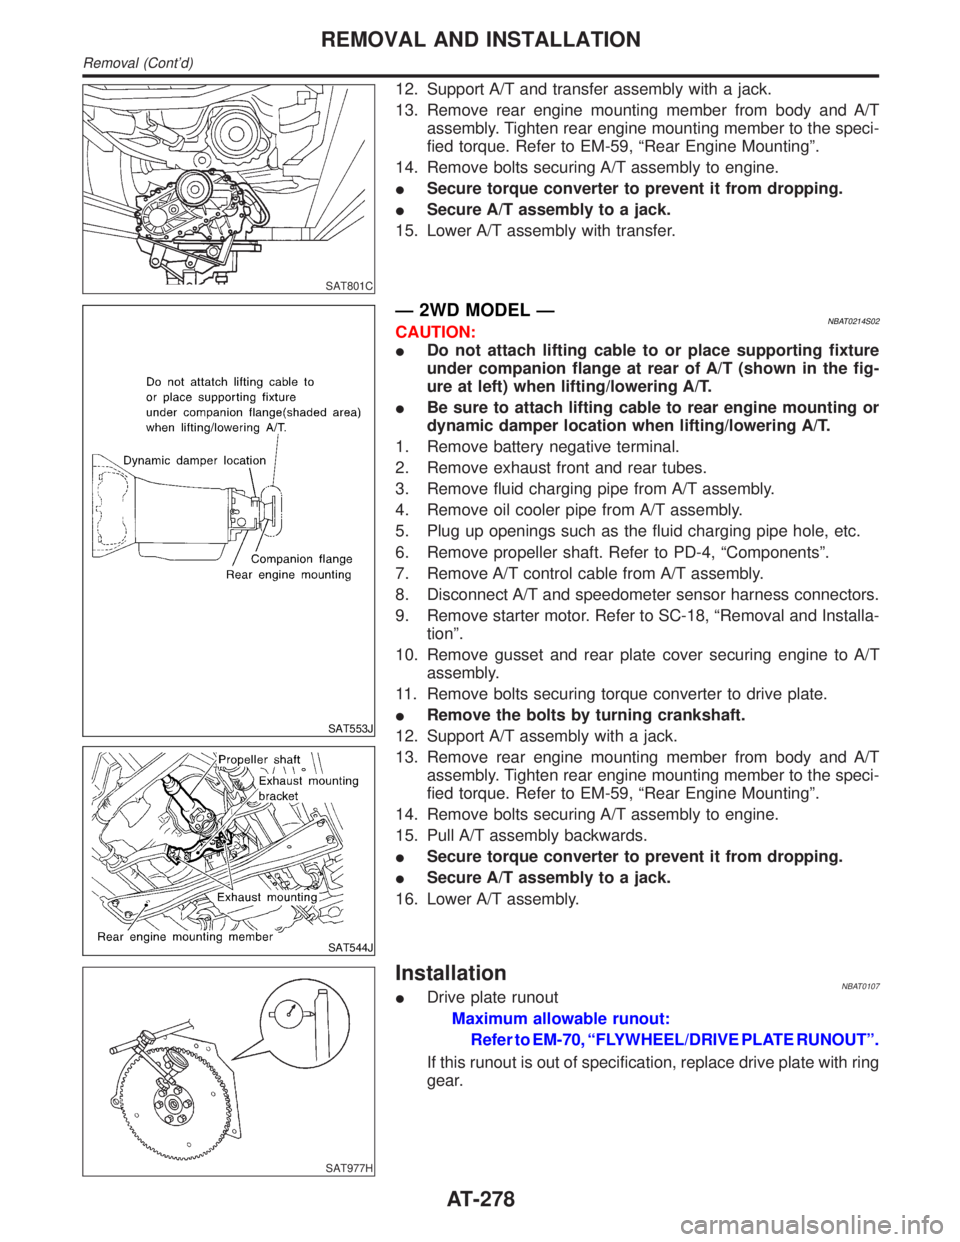
SAT801C
12. Support A/T and transfer assembly with a jack.
13. Remove rear engine mounting member from body and A/T
assembly. Tighten rear engine mounting member to the speci-
fied torque. Refer to EM-59, ªRear Engine Mountingº.
14. Remove bolts securing A/T assembly to engine.
ISecure torque converter to prevent it from dropping.
ISecure A/T assembly to a jack.
15. Lower A/T assembly with transfer.
SAT553J
SAT544J
Ð 2WD MODEL ÐNBAT0214S02CAUTION:
IDo not attach lifting cable to or place supporting fixture
under companion flange at rear of A/T (shown in the fig-
ure at left) when lifting/lowering A/T.
IBe sure to attach lifting cable to rear engine mounting or
dynamic damper location when lifting/lowering A/T.
1. Remove battery negative terminal.
2. Remove exhaust front and rear tubes.
3. Remove fluid charging pipe from A/T assembly.
4. Remove oil cooler pipe from A/T assembly.
5. Plug up openings such as the fluid charging pipe hole, etc.
6. Remove propeller shaft. Refer to PD-4, ªComponentsº.
7. Remove A/T control cable from A/T assembly.
8. Disconnect A/T and speedometer sensor harness connectors.
9. Remove starter motor. Refer to SC-18, ªRemoval and Installa-
tionº.
10. Remove gusset and rear plate cover securing engine to A/T
assembly.
11. Remove bolts securing torque converter to drive plate.
IRemove the bolts by turning crankshaft.
12. Support A/T assembly with a jack.
13. Remove rear engine mounting member from body and A/T
assembly. Tighten rear engine mounting member to the speci-
fied torque. Refer to EM-59, ªRear Engine Mountingº.
14. Remove bolts securing A/T assembly to engine.
15. Pull A/T assembly backwards.
ISecure torque converter to prevent it from dropping.
ISecure A/T assembly to a jack.
16. Lower A/T assembly.
SAT977H
InstallationNBAT0107IDrive plate runout
Maximum allowable runout:
Refer to EM-70, ªFLYWHEEL/DRIVE PLATE RUNOUTº.
If this runout is out of specification, replace drive plate with ring
gear.
REMOVAL AND INSTALLATION
Removal (Cont'd)
AT-278
Page 449 of 2395

5 CHECK SOLENOID VALVE POWER SUPPLY CIRCUIT
1. Disconnect ABS actuator and electric unit connector.
2. Check voltage between ABS actuator and electric unit connector E111 (body side) terminal 18 and ground.
SBR489E
Does battery voltage exist?
Ye s©Replace ABS actuator and electric unit.
No©Check the following.
If NG, repair harness or connectors.
IHarness connector E111
IHarness for open or short between ABS actuator and electric unit and fusible link
6 REPLACE FUSIBLE LINK
Replace fusible link.
Does the fusible link blow out when ignition switch is turned ON?
Ye s©GO TO 7.
No©INSPECTION END
7 CHECK SOLENOID VALVE RELAY POWER SUPPLY CIRCUIT FOR SHORT
1. Disconnect battery cable and ABS actuator and electric unit connector.
2. Check continuity between ABS actuator and electric unit connector E111 (body side) terminal 18 and ground.
SBR490E
Continuity should not exist.
Does continuity exist?
Ye s©Check the following.
If NG, repair harness or connector.
IHarness connector E111
IHarness for open or short between ABS actuator and electric unit and fusible link
No©Replace ABS actuator and electric unit.
TROUBLE DIAGNOSES FOR SELF-DIAGNOSTIC ITEMSABS
ABS Actuator Solenoid Valve or Solenoid Valve Relay (Cont'd)
BR-60
Page 451 of 2395

5 CHECK MOTOR RELAY POWER SUPPLY CIRCUIT
1. Disconnect ABS actuator and electric unit connector.
2. Check voltage between ABS actuator and electric unit connector E111 (body side) terminal 17 and ground.
SBR492E
Does battery voltage exist?
Ye s©Replace ABS actuator and electric unit.
No©Check the following.
If NG, repair harness or connector.
IHarness connector E111
IHarness for open or short between ABS actuator and electric unit and fusible link
6 REPLACE FUSIBLE LINK
Replace fusible link.
Does the fusible link blow out when ignition switch is turned ON?
Ye s©GO TO 7.
No©INSPECTION END
7 CHECK ABS ACTUATOR MOTOR POWER SUPPLY CIRCUIT FOR SHORT
1. Disconnect battery cable and ABS actuator and electric unit connector.
2. Check continuity between ABS actuator and electric unit connector E111 (body side) terminal 17 and ground.
SBR493E
Continuity should not exist.
Does continuity exist?
Ye s©Check the following.
If NG, repair harness or connector.
IHarness connector E111
IHarness for open or short between ABS actuator and electric unit and fusible link
No©Replace ABS actuator and electric unit.
TROUBLE DIAGNOSES FOR SELF-DIAGNOSTIC ITEMSABS
Motor Relay or Motor (Cont'd)
BR-62
Page 453 of 2395

5 CHECK ABS ACTUATOR AND ELECTRIC UNIT POWER SUPPLY CIRCUIT
1. Disconnect ABS actuator and electric unit connector.
2. Check voltage between ABS actuator and electric unit connector E111 (body side) terminal 15 and ground.
SBR495E
Does battery voltage exist when ignition switch is turned ON?
Ye s©Replace ABS actuator and electric unit.
No©Check the following.
If NG, repair harness or connector.
IHarness connector E111
IHarness for open or short between ABS actuator and electric unit and fuse
6 REPLACE FUSE
Replace fuse.
Does the fuse blow out when ignition switch is turned ON?
Ye s©GO TO 7.
No©INSPECTION END
7 CHECK ABS ACTUATOR AND ELECTRIC UNIT POWER SUPPLY CIRCUIT FOR SHORT
1. Disconnect battery cable and ABS actuator and electric unit connector.
2. Check continuity between ABS actuator and electric unit connector E111 (body side) terminal 15 and ground.
SBR496E
Continuity should not exist.
Does continuity exist?
Ye s©Check the following.
If NG, repair harness or connector.
IHarness connector E111
IHarness for open or short between ABS actuator and electric unit and fuse
No©Replace ABS actuator and electric unit.
TROUBLE DIAGNOSES FOR SELF-DIAGNOSTIC ITEMSABS
Low Voltage (Cont'd)
BR-64