Page 2297 of 2395
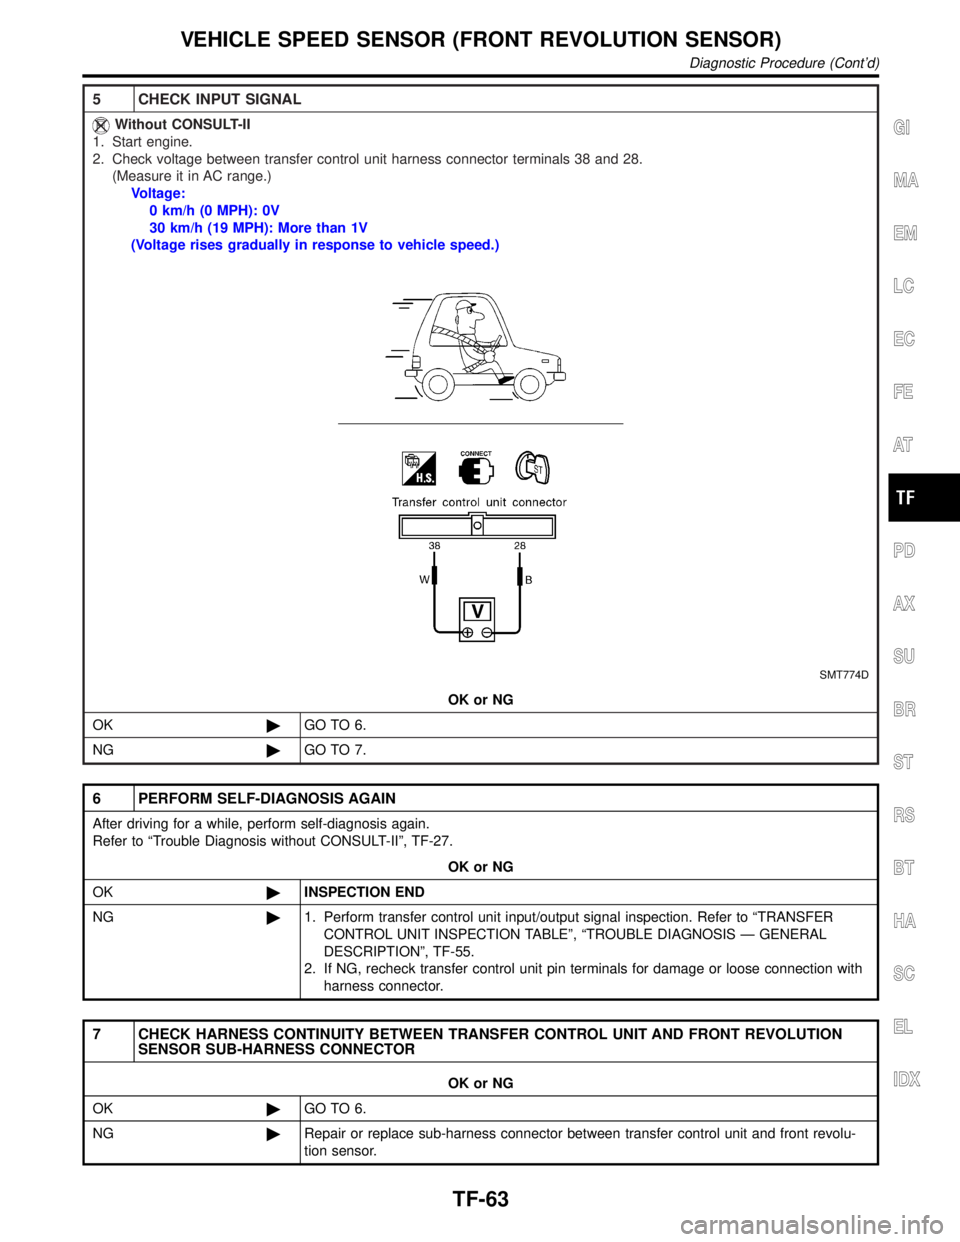
4 CHECK INPUT SIGNAL
With CONSULT-II
1. Start engine.
2. Select ªECU INPUT SIGNALSº in Data Monitor.
3. Read out the value of ªVEHICLE SPEED SENSOR (FRONT)º while driving.
SMT773D
SMT974D
4. Check if the value changes according to accelerating and decelerating the vehicle.
OK or NG
OK©GO TO 6.
NG©GO TO 7.
VEHICLE SPEED SENSOR (FRONT REVOLUTION SENSOR)
Diagnostic Procedure (Cont'd)
TF-62
Page 2298 of 2395

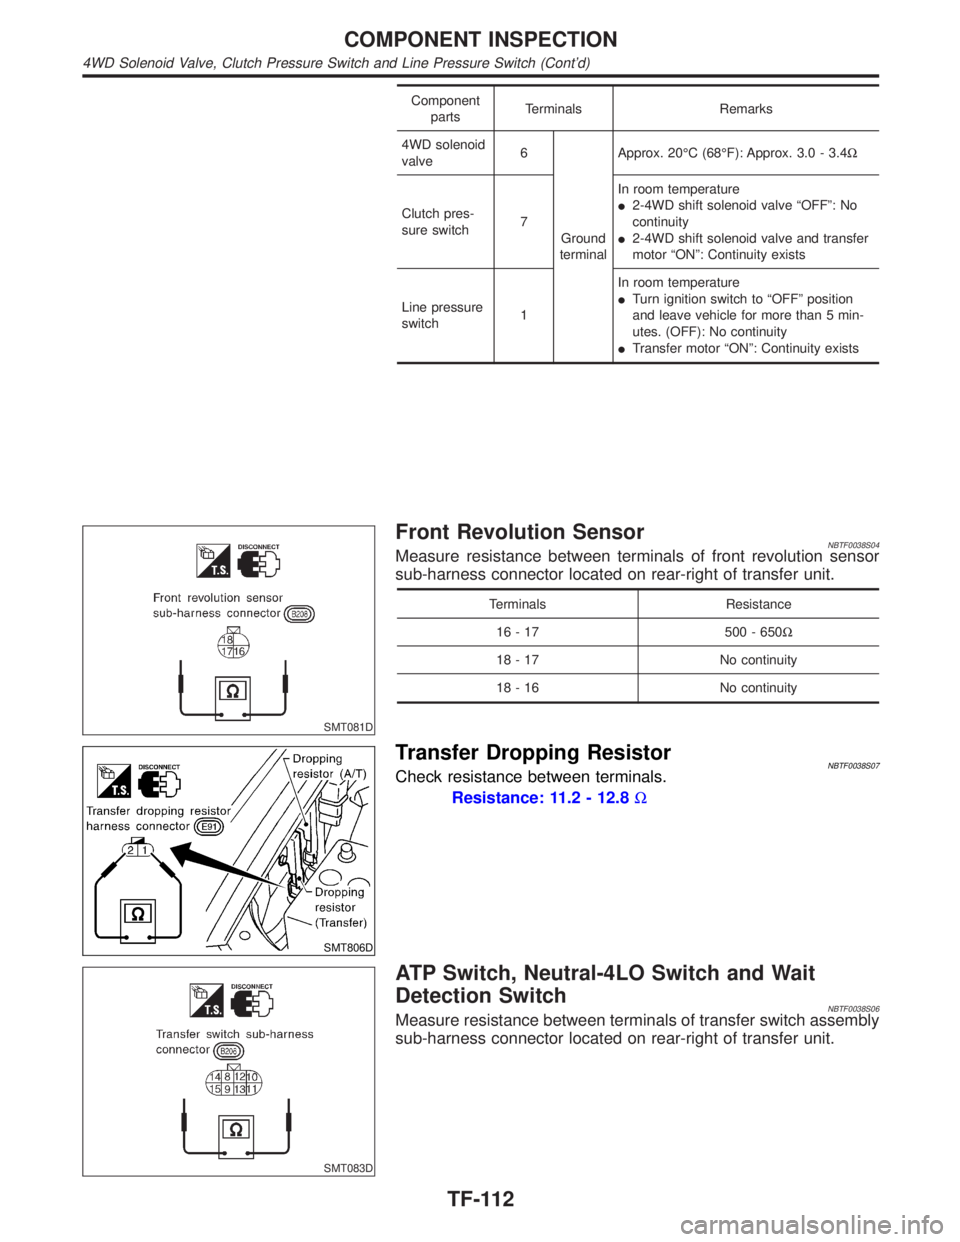
5 CHECK INPUT SIGNAL
Without CONSULT-II
1. Start engine.
2. Check voltage between transfer control unit harness connector terminals 38 and 28.
(Measure it in AC range.)
Voltage:
0 km/h (0 MPH): 0V
30 km/h (19 MPH): More than 1V
(Voltage rises gradually in response to vehicle speed.)
SMT774D
OK or NG
OK©GO TO 6.
NG©GO TO 7.
6 PERFORM SELF-DIAGNOSIS AGAIN
After driving for a while, perform self-diagnosis again.
Refer to ªTrouble Diagnosis without CONSULT-IIº, TF-27.
OK or NG
OK©INSPECTION END
NG©1. Perform transfer control unit input/output signal inspection. Refer to ªTRANSFER
CONTROL UNIT INSPECTION TABLEº, ªTROUBLE DIAGNOSIS Ð GENERAL
DESCRIPTIONº, TF-55.
2. If NG, recheck transfer control unit pin terminals for damage or loose connection with
harness connector.
7 CHECK HARNESS CONTINUITY BETWEEN TRANSFER CONTROL UNIT AND FRONT REVOLUTION
SENSOR SUB-HARNESS CONNECTOR
OK or NG
OK©GO TO 6.
NG©Repair or replace sub-harness connector between transfer control unit and front revolu-
tion sensor.
GI
MA
EM
LC
EC
FE
AT
PD
AX
SU
BR
ST
RS
BT
HA
SC
EL
IDX
VEHICLE SPEED SENSOR (FRONT REVOLUTION SENSOR)
Diagnostic Procedure (Cont'd)
TF-63
Page 2347 of 2395

Component
partsTerminals Remarks
4WD solenoid
valve6
Ground
terminalApprox. 20ÉC (68ÉF): Approx. 3.0 - 3.4W
Clutch pres-
sure switch7In room temperature
I2-4WD shift solenoid valve ªOFFº: No
continuity
I2-4WD shift solenoid valve and transfer
motor ªONº: Continuity exists
Line pressure
switch1In room temperature
ITurn ignition switch to ªOFFº position
and leave vehicle for more than 5 min-
utes. (OFF): No continuity
ITransfer motor ªONº: Continuity exists
SMT081D
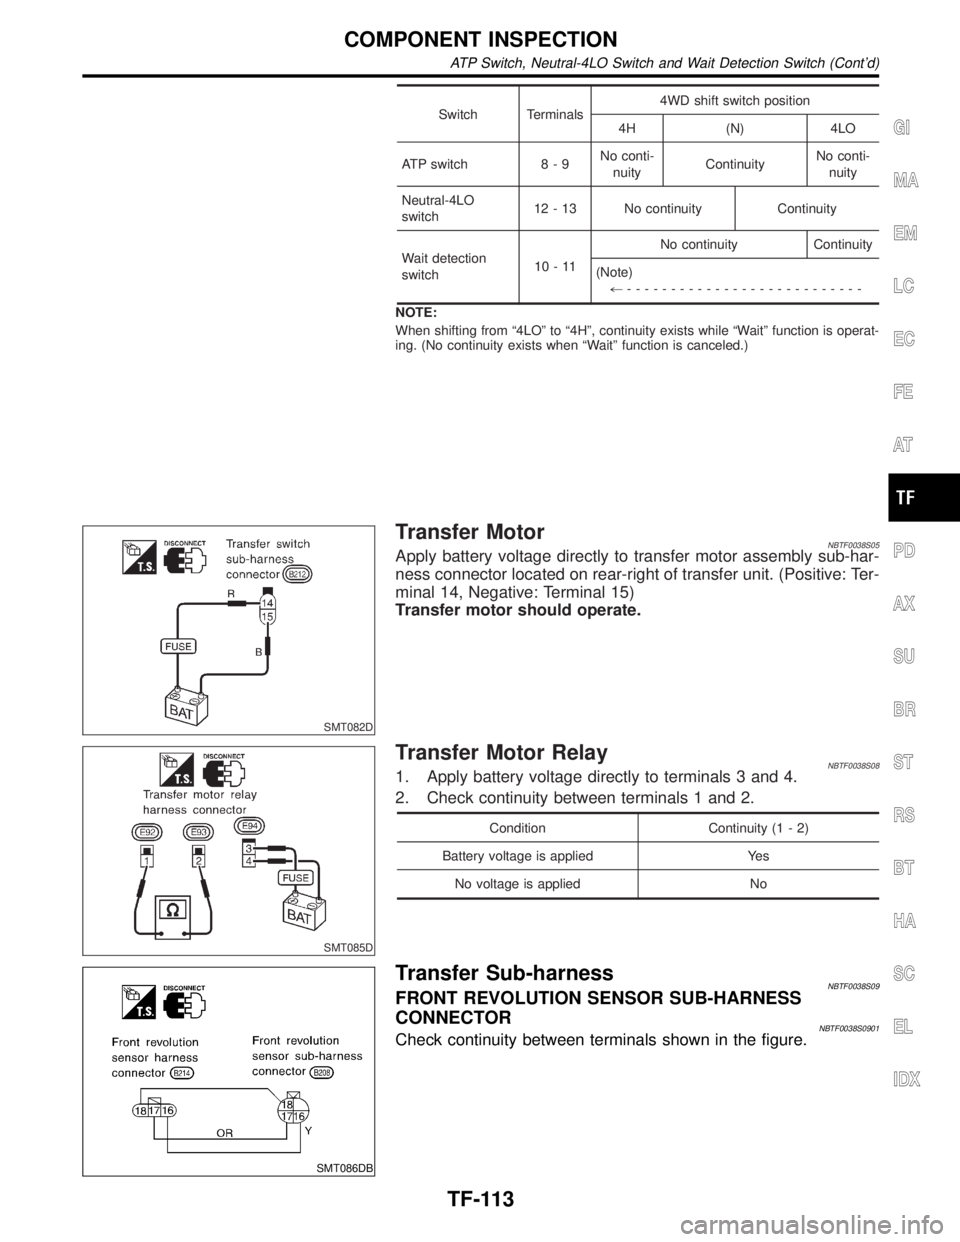
Front Revolution SensorNBTF0038S04Measure resistance between terminals of front revolution sensor
sub-harness connector located on rear-right of transfer unit.
Terminals Resistance
16 - 17 500 - 650W
18 - 17 No continuity
18 - 16 No continuity
SMT806D
Transfer Dropping ResistorNBTF0038S07Check resistance between terminals.
Resistance: 11.2 - 12.8W
SMT083D
ATP Switch, Neutral-4LO Switch and Wait
Detection Switch
NBTF0038S06Measure resistance between terminals of transfer switch assembly
sub-harness connector located on rear-right of transfer unit.
COMPONENT INSPECTION
4WD Solenoid Valve, Clutch Pressure Switch and Line Pressure Switch (Cont'd)
TF-112
Page 2348 of 2395

Switch Terminals4WD shift switch position
4H (N) 4LO
ATP switch 8 - 9No conti-
nuityContinuityNo conti-
nuity
Neutral-4LO
switch12 - 13 No continuity Continuity
Wait detection
switch10-11No continuity Continuity
(Note)
+---------------------------
NOTE:
When shifting from ª4LOº to ª4Hº, continuity exists while ªWaitº function is operat-
ing. (No continuity exists when ªWaitº function is canceled.)
SMT082D
Transfer MotorNBTF0038S05Apply battery voltage directly to transfer motor assembly sub-har-
ness connector located on rear-right of transfer unit. (Positive: Ter-
minal 14, Negative: Terminal 15)
Transfer motor should operate.
SMT085D
Transfer Motor RelayNBTF0038S081. Apply battery voltage directly to terminals 3 and 4.
2. Check continuity between terminals 1 and 2.
Condition Continuity (1 - 2)
Battery voltage is applied Yes
No voltage is applied No
SMT086DB
Transfer Sub-harnessNBTF0038S09FRONT REVOLUTION SENSOR SUB-HARNESS
CONNECTOR
NBTF0038S0901Check continuity between terminals shown in the figure.
GI
MA
EM
LC
EC
FE
AT
PD
AX
SU
BR
ST
RS
BT
HA
SC
EL
IDX
COMPONENT INSPECTION
ATP Switch, Neutral-4LO Switch and Wait Detection Switch (Cont'd)
TF-113
Page 2354 of 2395

SMT897C
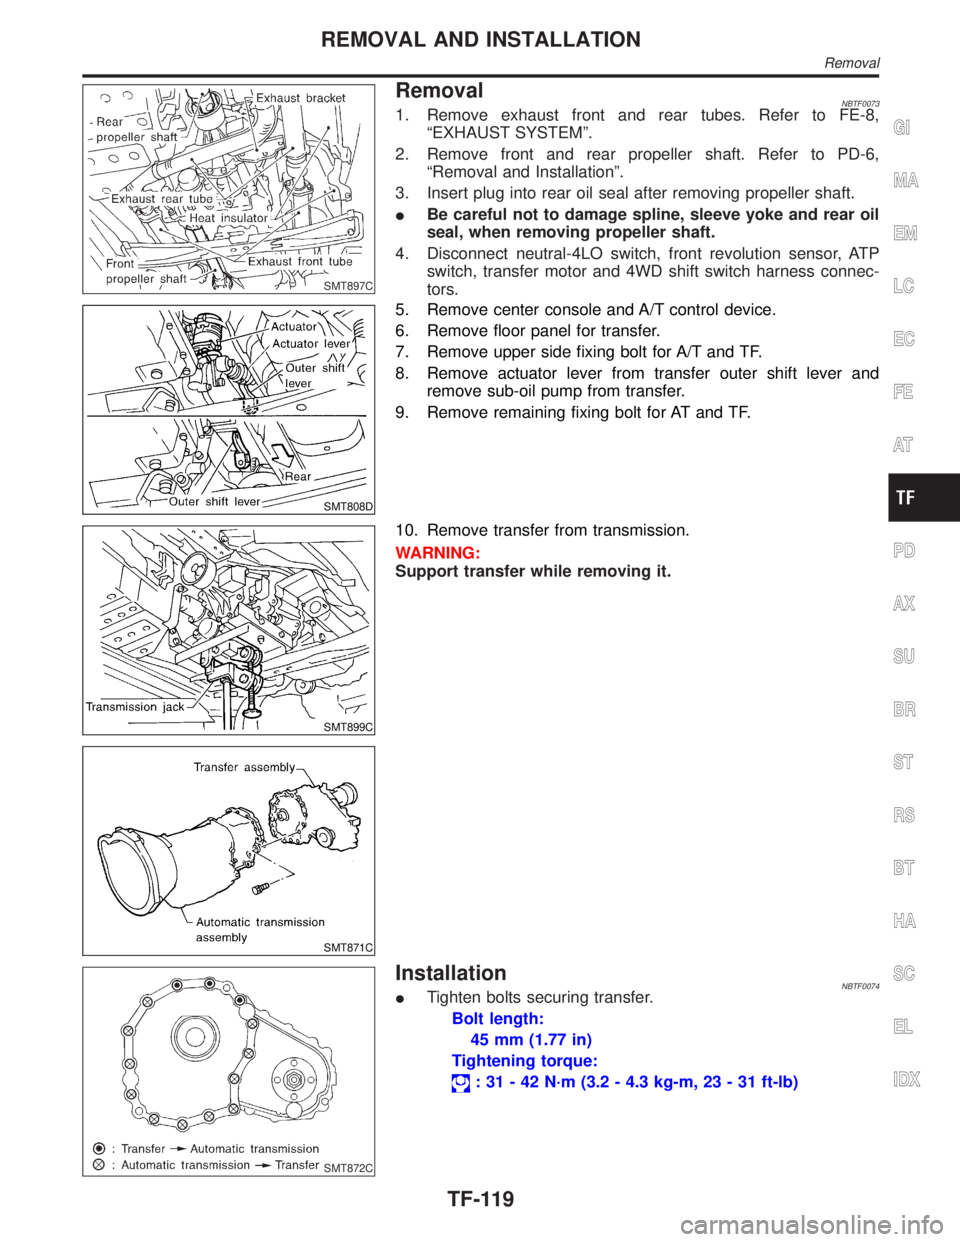
RemovalNBTF00731. Remove exhaust front and rear tubes. Refer to FE-8,
ªEXHAUST SYSTEMº.
2. Remove front and rear propeller shaft. Refer to PD-6,
ªRemoval and Installationº.
3. Insert plug into rear oil seal after removing propeller shaft.
IBe careful not to damage spline, sleeve yoke and rear oil
seal, when removing propeller shaft.
4. Disconnect neutral-4LO switch, front revolution sensor, ATP
switch, transfer motor and 4WD shift switch harness connec-
tors.
SMT808D
5. Remove center console and A/T control device.
6. Remove floor panel for transfer.
7. Remove upper side fixing bolt for A/T and TF.
8. Remove actuator lever from transfer outer shift lever and
remove sub-oil pump from transfer.
9. Remove remaining fixing bolt for AT and TF.
SMT899C
SMT871C
10. Remove transfer from transmission.
WARNING:
Support transfer while removing it.
SMT872C
InstallationNBTF0074ITighten bolts securing transfer.
Bolt length:
45 mm (1.77 in)
Tightening torque:
: 31 - 42 N´m (3.2 - 4.3 kg-m, 23 - 31 ft-lb)
GI
MA
EM
LC
EC
FE
AT
PD
AX
SU
BR
ST
RS
BT
HA
SC
EL
IDX
REMOVAL AND INSTALLATION
Removal
TF-119
Page 2356 of 2395

Transfer ComponentsNBTF0076
SMT810D
1. Oil seal
2. Transfer cover
3. Snap ring
4. Washer
5. Snap ring
6. Main gear bearing
7. Front case
8. Check plug
9. Check spring
10. Check ball
11. Internal gear
12. Snap ring
13. Bearing race
14. Thrust needle bearing
15. Planetary carrier
16. Thrust needle bearing
17. Sun gear18. L-H sleeve
19. 2-4 sleeve
20. Radial needle bearing
21. Front revolution sensor
22. Roll pin
23. L-H fork
24. 2-4 fork
25. Shift fork spring
26. Fork guide
27. Roll pin
28. Shift rod
29. Self-lock nut
30. Companion flange
31. Oil seal
32. Drain plug
33. Wait detection switch
34. Needle bearing35. Mainshaft
36. Drive chain
37. Clutch drum
38. Clutch hub
39. Snap ring
40. Driven plate
41. Drive plate
42. Retaining plate
43. Return spring assembly
44. Press flange
45. Washer
46. Thrust needle bearing
47. Snap ring
48. Seal ring
49. Front bearing
50. Front drive shaft
51. Rear bearing
GI
MA
EM
LC
EC
FE
AT
PD
AX
SU
BR
ST
RS
BT
HA
SC
EL
IDX
OVERHAUL
Transfer Components
TF-121