Page 241 of 2395

9. A/T Does Not Shift: D1®D2Or Does Not
Kickdown: D
4®D2=NBAT0081SYMPTOM:
A/T does not shift from D
1to D2at the specified speed.
A/T does not shift from D
4to D2when depressing accelerator
pedal fully at the specified speed.
1 CHECK SYMPTOM
Are ª7. Vehicle Does Not Creep Forward In ªDº, ª2º Or ª1º Positionº and ª8. Vehicle Cannot Be Started From D1º OK?
YesorNo
Ye s©GO TO 2.
No©Go to ª7. Vehicle Does Not Creep Forward In ªDº, ª2º Or ª1º Positionº and ª8. Vehicle
Cannot Be Started From D
1º, AT-230, 233.
2 CHECK PNP SWITCH CIRCUIT
With CONSULT-II
Does ªTCM INPUT SIGNALSº in Data Monitor show damage to PNP switch circuit?
Without CONSULT-II
Does self-diagnosis show damage to PNP switch circuit?
SAT367J
YesorNo
Ye s©Check PNP switch circuit. Refer to ªDTC P0705º, AT-99.
No©GO TO 3.
3 CHECK VEHICLE SPEED SENSOR´A/T AND VEHICLE SPEED SENSOR´MTR CIRCUIT
Check vehicle speed sensor´A/T (revolution sensor) and vehicle speed sensor´MTR circuit. Refer to ªDTC P0720 and
VEHICLE SPEED SENSOR´MTRº, AT-111, 197.
OK or NG
OK©GO TO 4.
NG©Repair or replace vehicle speed sensor´A/T (revolution sensor) and vehicle speed
sensor´MTR circuits.
TROUBLE DIAGNOSES FOR SYMPTOMS
9. A/T Does Not Shift: D1®D2Or Does Not Kickdown: D4®D2
AT-236
Page 247 of 2395
11. A/T Does Not Shift: D3®D4=NBAT0083SYMPTOM:
IA/T does not shift from D
3to D4at the specified speed.
IA/T must be warm before D
3to D4shift will occur.
1 CHECK SYMPTOM
Are ª7. Vehicle Does Not Creep Forward In ªDº, ª2º Or ª1º Positionº and ª8. Vehicle Cannot Be Started From D1º OK?
YesorNo
Ye s©GO TO 2.
No©Go to ª7. Vehicle Does Not Creep Forward In ªDº, ª2º Or ª1º Positionº and ª8. Vehicle
Cannot Be Started From D
1º, AT-230, 233.
2 CHECK SELF-DIAGNOSTIC RESULTS
With CONSULT-II
Does self-diagnosis, after cruise test, show damage to any of the following circuits?
IInhibitor switch
IOverdrive control switch
IA/T fluid temperature sensor
IRevolution sensor
IShift solenoid valve A or B
IVehicle speed sensor
SAT580I
YesorNo
Ye s©Check damaged circuit. Refer to ªDTC P0705, P0710, P0720, P0750, P0755 or VHCL
SPEED SEN´MTRº, AT-99, 105, 111, 168, 172 or 197.
No©GO TO 3.
TROUBLE DIAGNOSES FOR SYMPTOMS
11. A/T Does Not Shift: D3®D4
AT-242
Page 257 of 2395
16. Vehicle Does Not Start From D1NBAT0088SYMPTOM:
Vehicle does not start from D
1on Cruise test Ð Part 2.
1 CHECK SELF-DIAGNOSTIC RESULTS
Does self-diagnosis show damage to vehicle speed sensor´A/T (revolution sensor), shift solenoid valve A, B or vehicle
speed sensor´MTR after cruise test?
SAT686I
YesorNo
Ye s©Check damaged circuit. Refer to ªDTC P0720, P0750, P0755 or VHCL SPEED
SEN´MTRº, AT-111, 176, 172 or 197.
No©GO TO 2.
2 CHECK SYMPTOM
Check again.
OK or NG
OK©Go to ª8. Vehicle Cannot Be Started From D
1º, AT-233.
NG©1. Perform TCM input/output signal inspection.
2. If NG, recheck TCM pin terminals for damage or loose connection with harness con-
nector.
TROUBLE DIAGNOSES FOR SYMPTOMS
16. Vehicle Does Not Start From D1
AT-252
Page 279 of 2395

SAT360IA
Revolution Sensor ReplacementNBAT0210Ð 4WD MODEL ÐNBAT0210S011. Remove rear engine mounting member from side member
while supporting A/T with transfer case with jack. Tighten rear
engine mounting member to the specified torque. Refer to
EM-59, ªRear Engine Mountingº.
2. Lower A/T with transfer case as much as possible.
3. Remove revolution sensor from A/T.
4. Reinstall any part removed.
IAlways use new sealing parts.
SAT661I
Ð 2WD MODEL ÐNBAT0210S02IRemove revolution sensor from A/T.
IAlways use new sealing parts.
SAT136K
Turbine Revolution Sensor ReplacementNBAT02311. Remove A/T assembly, Refer to ªRemovalº, AT-277.
2. Remove turbine revolution sensor from A/T assembly upper
side.
3. Reinstall any part removed.
IAlways use new sealing parts.
SAT035E
Rear Oil Seal ReplacementNBAT0211Ð 4WD MODEL ÐNBAT0211S011. Remove transfer case from vehicle. Refer to TF-119, ªRemovalº.
2. Remove rear oil seal.
IDo not remove oil seal unless it is to be replaced.
3. Install rear oil seal.
IApply ATF before installing.
4. Reinstall any part removed.
ON-VEHICLE SERVICE
Revolution Sensor Replacement
AT-274
Page 280 of 2395

SAT544J
SAT546J
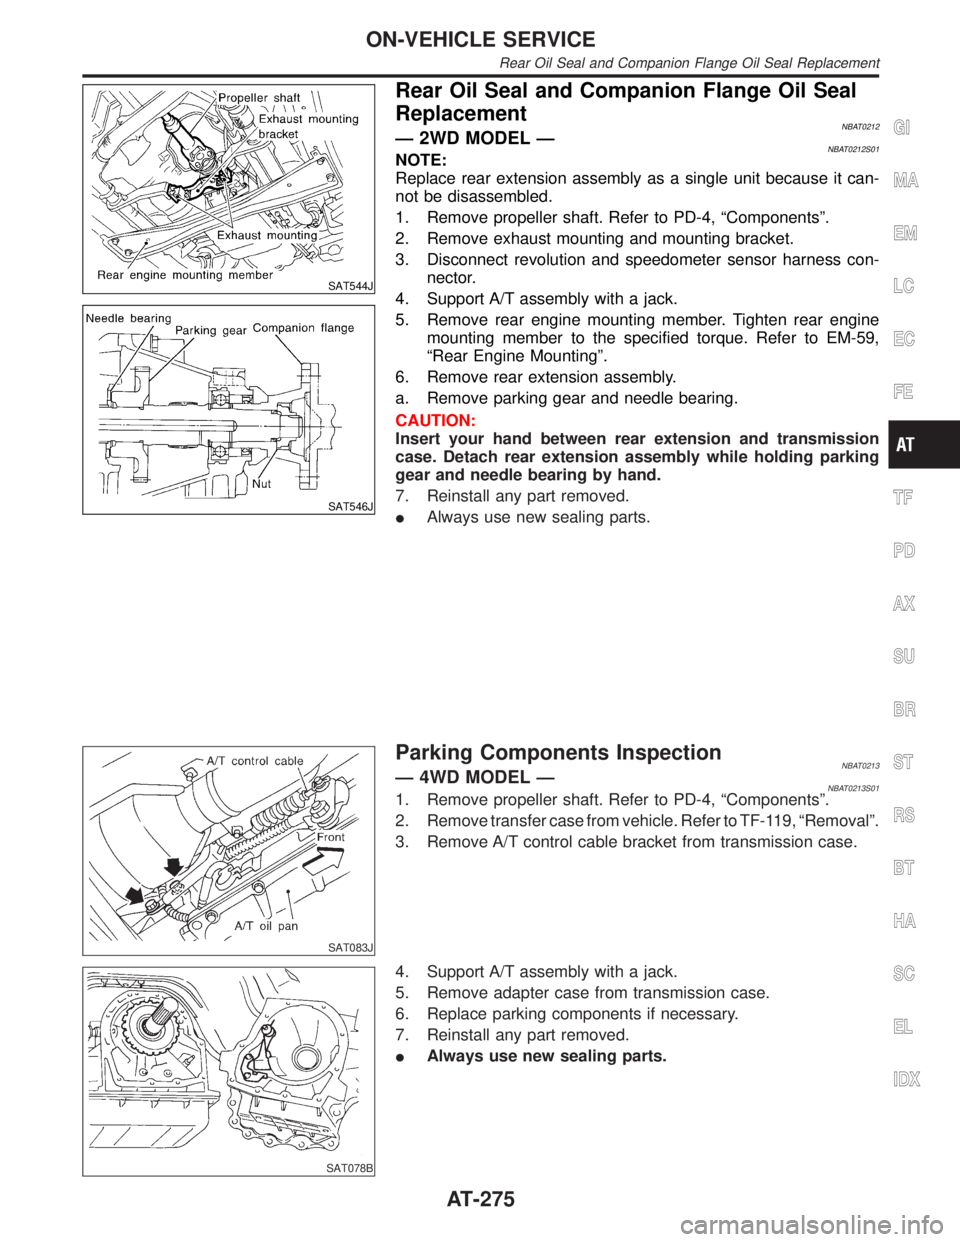
Rear Oil Seal and Companion Flange Oil Seal
Replacement
NBAT0212Ð 2WD MODEL ÐNBAT0212S01NOTE:
Replace rear extension assembly as a single unit because it can-
not be disassembled.
1. Remove propeller shaft. Refer to PD-4, ªComponentsº.
2. Remove exhaust mounting and mounting bracket.
3. Disconnect revolution and speedometer sensor harness con-
nector.
4. Support A/T assembly with a jack.
5. Remove rear engine mounting member. Tighten rear engine
mounting member to the specified torque. Refer to EM-59,
ªRear Engine Mountingº.
6. Remove rear extension assembly.
a. Remove parking gear and needle bearing.
CAUTION:
Insert your hand between rear extension and transmission
case. Detach rear extension assembly while holding parking
gear and needle bearing by hand.
7. Reinstall any part removed.
IAlways use new sealing parts.
SAT083J
Parking Components InspectionNBAT0213Ð 4WD MODEL ÐNBAT0213S011. Remove propeller shaft. Refer to PD-4, ªComponentsº.
2. Remove transfer case from vehicle. Refer to TF-119, ªRemovalº.
3. Remove A/T control cable bracket from transmission case.
SAT078B
4. Support A/T assembly with a jack.
5. Remove adapter case from transmission case.
6. Replace parking components if necessary.
7. Reinstall any part removed.
IAlways use new sealing parts.
GI
MA
EM
LC
EC
FE
TF
PD
AX
SU
BR
ST
RS
BT
HA
SC
EL
IDX
ON-VEHICLE SERVICE
Rear Oil Seal and Companion Flange Oil Seal Replacement
AT-275
Page 282 of 2395

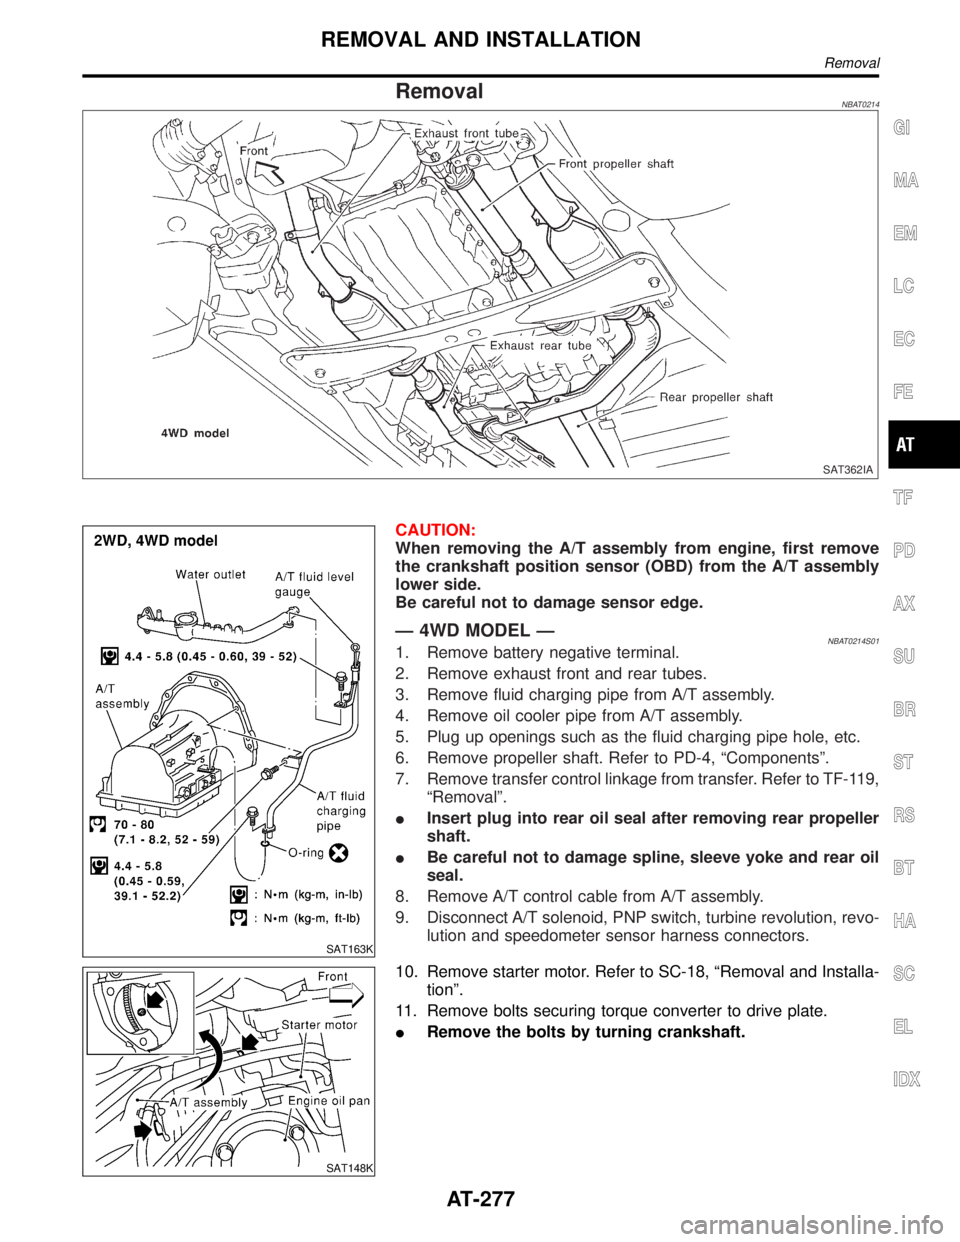
RemovalNBAT0214
SAT362IA
SAT163K
CAUTION:
When removing the A/T assembly from engine, first remove
the crankshaft position sensor (OBD) from the A/T assembly
lower side.
Be careful not to damage sensor edge.
Ð 4WD MODEL ÐNBAT0214S011. Remove battery negative terminal.
2. Remove exhaust front and rear tubes.
3. Remove fluid charging pipe from A/T assembly.
4. Remove oil cooler pipe from A/T assembly.
5. Plug up openings such as the fluid charging pipe hole, etc.
6. Remove propeller shaft. Refer to PD-4, ªComponentsº.
7. Remove transfer control linkage from transfer. Refer to TF-119,
ªRemovalº.
IInsert plug into rear oil seal after removing rear propeller
shaft.
IBe careful not to damage spline, sleeve yoke and rear oil
seal.
8. Remove A/T control cable from A/T assembly.
9. Disconnect A/T solenoid, PNP switch, turbine revolution, revo-
lution and speedometer sensor harness connectors.
SAT148K
10. Remove starter motor. Refer to SC-18, ªRemoval and Installa-
tionº.
11. Remove bolts securing torque converter to drive plate.
IRemove the bolts by turning crankshaft.
GI
MA
EM
LC
EC
FE
TF
PD
AX
SU
BR
ST
RS
BT
HA
SC
EL
IDX
REMOVAL AND INSTALLATION
Removal
AT-277
Page 291 of 2395
NBAT0111
SAT018B
1. Drain ATF through drain plug.
2. Remove turbine revolution sensor.
3. Remove torque converter by holding it firmly and turning while
pulling straight out.
SAT521G
4. Check torque converter one-way clutch.
a. Insert Tool into spline of one-way clutch inner race.
b. Hook bearing support unitized with one-way clutch outer race
with suitable wire.
c. Check that one-way clutch inner race rotates only clockwise
with Tool while holding bearing support with wire.
SAT021BB
5. Remove PNP switch from transmission case.
SAT754I
6. Remove oil pan.
IAlways place oil pan straight down so that foreign particles
inside will not move.
SAT522G
7. Place transmission into Tool with the control valve facing up.
DISASSEMBLY
AT-286
Page 297 of 2395
SAT755I
20. Remove adapter case (4WD model only).
a. Remove adapter case from transmission case.
b. Remove adapter case gasket from transmission case.
SAT756I
c. Remove oil seal from adapter case.
IBe careful not to scratch adapter case.
IDo not remove oil seal unless it is to be replaced.
SAT556J
21. Remove revolution sensor from rear extension or adapter
case.
a. Remove O-ring from revolution sensor.
SAT960A
22. Remove output shaft and parking gear (4WD model only).
a. Remove rear snap ring from output shaft.
SAT957A
b. Slowly push output shaft all the way forward.
IDo not use excessive force.
c. Remove snap ring from output shaft.
DISASSEMBLY
AT-292