Page 25 of 79
![FIAT SEICENTO 2001 1.G Clarion PU1573 Manual 24
le porter au niveau choisi de la manière sui-
vante:
1.Enfoncez la touche TA [9] pendant au
moins 2 secondes. Si le volume n’est pas
réglé dans les 7 secondes qui suivent, l’af-
ficheur reto](/manual-img/10/4724/w960_4724-24.png "FIAT SEICENTO 2001 1.G Clarion PU1573 Manual 24
le porter au niveau choisi de la manière sui-
vante:
1.Enfoncez la touche TA [9] pendant au
moins 2 secondes. Si le volume n’est pas
réglé dans les 7 secondes qui suivent, l’af-
ficheur reto")
24
le porter au niveau choisi de la manière sui-
vante:
1.Enfoncez la touche TA [9] pendant au
moins 2 secondes. Si le volume n’est pas
réglé dans les 7 secondes qui suivent, l’af-
ficheur retourne automatiquement au mode
radio
2. Pour régler le niveau du volume, ser-
vez-vous des touches en haut/en bas [3]
3. Pour sortir de la procédure enfoncez
la touche TA [9].FONCTIONNEMENT DE LA
CASSETTE
Introduction de la cassette
Introduisez la cassette dans la fente spé-
cifique, le ruban vers la droite. La lecture
commence automatiquement.
Suivant le type de bande utilisée, l’appa-
reil effectue automatiquement l’égalisation
correcte du lecteur de cassettes (p. ex. pour
les bandes Chrome ou Métal).
A la fin de la bande entre en action le mé-
canisme d’inversion automatique du sens
de lecture qui permet d’écouter l’autre fa-
ce de la cassette.
Pour changer la face de la cassette avant
la fin de la bande, enfoncez la touche PROG
[17].
Ecoute d’une cassette
déjà en place
Enfoncez la touche de fonction FUNC [2]
pour sélectionner le mode cassette. La lec-
ture aura lieu automatiquement.
Fonction Pause
Enfoncez la touche de lecture/pause [14]
pour arrêter provisoirement la lecture. Enfon-
cez-la de nouveau pour poursuivre la lecture.
Expulsion des cassettes
Quand vous appuyez sur la touche d’ex-
pulsion [5], la cassette sort automatique-
ment.
L’unité commute automatiquement dans
le mode radio 4 secondes après que la
touche d’expulsion a été enfoncée.
Avance/retour rapides
Enfoncer la touche gauche/droite [19].
H: enfoncez cette touche pour faire avan-
cer rapidement la bande;
G: enfoncez cette touche pour faire re-
venir en arrière rapidement la bande.
Pendant l’avancement/le retour rapides
de la bande on entend la radio.
Page 26 of 79
![FIAT SEICENTO 2001 1.G Clarion PU1573 Manual 25
FRANÇAIS
Recherche morceau
précédent/suivant (fonction
auto program control)
Enfoncez deux fois la touche gauche/droi-
te [19].
H: enfoncez cette touche deux fois pour
avancer jusqu’au début](/manual-img/10/4724/w960_4724-25.png "FIAT SEICENTO 2001 1.G Clarion PU1573 Manual 25
FRANÇAIS
Recherche morceau
précédent/suivant (fonction
auto program control)
Enfoncez deux fois la touche gauche/droi-
te [19].
H: enfoncez cette touche deux fois pour
avancer jusqu’au début")
25
FRANÇAIS
Recherche morceau
précédent/suivant (fonction
auto program control)
Enfoncez deux fois la touche gauche/droi-
te [19].
H: enfoncez cette touche deux fois pour
avancer jusqu’au début du morceau
suivant;
G: enfoncez cette touche deux fois pour
revenir au début du morceau en cours
de lecture. Si vous enfoncez la touche
encore une fois, on entend le morceau
précédent.
Pendant la recherche automatique on en-
tend la radio.
Exploration (en avant) des
morceaux présents sur
cassette
Enfoncez la touche SCN [6] pour lire les
10 première secondes de chaque morceau
sur cassette. L’afficheur montre l’indication
“SCAN”. Pour arrêter l’exploration, enfon-
cez de nouveau la touche SCN [6].
Répétition du morceau
Enfoncez la touche RPT [8] pour réécou-
ter plusieurs fois le dernier morceau écouté.
L’afficheur visualise l’indication “RPT”. Pour
sortir de ce mode, enfoncez encore une fois
la touche RPT [8].
Fonction Dolby B pour la
réduction des parasites
Enfoncez la touche Dolby B NR [15] pour
activer la fonction. L’afficheur montre l’in-
dication “B NR”. Enfoncez de nouveau la
touche pour désactiver la fonction.
Dépassement des parties de
bande vides
S’il y a des espaces vides sur la bande,
dont la durée est de 12 secondes ou supé-
rieure, cette fonction permet de passer au-
tomatiquement au début de la section en-
registrée suivante.
Pour activer cette fonction il faut garder
la touche BLS [13] enfoncée jusqu’à ce que
l’indication “BLS” n’apparaît sur l’afficheur.
Enfoncez encore une fois la touche pour
désactiver la fonction.
ATTENTION
Dans certains cas les fonctions suivantes
peuvent ne pas s’activer correctement:
– recherche morceau précédent/suivant;
– exploration des morceaux;
– répétition d’un morceau;
– dépassement des parties de bande vides.
L’activation manquée ou erronée peut
avoir les causes suivantes:
– bandes enregistrées à des niveaux bas (p.
ex. avec un son très faible et un enregis-
trement imparfait);
– bandes contenant des conversations;
– bandes avec des parties vides d’une du-
rée inférieure à 12 secondes;
– bandes avec de longues périodes de si-
lence entre les morceaux;
– bandes n’ayant pas de parties vides (p.
ex. enregistrements en direct);
– bandes avec un fort bruit de fond dans les
parties vides.
Page 27 of 79
 be-
fore trying to use them while driving.
RECEPTION CONDITIONS
Reception conditions v")
26
USEFUL ADVICE
ROAD SAFETY
You should learn how to use the various
functions (e.g. storing the stations, etc.) be-
fore trying to use them while driving.
RECEPTION CONDITIONS
Reception conditions vary constantly while
the car is moving. Reception may be ef-
fected by mountains, buildings or bridges,
especially when you are a long way from
the broadcasting transmitter of the station
you are listening to.
IMPORTANTAn increase in volume
could occur when traffic announcements are
given.
CARE AND MAINTENANCE
The basic structure of the sound system en-
sures long-term operation without the need
for any particular maintenance. Get in touch
with aDealershipif anything goes wrong.
Only clean the front panel with a soft, an-
tistatic cloth. Cleaning or polishing agents
could damage the surface.
TAPES
For optimal playback:
– Do not use bad quality tapes, misshapen
cassettes or cassettes with the labels com-
ing unstuck.
– Do not leave the tape in the player when
not in use.
– Do not introduce any other object in the
tape deck.
– Do not leave tapes in direct sunlight or
expose them to excessive heat or moisture.
– Put cassettes back into their boxes af-
ter use.
– Dirt on the player head from tapes can,
in time, reduce treble during playback. We
recommend you clean the head periodical-
ly with a specific head cleaner tape (non
abrasive). If you drive with the vol-
ume too high you put both
your own life and that of
others in jeopardy. You should ad-
just the volume so that you can
hear noises from outside the car
(e.g. horns, ambulan-ce/police
sirens, etc.).
Page 28 of 79

27
ENGLISH
– Ideally, use C-60 tapes. Do not use
tapes longer than C-90 to ensure constant,
optimal playback. Moreover, longer tapes
are very thin and can easily break.
– Avoid using cassettes with slack tape,
especially C-90 tapes. The tape could come
out of the cassette and block the mecha-
nism. However, if the player detects slack
tape or similar problems, the cassette will
be ejected automatically.
– Do not lubricate cassette mechanism.
– Do not touch the player head with mag-
netic or hard objects.COMPACT DISC
If you are using a CD player, remember
that dirt or marks on the CD can cause skip-
ping or bad sound quality in playback. The
same will occur if the CD is bent.
For optimal playback:
– Only use CDs with the following trade-
mark:– After use, put the CDs back in their cas-
es to avoid marking or scratching the discs.
This would cause skips in playback.
– Do not leave discs in direct sunlight or
expose them to high temperatures or mois-
ture for a long time to avoid bending them.
– Do not stick labels or write on the record-
ed side of a CD.
To remove the CD from its box, press the
middle and lift the CD holding it carefully on
the edges.
– Clean each CD carefully. Remove fin-
gerprints and dust with a soft cloth. Hold the
CD at the edge and clean from the centre
outwards.
– Never use chemical products (e.g.
sprays, antistatic products or thinners).
These products could damage the CD sur-
face.
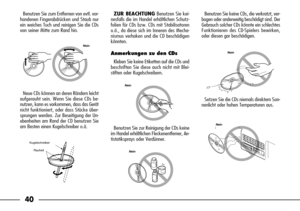
Modo corretto di tenere
il compact discEstrazione del discoRemoving the discProper way to hold the
compact disc
Always only hold the CD from its edges.
Never touch the surface.
Page 29 of 79
28
Use a soft cloth, working from the mid-
dle towards, to remove fingerprints and dust
from the CD.
The edges of new CDs may be rough. The
player may not work or CD may skip when
using these CDs. Use a ball point pen or sim-
ilar to remove the rough edges.
ErratoNo
Penna a sfera
RuviditàBall-point pen
Roughness
IMPORTANTDo not use protective CD
film or disks with stabilisers, etc. They could
get caught in the mechanism and damage
the CD.
Notes on CDs
Do not stick labels or write on the record-
ed side of a CD.
Errato
Never use solvents (e.g. stain removers,
antistatic sprays or thinners) to clean a CD.
ErratoNo
No
Do not use very scratched, cracked or mis-
shapen CDs. You could cause faults or dam-
age the player.
Do not leave discs in direct sunlight or ex-
pose them to high temperatures.
ErratoNo
ErratoNo
Page 30 of 79
.
– RDS (Radio Data System) with TA (Traf-
fic Announceme")
29
ENGLISH
INTRODUCTION
The sound system is fixed and present the
following features:
RADIO SECTION
– PLL tuning (FM/MW/LW frequency
bands).
– RDS (Radio Data System) with TA (Traf-
fic Announcement) - PTY NEWS (Pro-
gramme Type News) - EON (Enhanced
Other Network) - REG (Regional Pro-
gramme) functions.
– RDS alternative frequency tuning.
– Automatic/manual station tuning.
– Manual storage of 24 stations: 18 in FM
band (6 in FM1, 6 in FM2 and 6 in FM3)
and 6 in MW band.
– Automatic storage (AUTOSTORE function)
of 6 stations.
– DX function (Distant: increased sensitivi-
ty in searching for radio stations).
– Automatic Stereo/Mono selection.
TAPE SECTION
– Autoreverse.
– Tape fast forward and rewind.
– Automatic recognition and equalisation of
Cr/Me tapes with consequent optimisa-
tion of sound.
– Pause function.
– Last/next track search function.
– Repeat function (repeats last track).
– Blank Skip function.
– Scan tracks on tape (forward) function.
– DOLBY B (noise reduction circuit) (*).
(*) The DOLBY noise reduction device is made under
licence from the Dolby Laboratories Licensing Corpo-
ration. DOLBY and double D symbol are registered
trademarks of the Dolby Laboratories Licensing Cor-
poration.
CD PLAYER SECTION
(where fitted)
– Disc selection (last/next).
– Track selection (last/next).
– Fast forward and fast backward.
– Pause function.
– Repeat function (repeats last track or CD).
– CD Scan (scans tracks on selected CD or
all CD’s).
– Random (plays tracks on selected CD or
all CD’s in random order).
AUDIO SECTION
– Separate bass/treble settings.
– Right/left and front/rear channel bal-
ance.
– Loudness function.
– Mute function.
– Pre-set volume for TA, ALARM (Emer-
gency) and PTY-NEWS functions.
– Sound system muting when cellular
phone is in use.
Page 31 of 79
. Loudness
button (LOUD).
2.On/Off button (POWER). Radio,
Tape, CD button (FUNC).
3.Volume, treble, fader adjustment but-
ton (up/down) (O/")
30
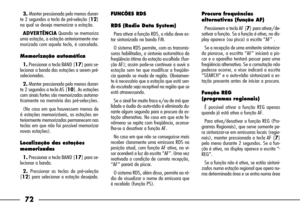
DESCRIPTION OF CONTROLS
P5P00887
1.Audio mode button (A-M). Loudness
button (LOUD).
2.On/Off button (POWER). Radio,
Tape, CD button (FUNC).
3.Volume, treble, fader adjustment but-
ton (up/down) (O/N).
4.Next disc button (DISC UP) [I].
5.Eject tape button (EJECT) (˚)
[J].
6.Scan tape/CD (SCAN) [J],
[I].7.Alternative frequency button, RDS REG
function (AF).
8.Repeat tape/CD track button (RPT)
[J], [I].
9.Traffic announcement function button,
pre-set volume for TA, ALARM and PTY-
NEWS (TA) [K].
10.Automatic station storage button (AS)
[K] PTY NEWS function button.
11.Random CD track function button
(RDM) [I].
12.Pre-set station button [K].13.Skip blank tape function button (BLS)
[J].
14.Mute sound system (MUTE) [K].
Play/pause tape/CD (˙/❙❙) [J],
[I].
15.Dolby NR B function button (BNR)
[J].
16.Last disc button (DISC DN) [I].
17.Band selection button, manual tuning
(BAND) [K]. Change tape side b.utton
(PROG) [J]. CD Changer magazine but-
ton (MAG) [I].
18.Front panel release key.
19.Bass, balance, manual/automatic
tuning, distant/locale search, tape fast for-
ward/reverse, next/last tape/CD track, CD
fast forward/reverse buttons (left/-right)
(Gand H) [J], [K], [I].
[K]: In radio mode.
[J]: In tape player mode.
[I]: In CD mode.
IMPORTANTVarious functions and set-
tings can be made by pressing the up/down
[3] and left/right [19] buttons. This op-
eration is called the «Alpha-Touch Controller»
function.
Page 32 of 79
 case D-fig. 4to prevent
scratches.
We recommend ta")
31
ENGLISH
The control panel can be detached to pre-
vent theft. When detaching the control pan-
el, store it in the DCP (DETACHABLE CON-
TROL PANEL) case D-fig. 4to prevent
scratches.
We recommend taking the DCP with you
when leaving the car.
Removing the DCP
1)Hold down POWER button 2-fig. 1
for 1 second or longer to switch off the pow-
er.
2)Deeply push in the DCP Release button
1 18-fig. 1.
3)Remove the DCP A-fig. 2.
Fig. 1
DETACHABLE CONTROL PANEL (DCP)
Attaching the DCP
1)Insert the right side C-fig. 3of the
DCP into the main unit.
2)Insert the left side B-fig. 3of the DCP
into the main unit.
WARNINGDo not insert the DCP left
side for the first: it could be damaged.
The DCP can easily be
damaged by shocks. After
removing it, be careful not
to drop it or subject it to strong
shocks.The connector connecting
the main unit and the DCP
is an extremely important
part. Be careful not to damage it
by pressing on it with fingernails,
screwdrivers, etc.
IMPORTANTIf the DCP is dirty, wipe
off the dirt with a soft, dry cloth only.
When the Release button
is pressed and the DCP is
unlocked, the car’s vibra-
tions may cause it to fall. To pre-
vent damage to the DCP, always
store it in its case after detaching
it. (See figure 4).
Fig. 2
Fig. 3
Fig. 4