2001 DODGE RAM torque
[x] Cancel search: torquePage 2552 of 2889
(4) Apply bead of MopartGasket Maker, or equiv-
alent, to mating surface of front case. Keep sealer
bead width to maximum of 3/16 inch. Do not use
excessive amount of sealer as excess will be displaced
into case interior.
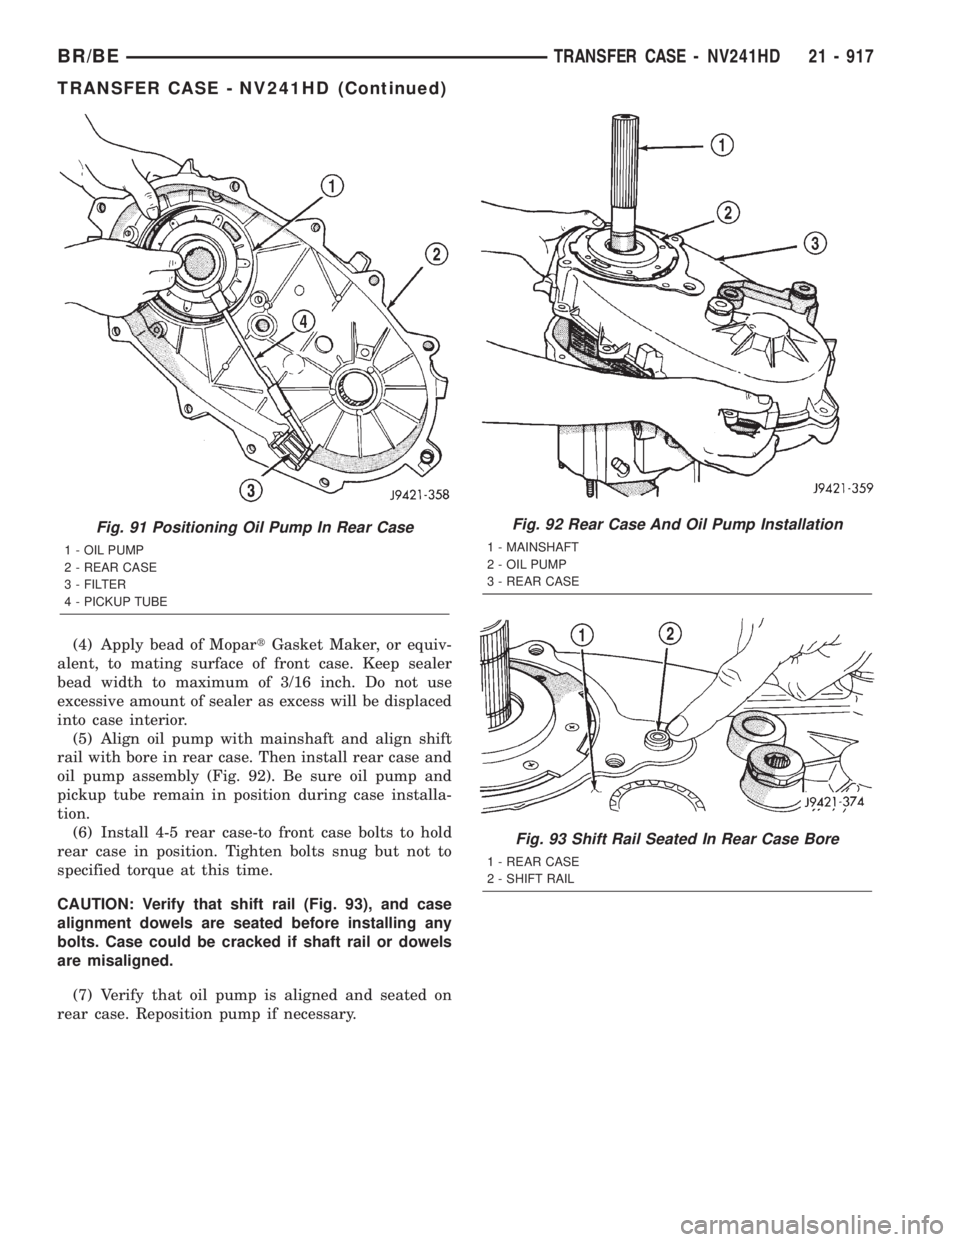
(5) Align oil pump with mainshaft and align shift
rail with bore in rear case. Then install rear case and
oil pump assembly (Fig. 92). Be sure oil pump and
pickup tube remain in position during case installa-
tion.
(6) Install 4-5 rear case-to front case bolts to hold
rear case in position. Tighten bolts snug but not to
specified torque at this time.
CAUTION: Verify that shift rail (Fig. 93), and case
alignment dowels are seated before installing any
bolts. Case could be cracked if shaft rail or dowels
are misaligned.
(7) Verify that oil pump is aligned and seated on
rear case. Reposition pump if necessary.
Fig. 91 Positioning Oil Pump In Rear Case
1 - OIL PUMP
2 - REAR CASE
3 - FILTER
4 - PICKUP TUBE
Fig. 92 Rear Case And Oil Pump Installation
1 - MAINSHAFT
2 - OIL PUMP
3 - REAR CASE
Fig. 93 Shift Rail Seated In Rear Case Bore
1 - REAR CASE
2 - SHIFT RAIL
BR/BETRANSFER CASE - NV241HD 21 - 917
TRANSFER CASE - NV241HD (Continued)
Page 2553 of 2889
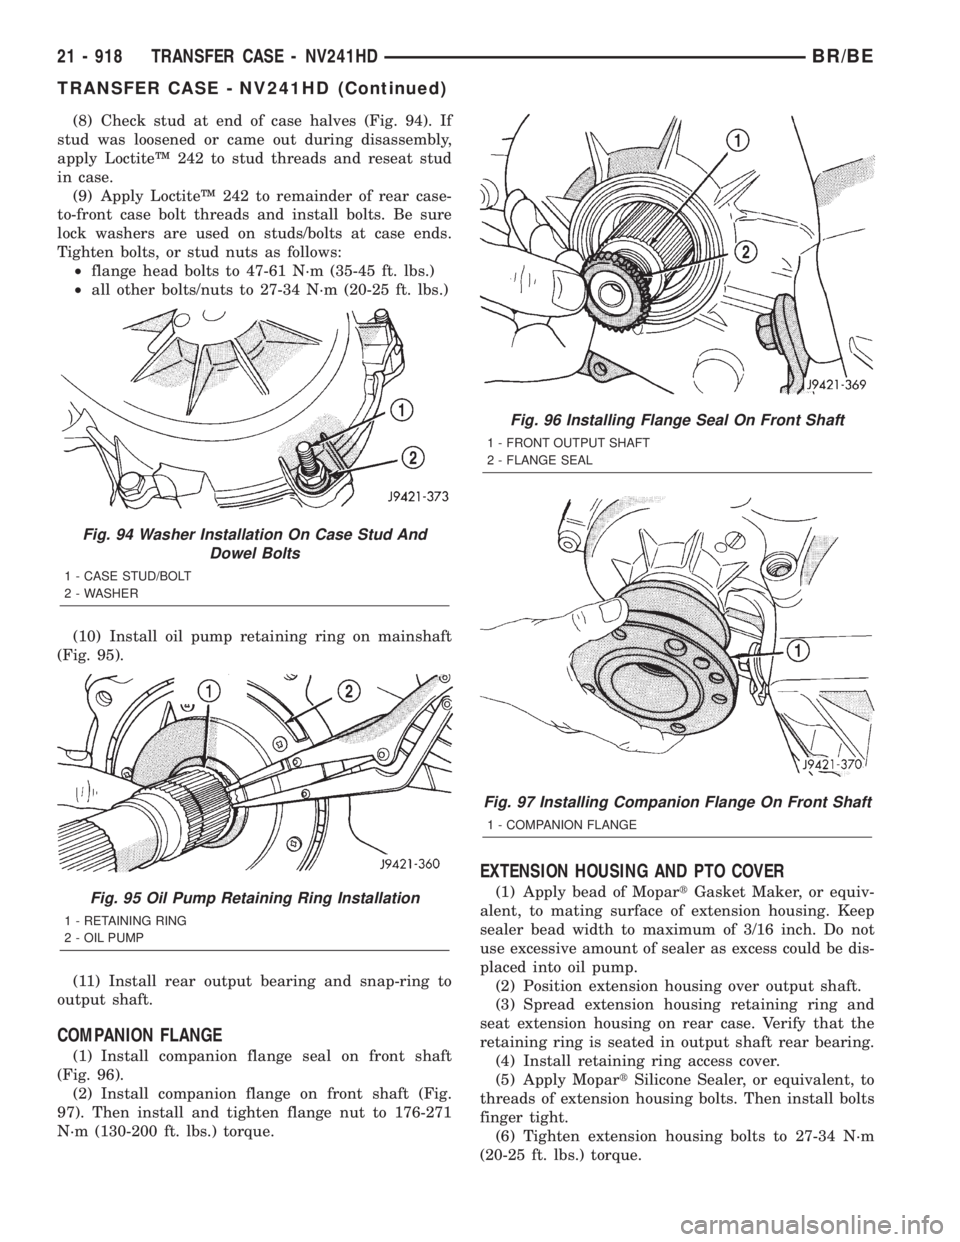
(8) Check stud at end of case halves (Fig. 94). If
stud was loosened or came out during disassembly,
apply LoctiteŸ 242 to stud threads and reseat stud
in case.
(9) Apply LoctiteŸ 242 to remainder of rear case-
to-front case bolt threads and install bolts. Be sure
lock washers are used on studs/bolts at case ends.
Tighten bolts, or stud nuts as follows:
²flange head bolts to 47-61 N´m (35-45 ft. lbs.)
²all other bolts/nuts to 27-34 N´m (20-25 ft. lbs.)
(10) Install oil pump retaining ring on mainshaft
(Fig. 95).
(11) Install rear output bearing and snap-ring to
output shaft.
COMPANION FLANGE
(1) Install companion flange seal on front shaft
(Fig. 96).
(2) Install companion flange on front shaft (Fig.
97). Then install and tighten flange nut to 176-271
N´m (130-200 ft. lbs.) torque.
EXTENSION HOUSING AND PTO COVER
(1) Apply bead of MopartGasket Maker, or equiv-
alent, to mating surface of extension housing. Keep
sealer bead width to maximum of 3/16 inch. Do not
use excessive amount of sealer as excess could be dis-
placed into oil pump.
(2) Position extension housing over output shaft.
(3) Spread extension housing retaining ring and
seat extension housing on rear case. Verify that the
retaining ring is seated in output shaft rear bearing.
(4) Install retaining ring access cover.
(5) Apply MopartSilicone Sealer, or equivalent, to
threads of extension housing bolts. Then install bolts
finger tight.
(6) Tighten extension housing bolts to 27-34 N´m
(20-25 ft. lbs.) torque.
Fig. 94 Washer Installation On Case Stud And
Dowel Bolts
1 - CASE STUD/BOLT
2 - WASHER
Fig. 95 Oil Pump Retaining Ring Installation
1 - RETAINING RING
2 - OIL PUMP
Fig. 96 Installing Flange Seal On Front Shaft
1 - FRONT OUTPUT SHAFT
2 - FLANGE SEAL
Fig. 97 Installing Companion Flange On Front Shaft
1 - COMPANION FLANGE
21 - 918 TRANSFER CASE - NV241HDBR/BE
TRANSFER CASE - NV241HD (Continued)
Page 2554 of 2889
(7) Apply MopartSilicone Sealer to mating surface
of PTO cover and to cover bolt shanks and underside
of bolt heads. Then install and tighten bolts to 27-34
N´m (20-25 ft. lbs.) torque.
INSTALLATION
(1) Align and seat transfer case on transmission.
Be sure transfer case input gear splines are aligned
with transmission output shaft. Align splines by
rotating transfer case rear output shaft yoke if nec-
essary. Do not install any transfer case attaching
nuts until the transfer case is completely seated
against the transmission.
(2) Install and tighten transfer case attaching
nuts. Tighten nuts to 30-41 N´m (20-30 ft.lbs.).
(3) Install rear crossmember.(4) Remove jack stand from under transmission.
(5) Align and connect propeller shafts. (Refer to 3 -
DIFFERENTIAL & DRIVELINE/PROPELLER
SHAFT/PROPELLER SHAFT - INSTALLATION)
(6) Connect vacuum harness and vent hose.
(7) Connect shift rod to transfer case lever or floor
shift arm. Use channel lock style pliers to press rod
back into lever grommet.
(8) Adjust shift linkage, if necessary.
(9) Fill transfer case with recommended transmis-
sion fluid and install fill plug.
(10) Install skid plate, if equipped. (Refer to 13 -
FRAMES & BUMPERS/FRAME/TRANSFER CASE
SKID PLATE - INSTALLATION)
(11) Lower vehicle
SPECIFICATIONS
TRANSFER CASE
TORQUE SPECIFICATIONS
DESCRIPTION N-m Ft. Lbs. In. Lbs.
Plug, Detent 16-24 12-18 -
Bolt, Diff. Case 17-27 15-24 -
Plug, Drain/Fill 40-45 30-40 -
Bolt, Extension Housing 35-46 26-34 -
Bolt, Front Brg. Retainer 16-27 12-24 -
Bolt, Case Half 35-46 26-34 -
Nut, Front Yoke 122-176 90-130 -
Screw, Oil Pump 1.2-1.8 - 12-15
Nut, Range Lever 27-34 20-25 -
Bolt, Rear Retainer 35-46 26-34 -
Nuts, Mounting 30-41 20-30 -
Bolts, U-Joint 19 17 -
Vacuum Switch 20-34 15-25 -
BR/BETRANSFER CASE - NV241HD 21 - 919
TRANSFER CASE - NV241HD (Continued)
Page 2558 of 2889
(b) Start seal in bore. Once seal is started, con-
tinue tapping seal into bore until installer tool bot-
toms against case.
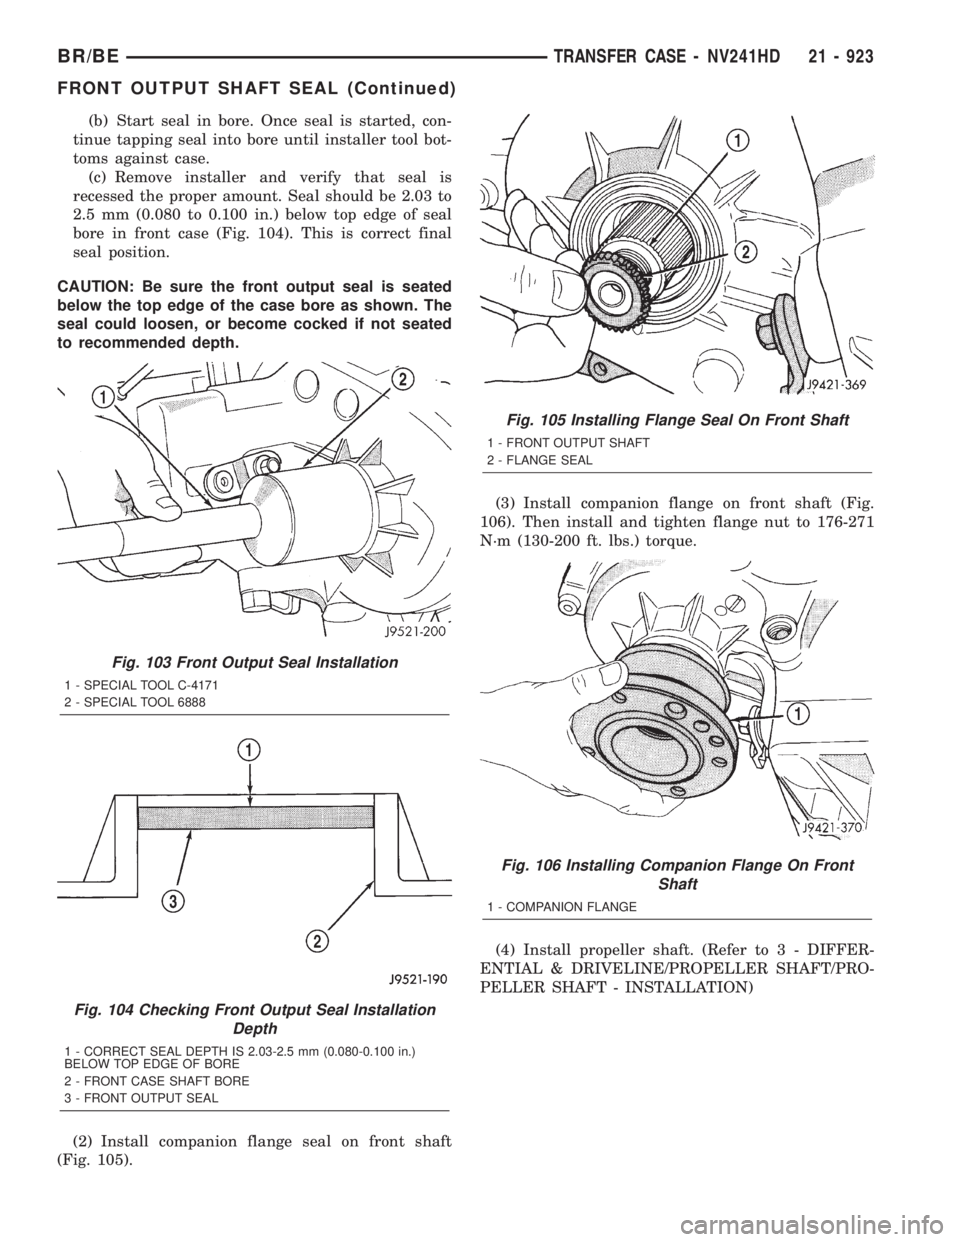
(c) Remove installer and verify that seal is
recessed the proper amount. Seal should be 2.03 to
2.5 mm (0.080 to 0.100 in.) below top edge of seal
bore in front case (Fig. 104). This is correct final
seal position.
CAUTION: Be sure the front output seal is seated
below the top edge of the case bore as shown. The
seal could loosen, or become cocked if not seated
to recommended depth.
(2) Install companion flange seal on front shaft
(Fig. 105).(3) Install companion flange on front shaft (Fig.
106). Then install and tighten flange nut to 176-271
N´m (130-200 ft. lbs.) torque.
(4) Install propeller shaft. (Refer to 3 - DIFFER-
ENTIAL & DRIVELINE/PROPELLER SHAFT/PRO-
PELLER SHAFT - INSTALLATION)
Fig. 103 Front Output Seal Installation
1 - SPECIAL TOOL C-4171
2 - SPECIAL TOOL 6888
Fig. 104 Checking Front Output Seal Installation
Depth
1 - CORRECT SEAL DEPTH IS 2.03-2.5 mm (0.080-0.100 in.)
BELOW TOP EDGE OF BORE
2 - FRONT CASE SHAFT BORE
3 - FRONT OUTPUT SEAL
Fig. 105 Installing Flange Seal On Front Shaft
1 - FRONT OUTPUT SHAFT
2 - FLANGE SEAL
Fig. 106 Installing Companion Flange On Front
Shaft
1 - COMPANION FLANGE
BR/BETRANSFER CASE - NV241HD 21 - 923
FRONT OUTPUT SHAFT SEAL (Continued)
Page 2560 of 2889
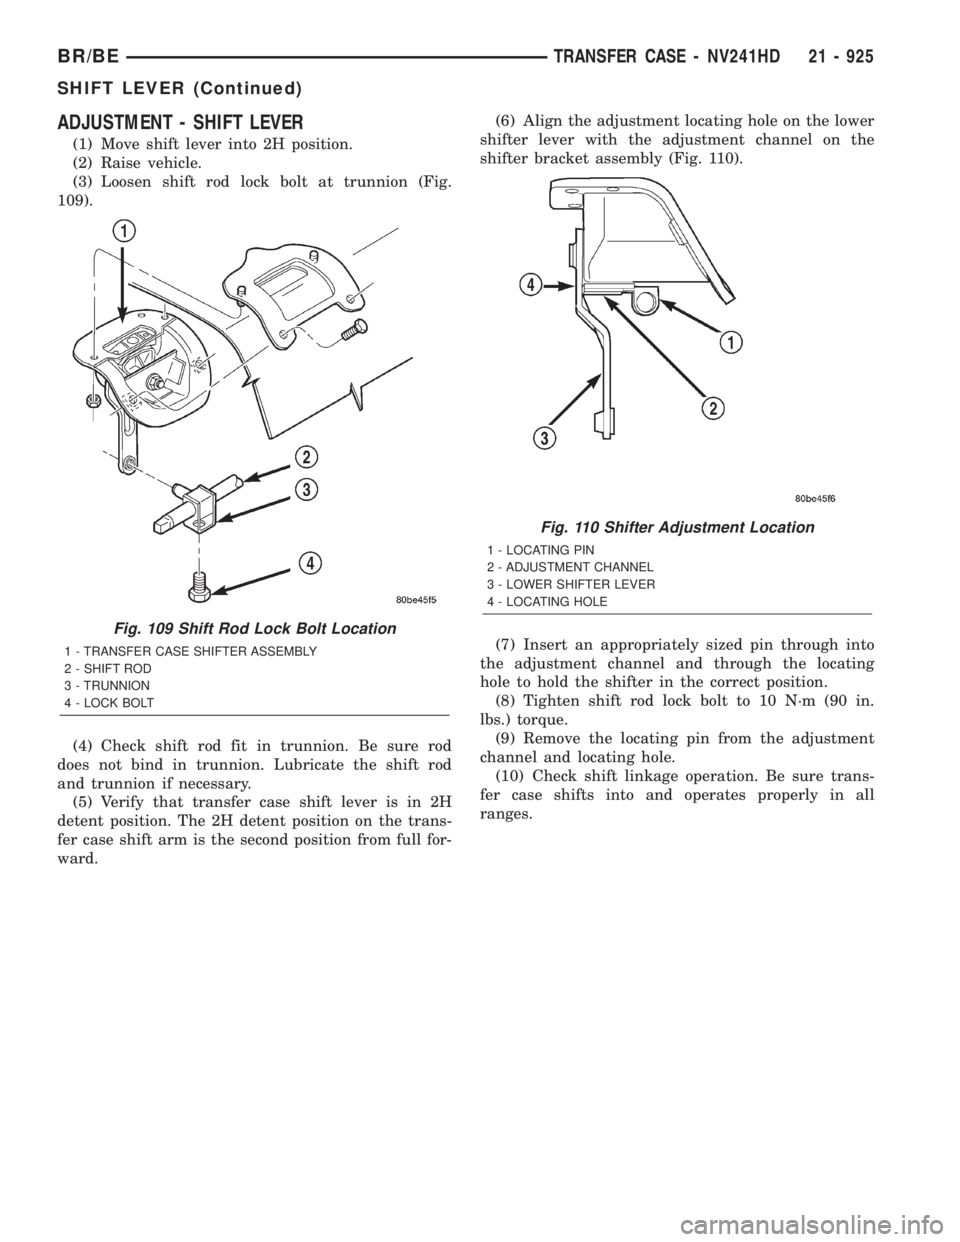
ADJUSTMENT - SHIFT LEVER
(1) Move shift lever into 2H position.
(2) Raise vehicle.
(3) Loosen shift rod lock bolt at trunnion (Fig.
109).
(4) Check shift rod fit in trunnion. Be sure rod
does not bind in trunnion. Lubricate the shift rod
and trunnion if necessary.
(5) Verify that transfer case shift lever is in 2H
detent position. The 2H detent position on the trans-
fer case shift arm is the second position from full for-
ward.(6) Align the adjustment locating hole on the lower
shifter lever with the adjustment channel on the
shifter bracket assembly (Fig. 110).
(7) Insert an appropriately sized pin through into
the adjustment channel and through the locating
hole to hold the shifter in the correct position.
(8) Tighten shift rod lock bolt to 10 N´m (90 in.
lbs.) torque.
(9) Remove the locating pin from the adjustment
channel and locating hole.
(10) Check shift linkage operation. Be sure trans-
fer case shifts into and operates properly in all
ranges.
Fig. 109 Shift Rod Lock Bolt Location
1 - TRANSFER CASE SHIFTER ASSEMBLY
2 - SHIFT ROD
3 - TRUNNION
4 - LOCK BOLT
Fig. 110 Shifter Adjustment Location
1 - LOCATING PIN
2 - ADJUSTMENT CHANNEL
3 - LOWER SHIFTER LEVER
4 - LOCATING HOLE
BR/BETRANSFER CASE - NV241HD 21 - 925
SHIFT LEVER (Continued)
Page 2562 of 2889
TIRES/WHEELS
TABLE OF CONTENTS
page page
TIRES/WHEELS
DIAGNOSIS AND TESTING..................1
TIRE AND WHEEL RUNOUT...............1
STANDARD PROCEDURE...................2
TIRE ROTATION.........................2
MATCH MOUNTING......................2
TIRE AND WHEEL BALANCE...............4
TIRES
DESCRIPTION............................5
DIAGNOSIS AND TESTING..................7
PRESSURE GAUGES....................7
TREAD WEAR INDICATORS...............7
TIRE WEAR PATTERNS...................7
TIRE NOISE OR VIBRATION...............8
STANDARD PROCEDURE...................8
REPAIRING LEAKS......................8
SPECIFICATIONS.........................9SPARE TIRE
DESCRIPTION............................9
WHEELS
DESCRIPTION............................9
OPERATION.............................10
DIAGNOSIS AND TESTING.................10
WHEEL INSPECTION....................10
STANDARD PROCEDURE..................10
DUAL WHEEL INSTALLATION.............10
SPECIFICATIONS.........................11
STUDS
REMOVAL..............................12
INSTALLATION...........................12
WHEEL COVER
REMOVAL..............................12
INSTALLATION...........................12
TIRES/WHEELS
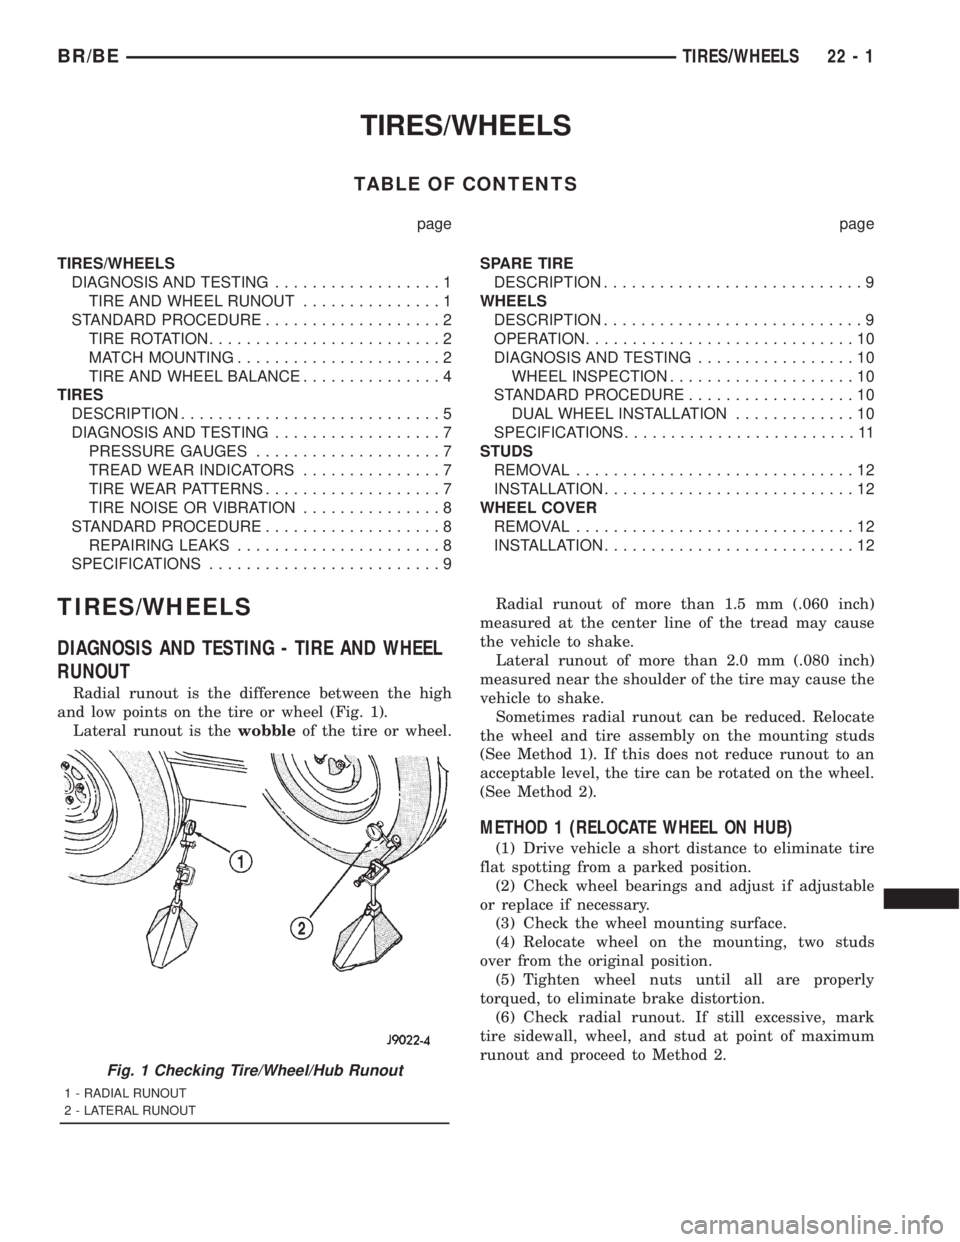
DIAGNOSIS AND TESTING - TIRE AND WHEEL
RUNOUT
Radial runout is the difference between the high
and low points on the tire or wheel (Fig. 1).
Lateral runout is thewobbleof the tire or wheel.Radial runout of more than 1.5 mm (.060 inch)
measured at the center line of the tread may cause
the vehicle to shake.
Lateral runout of more than 2.0 mm (.080 inch)
measured near the shoulder of the tire may cause the
vehicle to shake.
Sometimes radial runout can be reduced. Relocate
the wheel and tire assembly on the mounting studs
(See Method 1). If this does not reduce runout to an
acceptable level, the tire can be rotated on the wheel.
(See Method 2).
METHOD 1 (RELOCATE WHEEL ON HUB)
(1) Drive vehicle a short distance to eliminate tire
flat spotting from a parked position.
(2) Check wheel bearings and adjust if adjustable
or replace if necessary.
(3) Check the wheel mounting surface.
(4) Relocate wheel on the mounting, two studs
over from the original position.
(5) Tighten wheel nuts until all are properly
torqued, to eliminate brake distortion.
(6) Check radial runout. If still excessive, mark
tire sidewall, wheel, and stud at point of maximum
runout and proceed to Method 2.
Fig. 1 Checking Tire/Wheel/Hub Runout
1 - RADIAL RUNOUT
2 - LATERAL RUNOUT
BR/BETIRES/WHEELS 22 - 1
Page 2569 of 2889
DIAGNOSIS AND TESTING - TIRE NOISE OR
VIBRATION
Radial-ply tires are sensitive to force impulses
caused by improper mounting, vibration, wheel
defects, or possibly tire imbalance.
To find out if tires are causing the noise or vibra-
tion, drive the vehicle over a smooth road at varying
speeds. Note the noise level during acceleration and
deceleration. The engine, differential and exhaust
noises will change as speed varies, while the tire
noise will usually remain constant.
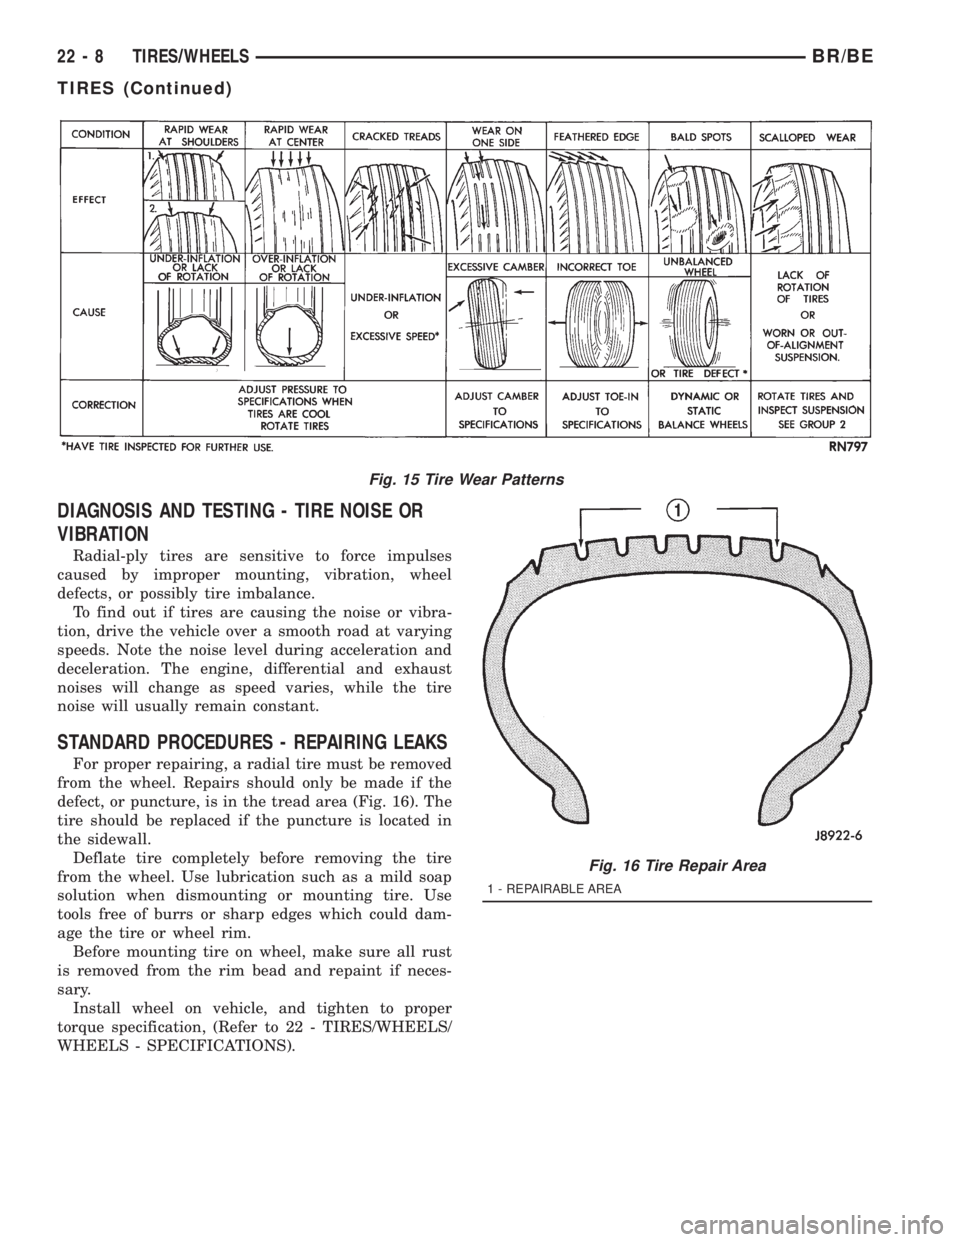
STANDARD PROCEDURES - REPAIRING LEAKS
For proper repairing, a radial tire must be removed
from the wheel. Repairs should only be made if the
defect, or puncture, is in the tread area (Fig. 16). The
tire should be replaced if the puncture is located in
the sidewall.
Deflate tire completely before removing the tire
from the wheel. Use lubrication such as a mild soap
solution when dismounting or mounting tire. Use
tools free of burrs or sharp edges which could dam-
age the tire or wheel rim.
Before mounting tire on wheel, make sure all rust
is removed from the rim bead and repaint if neces-
sary.
Install wheel on vehicle, and tighten to proper
torque specification, (Refer to 22 - TIRES/WHEELS/
WHEELS - SPECIFICATIONS).
Fig. 15 Tire Wear Patterns
Fig. 16 Tire Repair Area
1 - REPAIRABLE AREA
22 - 8 TIRES/WHEELSBR/BE
TIRES (Continued)
Page 2571 of 2889
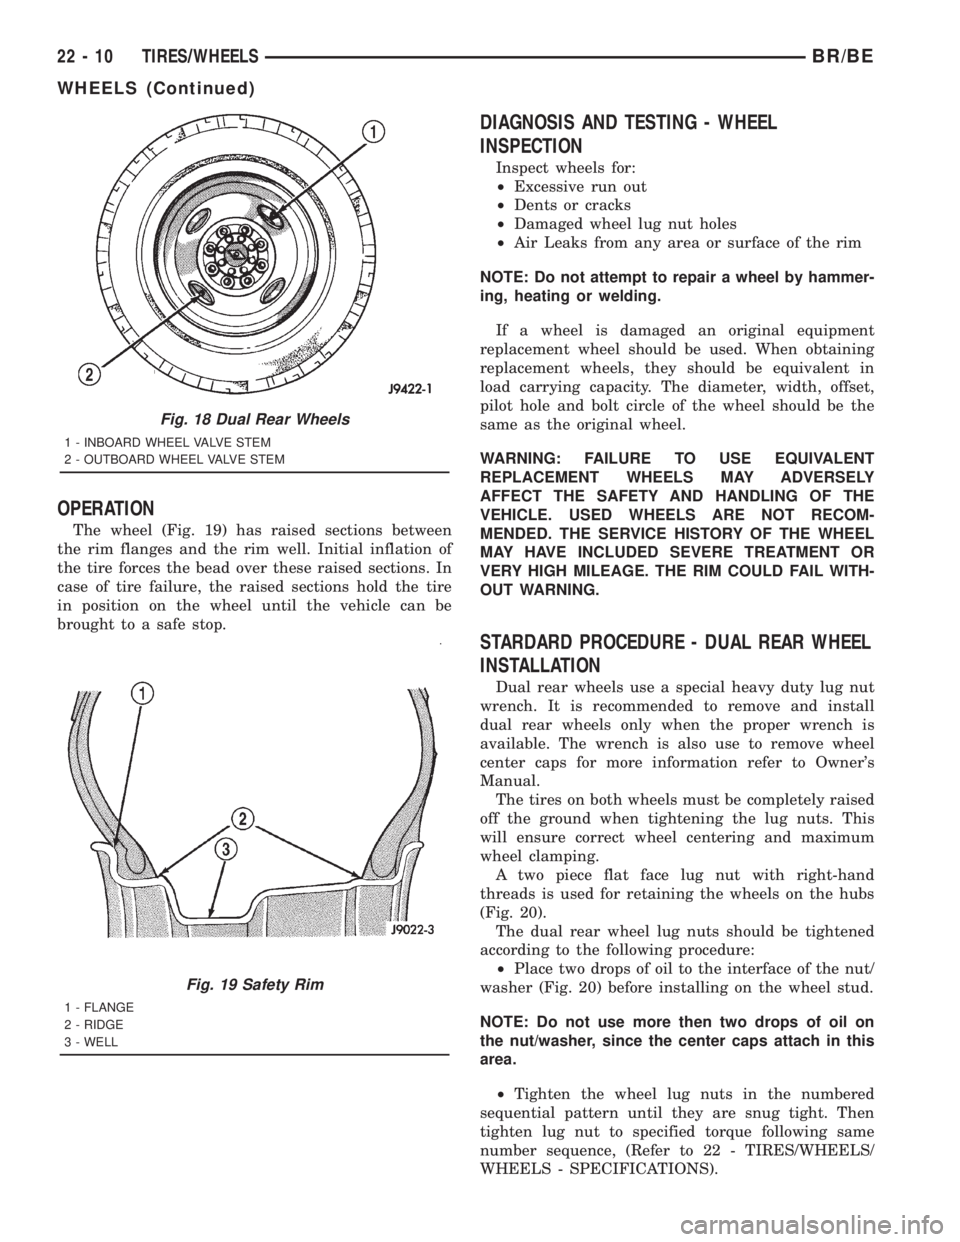
OPERATION
The wheel (Fig. 19) has raised sections between
the rim flanges and the rim well. Initial inflation of
the tire forces the bead over these raised sections. In
case of tire failure, the raised sections hold the tire
in position on the wheel until the vehicle can be
brought to a safe stop.
DIAGNOSIS AND TESTING - WHEEL
INSPECTION
Inspect wheels for:
²Excessive run out
²Dents or cracks
²Damaged wheel lug nut holes
²Air Leaks from any area or surface of the rim
NOTE: Do not attempt to repair a wheel by hammer-
ing, heating or welding.
If a wheel is damaged an original equipment
replacement wheel should be used. When obtaining
replacement wheels, they should be equivalent in
load carrying capacity. The diameter, width, offset,
pilot hole and bolt circle of the wheel should be the
same as the original wheel.
WARNING: FAILURE TO USE EQUIVALENT
REPLACEMENT WHEELS MAY ADVERSELY
AFFECT THE SAFETY AND HANDLING OF THE
VEHICLE. USED WHEELS ARE NOT RECOM-
MENDED. THE SERVICE HISTORY OF THE WHEEL
MAY HAVE INCLUDED SEVERE TREATMENT OR
VERY HIGH MILEAGE. THE RIM COULD FAIL WITH-
OUT WARNING.
STARDARD PROCEDURE - DUAL REAR WHEEL
INSTALLATION
Dual rear wheels use a special heavy duty lug nut
wrench. It is recommended to remove and install
dual rear wheels only when the proper wrench is
available. The wrench is also use to remove wheel
center caps for more information refer to Owner's
Manual.
The tires on both wheels must be completely raised
off the ground when tightening the lug nuts. This
will ensure correct wheel centering and maximum
wheel clamping.
A two piece flat face lug nut with right-hand
threads is used for retaining the wheels on the hubs
(Fig. 20).
The dual rear wheel lug nuts should be tightened
according to the following procedure:
²Place two drops of oil to the interface of the nut/
washer (Fig. 20) before installing on the wheel stud.
NOTE: Do not use more then two drops of oil on
the nut/washer, since the center caps attach in this
area.
²Tighten the wheel lug nuts in the numbered
sequential pattern until they are snug tight. Then
tighten lug nut to specified torque following same
number sequence, (Refer to 22 - TIRES/WHEELS/
WHEELS - SPECIFICATIONS).
Fig. 18 Dual Rear Wheels
1 - INBOARD WHEEL VALVE STEM
2 - OUTBOARD WHEEL VALVE STEM
Fig. 19 Safety Rim
1 - FLANGE
2 - RIDGE
3 - WELL
22 - 10 TIRES/WHEELSBR/BE
WHEELS (Continued)