2001 DODGE RAM service
[x] Cancel search: servicePage 2704 of 2889
SEATS
TABLE OF CONTENTS
page page
SEATS
DESCRIPTION..........................131
OPERATION............................131
CENTER CONSOLE LID
REMOVAL.............................131
INSTALLATION..........................132
CENTER SEAT ARMREST/CONSOLE
REMOVAL.............................132
INSTALLATION..........................132
CENTER SEAT ARMREST/LATCH COVER
REMOVAL.............................132
INSTALLATION..........................132
LUMBAR SUPPORT
REMOVAL.............................133
INSTALLATION..........................133
SEAT - BENCH SEAT
REMOVAL.............................133
INSTALLATION..........................133
SEAT - SPLIT BENCH
REMOVAL.............................134
INSTALLATION..........................134
SEAT BACK - BENCH SEAT
REMOVAL.............................135
INSTALLATION..........................135
SEAT BACK - SPLIT BENCH
REMOVAL.............................135
INSTALLATION..........................136
SEAT BACK COVER
REMOVAL.............................137
INSTALLATION..........................137
SEAT BACK COVER - SPLIT BENCH
REMOVAL.............................137
INSTALLATION..........................138SEAT BACK RECLINER
REMOVAL.............................138
INSTALLATION..........................138
SEAT CUSHION
REMOVAL.............................138
INSTALLATION..........................138
SEAT CUSHION COVER
REMOVAL.............................139
INSTALLATION..........................139
SEAT CUSHION COVER - SPLIT BENCH
REMOVAL.............................139
INSTALLATION..........................140
SEAT RISER
REMOVAL.............................141
INSTALLATION..........................141
SEAT TRACK
REMOVAL.............................141
INSTALLATION..........................141
SEAT TRACK - SPLIT BENCH
REMOVAL.............................142
INSTALLATION..........................142
EASY ENTRY SEAT TRACK
REMOVAL.............................142
INSTALLATION..........................142
SEAT TRACK ADJUSTER
REMOVAL.............................143
INSTALLATION..........................143
STANCHION COVER
REMOVAL.............................143
INSTALLATION..........................143
REAR SEAT
REMOVAL.............................144
INSTALLATION..........................144
SEATS
DESCRIPTION
Seat modules are made up of a seat frame, seat
cushion, seat back cushion, a covering material, and
the electrical components used for power operation, if
equipped. Some seat systems also contain seat belt
components and supplemental restraint systems.
OPERATION
Seat assemblies transport the occupants in comfort
and safety. Seat assemblies also help position occupants
correctly in the event of airbag deployment. Seat cush-
ions, coverings, and electrical components are service-
able. Refer to the appropriate group in this manual.
CENTER CONSOLE LID
REMOVAL
(1) Open console lid.
(2) Using a small flat blade screwdriver, disengage
locking tabs located under the console lid trim bezel.
(3) Separate bezel from lid.
(4) Move driver and passenger seat to full forward
position.
(5) Using a small drift and hammer, tap out con-
sole lid hinge pin.
(6) Separate lid from console.
BR/BESEATS 23 - 131
Page 2719 of 2889
(2) If necessary, apply black-out primer to outer
edge of replacement backlite frame.
(3) If black-out primer was pre-applied on backlite,
clean bonding surface with Isopropyl alcohol and
clean lint free cloth. Allow 3 minutes for drying time.
(4) Apply black-out primer to backlite opening
fence.
(5) Apply a 13 mm (0.5 in.) bead of urethane
around the perimeter of the window frame bonding
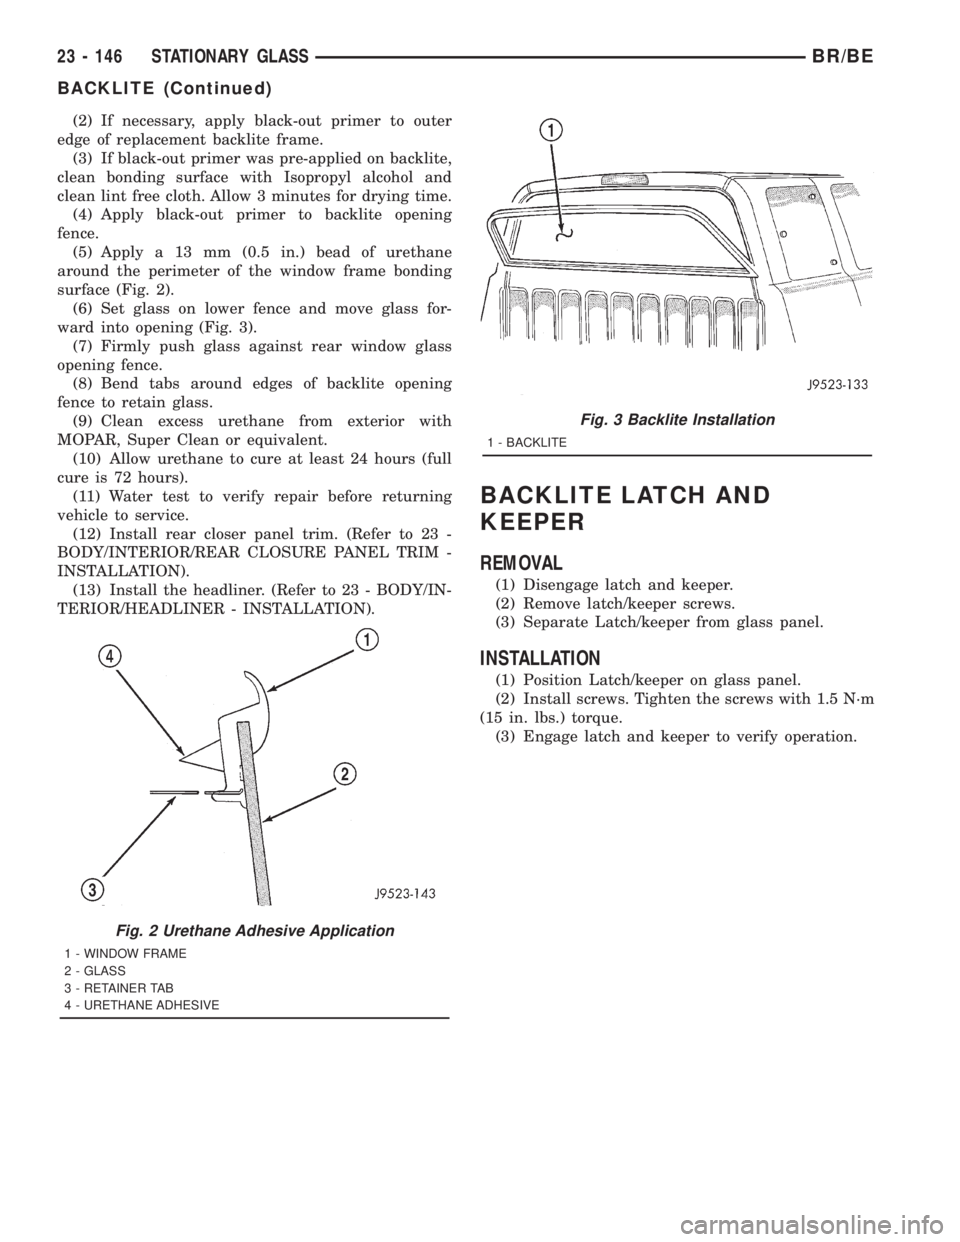
surface (Fig. 2).
(6) Set glass on lower fence and move glass for-
ward into opening (Fig. 3).
(7) Firmly push glass against rear window glass
opening fence.
(8) Bend tabs around edges of backlite opening
fence to retain glass.
(9) Clean excess urethane from exterior with
MOPAR, Super Clean or equivalent.
(10) Allow urethane to cure at least 24 hours (full
cure is 72 hours).
(11) Water test to verify repair before returning
vehicle to service.
(12) Install rear closer panel trim. (Refer to 23 -
BODY/INTERIOR/REAR CLOSURE PANEL TRIM -
INSTALLATION).
(13) Install the headliner. (Refer to 23 - BODY/IN-
TERIOR/HEADLINER - INSTALLATION).
BACKLITE LATCH AND
KEEPER
REMOVAL
(1) Disengage latch and keeper.
(2) Remove latch/keeper screws.
(3) Separate Latch/keeper from glass panel.
INSTALLATION
(1) Position Latch/keeper on glass panel.
(2) Install screws. Tighten the screws with 1.5 N´m
(15 in. lbs.) torque.
(3) Engage latch and keeper to verify operation.
Fig. 2 Urethane Adhesive Application
1 - WINDOW FRAME
2 - GLASS
3 - RETAINER TAB
4 - URETHANE ADHESIVE
Fig. 3 Backlite Installation
1 - BACKLITE
23 - 146 STATIONARY GLASSBR/BE
BACKLITE (Continued)
Page 2730 of 2889
HEATING & AIR CONDITIONING
TABLE OF CONTENTS
page page
HEATING & AIR CONDITIONING
DESCRIPTION............................1
OPERATION.............................1
DIAGNOSIS AND TESTING..................2
A/C PERFORMANCE.....................2
HEATER PERFORMANCE.................6STANDARD PROCEDURE...................7
DIODE REPLACEMENT...................7
SPECIFICATIONS.........................8
CONTROLS..............................9
DISTRIBUTION..........................31
PLUMBING.............................40
HEATING & AIR
CONDITIONING
DESCRIPTION - HEATER AND AIR
CONDITIONER
All vehicles are equipped with a common HVAC
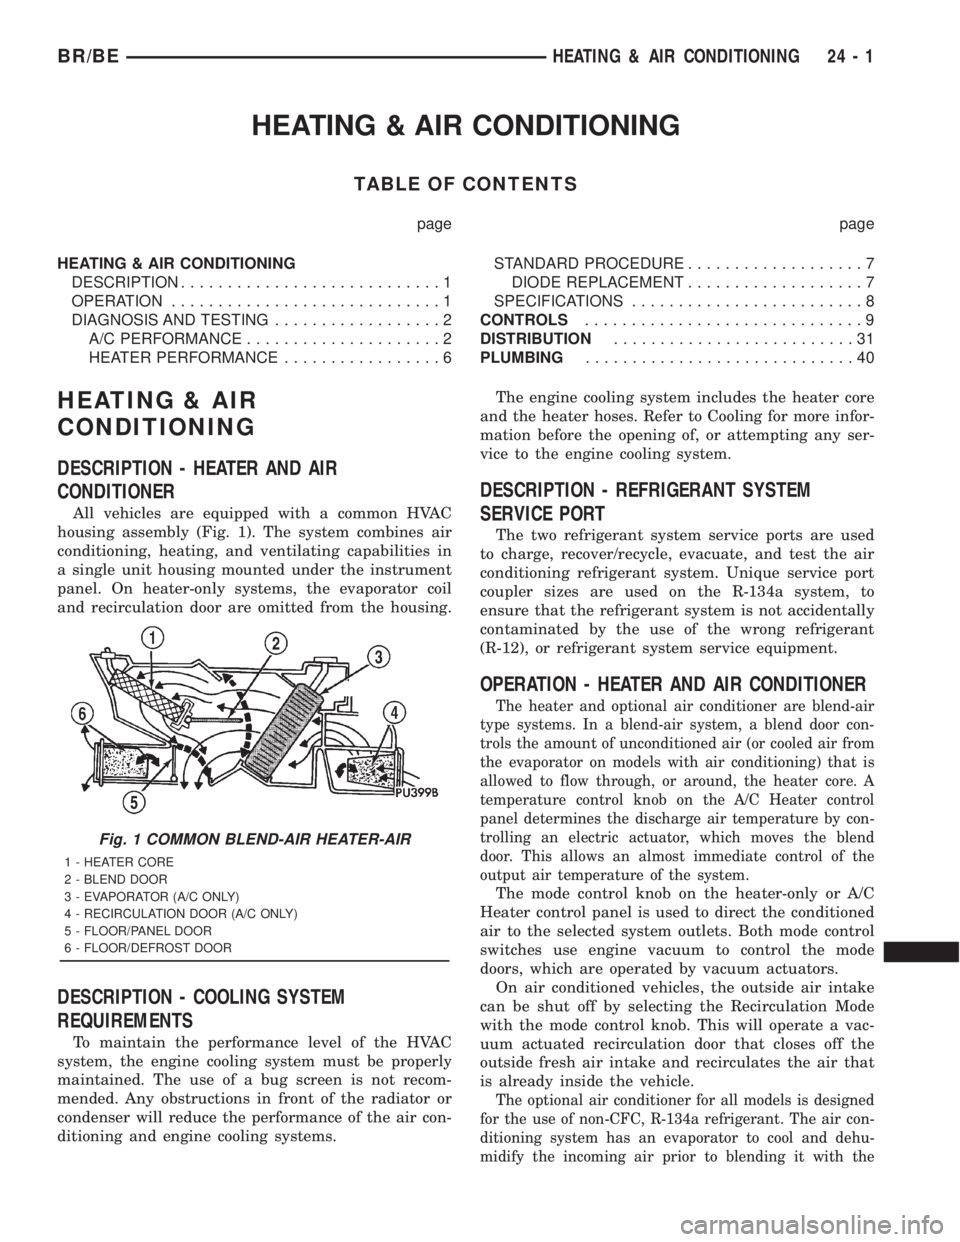
housing assembly (Fig. 1). The system combines air
conditioning, heating, and ventilating capabilities in
a single unit housing mounted under the instrument
panel. On heater-only systems, the evaporator coil
and recirculation door are omitted from the housing.
DESCRIPTION - COOLING SYSTEM
REQUIREMENTS
To maintain the performance level of the HVAC
system, the engine cooling system must be properly
maintained. The use of a bug screen is not recom-
mended. Any obstructions in front of the radiator or
condenser will reduce the performance of the air con-
ditioning and engine cooling systems.The engine cooling system includes the heater core
and the heater hoses. Refer to Cooling for more infor-
mation before the opening of, or attempting any ser-
vice to the engine cooling system.
DESCRIPTION - REFRIGERANT SYSTEM
SERVICE PORT
The two refrigerant system service ports are used
to charge, recover/recycle, evacuate, and test the air
conditioning refrigerant system. Unique service port
coupler sizes are used on the R-134a system, to
ensure that the refrigerant system is not accidentally
contaminated by the use of the wrong refrigerant
(R-12), or refrigerant system service equipment.
OPERATION - HEATER AND AIR CONDITIONER
The heater and optional air conditioner are blend-air
type systems. In a blend-air system, a blend door con-
trols the amount of unconditioned air (or cooled air from
the evaporator on models with air conditioning) that is
allowed to flow through, or around, the heater core. A
temperature control knob on the A/C Heater control
panel determines the discharge air temperature by con-
trolling an electric actuator, which moves the blend
door. This allows an almost immediate control of the
output air temperature of the system.
The mode control knob on the heater-only or A/C
Heater control panel is used to direct the conditioned
air to the selected system outlets. Both mode control
switches use engine vacuum to control the mode
doors, which are operated by vacuum actuators.
On air conditioned vehicles, the outside air intake
can be shut off by selecting the Recirculation Mode
with the mode control knob. This will operate a vac-
uum actuated recirculation door that closes off the
outside fresh air intake and recirculates the air that
is already inside the vehicle.
The optional air conditioner for all models is designed
for the use of non-CFC, R-134a refrigerant. The air con-
ditioning system has an evaporator to cool and dehu-
midify the incoming air prior to blending it with the
Fig. 1 COMMON BLEND-AIR HEATER-AIR
1 - HEATER CORE
2 - BLEND DOOR
3 - EVAPORATOR (A/C ONLY)
4 - RECIRCULATION DOOR (A/C ONLY)
5 - FLOOR/PANEL DOOR
6 - FLOOR/DEFROST DOOR
BR/BEHEATING & AIR CONDITIONING 24 - 1
Page 2731 of 2889
heated air. This air conditioning system uses a fixed ori-
fice tube in the middle of the liquid line to meter refrig-
erant flow to the evaporator coil. To maintain minimum
evaporator temperature and prevent evaporator freez-
ing, the a/c low pressure switch on the accumulator
cycles the compressor clutch.
OPERATION - REFRIGERANT SYSTEM SERVICE
PORT
The high pressure service port is located on the liq-
uid line between the condenser and the evaporator,
near the front of the engine compartment. The low
pressure service port is located on the suction line,
near the accumulator outlet.
Each of the service ports has a threaded plastic
protective cap installed over it from the factory. After
servicing the refrigerant system, always reinstall
both of the service port caps.
DIAGNOSIS AND TESTING - A/C
PERFORMANCE
The air conditioning system is designed to provide
the passenger compartment with low temperature
and low humidity air. The evaporator, located in the
HVAC housing on the dash panel below the instru-
ment panel, is cooled to temperatures near the freez-
ing point. As warm damp air passes through the
cooled evaporator, the air transfers its heat to the
refrigerant in the evaporator tubes and the moisture
in the air condenses on the evaporator fins. During
periods of high heat and humidity, an air condition-
ing system will be more effective in the recirculation
mode (Max-A/C). With the system in the recirculation
mode, only air from the passenger compartment
passes through the evaporator. As the passenger com-
partment air dehumidifies, the air conditioning sys-
tem performance levels improve.
Humidity has an important bearing on the temper-
ature of the air delivered to the interior of the vehi-
cle. It is important to understand the effect that
humidity has on the performance of the air condition-
ing system. When humidity is high, the evaporator
has to perform a double duty. It must lower the air
temperature, and it must lower the temperature of
the moisture in the air that condenses on the evapo-
rator fins. Condensing the moisture in the air trans-
fers heat energy into the evaporator fins and tubing.
This reduces the amount of heat the evaporator can
absorb from the air. High humidity greatly reduces
the ability of the evaporator to lower the temperature
of the air.
However, evaporator capacity used to reduce the
amount of moisture in the air is not wasted. Wring-
ing some of the moisture out of the air entering the
vehicle adds to the comfort of the passengers.
Although, an owner may expect too much from theirair conditioning system on humid days. A perfor-
mance test is the best way to determine whether the
system is performing up to standard. This test also
provides valuable clues as to the possible cause of
trouble with the air conditioning system.
Before proceeding, (Refer to 24 - HEATING & AIR
CONDITIONING/PLUMBING - WARNING) and
(Refer to 24 - HEATING & AIR CONDITIONING/
PLUMBING - CAUTION). The air temperature in
the test room and in the vehicle must be a minimum
of 21É C (70É F) for this test.
(1)
Connect a tachometer and a manifold gauge set.
(2) Set the a/c heater mode control switch knob to
the recirculation mode (Max-A/C) position, the tem-
perature control knob to the full cool position, and
the blower motor switch to the highest speed posi-
tion.
(3) Start the engine and hold the idle speed at
1,000 rpm with the compressor clutch engaged. If the
compressor clutch does not engage, (Refer to 24 -
HEATING & AIR CONDITIONING/CONTROLS/A/C
COMPRESSOR CLUTCH COIL - DIAGNOSIS AND
TESTING).
(4) The engine should be at operating temperature.
The doors and windows must be closed and the hood
must be mostly closed.
(5)
Insert a thermometer in the driver side center
A/C (panel) outlet. Operate the engine for five minutes.
(6) The compressor clutch may cycle, depending
upon the ambient temperature and humidity. If the
clutch cycles, unplug the a/c low pressure switch wire
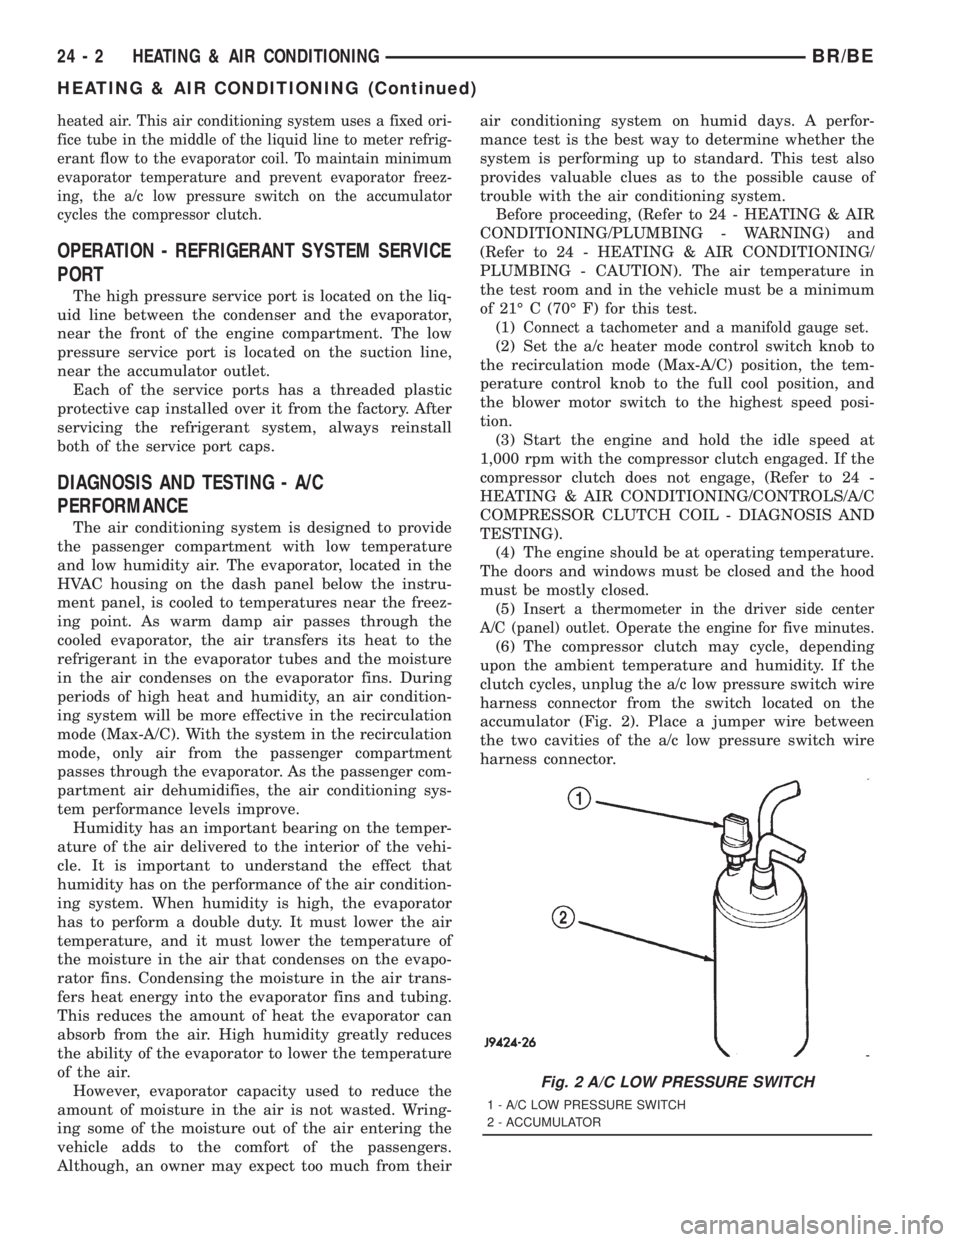
harness connector from the switch located on the
accumulator (Fig. 2). Place a jumper wire between
the two cavities of the a/c low pressure switch wire
harness connector.
Fig. 2 A/C LOW PRESSURE SWITCH
1 - A/C LOW PRESSURE SWITCH
2 - ACCUMULATOR
24 - 2 HEATING & AIR CONDITIONINGBR/BE
HEATING & AIR CONDITIONING (Continued)
Page 2735 of 2889
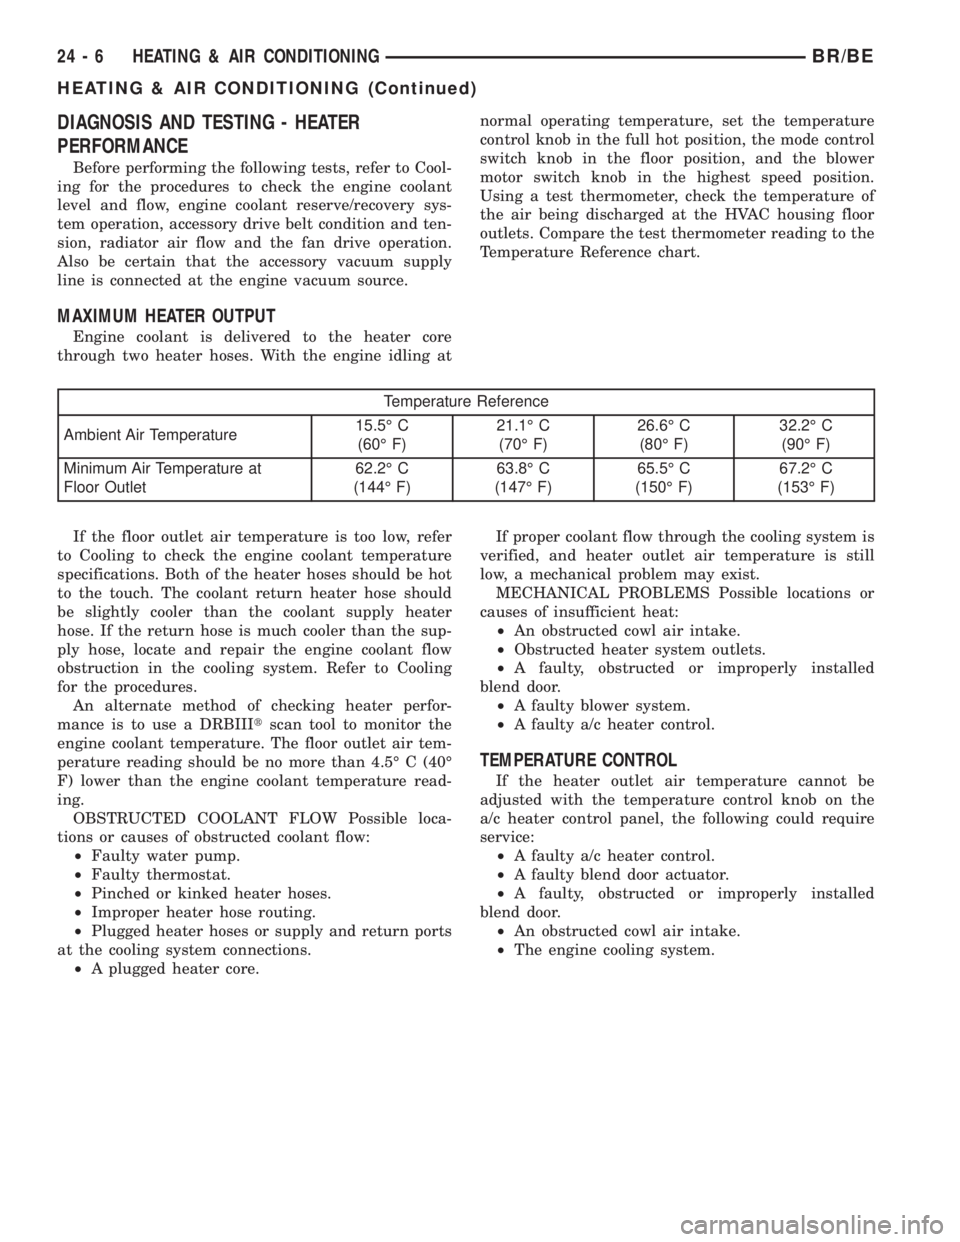
DIAGNOSIS AND TESTING - HEATER
PERFORMANCE
Before performing the following tests, refer to Cool-
ing for the procedures to check the engine coolant
level and flow, engine coolant reserve/recovery sys-
tem operation, accessory drive belt condition and ten-
sion, radiator air flow and the fan drive operation.
Also be certain that the accessory vacuum supply
line is connected at the engine vacuum source.
MAXIMUM HEATER OUTPUT
Engine coolant is delivered to the heater core
through two heater hoses. With the engine idling atnormal operating temperature, set the temperature
control knob in the full hot position, the mode control
switch knob in the floor position, and the blower
motor switch knob in the highest speed position.
Using a test thermometer, check the temperature of
the air being discharged at the HVAC housing floor
outlets. Compare the test thermometer reading to the
Temperature Reference chart.
Temperature Reference
Ambient Air Temperature15.5É C
(60É F)21.1É C
(70É F)26.6É C
(80É F)32.2É C
(90É F)
Minimum Air Temperature at
Floor Outlet62.2É C
(144É F)63.8É C
(147É F)65.5É C
(150É F)67.2É C
(153É F)
If the floor outlet air temperature is too low, refer
to Cooling to check the engine coolant temperature
specifications. Both of the heater hoses should be hot
to the touch. The coolant return heater hose should
be slightly cooler than the coolant supply heater
hose. If the return hose is much cooler than the sup-
ply hose, locate and repair the engine coolant flow
obstruction in the cooling system. Refer to Cooling
for the procedures.
An alternate method of checking heater perfor-
mance is to use a DRBIIItscan tool to monitor the
engine coolant temperature. The floor outlet air tem-
perature reading should be no more than 4.5É C (40É
F) lower than the engine coolant temperature read-
ing.
OBSTRUCTED COOLANT FLOW Possible loca-
tions or causes of obstructed coolant flow:
²Faulty water pump.
²Faulty thermostat.
²Pinched or kinked heater hoses.
²Improper heater hose routing.
²Plugged heater hoses or supply and return ports
at the cooling system connections.
²A plugged heater core.If proper coolant flow through the cooling system is
verified, and heater outlet air temperature is still
low, a mechanical problem may exist.
MECHANICAL PROBLEMS Possible locations or
causes of insufficient heat:
²An obstructed cowl air intake.
²Obstructed heater system outlets.
²A faulty, obstructed or improperly installed
blend door.
²A faulty blower system.
²A faulty a/c heater control.
TEMPERATURE CONTROL
If the heater outlet air temperature cannot be
adjusted with the temperature control knob on the
a/c heater control panel, the following could require
service:
²A faulty a/c heater control.
²A faulty blend door actuator.
²A faulty, obstructed or improperly installed
blend door.
²An obstructed cowl air intake.
²The engine cooling system.
24 - 6 HEATING & AIR CONDITIONINGBR/BE
HEATING & AIR CONDITIONING (Continued)
Page 2740 of 2889
LOCATING VACUUM LEAKS
WARNING: ON VEHICLES EQUIPPED WITH AIR-
BAGS, DISABLE THE AIRBAG SYSTEM BEFORE
ATTEMPTING ANY STEERING WHEEL, STEERING
COLUMN, OR INSTRUMENT PANEL COMPONENT
DIAGNOSIS OR SERVICE. DISCONNECT AND ISO-
LATE THE BATTERY NEGATIVE (GROUND) CABLE,
THEN WAIT TWO MINUTES FOR THE AIRBAG SYS-
TEM CAPACITOR TO DISCHARGE BEFORE PER-
FORMING FURTHER DIAGNOSIS OR SERVICE. THIS
IS THE ONLY SURE WAY TO DISABLE THE AIRBAG
SYSTEM. FAILURE TO TAKE THE PROPER PRE-
CAUTIONS COULD RESULT IN AN ACCIDENTAL
AIRBAG DEPLOYMENT AND POSSIBLE PERSONAL
INJURY.
(1) Disconnect the vacuum harness connector
located between the a/c heater control and the HVAC
housing under the instrument panel.
(2) Connect the test set vacuum hose probe to each
port in the HVAC housing half of the vacuum har-
ness connector, one port at a time, and pause after
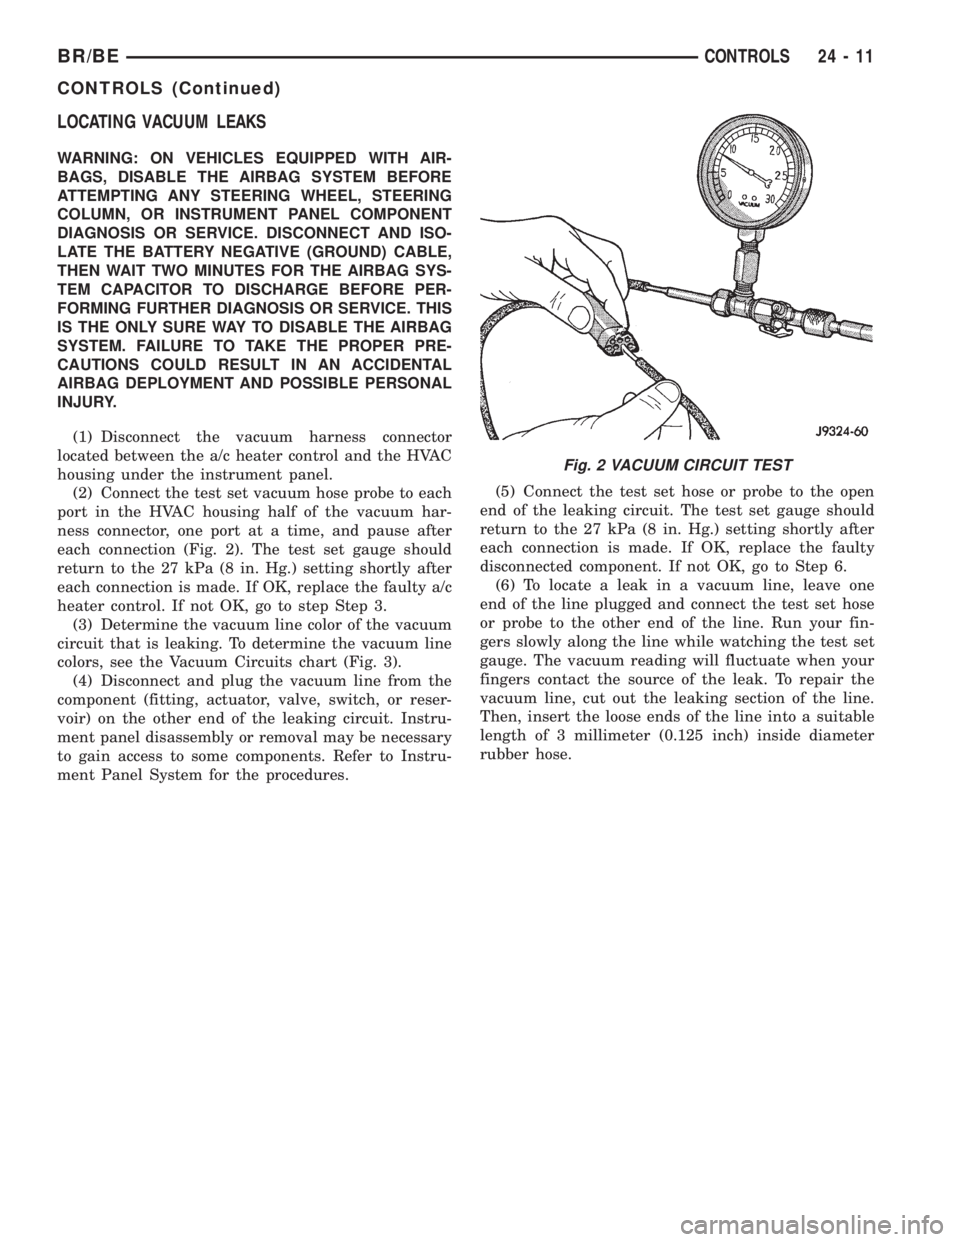
each connection (Fig. 2). The test set gauge should
return to the 27 kPa (8 in. Hg.) setting shortly after
each connection is made. If OK, replace the faulty a/c
heater control. If not OK, go to step Step 3.
(3) Determine the vacuum line color of the vacuum
circuit that is leaking. To determine the vacuum line
colors, see the Vacuum Circuits chart (Fig. 3).
(4) Disconnect and plug the vacuum line from the
component (fitting, actuator, valve, switch, or reser-
voir) on the other end of the leaking circuit. Instru-
ment panel disassembly or removal may be necessary
to gain access to some components. Refer to Instru-
ment Panel System for the procedures.(5) Connect the test set hose or probe to the open
end of the leaking circuit. The test set gauge should
return to the 27 kPa (8 in. Hg.) setting shortly after
each connection is made. If OK, replace the faulty
disconnected component. If not OK, go to Step 6.
(6) To locate a leak in a vacuum line, leave one
end of the line plugged and connect the test set hose
or probe to the other end of the line. Run your fin-
gers slowly along the line while watching the test set
gauge. The vacuum reading will fluctuate when your
fingers contact the source of the leak. To repair the
vacuum line, cut out the leaking section of the line.
Then, insert the loose ends of the line into a suitable
length of 3 millimeter (0.125 inch) inside diameter
rubber hose.
Fig. 2 VACUUM CIRCUIT TEST
BR/BECONTROLS 24 - 11
CONTROLS (Continued)
Page 2742 of 2889
A/C COMPRESSOR CLUTCH
DESCRIPTION
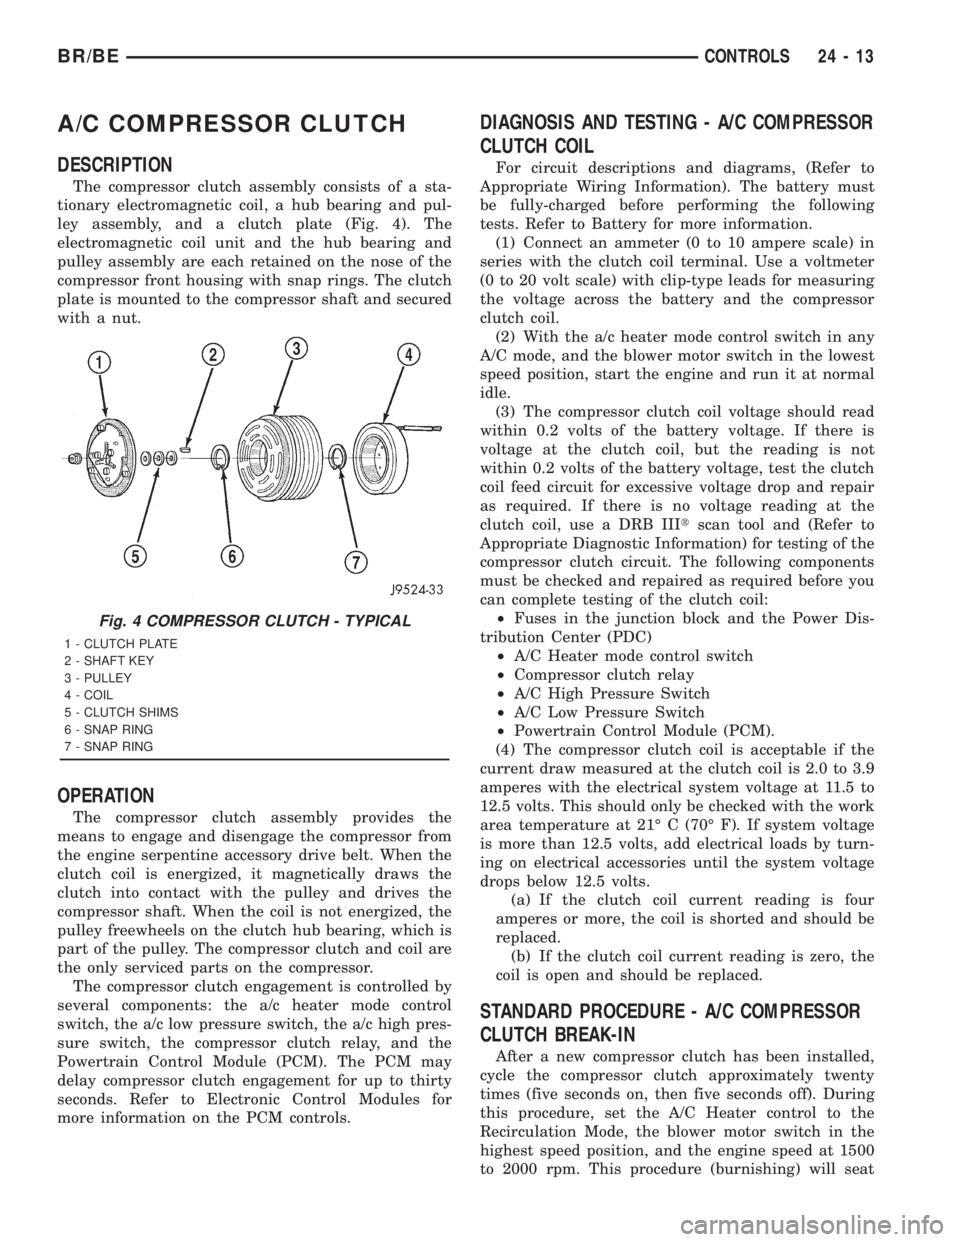
The compressor clutch assembly consists of a sta-
tionary electromagnetic coil, a hub bearing and pul-
ley assembly, and a clutch plate (Fig. 4). The
electromagnetic coil unit and the hub bearing and
pulley assembly are each retained on the nose of the
compressor front housing with snap rings. The clutch
plate is mounted to the compressor shaft and secured
with a nut.
OPERATION
The compressor clutch assembly provides the
means to engage and disengage the compressor from
the engine serpentine accessory drive belt. When the
clutch coil is energized, it magnetically draws the
clutch into contact with the pulley and drives the
compressor shaft. When the coil is not energized, the
pulley freewheels on the clutch hub bearing, which is
part of the pulley. The compressor clutch and coil are
the only serviced parts on the compressor.
The compressor clutch engagement is controlled by
several components: the a/c heater mode control
switch, the a/c low pressure switch, the a/c high pres-
sure switch, the compressor clutch relay, and the
Powertrain Control Module (PCM). The PCM may
delay compressor clutch engagement for up to thirty
seconds. Refer to Electronic Control Modules for
more information on the PCM controls.
DIAGNOSIS AND TESTING - A/C COMPRESSOR
CLUTCH COIL
For circuit descriptions and diagrams, (Refer to
Appropriate Wiring Information). The battery must
be fully-charged before performing the following
tests. Refer to Battery for more information.
(1) Connect an ammeter (0 to 10 ampere scale) in
series with the clutch coil terminal. Use a voltmeter
(0 to 20 volt scale) with clip-type leads for measuring
the voltage across the battery and the compressor
clutch coil.
(2) With the a/c heater mode control switch in any
A/C mode, and the blower motor switch in the lowest
speed position, start the engine and run it at normal
idle.
(3) The compressor clutch coil voltage should read
within 0.2 volts of the battery voltage. If there is
voltage at the clutch coil, but the reading is not
within 0.2 volts of the battery voltage, test the clutch
coil feed circuit for excessive voltage drop and repair
as required. If there is no voltage reading at the
clutch coil, use a DRB IIItscan tool and (Refer to
Appropriate Diagnostic Information) for testing of the
compressor clutch circuit. The following components
must be checked and repaired as required before you
can complete testing of the clutch coil:
²Fuses in the junction block and the Power Dis-
tribution Center (PDC)
²A/C Heater mode control switch
²Compressor clutch relay
²A/C High Pressure Switch
²A/C Low Pressure Switch
²Powertrain Control Module (PCM).
(4) The compressor clutch coil is acceptable if the
current draw measured at the clutch coil is 2.0 to 3.9
amperes with the electrical system voltage at 11.5 to
12.5 volts. This should only be checked with the work
area temperature at 21É C (70É F). If system voltage
is more than 12.5 volts, add electrical loads by turn-
ing on electrical accessories until the system voltage
drops below 12.5 volts.
(a) If the clutch coil current reading is four
amperes or more, the coil is shorted and should be
replaced.
(b) If the clutch coil current reading is zero, the
coil is open and should be replaced.
STANDARD PROCEDURE - A/C COMPRESSOR
CLUTCH BREAK-IN
After a new compressor clutch has been installed,
cycle the compressor clutch approximately twenty
times (five seconds on, then five seconds off). During
this procedure, set the A/C Heater control to the
Recirculation Mode, the blower motor switch in the
highest speed position, and the engine speed at 1500
to 2000 rpm. This procedure (burnishing) will seat
Fig. 4 COMPRESSOR CLUTCH - TYPICAL
1 - CLUTCH PLATE
2 - SHAFT KEY
3 - PULLEY
4 - COIL
5 - CLUTCH SHIMS
6 - SNAP RING
7 - SNAP RING
BR/BECONTROLS 24 - 13
Page 2743 of 2889
the opposing friction surfaces and provide a higher
compressor clutch torque capability.
REMOVAL
The refrigerant system can remain fully-charged
during compressor clutch, pulley, or coil replacement.
The compressor clutch can be serviced in the vehicle.
(1) Disconnect and isolate the battery negative
cable.
(2) On models with the diesel engine option,
remove the compressor from the engine. Do not
remove the refrigerant lines or fittings. (Refer to 24 -
HEATING & AIR CONDITIONING/PLUMBING/A/C
COMPRESSOR - REMOVAL)
(3) Unplug the compressor clutch coil wire harness
connector.
(4) Insert the two pins of the spanner wrench
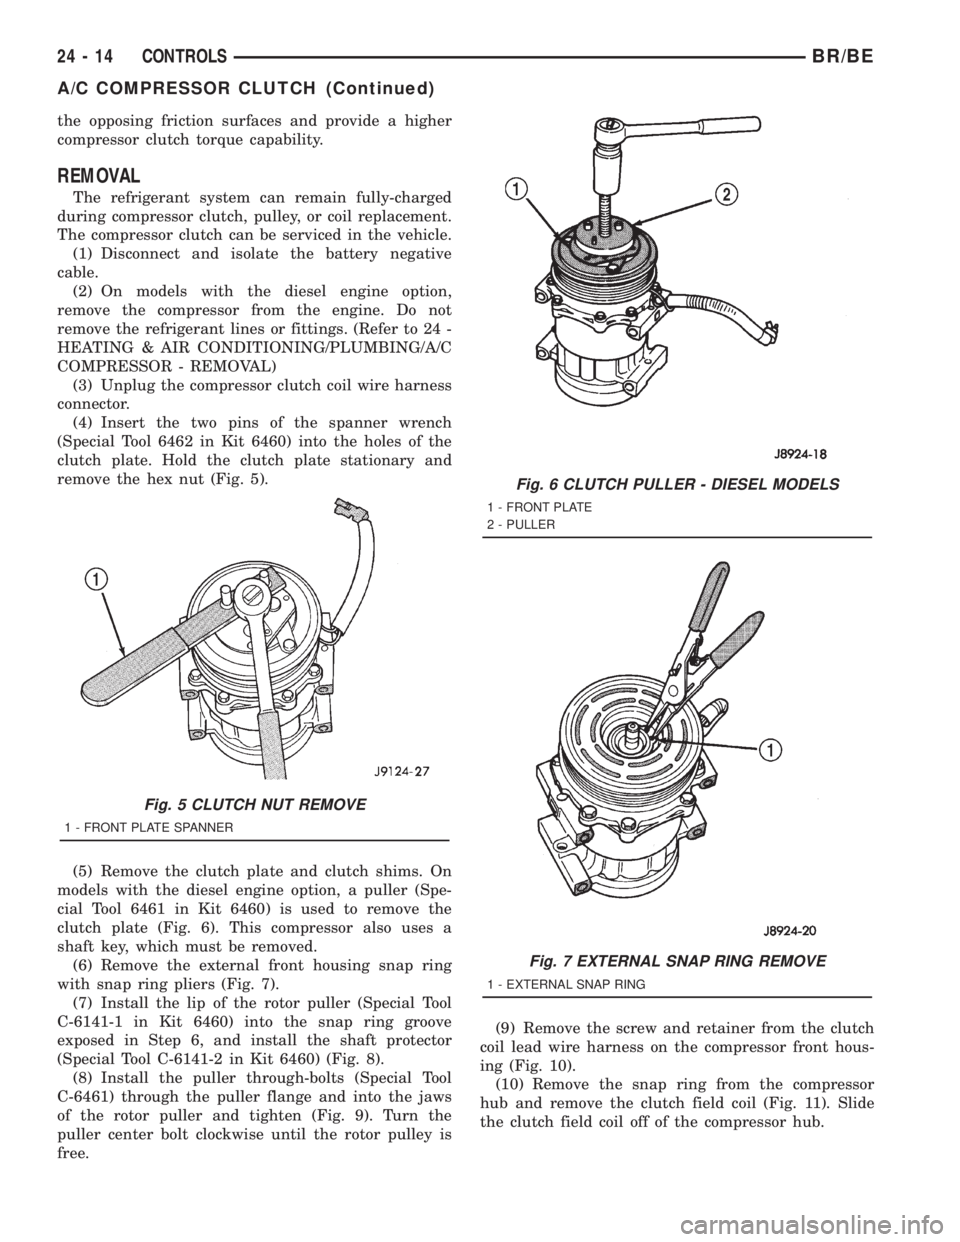
(Special Tool 6462 in Kit 6460) into the holes of the
clutch plate. Hold the clutch plate stationary and
remove the hex nut (Fig. 5).
(5) Remove the clutch plate and clutch shims. On
models with the diesel engine option, a puller (Spe-
cial Tool 6461 in Kit 6460) is used to remove the
clutch plate (Fig. 6). This compressor also uses a
shaft key, which must be removed.
(6) Remove the external front housing snap ring
with snap ring pliers (Fig. 7).
(7) Install the lip of the rotor puller (Special Tool
C-6141-1 in Kit 6460) into the snap ring groove
exposed in Step 6, and install the shaft protector
(Special Tool C-6141-2 in Kit 6460) (Fig. 8).
(8) Install the puller through-bolts (Special Tool
C-6461) through the puller flange and into the jaws
of the rotor puller and tighten (Fig. 9). Turn the
puller center bolt clockwise until the rotor pulley is
free.(9) Remove the screw and retainer from the clutch
coil lead wire harness on the compressor front hous-
ing (Fig. 10).
(10) Remove the snap ring from the compressor
hub and remove the clutch field coil (Fig. 11). Slide
the clutch field coil off of the compressor hub.
Fig. 5 CLUTCH NUT REMOVE
1 - FRONT PLATE SPANNER
Fig. 6 CLUTCH PULLER - DIESEL MODELS
1 - FRONT PLATE
2 - PULLER
Fig. 7 EXTERNAL SNAP RING REMOVE
1 - EXTERNAL SNAP RING
24 - 14 CONTROLSBR/BE
A/C COMPRESSOR CLUTCH (Continued)