2001 DODGE RAM torque
[x] Cancel search: torquePage 149 of 2889
(11) Install yoke washer and anewnut on the
pinion gear. Tighten the nut to 291 N´m (215 ft. lbs.)
minimum.Do not over±tighten.Maximum torque
is 380 N´m (280 ft. lbs.).
CAUTION: Never loosen pinion gear nut to decrease
pinion gear bearing preload torque and never
exceed specified preload torque. If preload torque
is exceeded a new collapsible spacer must be
installed.
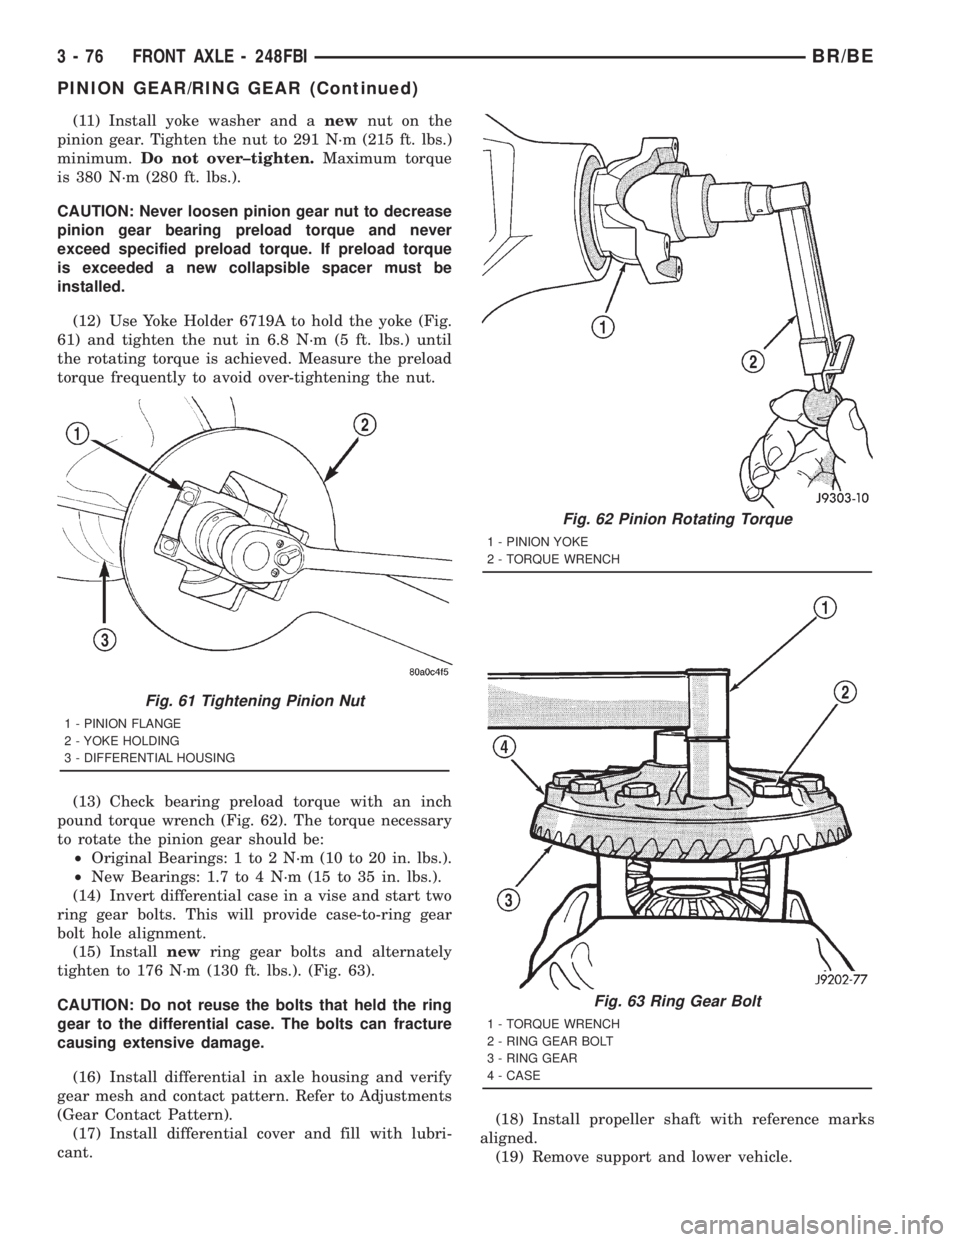
(12) Use Yoke Holder 6719A to hold the yoke (Fig.
61) and tighten the nut in 6.8 N´m (5 ft. lbs.) until
the rotating torque is achieved. Measure the preload
torque frequently to avoid over-tightening the nut.
(13) Check bearing preload torque with an inch
pound torque wrench (Fig. 62). The torque necessary
to rotate the pinion gear should be:
²Original Bearings: 1 to 2 N´m (10 to 20 in. lbs.).
²New Bearings: 1.7 to 4 N´m (15 to 35 in. lbs.).
(14) Invert differential case in a vise and start two
ring gear bolts. This will provide case-to-ring gear
bolt hole alignment.
(15) Installnewring gear bolts and alternately
tighten to 176 N´m (130 ft. lbs.). (Fig. 63).
CAUTION: Do not reuse the bolts that held the ring
gear to the differential case. The bolts can fracture
causing extensive damage.
(16) Install differential in axle housing and verify
gear mesh and contact pattern. Refer to Adjustments
(Gear Contact Pattern).
(17) Install differential cover and fill with lubri-
cant.(18) Install propeller shaft with reference marks
aligned.
(19) Remove support and lower vehicle.
Fig. 61 Tightening Pinion Nut
1 - PINION FLANGE
2 - YOKE HOLDING
3 - DIFFERENTIAL HOUSING
Fig. 62 Pinion Rotating Torque
1 - PINION YOKE
2 - TORQUE WRENCH
Fig. 63 Ring Gear Bolt
1 - TORQUE WRENCH
2 - RING GEAR BOLT
3 - RING GEAR
4 - CASE
3 - 76 FRONT AXLE - 248FBIBR/BE
PINION GEAR/RING GEAR (Continued)
Page 152 of 2889
STANDARD DIFFERENTIAL
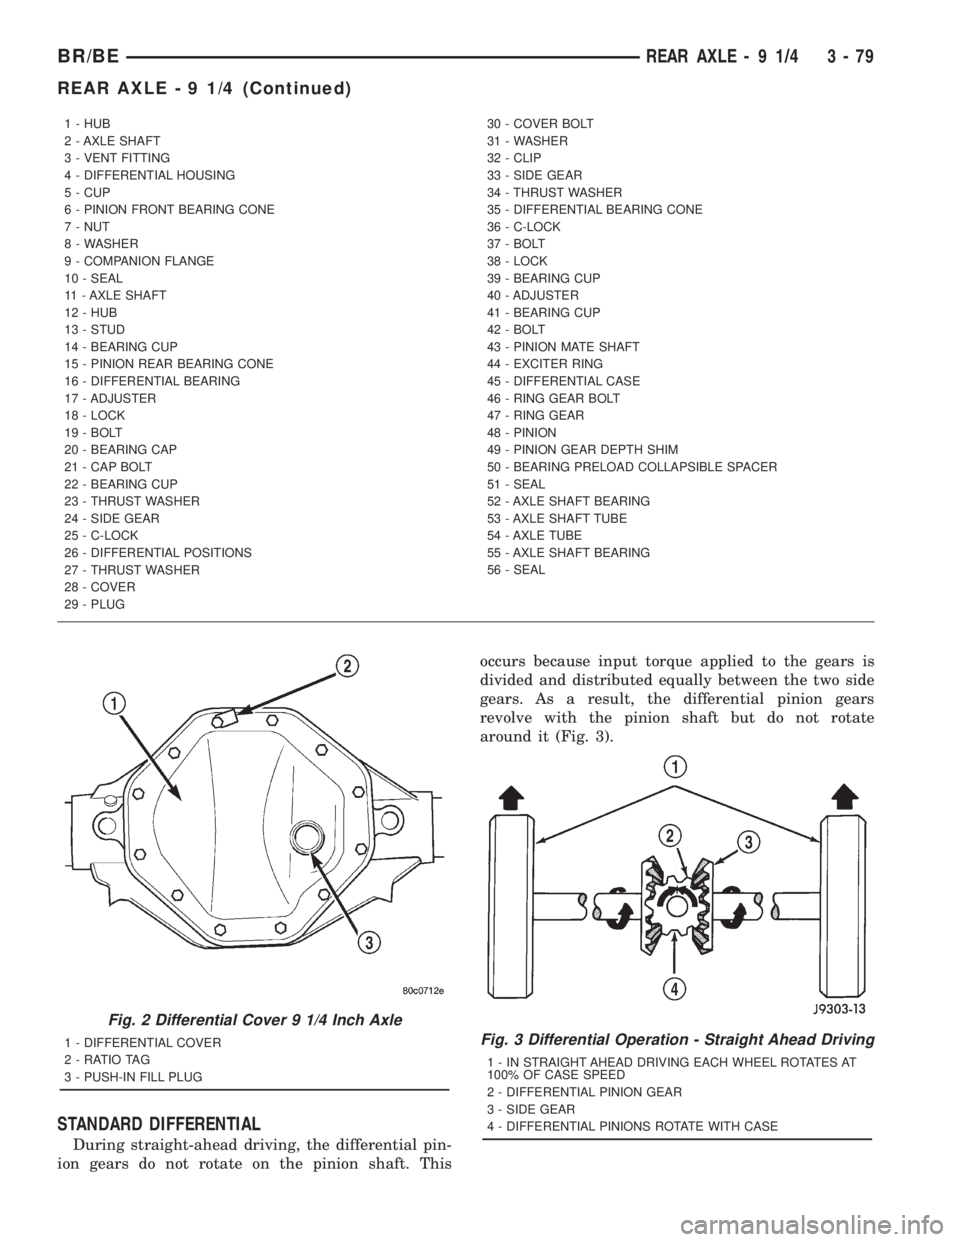
During straight-ahead driving, the differential pin-
ion gears do not rotate on the pinion shaft. Thisoccurs because input torque applied to the gears is
divided and distributed equally between the two side
gears. As a result, the differential pinion gears
revolve with the pinion shaft but do not rotate
around it (Fig. 3).
1 - HUB
2 - AXLE SHAFT
3 - VENT FITTING
4 - DIFFERENTIAL HOUSING
5 - CUP
6 - PINION FRONT BEARING CONE
7 - NUT
8 - WASHER
9 - COMPANION FLANGE
10 - SEAL
11 - AXLE SHAFT
12 - HUB
13 - STUD
14 - BEARING CUP
15 - PINION REAR BEARING CONE
16 - DIFFERENTIAL BEARING
17 - ADJUSTER
18 - LOCK
19 - BOLT
20 - BEARING CAP
21 - CAP BOLT
22 - BEARING CUP
23 - THRUST WASHER
24 - SIDE GEAR
25 - C-LOCK
26 - DIFFERENTIAL POSITIONS
27 - THRUST WASHER
28 - COVER
29 - PLUG30 - COVER BOLT
31 - WASHER
32 - CLIP
33 - SIDE GEAR
34 - THRUST WASHER
35 - DIFFERENTIAL BEARING CONE
36 - C-LOCK
37 - BOLT
38 - LOCK
39 - BEARING CUP
40 - ADJUSTER
41 - BEARING CUP
42 - BOLT
43 - PINION MATE SHAFT
44 - EXCITER RING
45 - DIFFERENTIAL CASE
46 - RING GEAR BOLT
47 - RING GEAR
48 - PINION
49 - PINION GEAR DEPTH SHIM
50 - BEARING PRELOAD COLLAPSIBLE SPACER
51 - SEAL
52 - AXLE SHAFT BEARING
53 - AXLE SHAFT TUBE
54 - AXLE TUBE
55 - AXLE SHAFT BEARING
56 - SEAL
Fig. 2 Differential Cover 9 1/4 Inch Axle
1 - DIFFERENTIAL COVER
2 - RATIO TAG
3 - PUSH-IN FILL PLUGFig. 3 Differential Operation - Straight Ahead Driving
1 - IN STRAIGHT AHEAD DRIVING EACH WHEEL ROTATES AT
100% OF CASE SPEED
2 - DIFFERENTIAL PINION GEAR
3 - SIDE GEAR
4 - DIFFERENTIAL PINIONS ROTATE WITH CASE
BR/BEREAR AXLE - 9 1/4 3 - 79
REAR AXLE - 9 1/4 (Continued)
Page 153 of 2889
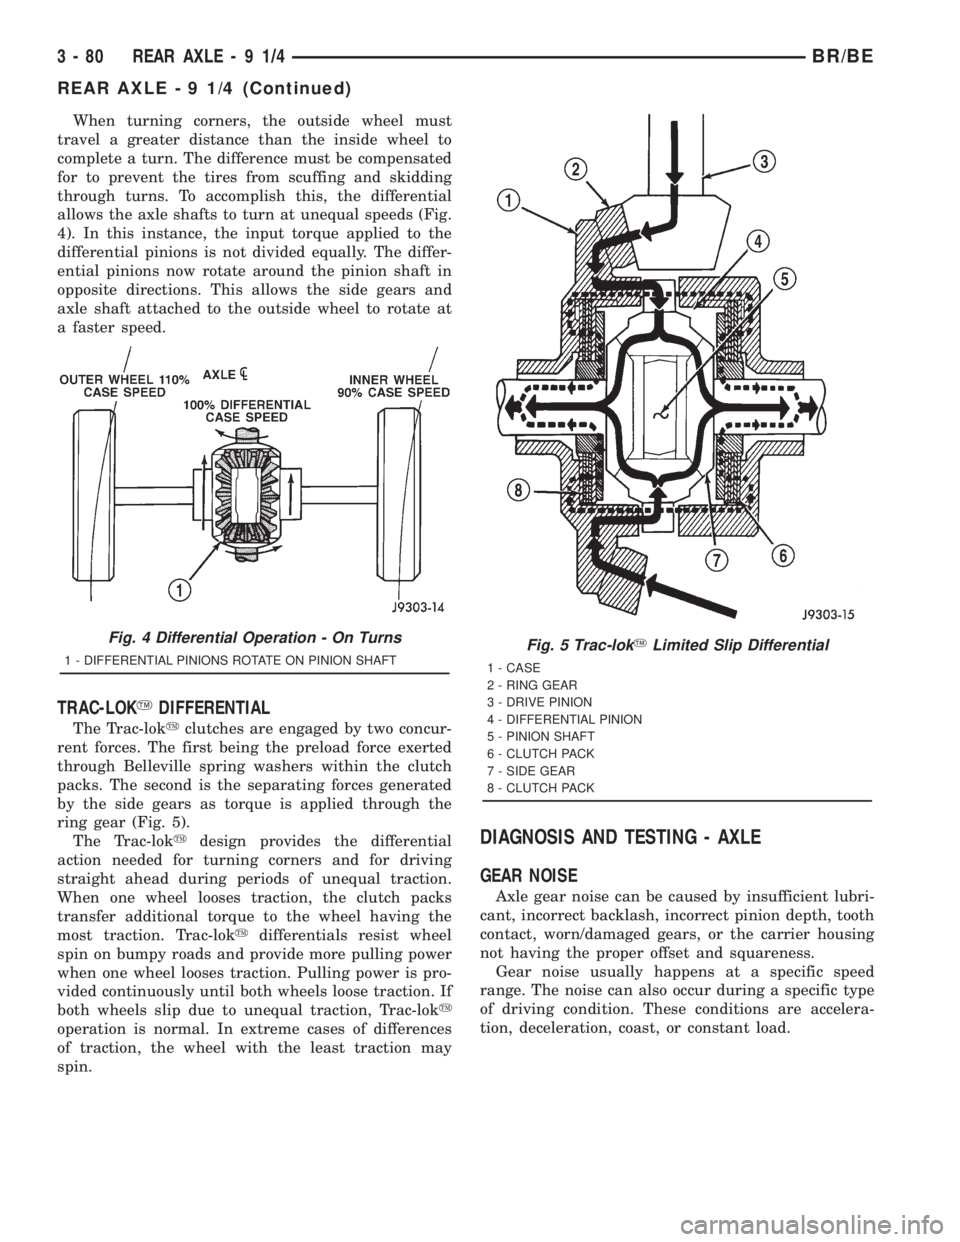
When turning corners, the outside wheel must
travel a greater distance than the inside wheel to
complete a turn. The difference must be compensated
for to prevent the tires from scuffing and skidding
through turns. To accomplish this, the differential
allows the axle shafts to turn at unequal speeds (Fig.
4). In this instance, the input torque applied to the
differential pinions is not divided equally. The differ-
ential pinions now rotate around the pinion shaft in
opposite directions. This allows the side gears and
axle shaft attached to the outside wheel to rotate at
a faster speed.
TRAC-LOKYDIFFERENTIAL
The Trac-lokyclutches are engaged by two concur-
rent forces. The first being the preload force exerted
through Belleville spring washers within the clutch
packs. The second is the separating forces generated
by the side gears as torque is applied through the
ring gear (Fig. 5).
The Trac-lokydesign provides the differential
action needed for turning corners and for driving
straight ahead during periods of unequal traction.
When one wheel looses traction, the clutch packs
transfer additional torque to the wheel having the
most traction. Trac-lokydifferentials resist wheel
spin on bumpy roads and provide more pulling power
when one wheel looses traction. Pulling power is pro-
vided continuously until both wheels loose traction. If
both wheels slip due to unequal traction, Trac-loky
operation is normal. In extreme cases of differences
of traction, the wheel with the least traction may
spin.
DIAGNOSIS AND TESTING - AXLE
GEAR NOISE
Axle gear noise can be caused by insufficient lubri-
cant, incorrect backlash, incorrect pinion depth, tooth
contact, worn/damaged gears, or the carrier housing
not having the proper offset and squareness.
Gear noise usually happens at a specific speed
range. The noise can also occur during a specific type
of driving condition. These conditions are accelera-
tion, deceleration, coast, or constant load.
Fig. 4 Differential Operation - On Turns
1 - DIFFERENTIAL PINIONS ROTATE ON PINION SHAFTFig. 5 Trac-lokYLimited Slip Differential
1 - CASE
2 - RING GEAR
3 - DRIVE PINION
4 - DIFFERENTIAL PINION
5 - PINION SHAFT
6 - CLUTCH PACK
7 - SIDE GEAR
8 - CLUTCH PACK
3 - 80 REAR AXLE-91/4BR/BE
REAR AXLE - 9 1/4 (Continued)
Page 156 of 2889

Condition Possible Causes Correction
Axle Overheating 1. Lubricant level low. 1. Fill differential to correct level.
2. Improper grade of lubricant. 2. Fill differential with the correct fluid
type and quantity.
3. Bearing pre-loads too high. 3. Re-adjust bearing pre-loads.
4. Insufficient ring gear backlash. 4. Re-adjust ring gear backlash.
Gear Teeth Broke 1. Overloading. 1. Replace gears. Examine other gears
and bearings for possible damage.
2. Erratic clutch operation. 2. Replace gears and examine the
remaining parts for damage. Avoid
erratic clutch operation.
3. Ice-spotted pavement. 3. Replace gears and examine
remaining parts for damage.
4. Improper adjustments. 4. Replace gears and examine
remaining parts for damage. Ensure ring
gear backlash is correct.
Axle Noise 1. Insufficient lubricant. 1. Fill differential with the correct fluid
type and quantity.
2. Improper ring gear and pinion
adjustment.2. Check ring gear and pinion contact
pattern. Adjust backlash or pinion depth.
3. Unmatched ring gear and pinion. 3. Replace gears with a matched ring
gear and pinion.
4. Worn teeth on ring gear and/or
pinion.4. Replace ring gear and pinion.
5. Loose pinion bearings. 5. Adjust pinion bearing pre-load.
6. Loose differential bearings. 6. Adjust differential bearing pre-load.
7. Mis-aligned or sprung ring gear. 7. Measure ring gear run-out. Replace
components as necessary.
8. Loose differential bearing cap bolts. 8. Inspect differential components and
replace as necessary. Ensure that the
bearing caps are torqued tot he proper
specification.
9. Housing not machined properly. 9. Replace housing.
REMOVAL
(1) Raise and support the vehicle.
(2) Position a suitable lifting device under the
axle.
(3) Secure axle to device.
(4) Remove the wheels and tires.
(5) Secure brake drums to the axle shaft.
(6) Remove the RWAL sensor from the differential
housing, if necessary. Refer to 5 Brakes for proce-
dures.
(7) Disconnect the brake hose at the axle junction
block. Do not disconnect the brake hydraulic lines at
the wheel cylinders. Refer to 5 Brakes for procedures.(8) Disconnect the parking brake cables and cable
brackets.
(9) Disconnect the vent hose from the axle shaft
tube.
(10) Mark the propeller shaft and companion
flange for installation alignment reference.
(11) Remove propeller shaft.
(12) Disconnect shock absorbers from axle.
(13) Remove the spring clamps and spring brack-
ets. Refer to 2 Suspension for procedures.
(14) Separate the axle from the vehicle.
BR/BEREAR AXLE - 9 1/4 3 - 83
REAR AXLE - 9 1/4 (Continued)
Page 159 of 2889
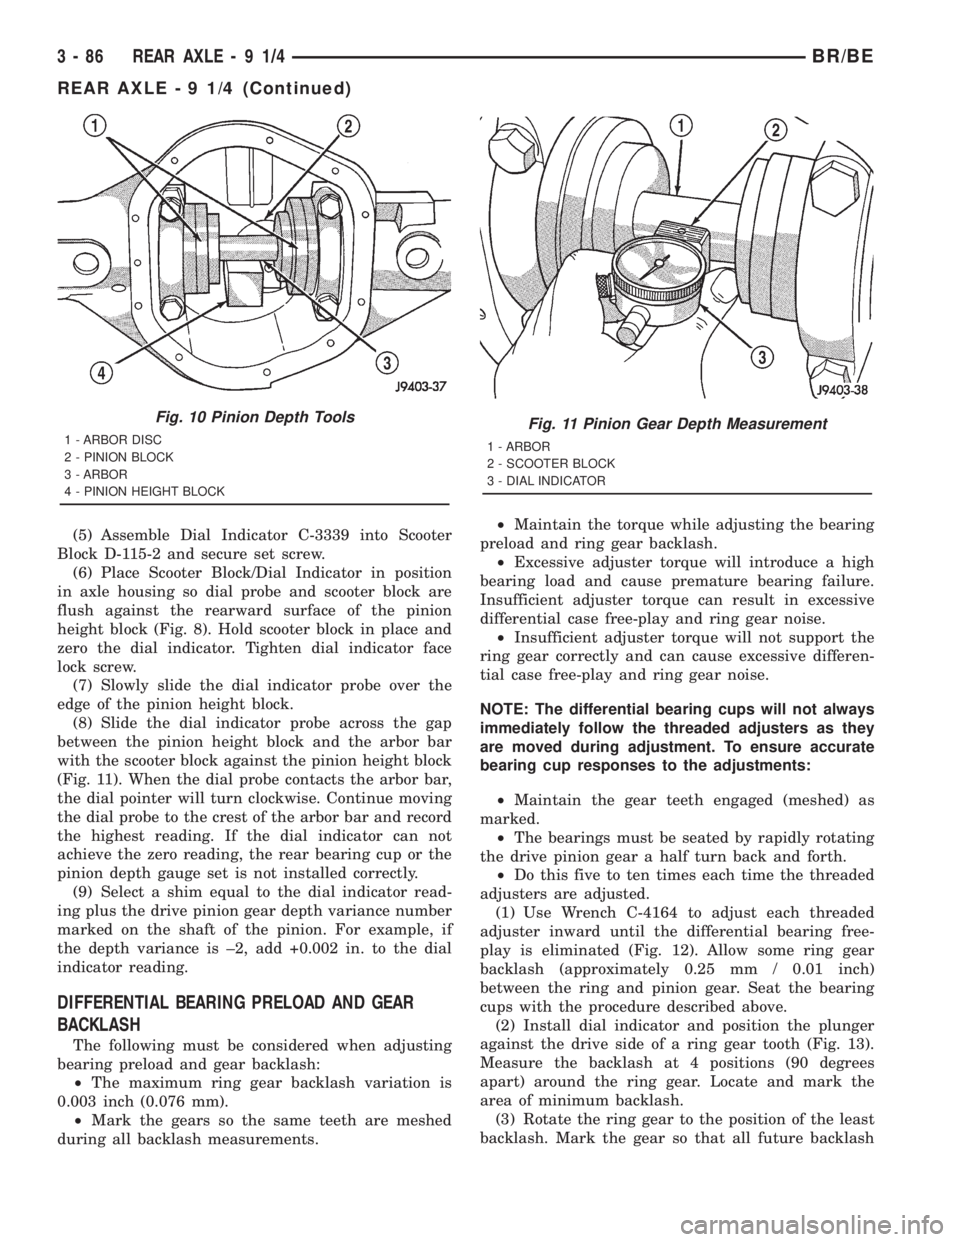
(5) Assemble Dial Indicator C-3339 into Scooter
Block D-115-2 and secure set screw.
(6) Place Scooter Block/Dial Indicator in position
in axle housing so dial probe and scooter block are
flush against the rearward surface of the pinion
height block (Fig. 8). Hold scooter block in place and
zero the dial indicator. Tighten dial indicator face
lock screw.
(7) Slowly slide the dial indicator probe over the
edge of the pinion height block.
(8) Slide the dial indicator probe across the gap
between the pinion height block and the arbor bar
with the scooter block against the pinion height block
(Fig. 11). When the dial probe contacts the arbor bar,
the dial pointer will turn clockwise. Continue moving
the dial probe to the crest of the arbor bar and record
the highest reading. If the dial indicator can not
achieve the zero reading, the rear bearing cup or the
pinion depth gauge set is not installed correctly.
(9) Select a shim equal to the dial indicator read-
ing plus the drive pinion gear depth variance number
marked on the shaft of the pinion. For example, if
the depth variance is ±2, add +0.002 in. to the dial
indicator reading.
DIFFERENTIAL BEARING PRELOAD AND GEAR
BACKLASH
The following must be considered when adjusting
bearing preload and gear backlash:
²The maximum ring gear backlash variation is
0.003 inch (0.076 mm).
²Mark the gears so the same teeth are meshed
during all backlash measurements.²Maintain the torque while adjusting the bearing
preload and ring gear backlash.
²Excessive adjuster torque will introduce a high
bearing load and cause premature bearing failure.
Insufficient adjuster torque can result in excessive
differential case free-play and ring gear noise.
²Insufficient adjuster torque will not support the
ring gear correctly and can cause excessive differen-
tial case free-play and ring gear noise.
NOTE: The differential bearing cups will not always
immediately follow the threaded adjusters as they
are moved during adjustment. To ensure accurate
bearing cup responses to the adjustments:
²Maintain the gear teeth engaged (meshed) as
marked.
²The bearings must be seated by rapidly rotating
the drive pinion gear a half turn back and forth.
²Do this five to ten times each time the threaded
adjusters are adjusted.
(1) Use Wrench C-4164 to adjust each threaded
adjuster inward until the differential bearing free-
play is eliminated (Fig. 12). Allow some ring gear
backlash (approximately 0.25 mm / 0.01 inch)
between the ring and pinion gear. Seat the bearing
cups with the procedure described above.
(2) Install dial indicator and position the plunger
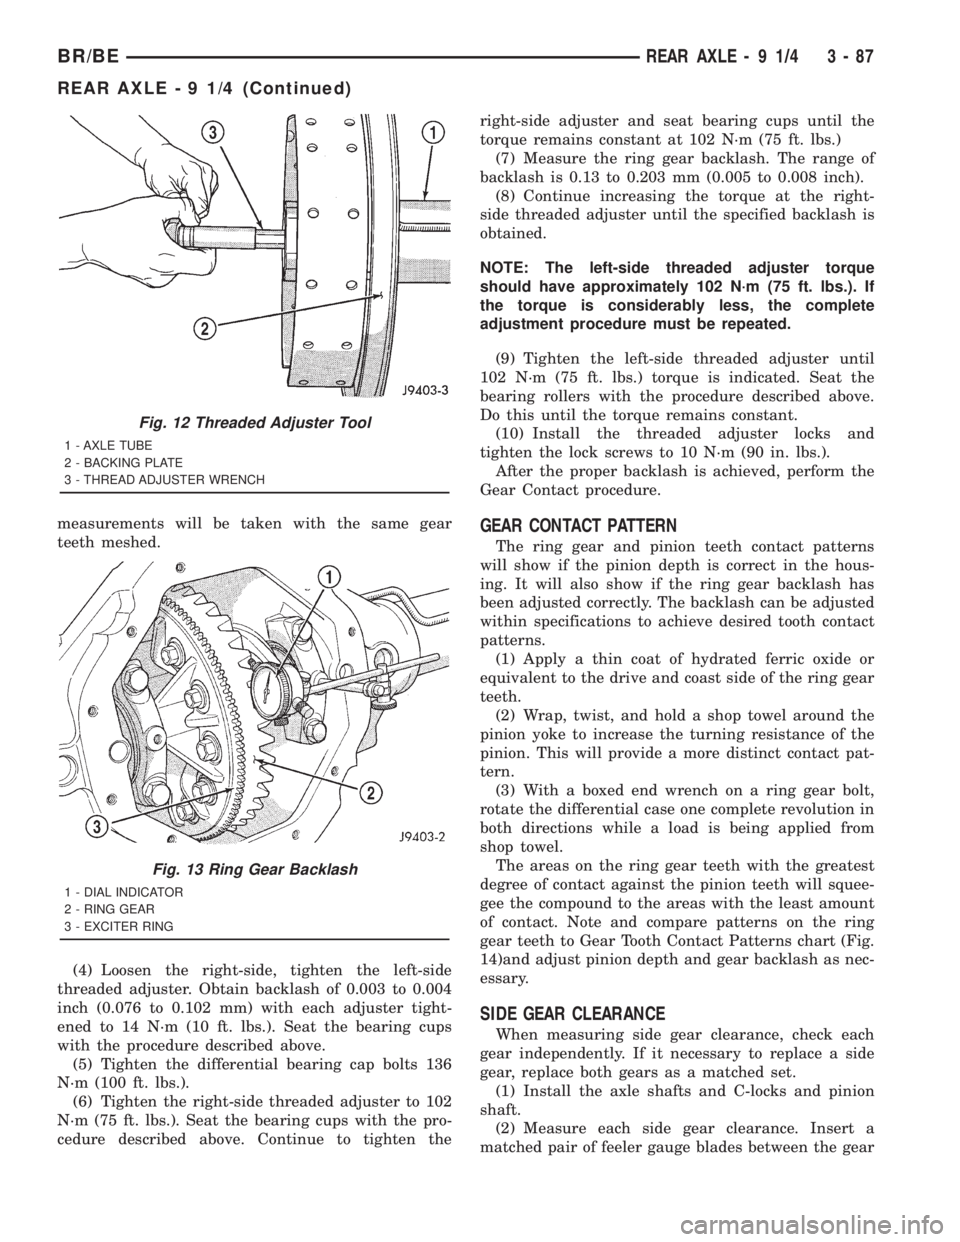
against the drive side of a ring gear tooth (Fig. 13).
Measure the backlash at 4 positions (90 degrees
apart) around the ring gear. Locate and mark the
area of minimum backlash.
(3) Rotate the ring gear to the position of the least
backlash. Mark the gear so that all future backlash
Fig. 10 Pinion Depth Tools
1 - ARBOR DISC
2 - PINION BLOCK
3 - ARBOR
4 - PINION HEIGHT BLOCKFig. 11 Pinion Gear Depth Measurement
1 - ARBOR
2 - SCOOTER BLOCK
3 - DIAL INDICATOR
3 - 86 REAR AXLE-91/4BR/BE
REAR AXLE - 9 1/4 (Continued)
Page 160 of 2889
measurements will be taken with the same gear
teeth meshed.
(4) Loosen the right-side, tighten the left-side
threaded adjuster. Obtain backlash of 0.003 to 0.004
inch (0.076 to 0.102 mm) with each adjuster tight-
ened to 14 N´m (10 ft. lbs.). Seat the bearing cups
with the procedure described above.
(5) Tighten the differential bearing cap bolts 136
N´m (100 ft. lbs.).
(6) Tighten the right-side threaded adjuster to 102
N´m (75 ft. lbs.). Seat the bearing cups with the pro-
cedure described above. Continue to tighten theright-side adjuster and seat bearing cups until the
torque remains constant at 102 N´m (75 ft. lbs.)
(7) Measure the ring gear backlash. The range of
backlash is 0.13 to 0.203 mm (0.005 to 0.008 inch).
(8) Continue increasing the torque at the right-
side threaded adjuster until the specified backlash is
obtained.
NOTE: The left-side threaded adjuster torque
should have approximately 102 N´m (75 ft. lbs.). If
the torque is considerably less, the complete
adjustment procedure must be repeated.
(9) Tighten the left-side threaded adjuster until
102 N´m (75 ft. lbs.) torque is indicated. Seat the
bearing rollers with the procedure described above.
Do this until the torque remains constant.
(10) Install the threaded adjuster locks and
tighten the lock screws to 10 N´m (90 in. lbs.).
After the proper backlash is achieved, perform the
Gear Contact procedure.GEAR CONTACT PATTERN
The ring gear and pinion teeth contact patterns
will show if the pinion depth is correct in the hous-
ing. It will also show if the ring gear backlash has
been adjusted correctly. The backlash can be adjusted
within specifications to achieve desired tooth contact
patterns.
(1) Apply a thin coat of hydrated ferric oxide or
equivalent to the drive and coast side of the ring gear
teeth.
(2) Wrap, twist, and hold a shop towel around the
pinion yoke to increase the turning resistance of the
pinion. This will provide a more distinct contact pat-
tern.
(3) With a boxed end wrench on a ring gear bolt,
rotate the differential case one complete revolution in
both directions while a load is being applied from
shop towel.
The areas on the ring gear teeth with the greatest
degree of contact against the pinion teeth will squee-
gee the compound to the areas with the least amount
of contact. Note and compare patterns on the ring
gear teeth to Gear Tooth Contact Patterns chart (Fig.
14)and adjust pinion depth and gear backlash as nec-
essary.
SIDE GEAR CLEARANCE
When measuring side gear clearance, check each
gear independently. If it necessary to replace a side
gear, replace both gears as a matched set.
(1) Install the axle shafts and C-locks and pinion
shaft.
(2) Measure each side gear clearance. Insert a
matched pair of feeler gauge blades between the gear
Fig. 12 Threaded Adjuster Tool
1 - AXLE TUBE
2 - BACKING PLATE
3 - THREAD ADJUSTER WRENCH
Fig. 13 Ring Gear Backlash
1 - DIAL INDICATOR
2 - RING GEAR
3 - EXCITER RING
BR/BEREAR AXLE - 9 1/4 3 - 87
REAR AXLE - 9 1/4 (Continued)
Page 163 of 2889
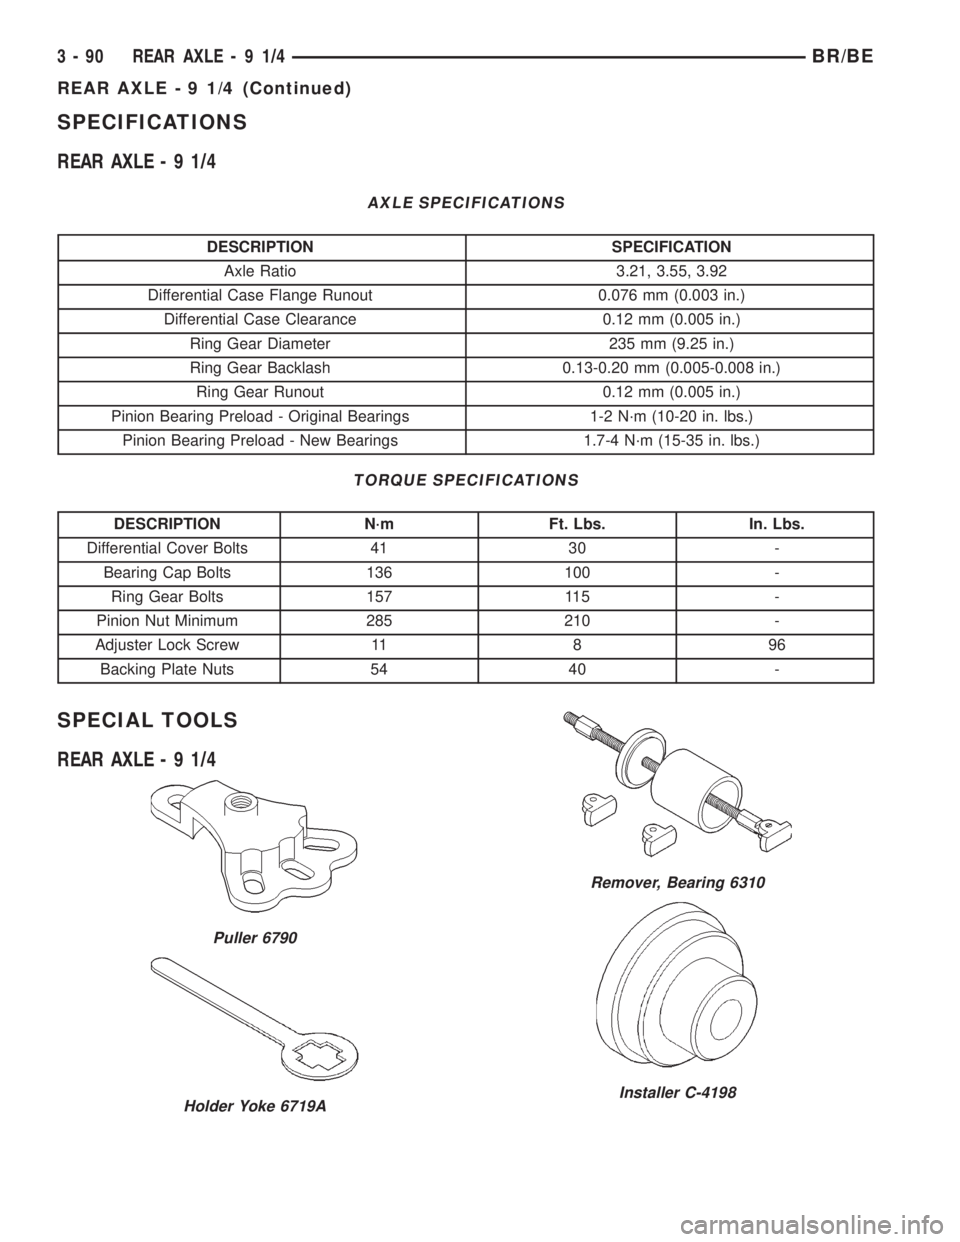
SPECIFICATIONS
REAR AXLE-91/4
AXLE SPECIFICATIONS
DESCRIPTION SPECIFICATION
Axle Ratio 3.21, 3.55, 3.92
Differential Case Flange Runout 0.076 mm (0.003 in.)
Differential Case Clearance 0.12 mm (0.005 in.)
Ring Gear Diameter 235 mm (9.25 in.)
Ring Gear Backlash 0.13-0.20 mm (0.005-0.008 in.)
Ring Gear Runout 0.12 mm (0.005 in.)
Pinion Bearing Preload - Original Bearings 1-2 N´m (10-20 in. lbs.)
Pinion Bearing Preload - New Bearings 1.7-4 N´m (15-35 in. lbs.)
TORQUE SPECIFICATIONS
DESCRIPTION N´m Ft. Lbs. In. Lbs.
Differential Cover Bolts 41 30 -
Bearing Cap Bolts 136 100 -
Ring Gear Bolts 157 115 -
Pinion Nut Minimum 285 210 -
Adjuster Lock Screw 11 8 96
Backing Plate Nuts 54 40 -
SPECIAL TOOLS
REAR AXLE-91/4
Puller 6790
Holder Yoke 6719A
Remover, Bearing 6310
Installer C-4198
3 - 90 REAR AXLE-91/4BR/BE
REAR AXLE - 9 1/4 (Continued)
Page 168 of 2889
INSTALLATION
(1) Wipe the axle tube bore clean. Remove any old
sealer or burrs from the tube.
(2) Install the axle shaft bearing with Installer
C-4198 and Handle C-4171 . Ensure that the bearing
part number is against the installer. Verify that the
bearing in installed straight and the tool fully con-
tacts the axle tube when seating the bearing.
(3) Install anewaxle seal with Installer C-4076-B
and Handle C-4735-1. When the tool contacts the
axle tube, the seal is installed to the correct depth.
(4) Coat the lip of the seal with axle lubricant for
protection prior to installing the axle shaft.
(5) Install the axle shaft.
PINION SEAL
REMOVAL
(1) Raise and support the vehicle.
(2) Mark the universal joint, companion flange and
pinion shaft for installation reference.
(3) Remove the propeller shaft from the companion
flange. Secure the propeller shaft in an upright posi-
tion to prevent damage to the rear universal joint.
(4) Remove the wheel and tire assemblies.
(5) Remove the brake drums to prevent any drag.
The drag may cause a false bearing preload torque
measurement.
(6) Rotate the companion flange three or four
times.
(7) Measure the amount of torque necessary to
rotate the pinion with an inch pound torque wrench.
Record the torque reading for installation reference.
(8) Install socket head bolts into two of the
threaded holes in the companion flange, 180É apart.
(9) Position Holder 6719A against the companion
flange and install a hex head bolt and washer into
one of the remaining threaded holes. Tighten the
bolts so the holder is held to the flange.
(10) Hold the flange with holder and remove the
pinion nut and washer.
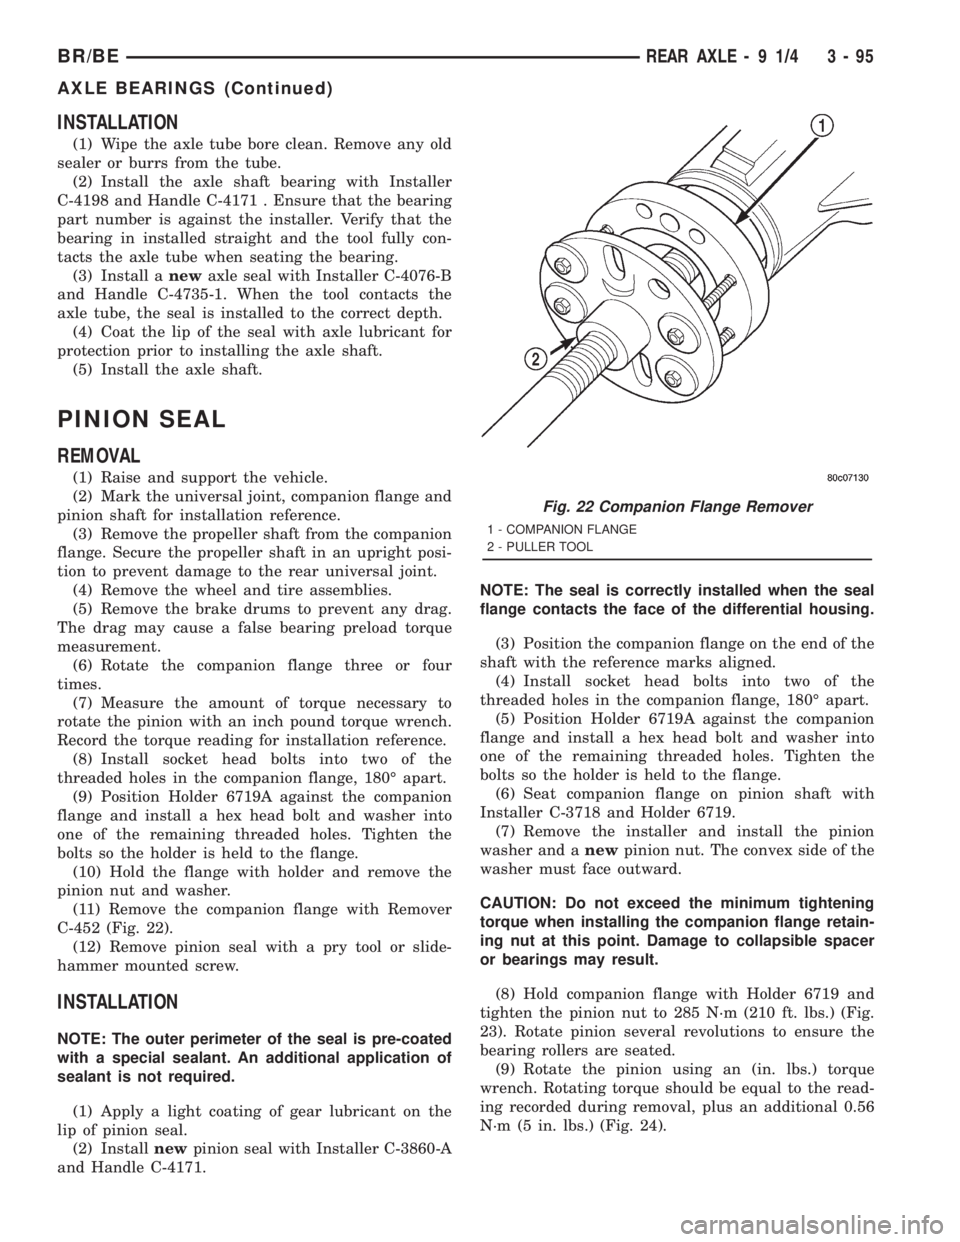
(11) Remove the companion flange with Remover
C-452 (Fig. 22).
(12) Remove pinion seal with a pry tool or slide-
hammer mounted screw.
INSTALLATION
NOTE: The outer perimeter of the seal is pre-coated
with a special sealant. An additional application of
sealant is not required.
(1) Apply a light coating of gear lubricant on the
lip of pinion seal.
(2) Installnewpinion seal with Installer C-3860-A
and Handle C-4171.NOTE: The seal is correctly installed when the seal
flange contacts the face of the differential housing.
(3) Position the companion flange on the end of the
shaft with the reference marks aligned.
(4) Install socket head bolts into two of the
threaded holes in the companion flange, 180É apart.
(5) Position Holder 6719A against the companion
flange and install a hex head bolt and washer into
one of the remaining threaded holes. Tighten the
bolts so the holder is held to the flange.
(6) Seat companion flange on pinion shaft with
Installer C-3718 and Holder 6719.
(7) Remove the installer and install the pinion
washer and anewpinion nut. The convex side of the
washer must face outward.
CAUTION: Do not exceed the minimum tightening
torque when installing the companion flange retain-
ing nut at this point. Damage to collapsible spacer
or bearings may result.
(8) Hold companion flange with Holder 6719 and
tighten the pinion nut to 285 N´m (210 ft. lbs.) (Fig.
23). Rotate pinion several revolutions to ensure the
bearing rollers are seated.
(9) Rotate the pinion using an (in. lbs.) torque
wrench. Rotating torque should be equal to the read-
ing recorded during removal, plus an additional 0.56
N´m (5 in. lbs.) (Fig. 24).
Fig. 22 Companion Flange Remover
1 - COMPANION FLANGE
2 - PULLER TOOL
BR/BEREAR AXLE - 9 1/4 3 - 95
AXLE BEARINGS (Continued)