2001 DODGE RAM service
[x] Cancel search: servicePage 171 of 2889
ASSEMBLY
(1) Install differential side gears and thrust wash-
ers.
(2) Install differential pinion and thrust washers.
(3) Install the pinion shaft.
(4) Align the hole in the pinion shaft with the hole
in the differential case and install the pinion shaft
lock screw.
(5) Lubricate all differential components with
hypoid gear lubricant.
INSTALLATION
(1) Apply a coating of hypoid gear lubricant to the
differential bearings, bearing cups, and threaded
adjusters. A dab of grease can be used to keep the
adjusters in position. Carefully position the assem-
bled differential case in the housing.
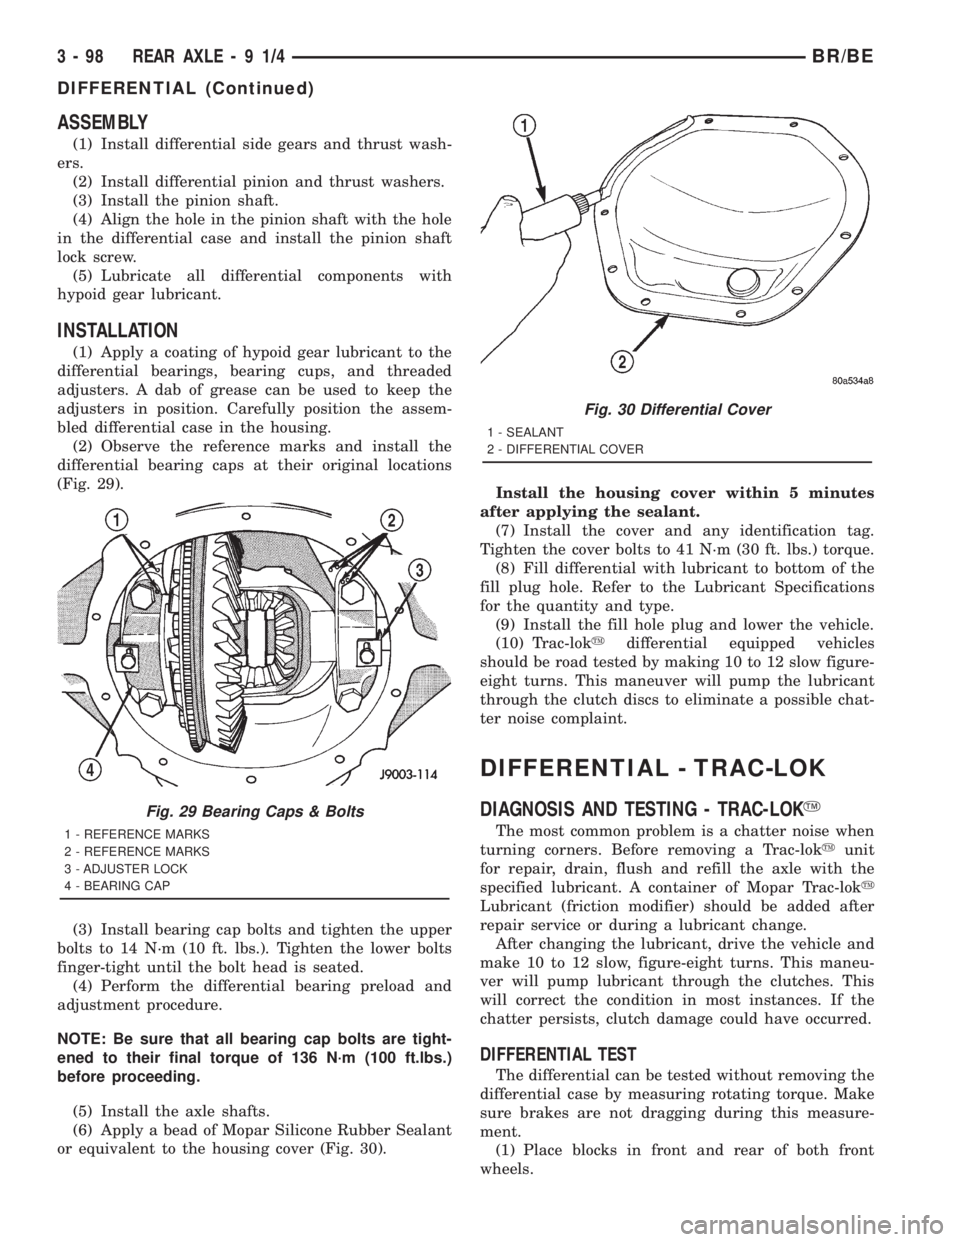
(2) Observe the reference marks and install the
differential bearing caps at their original locations
(Fig. 29).
(3) Install bearing cap bolts and tighten the upper
bolts to 14 N´m (10 ft. lbs.). Tighten the lower bolts
finger-tight until the bolt head is seated.
(4) Perform the differential bearing preload and
adjustment procedure.
NOTE: Be sure that all bearing cap bolts are tight-
ened to their final torque of 136 N´m (100 ft.lbs.)
before proceeding.
(5) Install the axle shafts.
(6) Apply a bead of Mopar Silicone Rubber Sealant
or equivalent to the housing cover (Fig. 30).Install the housing cover within 5 minutes
after applying the sealant.
(7) Install the cover and any identification tag.
Tighten the cover bolts to 41 N´m (30 ft. lbs.) torque.
(8) Fill differential with lubricant to bottom of the
fill plug hole. Refer to the Lubricant Specifications
for the quantity and type.
(9) Install the fill hole plug and lower the vehicle.
(10) Trac-lokydifferential equipped vehicles
should be road tested by making 10 to 12 slow figure-
eight turns. This maneuver will pump the lubricant
through the clutch discs to eliminate a possible chat-
ter noise complaint.
DIFFERENTIAL - TRAC-LOK
DIAGNOSIS AND TESTING - TRAC-LOKY
The most common problem is a chatter noise when
turning corners. Before removing a Trac-lokyunit
for repair, drain, flush and refill the axle with the
specified lubricant. A container of Mopar Trac-loky
Lubricant (friction modifier) should be added after
repair service or during a lubricant change.
After changing the lubricant, drive the vehicle and
make 10 to 12 slow, figure-eight turns. This maneu-
ver will pump lubricant through the clutches. This
will correct the condition in most instances. If the
chatter persists, clutch damage could have occurred.
DIFFERENTIAL TEST
The differential can be tested without removing the
differential case by measuring rotating torque. Make
sure brakes are not dragging during this measure-
ment.
(1) Place blocks in front and rear of both front
wheels.
Fig. 29 Bearing Caps & Bolts
1 - REFERENCE MARKS
2 - REFERENCE MARKS
3 - ADJUSTER LOCK
4 - BEARING CAP
Fig. 30 Differential Cover
1 - SEALANT
2 - DIFFERENTIAL COVER
3 - 98 REAR AXLE-91/4BR/BE
DIFFERENTIAL (Continued)
Page 172 of 2889
(2) Raise one rear wheel until it is completely off
the ground.
(3) Engine off, transmission in neutral, and park-
ing brake off.
(4) Remove wheel and bolt Special Tool 6790 or
equivalent tool to studs.
(5) Use torque wrench on special tool to rotate
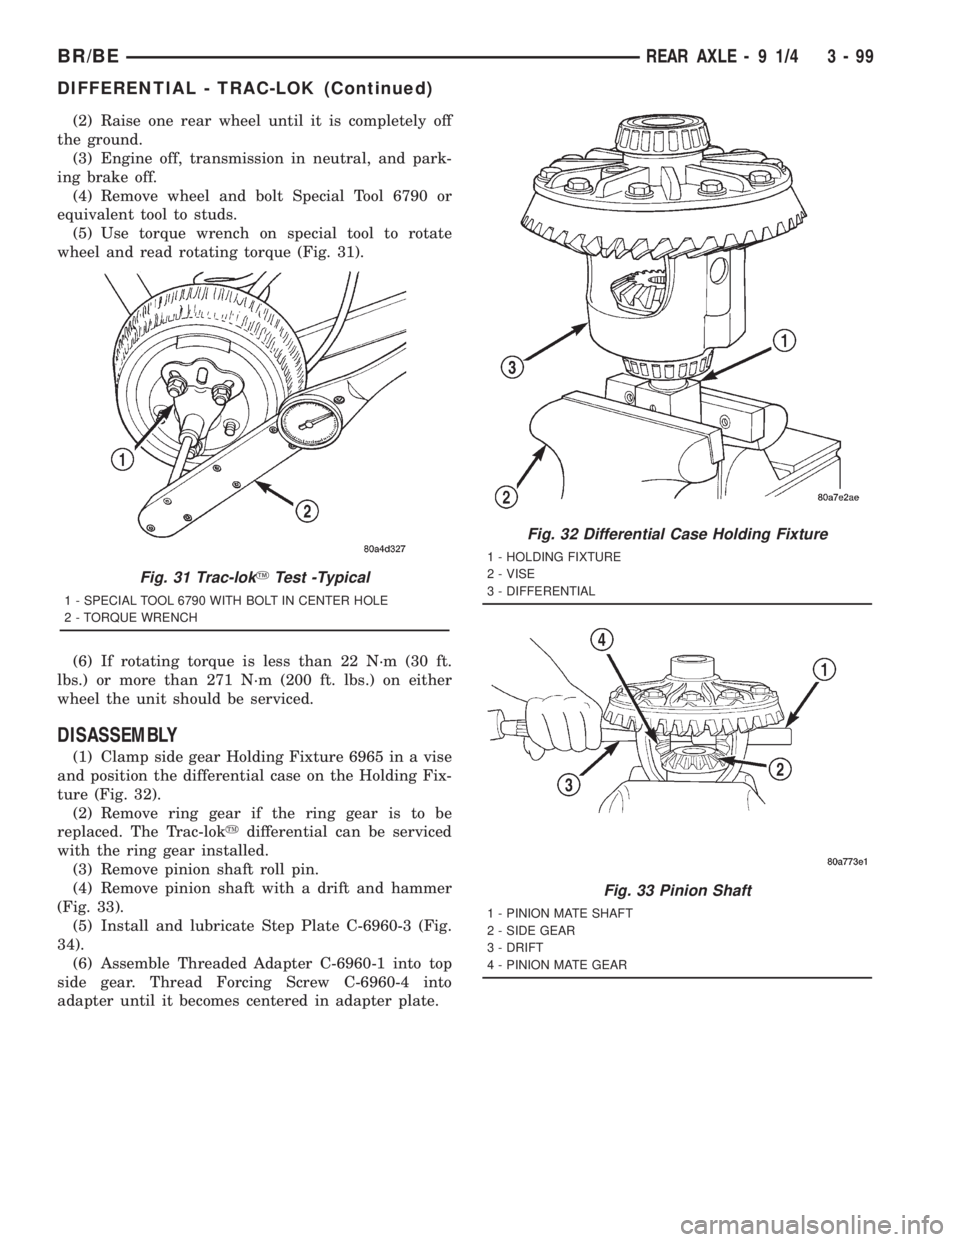
wheel and read rotating torque (Fig. 31).
(6) If rotating torque is less than 22 N´m (30 ft.
lbs.) or more than 271 N´m (200 ft. lbs.) on either
wheel the unit should be serviced.
DISASSEMBLY
(1) Clamp side gear Holding Fixture 6965 in a vise
and position the differential case on the Holding Fix-
ture (Fig. 32).
(2) Remove ring gear if the ring gear is to be
replaced. The Trac-lokydifferential can be serviced
with the ring gear installed.
(3) Remove pinion shaft roll pin.
(4) Remove pinion shaft with a drift and hammer
(Fig. 33).
(5) Install and lubricate Step Plate C-6960-3 (Fig.
34).
(6) Assemble Threaded Adapter C-6960-1 into top
side gear. Thread Forcing Screw C-6960-4 into
adapter until it becomes centered in adapter plate.
Fig. 31 Trac-lokYTest -Typical
1 - SPECIAL TOOL 6790 WITH BOLT IN CENTER HOLE
2 - TORQUE WRENCH
Fig. 32 Differential Case Holding Fixture
1 - HOLDING FIXTURE
2 - VISE
3 - DIFFERENTIAL
Fig. 33 Pinion Shaft
1 - PINION MATE SHAFT
2 - SIDE GEAR
3 - DRIFT
4 - PINION MATE GEAR
BR/BEREAR AXLE - 9 1/4 3 - 99
DIFFERENTIAL - TRAC-LOK (Continued)
Page 176 of 2889
DIFFERENTIAL CASE
BEARINGS
REMOVAL
(1) Remove differential case from axle housing.
(2) Remove bearings from the differential case
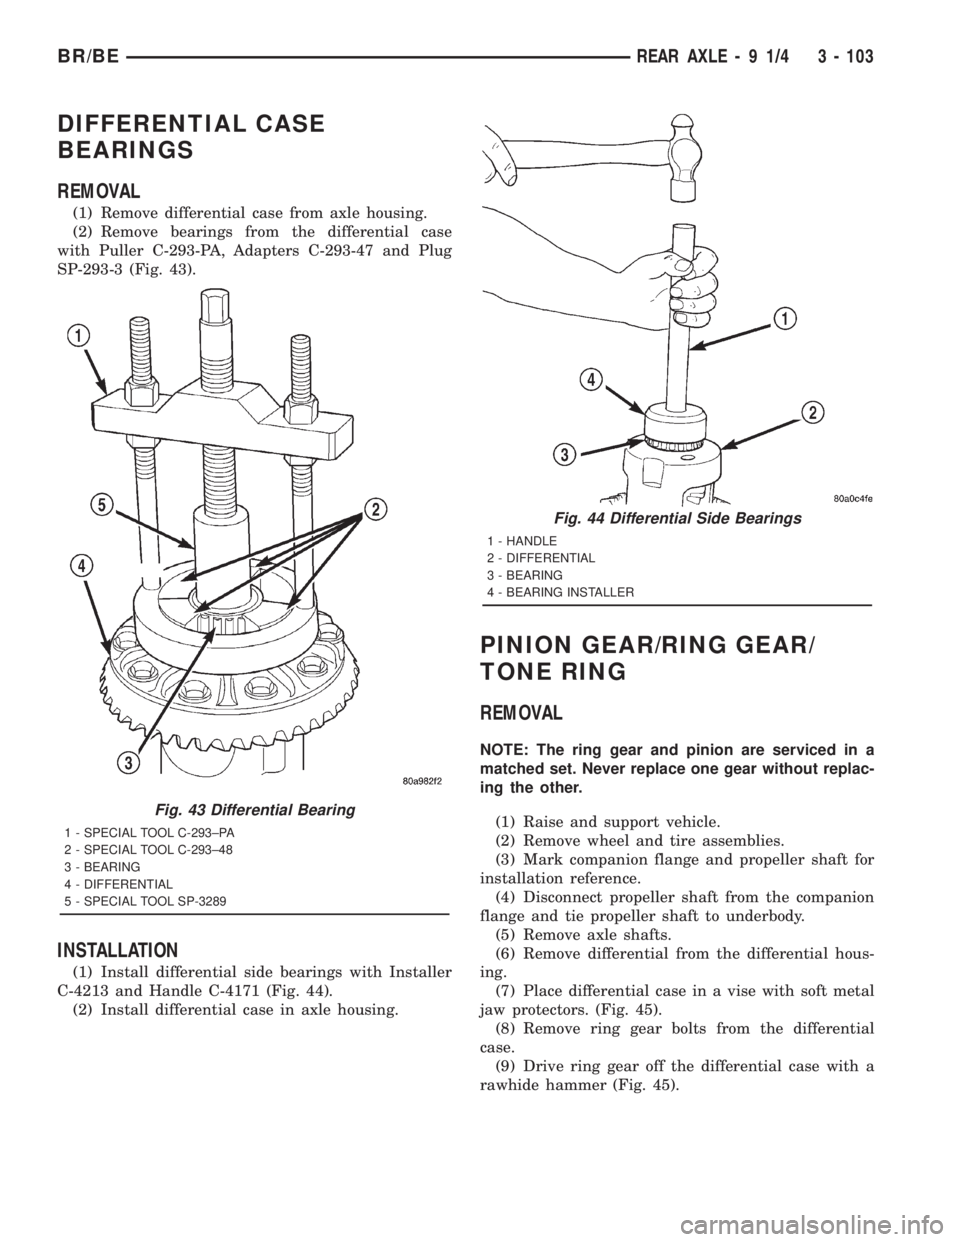
with Puller C-293-PA, Adapters C-293-47 and Plug
SP-293-3 (Fig. 43).
INSTALLATION
(1) Install differential side bearings with Installer
C-4213 and Handle C-4171 (Fig. 44).
(2) Install differential case in axle housing.
PINION GEAR/RING GEAR/
TONE RING
REMOVAL
NOTE: The ring gear and pinion are serviced in a
matched set. Never replace one gear without replac-
ing the other.
(1) Raise and support vehicle.
(2) Remove wheel and tire assemblies.
(3) Mark companion flange and propeller shaft for
installation reference.
(4) Disconnect propeller shaft from the companion
flange and tie propeller shaft to underbody.
(5) Remove axle shafts.
(6) Remove differential from the differential hous-
ing.
(7) Place differential case in a vise with soft metal
jaw protectors. (Fig. 45).
(8) Remove ring gear bolts from the differential
case.
(9) Drive ring gear off the differential case with a
rawhide hammer (Fig. 45).
Fig. 43 Differential Bearing
1 - SPECIAL TOOL C-293±PA
2 - SPECIAL TOOL C-293±48
3 - BEARING
4 - DIFFERENTIAL
5 - SPECIAL TOOL SP-3289
Fig. 44 Differential Side Bearings
1 - HANDLE
2 - DIFFERENTIAL
3 - BEARING
4 - BEARING INSTALLER
BR/BEREAR AXLE - 9 1/4 3 - 103
Page 178 of 2889
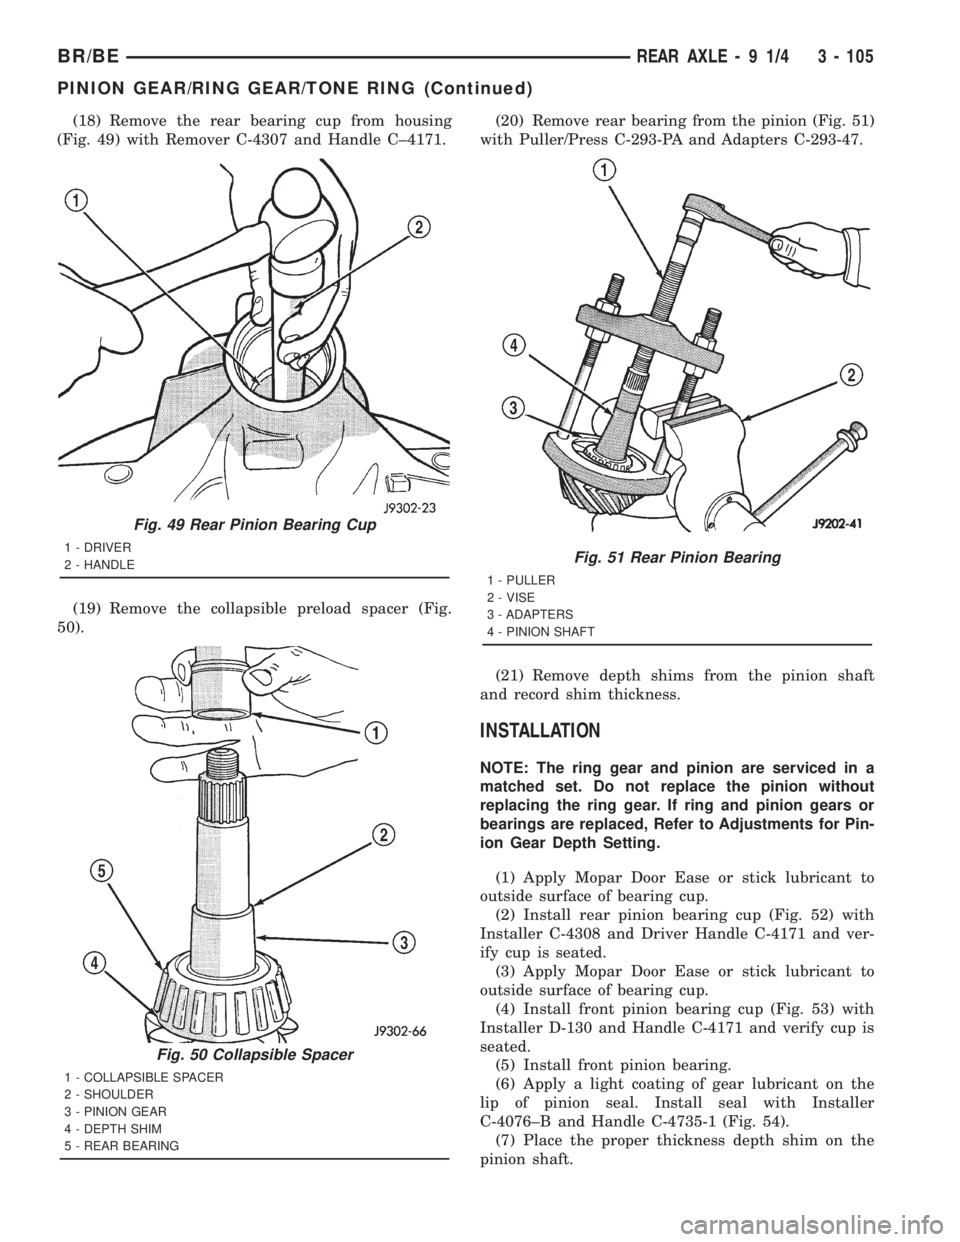
(18) Remove the rear bearing cup from housing
(Fig. 49) with Remover C-4307 and Handle C±4171.
(19) Remove the collapsible preload spacer (Fig.
50).(20) Remove rear bearing from the pinion (Fig. 51)
with Puller/Press C-293-PA and Adapters C-293-47.
(21) Remove depth shims from the pinion shaft
and record shim thickness.
INSTALLATION
NOTE: The ring gear and pinion are serviced in a
matched set. Do not replace the pinion without
replacing the ring gear. If ring and pinion gears or
bearings are replaced, Refer to Adjustments for Pin-
ion Gear Depth Setting.
(1) Apply Mopar Door Ease or stick lubricant to
outside surface of bearing cup.
(2) Install rear pinion bearing cup (Fig. 52) with
Installer C-4308 and Driver Handle C-4171 and ver-
ify cup is seated.
(3) Apply Mopar Door Ease or stick lubricant to
outside surface of bearing cup.
(4) Install front pinion bearing cup (Fig. 53) with
Installer D-130 and Handle C-4171 and verify cup is
seated.
(5) Install front pinion bearing.
(6) Apply a light coating of gear lubricant on the
lip of pinion seal. Install seal with Installer
C-4076±B and Handle C-4735-1 (Fig. 54).
(7) Place the proper thickness depth shim on the
pinion shaft.
Fig. 49 Rear Pinion Bearing Cup
1 - DRIVER
2 - HANDLE
Fig. 50 Collapsible Spacer
1 - COLLAPSIBLE SPACER
2 - SHOULDER
3 - PINION GEAR
4 - DEPTH SHIM
5 - REAR BEARING
Fig. 51 Rear Pinion Bearing
1 - PULLER
2 - VISE
3 - ADAPTERS
4 - PINION SHAFT
BR/BEREAR AXLE - 9 1/4 3 - 105
PINION GEAR/RING GEAR/TONE RING (Continued)
Page 182 of 2889

REAR AXLE - 248RBI
TABLE OF CONTENTS
page page
REAR AXLE - 248RBI
DESCRIPTION..........................109
OPERATION............................109
DIAGNOSIS AND TESTING.................111
AXLE...............................111
REMOVAL.............................113
INSTALLATION..........................114
ADJUSTMENTS.........................114
SPECIFICATIONS........................122
SPECIAL TOOLS........................122
AXLE SHAFTS
REMOVAL.............................125
INSTALLATION..........................125
AXLE BEARINGS
REMOVAL.............................125
INSTALLATION..........................125
PINION SEAL
REMOVAL.............................125INSTALLATION..........................125
DIFFERENTIAL
REMOVAL.............................127
DISASSEMBLY..........................128
ASSEMBLY............................128
INSTALLATION..........................129
DIFFERENTIAL - TRAC-LOK
DIAGNOSIS AND TESTING................130
TRAC-LOK...........................130
DISASSEMBLY..........................130
ASSEMBLY............................132
DIFFERENTIAL CASE BEARINGS
REMOVAL.............................134
INSTALLATION..........................134
PINION GEAR/RING GEAR/TONE RING
REMOVAL.............................135
INSTALLATION..........................137
REAR AXLE - 248RBI
DESCRIPTION
The Rear Beam-design Iron (RBI) axle housings
consist of an iron center casting (differential housing)
with axle shaft tubes extending from either side. The
tubes are pressed in to form a one-piece axle housing.
The integral type housing, hypoid gear design has
the centerline of the pinion set below the centerline
of the ring gear.
The axles are equipped with full-floating axle
shafts, meaning that loads are supported by the axle
housing tubes. The full-float axle shafts are retained
by bolts attached to the hub. The hub rides on two
bearings at the outboard end of the axle tube. The
axle shafts can be removed without disturbing or
removing the wheel bearings. The wheel bearings are
opposed tapered roller bearings and are contained in
the hub assembly.
The removable, stamped steel cover provides a
means for inspection and service without removing
the complete axle from the vehicle. A small, stamped
metal axle gear ratio identification tag is attached to
the housing cover via one of the cover bolts. This tag
also identifies the number of ring and pinion teeth.
The rear wheel anti-lock (RWAL) brake speed sen-
sor is attached to the top, forward exterior of the dif-
ferential housing. A seal is located between the
sensor and the wire harness connector. The seal mustbe in place when the wire connector is connected to
the sensor. The RWAL brake exciter ring is press-fit-
ted onto the differential case against the ring gear
flange.
The differential case for the standard differentials
and the Trac-lokydifferential are a one-piece design.
The differential pinion mate shaft is retained with a
roll pin. Differential bearing preload and ring gear
backlash are adjusted by the use of shims located
between the differential bearing cones and case. Pin-
ion bearing preload is set and maintained by the use
of a solid shims.
OPERATION
STANDARD DIFFERENTIAL
The axle receives power from the transmission/
transfer case through the rear propeller shaft. The
rear propeller shaft is connected to the pinion gear
which rotates the differential through the gear mesh
with the ring gear bolted to the differential case. The
engine power is transmitted to the axle shafts
through the pinion mate and side gears. The side
gears are splined to the axle shafts.
During straight-ahead driving, the differential pin-
ion gears do not rotate on the pinion mate shaft. This
occurs because input torque applied to the gears is
divided and distributed equally between the two side
BR/BEREAR AXLE - 248RBI 3 - 109
Page 185 of 2889
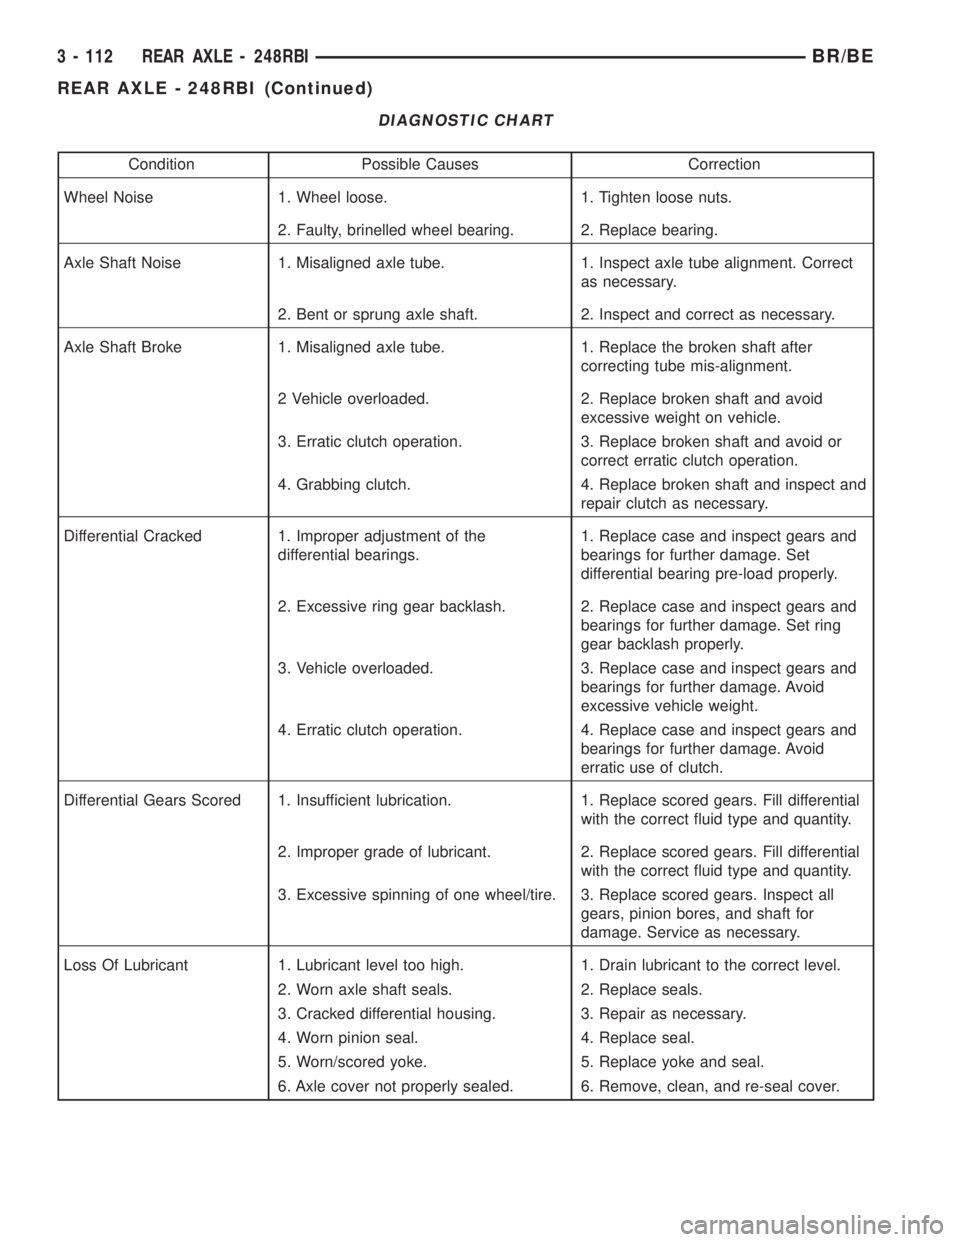
DIAGNOSTIC CHART
Condition Possible Causes Correction
Wheel Noise 1. Wheel loose. 1. Tighten loose nuts.
2. Faulty, brinelled wheel bearing. 2. Replace bearing.
Axle Shaft Noise 1. Misaligned axle tube. 1. Inspect axle tube alignment. Correct
as necessary.
2. Bent or sprung axle shaft. 2. Inspect and correct as necessary.
Axle Shaft Broke 1. Misaligned axle tube. 1. Replace the broken shaft after
correcting tube mis-alignment.
2 Vehicle overloaded. 2. Replace broken shaft and avoid
excessive weight on vehicle.
3. Erratic clutch operation. 3. Replace broken shaft and avoid or
correct erratic clutch operation.
4. Grabbing clutch. 4. Replace broken shaft and inspect and
repair clutch as necessary.
Differential Cracked 1. Improper adjustment of the
differential bearings.1. Replace case and inspect gears and
bearings for further damage. Set
differential bearing pre-load properly.
2. Excessive ring gear backlash. 2. Replace case and inspect gears and
bearings for further damage. Set ring
gear backlash properly.
3. Vehicle overloaded. 3. Replace case and inspect gears and
bearings for further damage. Avoid
excessive vehicle weight.
4. Erratic clutch operation. 4. Replace case and inspect gears and
bearings for further damage. Avoid
erratic use of clutch.
Differential Gears Scored 1. Insufficient lubrication. 1. Replace scored gears. Fill differential
with the correct fluid type and quantity.
2. Improper grade of lubricant. 2. Replace scored gears. Fill differential
with the correct fluid type and quantity.
3. Excessive spinning of one wheel/tire. 3. Replace scored gears. Inspect all
gears, pinion bores, and shaft for
damage. Service as necessary.
Loss Of Lubricant 1. Lubricant level too high. 1. Drain lubricant to the correct level.
2. Worn axle shaft seals. 2. Replace seals.
3. Cracked differential housing. 3. Repair as necessary.
4. Worn pinion seal. 4. Replace seal.
5. Worn/scored yoke. 5. Replace yoke and seal.
6. Axle cover not properly sealed. 6. Remove, clean, and re-seal cover.
3 - 112 REAR AXLE - 248RBIBR/BE
REAR AXLE - 248RBI (Continued)
Page 188 of 2889
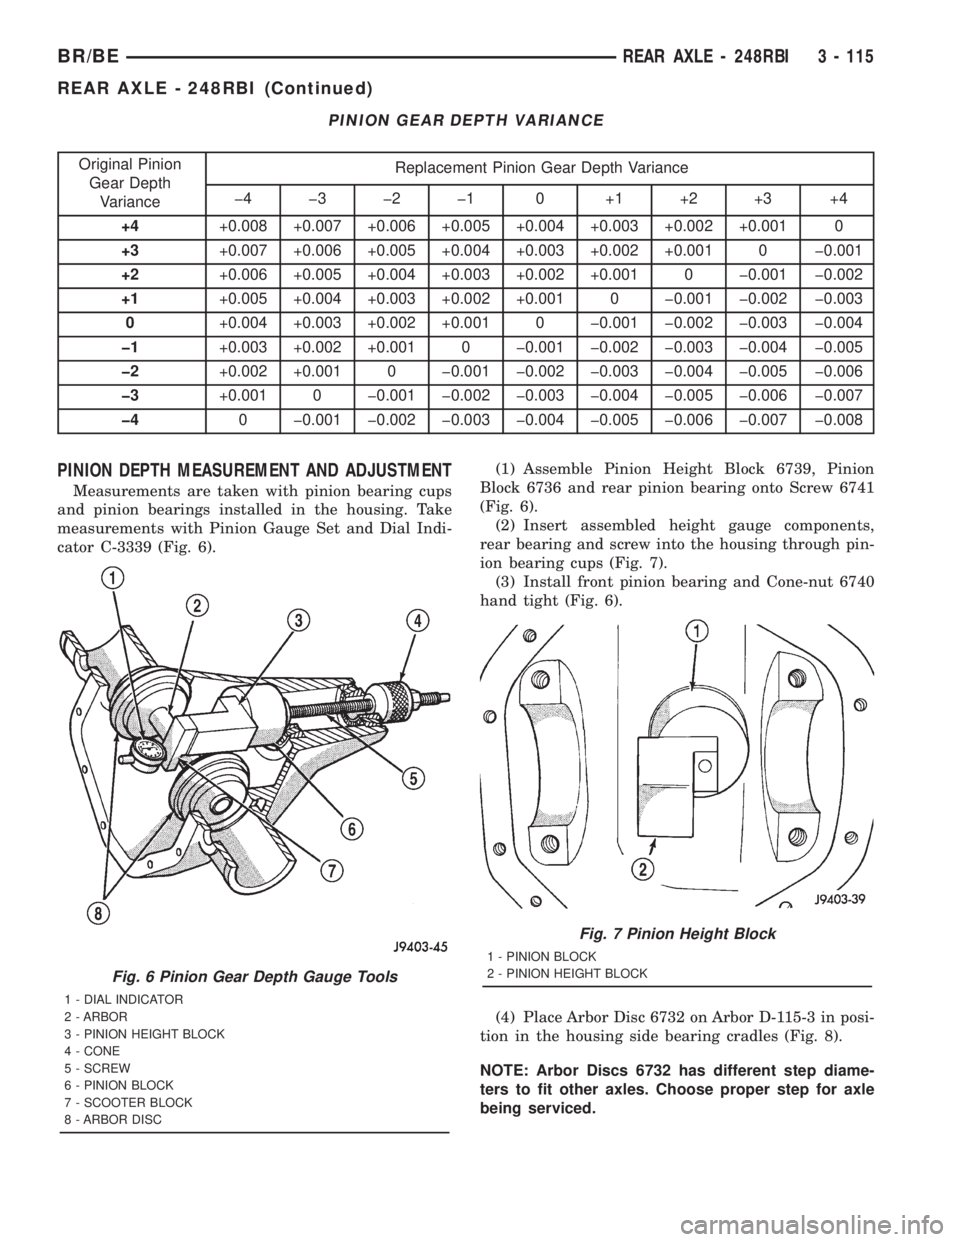
PINION GEAR DEPTH VARIANCE
Original Pinion
Gear Depth
VarianceReplacement Pinion Gear Depth Variance
þ4 þ3 þ2 þ1 0 +1 +2 +3 +4
+4+0.008 +0.007 +0.006 +0.005 +0.004 +0.003 +0.002 +0.001 0
+3+0.007 +0.006 +0.005 +0.004 +0.003 +0.002 +0.001 0 þ0.001
+2+0.006 +0.005 +0.004 +0.003 +0.002 +0.001 0 þ0.001 þ0.002
+1+0.005 +0.004 +0.003 +0.002 +0.001 0 þ0.001 þ0.002 þ0.003
0+0.004 +0.003 +0.002 +0.001 0 þ0.001 þ0.002 þ0.003 þ0.004
þ1+0.003 +0.002 +0.001 0 þ0.001 þ0.002 þ0.003 þ0.004 þ0.005
þ2+0.002 +0.001 0 þ0.001 þ0.002 þ0.003 þ0.004 þ0.005 þ0.006
þ3+0.001 0 þ0.001 þ0.002 þ0.003 þ0.004 þ0.005 þ0.006 þ0.007
þ40 þ0.001 þ0.002 þ0.003 þ0.004 þ0.005 þ0.006 þ0.007 þ0.008
PINION DEPTH MEASUREMENT AND ADJUSTMENT
Measurements are taken with pinion bearing cups
and pinion bearings installed in the housing. Take
measurements with Pinion Gauge Set and Dial Indi-
cator C-3339 (Fig. 6).(1) Assemble Pinion Height Block 6739, Pinion
Block 6736 and rear pinion bearing onto Screw 6741
(Fig. 6).
(2) Insert assembled height gauge components,
rear bearing and screw into the housing through pin-
ion bearing cups (Fig. 7).
(3) Install front pinion bearing and Cone-nut 6740
hand tight (Fig. 6).
(4) Place Arbor Disc 6732 on Arbor D-115-3 in posi-
tion in the housing side bearing cradles (Fig. 8).
NOTE: Arbor Discs 6732 has different step diame-
ters to fit other axles. Choose proper step for axle
being serviced.
Fig. 6 Pinion Gear Depth Gauge Tools
1 - DIAL INDICATOR
2 - ARBOR
3 - PINION HEIGHT BLOCK
4 - CONE
5 - SCREW
6 - PINION BLOCK
7 - SCOOTER BLOCK
8 - ARBOR DISC
Fig. 7 Pinion Height Block
1 - PINION BLOCK
2 - PINION HEIGHT BLOCK
BR/BEREAR AXLE - 248RBI 3 - 115
REAR AXLE - 248RBI (Continued)
Page 203 of 2889

(10) Apply a bead of Mopar Silicone Rubber Seal-
ant or equivalent to the housing cover (Fig. 34).
Install the housing cover within 5 minutes
after applying the sealant.
(11) Install the cover and any identification tag.
Tighten the cover bolts in a criss-cross pattern to 47
N´m (35 ft. lbs.).
(12) Refill the differential with Mopar Hypoid
Gear Lubricant or equivalent to bottom of the fill
plug hole. Refer to the Lubricant Specifications for
correct quantity and type.
(13) Install the fill hole plug and tighten to 34 N´m
(25 ft. lbs.).
(14) Remove support and lower vehicle.
DIFFERENTIAL - TRAC-LOK
DIAGNOSIS AND TESTING - TRAC-LOKY
The most common problem is a chatter noise when
turning corners. Before removing a Trac-lokyunit
for repair, drain, flush and refill the axle with the
specified lubricant. A container of Mopar Trac-loky
Lubricant (friction modifier) should be added after
repair service or during a lubricant change.
After changing the lubricant, drive the vehicle and
make 10 to 12 slow, figure-eight turns. This maneu-
ver will pump lubricant through the clutches. Thiswill correct the condition in most instances. If the
chatter persists, clutch damage could have occurred.
DIFFERENTIAL TEST
The differential can be tested without removing the
differential case by measuring rotating torque. Make
sure brakes are not dragging during this measure-
ment.
(1) Place blocks in front and rear of both front
wheels.
(2) Raise one rear wheel until it is completely off
the ground.
(3) Engine off, transmission in neutral, and park-
ing brake off.
(4) Remove wheel and bolt Special Tool 6790 or
equivalent tool to studs.
(5) Use torque wrench on special tool to rotate
wheel and read rotating torque (Fig. 35).
(6) If rotating torque is less than 22 N´m (30 ft.
lbs.) or more than 271 N´m (200 ft. lbs.) on either
wheel the unit should be serviced.
DISASSEMBLY
(1) Clamp side gear Holding Fixture 6965 in a vise
and position the differential case on the Holding Fix-
ture (Fig. 36).
(2) Remove ring gear if the ring gear is to be
replaced. The Trac-lokydifferential can be serviced
with the ring gear installed.
(3) Remove pinion shaft roll pin.
(4) Remove pinion shaft with a drift and hammer
(Fig. 37).
(5) Install and lubricate Step Plate C-6960-3 (Fig.
38).
Fig. 34 Differential Cover
1 - SEALANT SURFACE
2 - SEALANT
3 - SEALANT THICKNESS
Fig. 35 Trac-lokYTest -Typical
1 - SPECIAL TOOL 6790 WITH BOLT IN CENTER HOLE
2 - TORQUE WRENCH
3 - 130 REAR AXLE - 248RBIBR/BE
DIFFERENTIAL (Continued)