2001 DODGE RAM check oil
[x] Cancel search: check oilPage 2192 of 2889
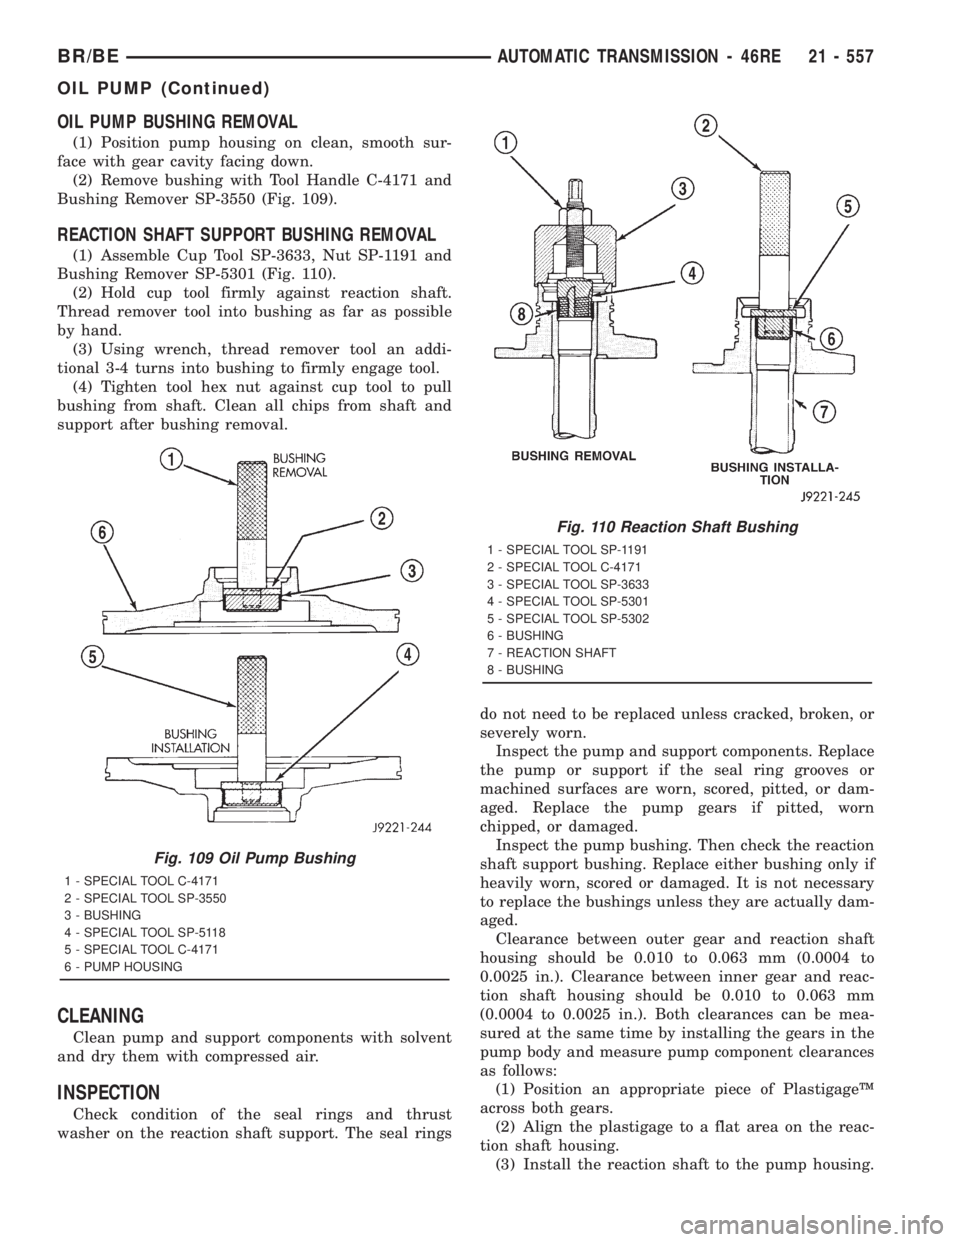
OIL PUMP BUSHING REMOVAL
(1) Position pump housing on clean, smooth sur-
face with gear cavity facing down.
(2) Remove bushing with Tool Handle C-4171 and
Bushing Remover SP-3550 (Fig. 109).
REACTION SHAFT SUPPORT BUSHING REMOVAL
(1) Assemble Cup Tool SP-3633, Nut SP-1191 and
Bushing Remover SP-5301 (Fig. 110).
(2) Hold cup tool firmly against reaction shaft.
Thread remover tool into bushing as far as possible
by hand.
(3) Using wrench, thread remover tool an addi-
tional 3-4 turns into bushing to firmly engage tool.
(4) Tighten tool hex nut against cup tool to pull
bushing from shaft. Clean all chips from shaft and
support after bushing removal.
CLEANING
Clean pump and support components with solvent
and dry them with compressed air.
INSPECTION
Check condition of the seal rings and thrust
washer on the reaction shaft support. The seal ringsdo not need to be replaced unless cracked, broken, or
severely worn.
Inspect the pump and support components. Replace
the pump or support if the seal ring grooves or
machined surfaces are worn, scored, pitted, or dam-
aged. Replace the pump gears if pitted, worn
chipped, or damaged.
Inspect the pump bushing. Then check the reaction
shaft support bushing. Replace either bushing only if
heavily worn, scored or damaged. It is not necessary
to replace the bushings unless they are actually dam-
aged.
Clearance between outer gear and reaction shaft
housing should be 0.010 to 0.063 mm (0.0004 to
0.0025 in.). Clearance between inner gear and reac-
tion shaft housing should be 0.010 to 0.063 mm
(0.0004 to 0.0025 in.). Both clearances can be mea-
sured at the same time by installing the gears in the
pump body and measure pump component clearances
as follows:
(1) Position an appropriate piece of PlastigageŸ
across both gears.
(2) Align the plastigage to a flat area on the reac-
tion shaft housing.
(3) Install the reaction shaft to the pump housing.
Fig. 109 Oil Pump Bushing
1 - SPECIAL TOOL C-4171
2 - SPECIAL TOOL SP-3550
3 - BUSHING
4 - SPECIAL TOOL SP-5118
5 - SPECIAL TOOL C-4171
6 - PUMP HOUSING
Fig. 110 Reaction Shaft Bushing
1 - SPECIAL TOOL SP-1191
2 - SPECIAL TOOL C-4171
3 - SPECIAL TOOL SP-3633
4 - SPECIAL TOOL SP-5301
5 - SPECIAL TOOL SP-5302
6 - BUSHING
7 - REACTION SHAFT
8 - BUSHING
BR/BEAUTOMATIC TRANSMISSION - 46RE 21 - 557
OIL PUMP (Continued)
Page 2193 of 2889
(4) Separate the reaction shaft housing from the
pump housing and measure the PlastigageŸ follow-
ing the instructions supplied with it.
Clearance between inner gear tooth and outer gear
should be 0.08 to 0.19 mm (0.0035 to 0.0075 in.).
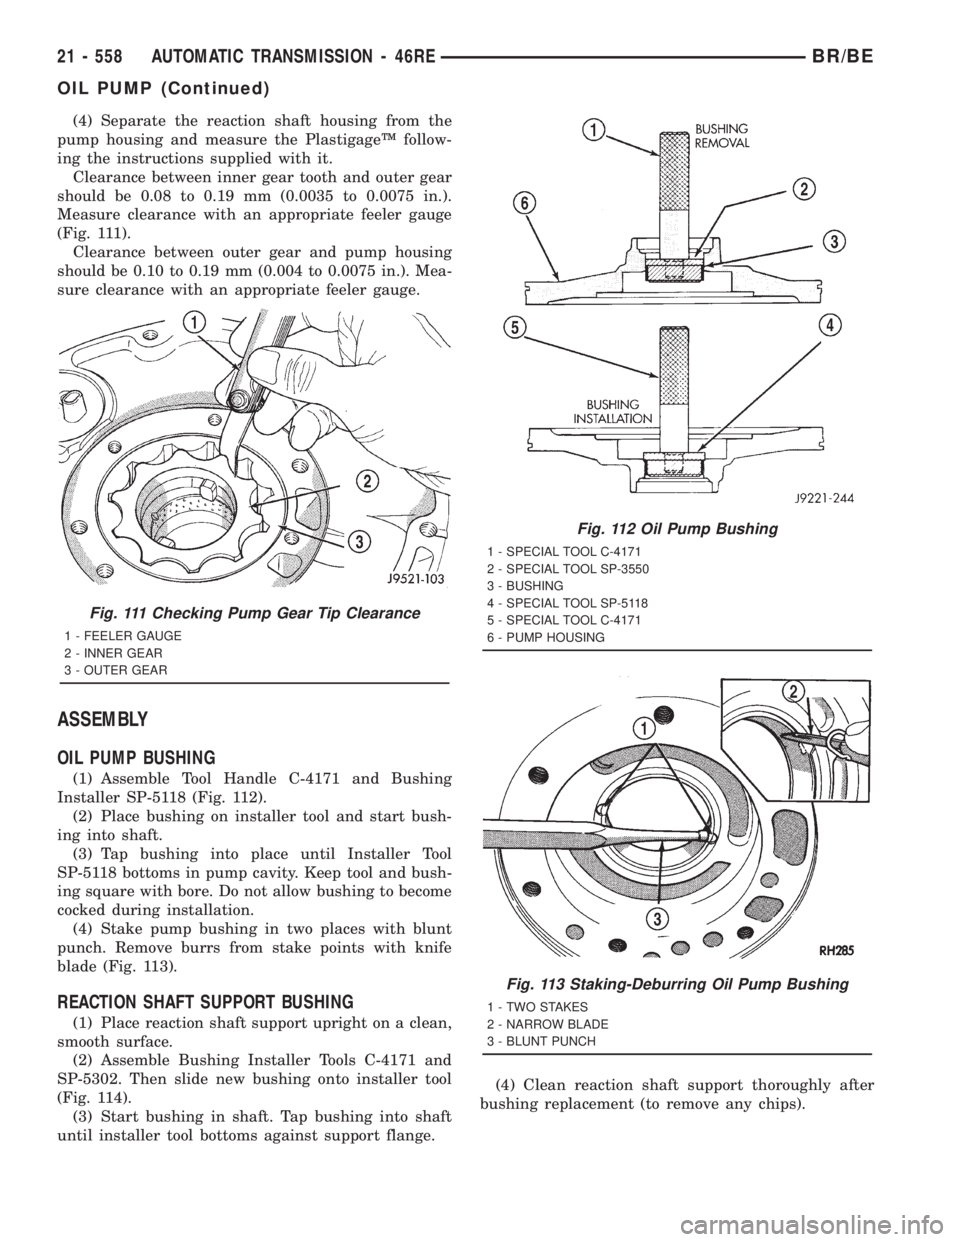
Measure clearance with an appropriate feeler gauge
(Fig. 111).
Clearance between outer gear and pump housing
should be 0.10 to 0.19 mm (0.004 to 0.0075 in.). Mea-
sure clearance with an appropriate feeler gauge.
ASSEMBLY
OIL PUMP BUSHING
(1) Assemble Tool Handle C-4171 and Bushing
Installer SP-5118 (Fig. 112).
(2) Place bushing on installer tool and start bush-
ing into shaft.
(3) Tap bushing into place until Installer Tool
SP-5118 bottoms in pump cavity. Keep tool and bush-
ing square with bore. Do not allow bushing to become
cocked during installation.
(4) Stake pump bushing in two places with blunt
punch. Remove burrs from stake points with knife
blade (Fig. 113).
REACTION SHAFT SUPPORT BUSHING
(1) Place reaction shaft support upright on a clean,
smooth surface.
(2) Assemble Bushing Installer Tools C-4171 and
SP-5302. Then slide new bushing onto installer tool
(Fig. 114).
(3) Start bushing in shaft. Tap bushing into shaft
until installer tool bottoms against support flange.(4) Clean reaction shaft support thoroughly after
bushing replacement (to remove any chips).
Fig. 111 Checking Pump Gear Tip Clearance
1 - FEELER GAUGE
2 - INNER GEAR
3 - OUTER GEAR
Fig. 112 Oil Pump Bushing
1 - SPECIAL TOOL C-4171
2 - SPECIAL TOOL SP-3550
3 - BUSHING
4 - SPECIAL TOOL SP-5118
5 - SPECIAL TOOL C-4171
6 - PUMP HOUSING
Fig. 113 Staking-Deburring Oil Pump Bushing
1 - TWO STAKES
2 - NARROW BLADE
3 - BLUNT PUNCH
21 - 558 AUTOMATIC TRANSMISSION - 46REBR/BE
OIL PUMP (Continued)
Page 2227 of 2889
OPERATION
To apply the clutch, pressure is applied between
the clutch retainer and piston. The fluid pressure is
provided by the oil pump, transferred through the
control valves and passageways, and enters the
clutch through the hub of the reaction shaft support.
With pressure applied between the clutch retainer
and piston, the piston moves away from the clutch
retainer and compresses the clutch pack. This action
applies the clutch pack, allowing torque to flow
through the input shaft into the driving discs, and
into the clutch plates and pressure plate that are
lugged to the clutch retainer. The waved spring is
used to cushion the application of the clutch pack.
The snap-ring is selective and used to adjust clutch
pack clearance.
When pressure is released from the piston, the
spring returns the piston to its fully released position
and disengages the clutch. The release spring also
helps to cushion the application of the clutch assem-
bly. When the clutch is in the process of being
released by the release spring, fluid flows through a
vent and one-way ball-check-valve located in the pis-ton. The check-valve is needed to eliminate the pos-
sibility of plate drag caused by centrifugal force
acting on the residual fluid trapped in the clutch pis-
ton retainer.
DISASSEMBLY
(1) Remove fiber thrust washer from forward side
of clutch retainer.
(2) Remove input shaft front and rear seal rings.
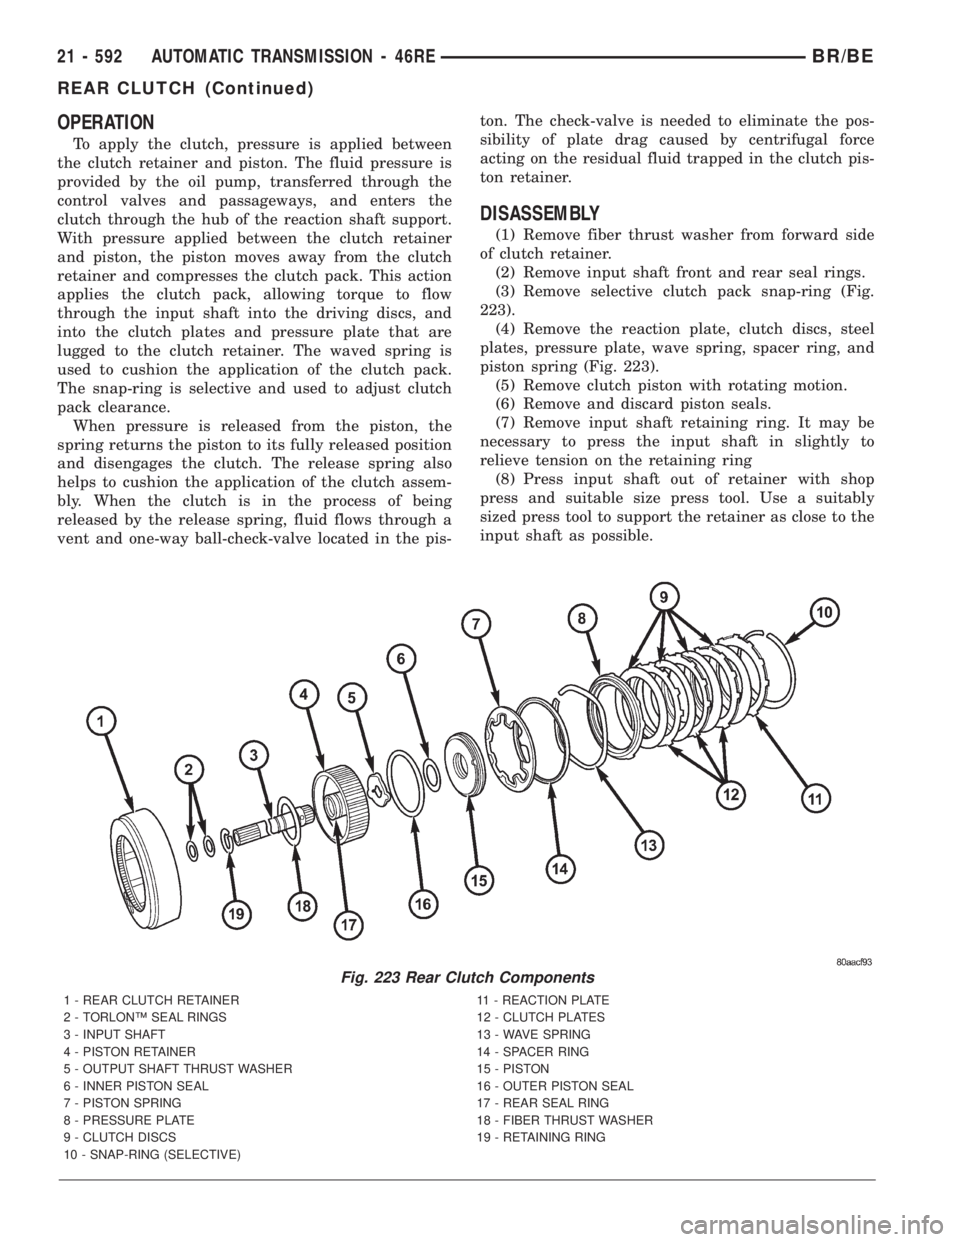
(3) Remove selective clutch pack snap-ring (Fig.
223).
(4) Remove the reaction plate, clutch discs, steel
plates, pressure plate, wave spring, spacer ring, and
piston spring (Fig. 223).
(5) Remove clutch piston with rotating motion.
(6) Remove and discard piston seals.
(7) Remove input shaft retaining ring. It may be
necessary to press the input shaft in slightly to
relieve tension on the retaining ring
(8) Press input shaft out of retainer with shop
press and suitable size press tool. Use a suitably
sized press tool to support the retainer as close to the
input shaft as possible.
Fig. 223 Rear Clutch Components
1 - REAR CLUTCH RETAINER 11 - REACTION PLATE
2 - TORLONŸ SEAL RINGS 12 - CLUTCH PLATES
3 - INPUT SHAFT 13 - WAVE SPRING
4 - PISTON RETAINER 14 - SPACER RING
5 - OUTPUT SHAFT THRUST WASHER 15 - PISTON
6 - INNER PISTON SEAL 16 - OUTER PISTON SEAL
7 - PISTON SPRING 17 - REAR SEAL RING
8 - PRESSURE PLATE 18 - FIBER THRUST WASHER
9 - CLUTCH DISCS 19 - RETAINING RING
10 - SNAP-RING (SELECTIVE)
21 - 592 AUTOMATIC TRANSMISSION - 46REBR/BE
REAR CLUTCH (Continued)
Page 2231 of 2889
ADJUSTMENT
Check linkage adjustment by starting engine in
PARK and NEUTRAL. Adjustment is acceptable if
the engine starts in only these two positions. Adjust-
ment is incorrect if the engine starts in one position
but not both positions
If the engine starts in any other position, or if the
engine will not start in any position, the park/neutral
switch is probably faulty.
LINKAGE ADJUSTMENT
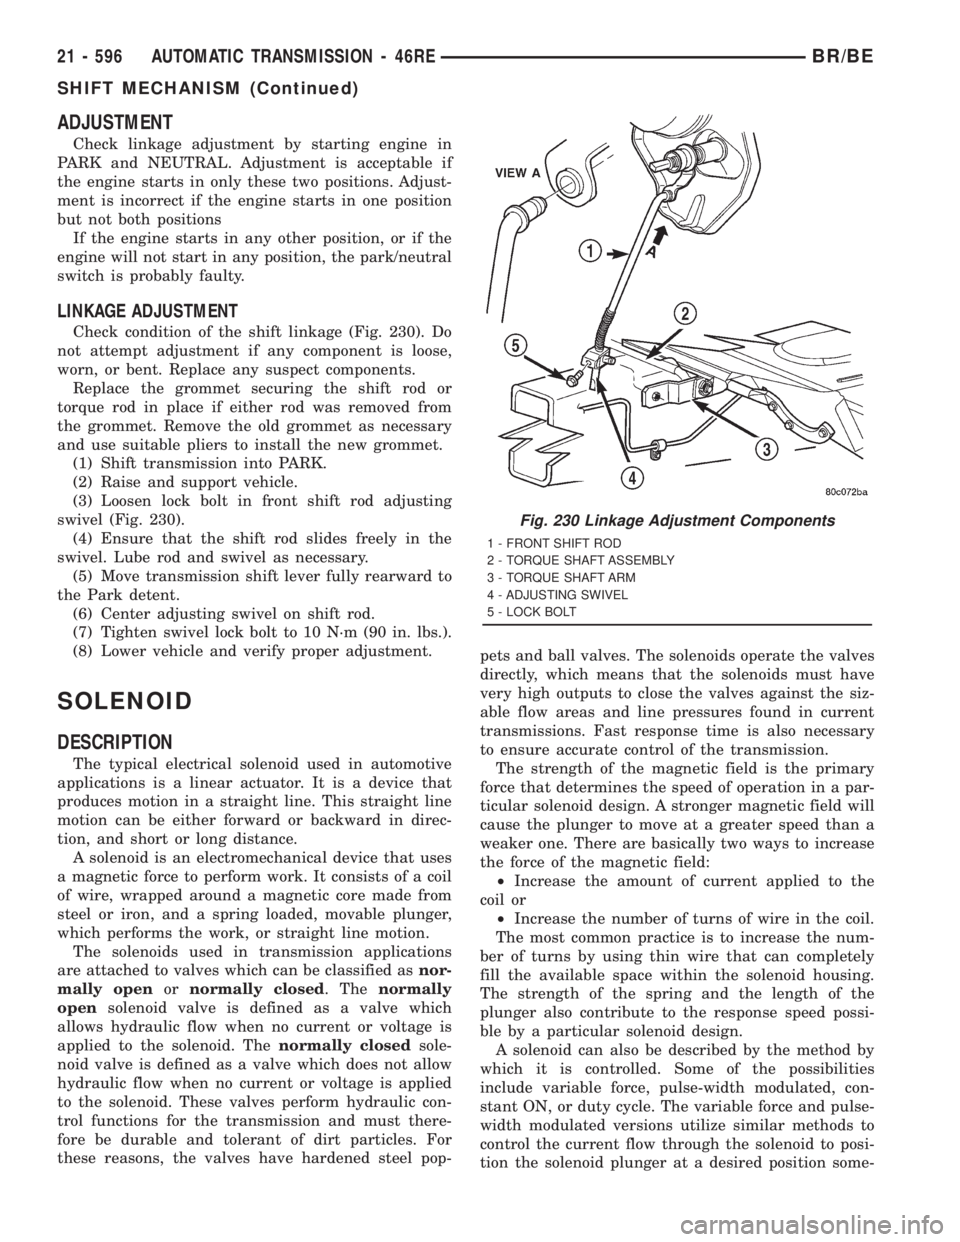
Check condition of the shift linkage (Fig. 230). Do
not attempt adjustment if any component is loose,
worn, or bent. Replace any suspect components.
Replace the grommet securing the shift rod or
torque rod in place if either rod was removed from
the grommet. Remove the old grommet as necessary
and use suitable pliers to install the new grommet.
(1) Shift transmission into PARK.
(2) Raise and support vehicle.
(3) Loosen lock bolt in front shift rod adjusting
swivel (Fig. 230).
(4) Ensure that the shift rod slides freely in the
swivel. Lube rod and swivel as necessary.
(5) Move transmission shift lever fully rearward to
the Park detent.
(6) Center adjusting swivel on shift rod.
(7) Tighten swivel lock bolt to 10 N´m (90 in. lbs.).
(8) Lower vehicle and verify proper adjustment.
SOLENOID
DESCRIPTION
The typical electrical solenoid used in automotive
applications is a linear actuator. It is a device that
produces motion in a straight line. This straight line
motion can be either forward or backward in direc-
tion, and short or long distance.
A solenoid is an electromechanical device that uses
a magnetic force to perform work. It consists of a coil
of wire, wrapped around a magnetic core made from
steel or iron, and a spring loaded, movable plunger,
which performs the work, or straight line motion.
The solenoids used in transmission applications
are attached to valves which can be classified asnor-
mally openornormally closed. Thenormally
opensolenoid valve is defined as a valve which
allows hydraulic flow when no current or voltage is
applied to the solenoid. Thenormally closedsole-
noid valve is defined as a valve which does not allow
hydraulic flow when no current or voltage is applied
to the solenoid. These valves perform hydraulic con-
trol functions for the transmission and must there-
fore be durable and tolerant of dirt particles. For
these reasons, the valves have hardened steel pop-pets and ball valves. The solenoids operate the valves
directly, which means that the solenoids must have
very high outputs to close the valves against the siz-
able flow areas and line pressures found in current
transmissions. Fast response time is also necessary
to ensure accurate control of the transmission.
The strength of the magnetic field is the primary
force that determines the speed of operation in a par-
ticular solenoid design. A stronger magnetic field will
cause the plunger to move at a greater speed than a
weaker one. There are basically two ways to increase
the force of the magnetic field:
²Increase the amount of current applied to the
coil or
²Increase the number of turns of wire in the coil.
The most common practice is to increase the num-
ber of turns by using thin wire that can completely
fill the available space within the solenoid housing.
The strength of the spring and the length of the
plunger also contribute to the response speed possi-
ble by a particular solenoid design.
A solenoid can also be described by the method by
which it is controlled. Some of the possibilities
include variable force, pulse-width modulated, con-
stant ON, or duty cycle. The variable force and pulse-
width modulated versions utilize similar methods to
control the current flow through the solenoid to posi-
tion the solenoid plunger at a desired position some-
Fig. 230 Linkage Adjustment Components
1 - FRONT SHIFT ROD
2 - TORQUE SHAFT ASSEMBLY
3 - TORQUE SHAFT ARM
4 - ADJUSTING SWIVEL
5 - LOCK BOLT
21 - 596 AUTOMATIC TRANSMISSION - 46REBR/BE
SHIFT MECHANISM (Continued)
Page 2240 of 2889
REMOVAL
(1) Remove transmission and torque converter
from vehicle.
(2) Place a suitable drain pan under the converter
housing end of the transmission.
CAUTION: Verify that transmission is secure on the
lifting device or work surface, the center of gravity
of the transmission will shift when the torque con-
verter is removed creating an unstable condition.
The torque converter is a heavy unit. Use caution
when separating the torque converter from the
transmission.
(3) Pull the torque converter forward until the cen-
ter hub clears the oil pump seal.
(4) Separate the torque converter from the trans-
mission.
INSTALLATION
Check converter hub and drive notches for sharp
edges, burrs, scratches, or nicks. Polish the hub and
notches with 320/400 grit paper or crocus cloth if nec-
essary. The hub must be smooth to avoid damaging
the pump seal at installation.
(1) Lubricate oil pump seal lip with transmission
fluid.
(2) Place torque converter in position on transmis-
sion.
CAUTION: Do not damage oil pump seal or bushing
while inserting torque converter into the front of the
transmission.(3) Align torque converter to oil pump seal open-
ing.
(4) Insert torque converter hub into oil pump.
(5) While pushing torque converter inward, rotate
converter until converter is fully seated in the oil
pump gears.
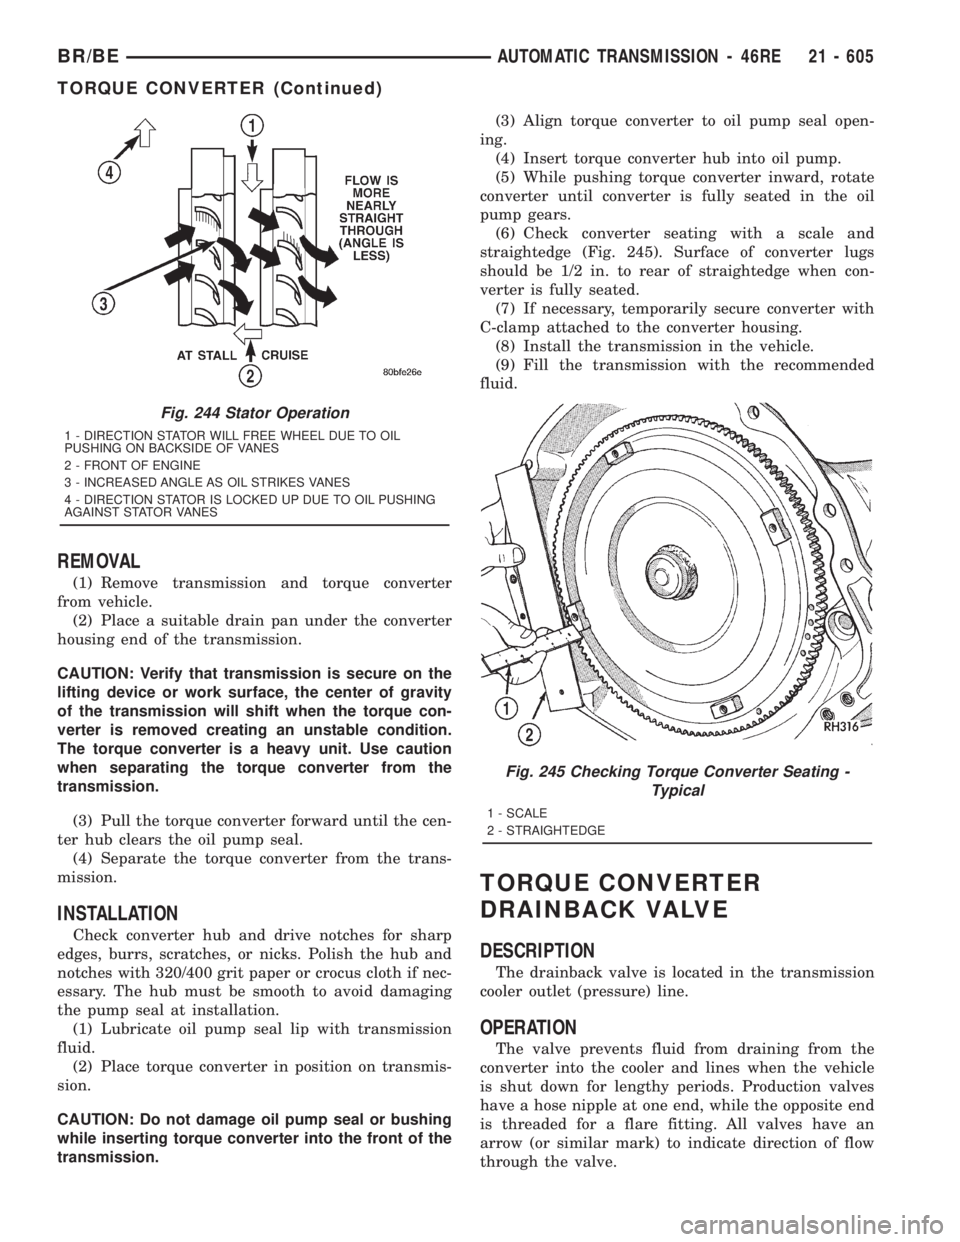
(6) Check converter seating with a scale and
straightedge (Fig. 245). Surface of converter lugs
should be 1/2 in. to rear of straightedge when con-
verter is fully seated.
(7) If necessary, temporarily secure converter with
C-clamp attached to the converter housing.
(8) Install the transmission in the vehicle.
(9) Fill the transmission with the recommended
fluid.
TORQUE CONVERTER
DRAINBACK VALVE
DESCRIPTION
The drainback valve is located in the transmission
cooler outlet (pressure) line.
OPERATION
The valve prevents fluid from draining from the
converter into the cooler and lines when the vehicle
is shut down for lengthy periods. Production valves
have a hose nipple at one end, while the opposite end
is threaded for a flare fitting. All valves have an
arrow (or similar mark) to indicate direction of flow
through the valve.
Fig. 244 Stator Operation
1 - DIRECTION STATOR WILL FREE WHEEL DUE TO OIL
PUSHING ON BACKSIDE OF VANES
2 - FRONT OF ENGINE
3 - INCREASED ANGLE AS OIL STRIKES VANES
4 - DIRECTION STATOR IS LOCKED UP DUE TO OIL PUSHING
AGAINST STATOR VANES
Fig. 245 Checking Torque Converter Seating -
Typical
1 - SCALE
2 - STRAIGHTEDGE
BR/BEAUTOMATIC TRANSMISSION - 46RE 21 - 605
TORQUE CONVERTER (Continued)
Page 2272 of 2889
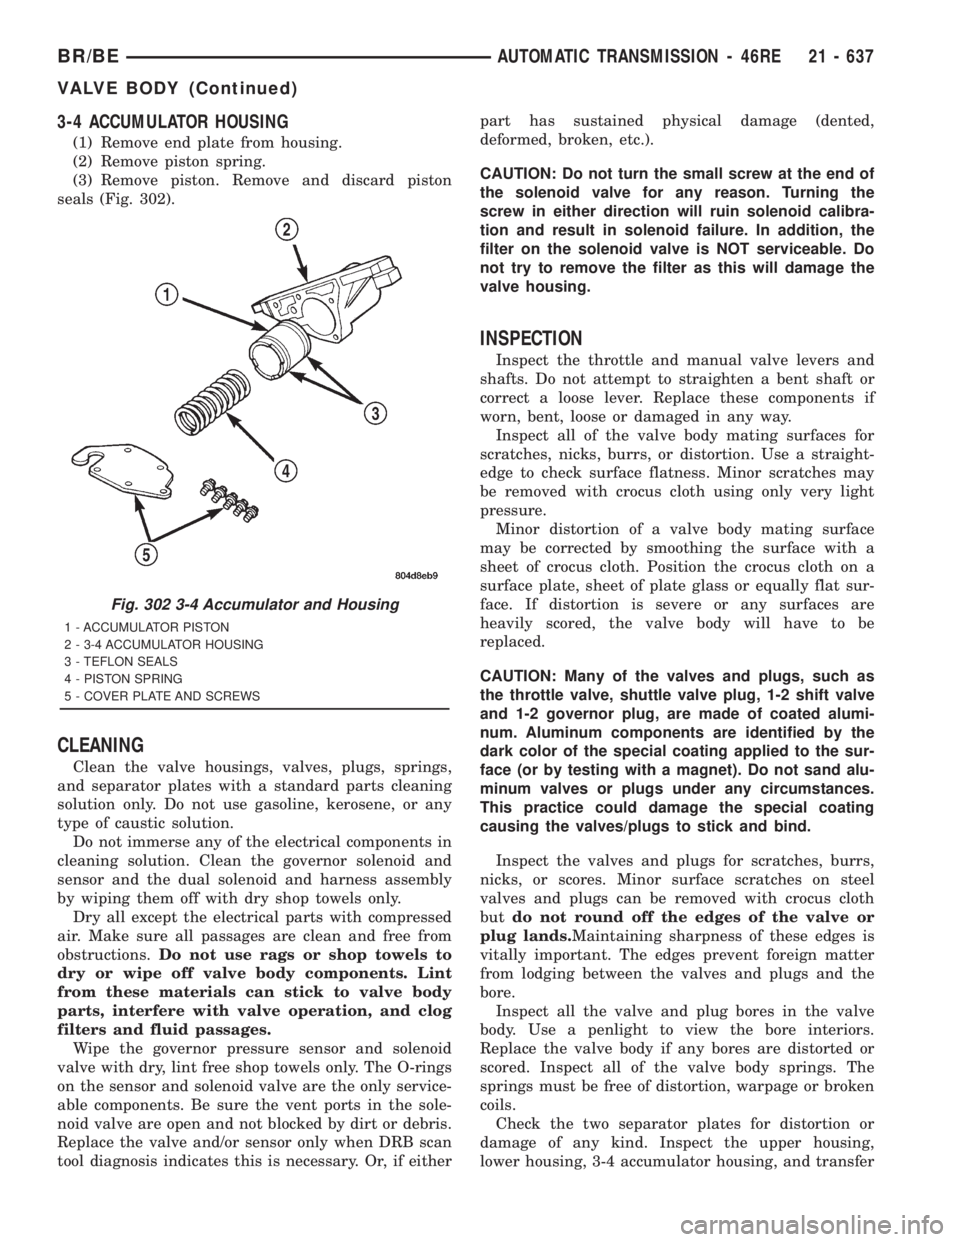
3-4 ACCUMULATOR HOUSING
(1) Remove end plate from housing.
(2) Remove piston spring.
(3) Remove piston. Remove and discard piston
seals (Fig. 302).
CLEANING
Clean the valve housings, valves, plugs, springs,
and separator plates with a standard parts cleaning
solution only. Do not use gasoline, kerosene, or any
type of caustic solution.
Do not immerse any of the electrical components in
cleaning solution. Clean the governor solenoid and
sensor and the dual solenoid and harness assembly
by wiping them off with dry shop towels only.
Dry all except the electrical parts with compressed
air. Make sure all passages are clean and free from
obstructions.Do not use rags or shop towels to
dry or wipe off valve body components. Lint
from these materials can stick to valve body
parts, interfere with valve operation, and clog
filters and fluid passages.
Wipe the governor pressure sensor and solenoid
valve with dry, lint free shop towels only. The O-rings
on the sensor and solenoid valve are the only service-
able components. Be sure the vent ports in the sole-
noid valve are open and not blocked by dirt or debris.
Replace the valve and/or sensor only when DRB scan
tool diagnosis indicates this is necessary. Or, if eitherpart has sustained physical damage (dented,
deformed, broken, etc.).
CAUTION: Do not turn the small screw at the end of
the solenoid valve for any reason. Turning the
screw in either direction will ruin solenoid calibra-
tion and result in solenoid failure. In addition, the
filter on the solenoid valve is NOT serviceable. Do
not try to remove the filter as this will damage the
valve housing.
INSPECTION
Inspect the throttle and manual valve levers and
shafts. Do not attempt to straighten a bent shaft or
correct a loose lever. Replace these components if
worn, bent, loose or damaged in any way.
Inspect all of the valve body mating surfaces for
scratches, nicks, burrs, or distortion. Use a straight-
edge to check surface flatness. Minor scratches may
be removed with crocus cloth using only very light
pressure.
Minor distortion of a valve body mating surface
may be corrected by smoothing the surface with a
sheet of crocus cloth. Position the crocus cloth on a
surface plate, sheet of plate glass or equally flat sur-
face. If distortion is severe or any surfaces are
heavily scored, the valve body will have to be
replaced.
CAUTION: Many of the valves and plugs, such as
the throttle valve, shuttle valve plug, 1-2 shift valve
and 1-2 governor plug, are made of coated alumi-
num. Aluminum components are identified by the
dark color of the special coating applied to the sur-
face (or by testing with a magnet). Do not sand alu-
minum valves or plugs under any circumstances.
This practice could damage the special coating
causing the valves/plugs to stick and bind.
Inspect the valves and plugs for scratches, burrs,
nicks, or scores. Minor surface scratches on steel
valves and plugs can be removed with crocus cloth
butdo not round off the edges of the valve or
plug lands.Maintaining sharpness of these edges is
vitally important. The edges prevent foreign matter
from lodging between the valves and plugs and the
bore.
Inspect all the valve and plug bores in the valve
body. Use a penlight to view the bore interiors.
Replace the valve body if any bores are distorted or
scored. Inspect all of the valve body springs. The
springs must be free of distortion, warpage or broken
coils.
Check the two separator plates for distortion or
damage of any kind. Inspect the upper housing,
lower housing, 3-4 accumulator housing, and transfer
Fig. 302 3-4 Accumulator and Housing
1 - ACCUMULATOR PISTON
2 - 3-4 ACCUMULATOR HOUSING
3 - TEFLON SEALS
4 - PISTON SPRING
5 - COVER PLATE AND SCREWS
BR/BEAUTOMATIC TRANSMISSION - 46RE 21 - 637
VALVE BODY (Continued)
Page 2281 of 2889
CAUTION: It is possible for the park rod to displace
into a cavity just above the pawl sprag during
installation. Make sure the rod is actually engaged
in the pawl and has not displaced into this cavity.
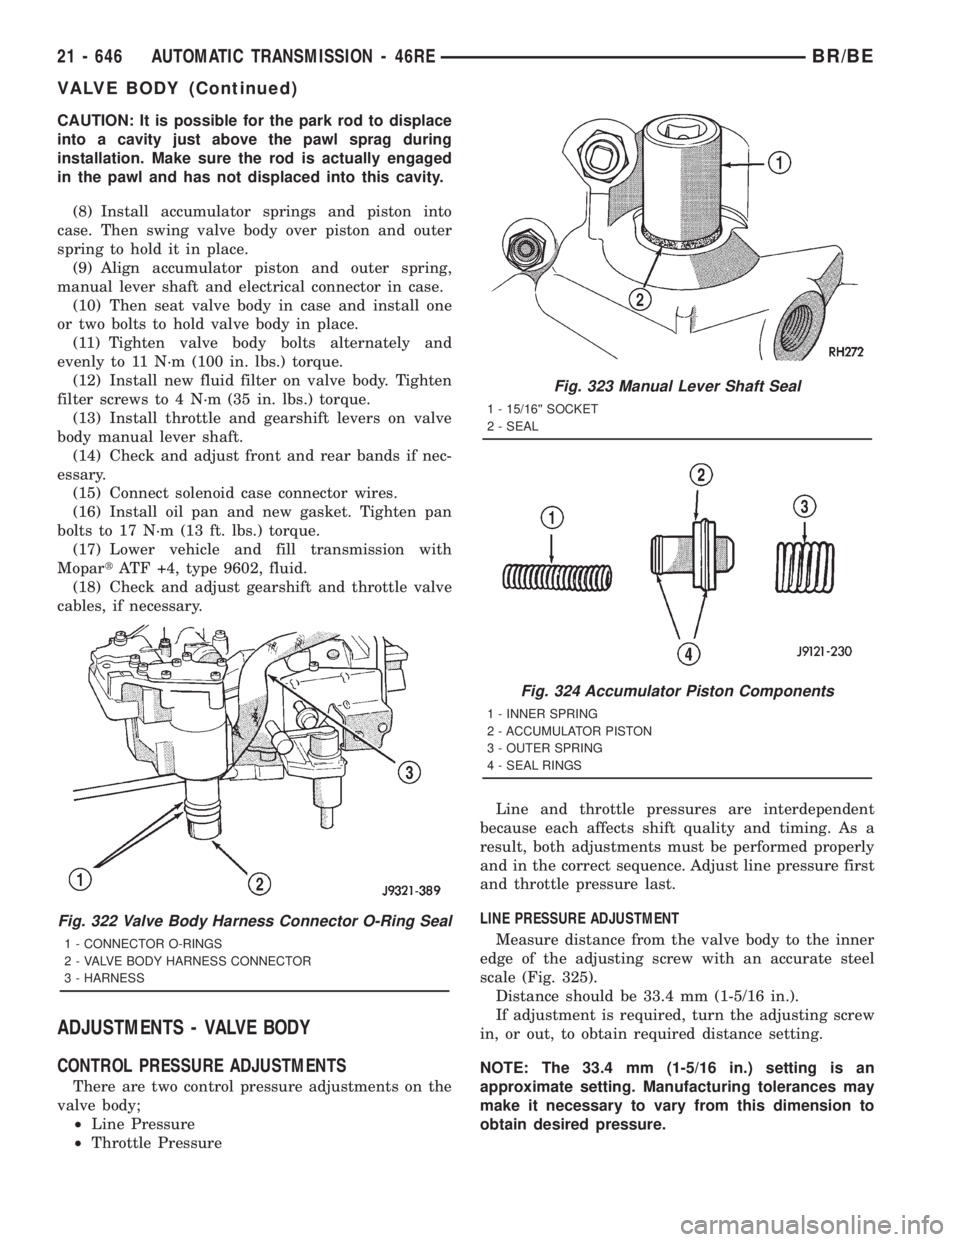
(8) Install accumulator springs and piston into
case. Then swing valve body over piston and outer
spring to hold it in place.
(9) Align accumulator piston and outer spring,
manual lever shaft and electrical connector in case.
(10) Then seat valve body in case and install one
or two bolts to hold valve body in place.
(11) Tighten valve body bolts alternately and
evenly to 11 N´m (100 in. lbs.) torque.
(12) Install new fluid filter on valve body. Tighten
filter screws to 4 N´m (35 in. lbs.) torque.
(13) Install throttle and gearshift levers on valve
body manual lever shaft.
(14) Check and adjust front and rear bands if nec-
essary.
(15) Connect solenoid case connector wires.
(16) Install oil pan and new gasket. Tighten pan
bolts to 17 N´m (13 ft. lbs.) torque.
(17) Lower vehicle and fill transmission with
MopartATF +4, type 9602, fluid.
(18) Check and adjust gearshift and throttle valve
cables, if necessary.
ADJUSTMENTS - VALVE BODY
CONTROL PRESSURE ADJUSTMENTS
There are two control pressure adjustments on the
valve body;
²Line Pressure
²Throttle PressureLine and throttle pressures are interdependent
because each affects shift quality and timing. As a
result, both adjustments must be performed properly
and in the correct sequence. Adjust line pressure first
and throttle pressure last.
LINE PRESSURE ADJUSTMENT
Measure distance from the valve body to the inner
edge of the adjusting screw with an accurate steel
scale (Fig. 325).
Distance should be 33.4 mm (1-5/16 in.).
If adjustment is required, turn the adjusting screw
in, or out, to obtain required distance setting.
NOTE: The 33.4 mm (1-5/16 in.) setting is an
approximate setting. Manufacturing tolerances may
make it necessary to vary from this dimension to
obtain desired pressure.
Fig. 322 Valve Body Harness Connector O-Ring Seal
1 - CONNECTOR O-RINGS
2 - VALVE BODY HARNESS CONNECTOR
3 - HARNESS
Fig. 323 Manual Lever Shaft Seal
1 - 15/16©© SOCKET
2 - SEAL
Fig. 324 Accumulator Piston Components
1 - INNER SPRING
2 - ACCUMULATOR PISTON
3 - OUTER SPRING
4 - SEAL RINGS
21 - 646 AUTOMATIC TRANSMISSION - 46REBR/BE
VALVE BODY (Continued)
Page 2283 of 2889
AUTOMATIC TRANSMISSION - 47RE
TABLE OF CONTENTS
page page
AUTOMATIC TRANSMISSION - 47RE
DESCRIPTION..........................649
OPERATION............................651
DIAGNOSIS AND TESTING................657
AUTOMATIC TRANSMISSION.............657
PRELIMINARY........................657
ROAD TESTING.......................657
HYDRAULIC PRESSURE TEST...........658
AIR TESTING TRANSMISSION CLUTCH
AND BAND OPERATION.................661
CONVERTER HOUSING FLUID LEAK......662
DIAGNOSIS CHARTS...................663
STANDARD PROCEDURE.................673
ALUMINUM THREAD REPAIR.............673
REMOVAL.............................673
DISASSEMBLY..........................674
CLEANING.............................680
INSPECTION...........................681
ASSEMBLY............................681
INSTALLATION..........................688
SCHEMATICS AND DIAGRAMS.............690
SPECIFICATIONS........................702
SPECIAL TOOLS........................704
ACCUMULATOR
DESCRIPTION..........................707
OPERATION............................708
INSPECTION...........................708
BANDS
DESCRIPTION..........................709
OPERATION............................709
ADJUSTMENTS.........................709
ELECTRONIC GOVERNOR
DESCRIPTION..........................710
OPERATION............................711
REMOVAL.............................712
INSTALLATION..........................713
EXTENSION HOUSING BUSHING
REMOVAL.............................714
INSTALLATION..........................714
EXTENSION HOUSING SEAL
REMOVAL.............................714
INSTALLATION..........................715
FLUID AND FILTER
DIAGNOSIS AND TESTING................715
EFFECTS OF INCORRECT FLUID LEVEL . . . 715
CAUSES OF BURNT FLUID..............715
FLUID CONTAMINATION................715
STANDARD PROCEDURE.................715
FLUID LEVEL CHECK...................715FLUID AND FILTER REPLACEMENT.......717
TRANSMISSION FILL...................718
FRONT CLUTCH
DESCRIPTION..........................718
OPERATION............................718
DISASSEMBLY..........................719
INSPECTION...........................721
ASSEMBLY............................721
FRONT SERVO
DESCRIPTION..........................722
OPERATION............................723
DISASSEMBLY..........................723
CLEANING.............................723
INSPECTION...........................723
ASSEMBLY............................723
OIL PUMP
DESCRIPTION..........................724
OPERATION............................724
STANDARD PROCEDURE.................724
OIL PUMP VOLUME CHECK..............724
DISASSEMBLY..........................726
CLEANING.............................728
INSPECTION...........................728
ASSEMBLY............................729
OUTPUT SHAFT FRONT BEARING
REMOVAL.............................730
INSTALLATION..........................730
OUTPUT SHAFT REAR BEARING
REMOVAL.............................731
INSTALLATION..........................731
OVERDRIVE CLUTCH
DESCRIPTION..........................731
OPERATION............................731
OVERDRIVE SWITCH
DESCRIPTION..........................732
OPERATION............................732
DIAGNOSIS AND TESTING................732
OVERDRIVE ELECTRICAL CONTROLS.....732
REMOVAL.............................733
INSTALLATION..........................733
OVERDRIVE UNIT
REMOVAL.............................733
DISASSEMBLY..........................734
CLEANING.............................741
INSPECTION...........................741
ASSEMBLY............................742
INSTALLATION..........................750
21 - 648 AUTOMATIC TRANSMISSION - 47REBR/BE