2001 CHRYSLER VOYAGER key
[x] Cancel search: keyPage 1160 of 4284
²three power feeds: valves, pump and microproces-
sor
²brake switch
²traction control switch
The CAB outputs include the following:
²ABS warning indicator actuation
²12 volts power to wheel speed sensors
²eight valves
²ten valves with traction control
²diagnostic communication
²PCI bus communication
²traction control lamp illumination
3.3.3 HYDRAULIC CONTROL UNIT
The hydraulic control unit (HCU) contains the
valve block assembly, two accumulators, and pump/
motor assembly. The HCU is attached to the CAB.
Valve Block Assembly:The valve block assem-
bly contains valves with four inlet valves and four
outlet valves. The inlet valves are spring-loaded in
the open position and the outlet valves are spring
loaded in the closed position. During an antilock
stop, these valves are cycled to maintain the proper
slip ratio for each wheel. If a wheel detects slip, the
inlet valve is closed to prevent and further pressure
increase. Then the outlet valve is opened to release
the pressure to the accumulators until the wheel is
no longer slipping. Once the wheel is no longer
slipping, the outlet valve is closed and the inlet
valve is opened to reapply pressure. If the wheel is
decelerating within its predetermined limits (prop-
er slip ratio), the inlet valve will close to hold the
pressure constant. On vehicles which are equipped
with a traction control system, there are two addi-
tional valves that isolate the master cylinder and
rear wheels. During a traction control event the
brakes are applied to reduce wheel slippage.
Pump Motor Assembly:The pump motor as-
sembly provides the extra amount of fluid needed
during antilock braking. The pump is supplied fluid
that is released to the accumulators when the outlet
valve is opened during an antilock stop. The pump
is also used to drain the accumulator circuits after
the antilock stop is complete. The pump is operated
by an integral electric motor. This DC-type motor is
controlled by the CAB. The CAB may turn on the
pump motor when an antilock stop is detected. The
pump continues to run during the antilock stop and
is turned off after the stop is complete. Under some
conditions, the pump motor will run to drain the
accumulators during the next drive off. The CAB
monitors the pump motor operation internally.
Accumulators:The accumulators provide tem-
porary fluid storage during an antilock stop and are
drained by the pump motor.
3.3.4 SWITCHES/SENSORS
Master Cylinder:The master cylinder is a stan-
dard tandem compensating port design for ABS and
non ABS systems. Traction control vehicles use a
dual center port master cylinder. For proper trac-
tion control operation the standard master cylinder
must not be used.
A fluid level switch is located in the master
cylinder fluid reservoir. The switch closes when a
low fluid level is detected. The fluid level switch
turns on the brake warning indicator by grounding
the indicator circuit. This switch does not disable
the ABS system.
Wheel Speed Sensors and Tone Wheels:One
active wheel speed sensor (WSS) is located at each
wheel and sends a small signal to the control
module (CAB). This signal is generated when a
toothed sensor ring (tone wheel) passes by a station-
ary wheel speed sensor. The CAB converts the
signals into digital signals for each wheel.
Because of internal circuitry, correct wheel speed
sensor function cannot be determined by a continu-
ity or resistance check through the sensor.
The front wheel speed sensor is attached to a boss
in the steering knuckle. The tone wheel is an
integral part of the front axle shaft. The rear speed
sensor is mounted though the bearing cover and the
rear tone wheel is an integral part of the rear
bearing hub. The wheel speed sensor air gap is not
adjustable. Refer to the service manual for wheel
speed sensor air gap and resistance specifications.
The four wheel speed sensors are serviced indi-
vidually. The front tone wheels are serviced as an
assembly with the outer constant velocity (C.V.)
joint housing. The rear tone wheels are serviced as
an assembly.
Correct antilock system operation is dependent
on tone wheel speed signals from the wheel speed
sensors. The vehicle's wheels and tires should all be
the same size and type to generate accurate signals.
In addition, the tires should be inflated to the
recommended pressure for optimum system opera-
tion. Variation in wheel and tire size or significant
variations in inflation pressure can produce inaccu-
rate wheel speed signals; however, the system will
continue to function when using the mini-spare.
3.3.5 SYSTEM INITIALIZATION
System initialization starts when the key is
turned to ªrunº. At this point, the CAB performs a
complete self-check of all electrical components in
the antilock systems.
Between 8-17 km/h (5-10 mph), a dynamic test is
performed. This will momentarily cycle the inlet
and outlet valves, check wheel speed sensor cir-
cuitry, and run the pump motor at 25 km/h (15
mph). The CAB will try to test the pump motor. If
3
GENERAL INFORMATION
Page 1161 of 4284
the brake pedal is applied the test will be run at 40
km/h (24 mph) regardless of brake switch state. If,
during the dynamic test, the brake pedal is applied,
the driver may feel the test through brake pedal
pulsations. This is a normal condition.
If any component exhibits a trouble condition
during system initialization or dynamic check, the
CAB will illuminate the ABS warning indicator and
TRAC OFF lamp if equipped.
3.3.6 DIAGNOSTIC MODE
To enter diagnostic mode, a vehicle speed must be
below 10 km/h (6 mph) and no ABS condition
present. If vehicle speed is not below 10 km/h
(6 mph), a ªNo Responseº message could be dis-
played by the DRBIIIt. The following are charac-
teristics of diagnostic mode:
± The amber ABS warning indicator will blink
rapidly (about 1/2 second ON and 1/2 second
OFF). If a hard trouble code, such as Valve
Power Feed Failure code is present, the indi-
cator will be illuminated without blinking un-
til the trouble condition is cleared.
± Antilock operation is disabled.
± The HCU valves cannot be actuated when the
vehicle speed is above 8 km/h (5 mph). If valve
actuation is attempted above 8 km/h (5 mph), a
ªNo Responseº message will be displayed on
the DRBIIIt.
3.4 DIAGNOSTIC TROUBLE CODES
The controller antilock brake may report any of
the following diagnostic trouble codes:
CLUSTER LAMP FAILURE
VALVE POWER FEED FAILURE
BUS SYSTEM COMMUNICATION FAILURE
CAB INTERNAL FAILURE
LEFT FRONT SENSOR CIRCUIT FAILURE
LEFT FRONT WHEEL SPEED SIGNAL
FAILURE
LEFT REAR SENSOR CIRCUIT FAILURE
LEFT REAR WHEEL SPEED SIGNAL
FAILURE
PUMP CIRCUIT FAILURE
RIGHT FRONT SENSOR CIRCUIT FAILURE
RIGHT FRONT WHEEL SPEED SIGNAL
FAILURE
RIGHT REAR SENSOR CIRCUIT FAILURE
RIGHT REAR WHEEL SPEED SIGNAL
FAILURE
SYSTEM OVERVOLTAGE
SYSTEM UNDERVOLTAGE
3.5 DRBIIITERROR MESSAGES AND
BLANK SCREEN
Under normal operation, the DRBIIItwill dis-
play one of only two error messages:
± User-Requested WARM Boot or User-
Requested COLD Boot.
If the DRBIIItshould display any other error
message, record the entire display and call the
STAR Center for information. This is a sample of
such an error message display:
ver: 2.14
date: 26 Jul93
file: key_itf.cc
date: Jul 26 1993
line: 548
err. 0x1
User-Requested COLD boot Press MORE to
switch between this display
and the application screen.
Press F4 when done noting information.
3.5.1 DRBIIITDOES NOT POWER UP
If the LED's do not light or no sound is emitted at
start up, check for loose cable connections or a bad
cable. Check the vehicle battery voltage (data link
connector cavity 16). A minimum of 11 volts is
required to adequately power the DRBIIIt.
If all connections are proper between the
DRBIIItand the vehicle or other devices, and the
vehicle battery is fully charged, an inoperative
DRBIIItmay be the result of faulty cable or vehicle
wiring.
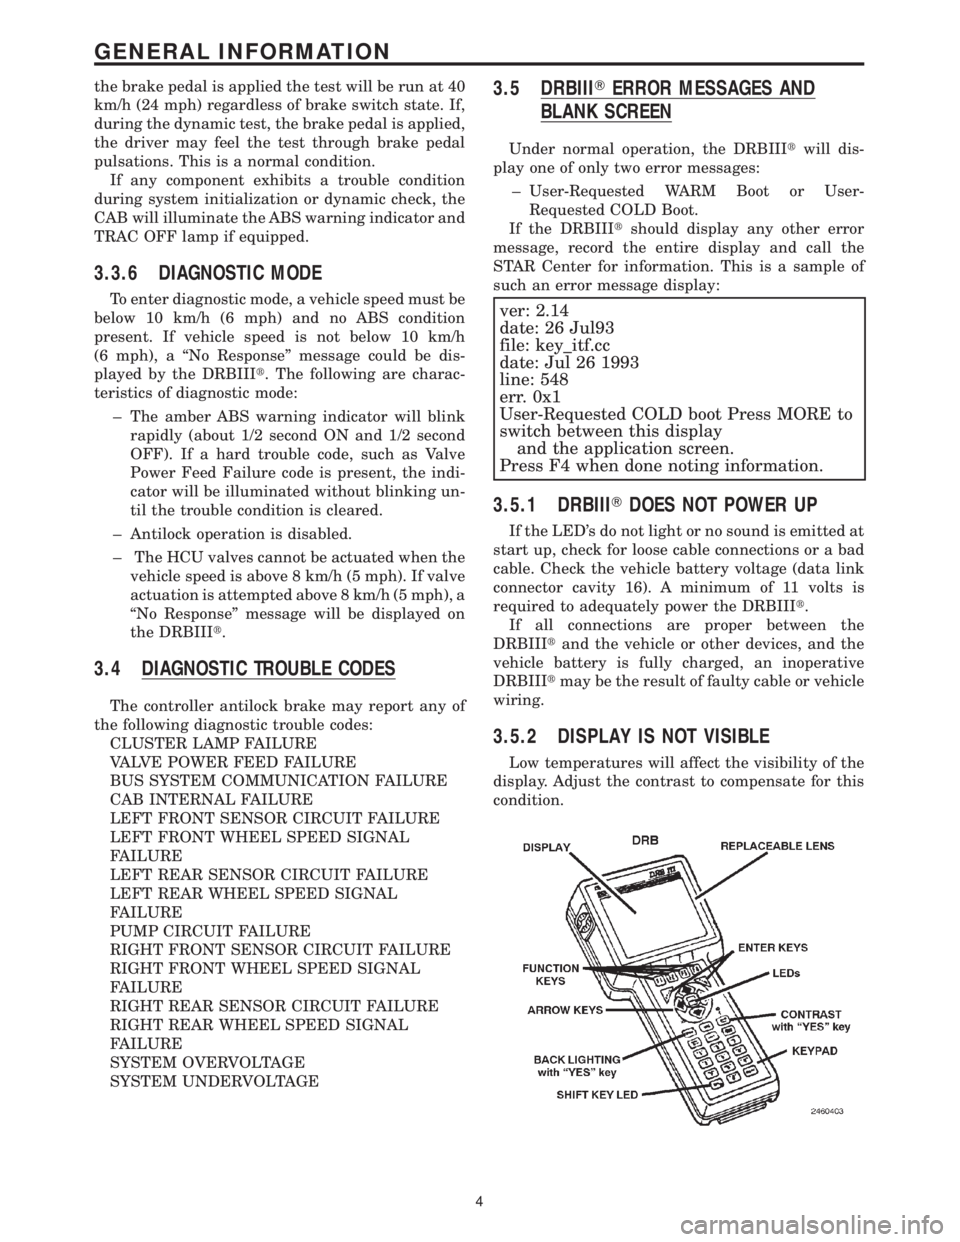
3.5.2 DISPLAY IS NOT VISIBLE
Low temperatures will affect the visibility of the
display. Adjust the contrast to compensate for this
condition.
4
GENERAL INFORMATION
Page 1169 of 4284
Symptom:
CLUSTER LAMP FAILURE
When Monitored and Set Condition:
CLUSTER LAMP FAILURE
When Monitored: Key ON. After Key-ON bulb check.
Set Condition: When the instrument cluster informs the CAB that the cluster cannot
turn on the ABS Lamp.
POSSIBLE CAUSES
CLUSTER DTC PRESENT
CLUSTER INTERNAL FAULT
CAB -- NO ABS INDICATOR MESSAGE
CAB -- ABS INDICATOR FAULT
TEST ACTION APPLICABILITY
1 Turn the ignition on.
With the DRBIIIt, read DTCs.
Are there any Instrument Cluster DTCs present?All
Ye s®Refer to the INSTRUMENT CLUSTER category for the related
symptom(s).
Perform ABS VERIFICATION TEST - VER 1.
No®Go To 2
2 Turn the ignition off.
Observe the instrument cluster indicators.
Turn the ignition on.
Did the ABS Indicator illuminate for several seconds and then go out?All
Ye s®Go To 3
No®Go To 4
3NOTE: The DRBIIItcommunication with the CAB must be operational for
the result of this test to be valid.
Turn the ignition off.
Remove Fuse 21 (ABS valve power) from the IPM.
Perform the Key-on Bulb Check.
Does the ABS Indicator remain on after the bulb check?All
Ye s®Test Complete.
No®Replace the Controller Antilock Brake in accordance with the
Service Information.
Perform ABS VERIFICATION TEST - VER 1.
12
BRAKES (CAB)
Page 1170 of 4284
TEST ACTION APPLICABILITY
4NOTE: The purpose of this test is to perform the Instrument Cluster self
test.
Turn the ignition off.
Depress and hold the Odometer Reset Button.
Turn the Key from OFF to ON and then back to OFF.
Release the Odometer Reset Button.
Do the Instrument Cluster Indicators and Gauges activate and deactivate?All
Ye s®Replace the Controller Antilock Brake in accordance with the
Service Information.
Perform ABS VERIFICATION TEST - VER 1.
No®Replace the Instrument Cluster in accordance with the Service
Information.
Perform ABS VERIFICATION TEST - VER 1.
13
BRAKES (CAB)
CLUSTER LAMP FAILURE ÐContinued
Page 1194 of 4284
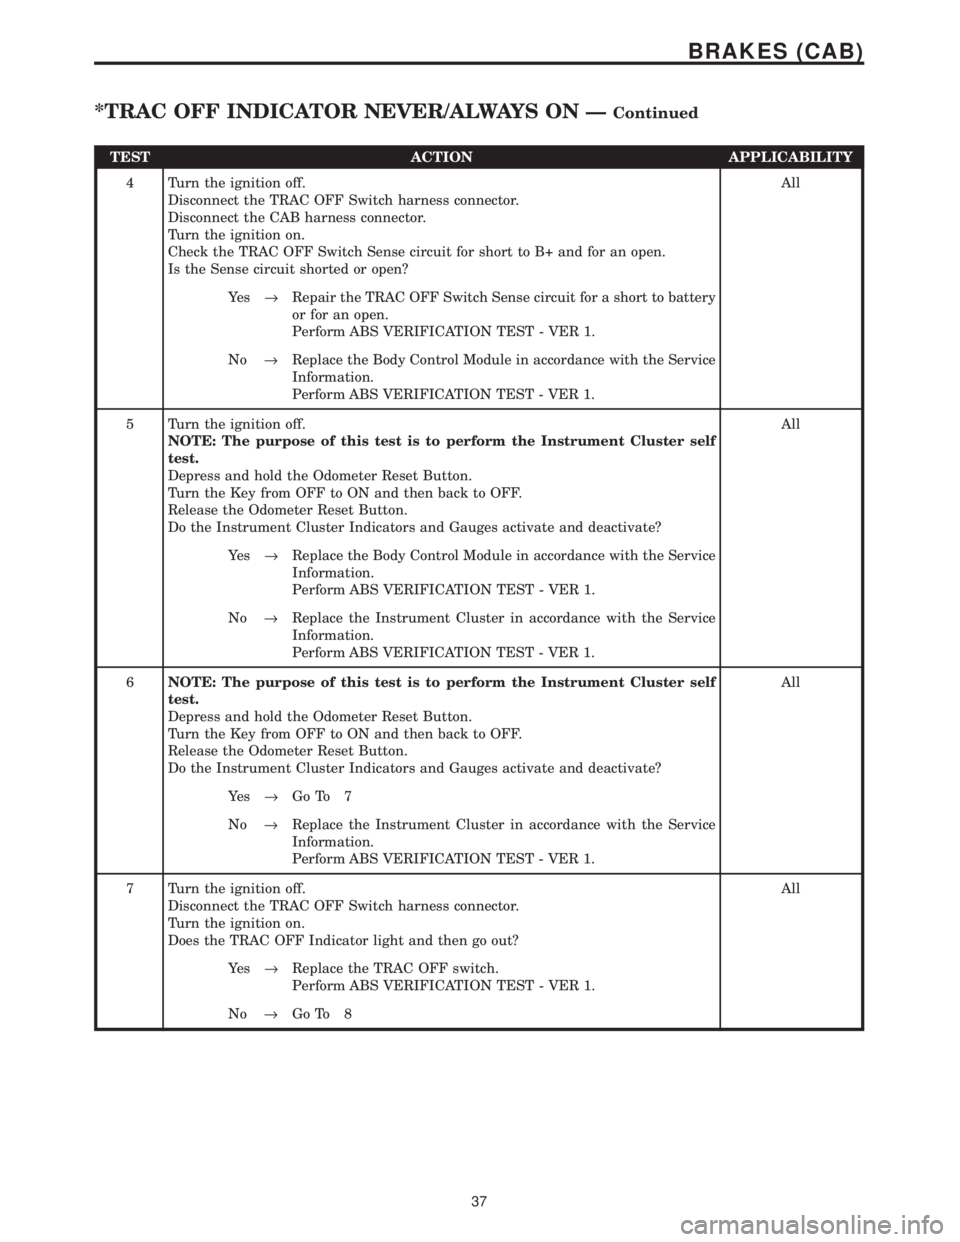
TEST ACTION APPLICABILITY
4 Turn the ignition off.
Disconnect the TRAC OFF Switch harness connector.
Disconnect the CAB harness connector.
Turn the ignition on.
Check the TRAC OFF Switch Sense circuit for short to B+ and for an open.
Is the Sense circuit shorted or open?All
Ye s®Repair the TRAC OFF Switch Sense circuit for a short to battery
or for an open.
Perform ABS VERIFICATION TEST - VER 1.
No®Replace the Body Control Module in accordance with the Service
Information.
Perform ABS VERIFICATION TEST - VER 1.
5 Turn the ignition off.
NOTE: The purpose of this test is to perform the Instrument Cluster self
test.
Depress and hold the Odometer Reset Button.
Turn the Key from OFF to ON and then back to OFF.
Release the Odometer Reset Button.
Do the Instrument Cluster Indicators and Gauges activate and deactivate?All
Ye s®Replace the Body Control Module in accordance with the Service
Information.
Perform ABS VERIFICATION TEST - VER 1.
No®Replace the Instrument Cluster in accordance with the Service
Information.
Perform ABS VERIFICATION TEST - VER 1.
6NOTE: The purpose of this test is to perform the Instrument Cluster self
test.
Depress and hold the Odometer Reset Button.
Turn the Key from OFF to ON and then back to OFF.
Release the Odometer Reset Button.
Do the Instrument Cluster Indicators and Gauges activate and deactivate?All
Ye s®Go To 7
No®Replace the Instrument Cluster in accordance with the Service
Information.
Perform ABS VERIFICATION TEST - VER 1.
7 Turn the ignition off.
Disconnect the TRAC OFF Switch harness connector.
Turn the ignition on.
Does the TRAC OFF Indicator light and then go out?All
Ye s®Replace the TRAC OFF switch.
Perform ABS VERIFICATION TEST - VER 1.
No®Go To 8
37
BRAKES (CAB)
*TRAC OFF INDICATOR NEVER/ALWAYS ON ÐContinued
Page 1196 of 4284
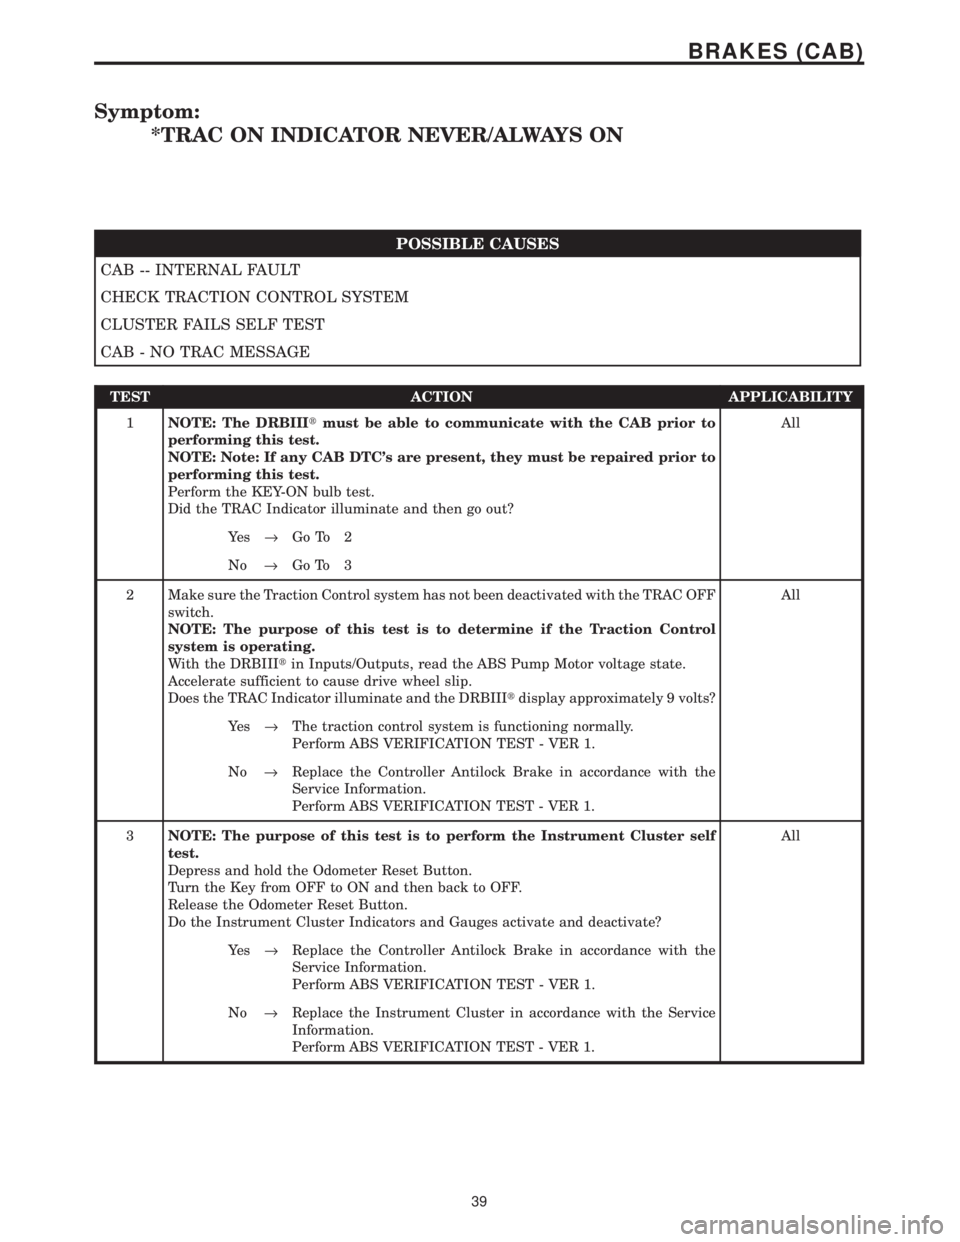
Symptom:
*TRAC ON INDICATOR NEVER/ALWAYS ON
POSSIBLE CAUSES
CAB -- INTERNAL FAULT
CHECK TRACTION CONTROL SYSTEM
CLUSTER FAILS SELF TEST
CAB - NO TRAC MESSAGE
TEST ACTION APPLICABILITY
1NOTE: The DRBIIItmust be able to communicate with the CAB prior to
performing this test.
NOTE: Note: If any CAB DTC's are present, they must be repaired prior to
performing this test.
Perform the KEY-ON bulb test.
Did the TRAC Indicator illuminate and then go out?All
Ye s®Go To 2
No®Go To 3
2 Make sure the Traction Control system has not been deactivated with the TRAC OFF
switch.
NOTE: The purpose of this test is to determine if the Traction Control
system is operating.
With the DRBIIItin Inputs/Outputs, read the ABS Pump Motor voltage state.
Accelerate sufficient to cause drive wheel slip.
Does the TRAC Indicator illuminate and the DRBIIItdisplay approximately 9 volts?All
Ye s®The traction control system is functioning normally.
Perform ABS VERIFICATION TEST - VER 1.
No®Replace the Controller Antilock Brake in accordance with the
Service Information.
Perform ABS VERIFICATION TEST - VER 1.
3NOTE: The purpose of this test is to perform the Instrument Cluster self
test.
Depress and hold the Odometer Reset Button.
Turn the Key from OFF to ON and then back to OFF.
Release the Odometer Reset Button.
Do the Instrument Cluster Indicators and Gauges activate and deactivate?All
Ye s®Replace the Controller Antilock Brake in accordance with the
Service Information.
Perform ABS VERIFICATION TEST - VER 1.
No®Replace the Instrument Cluster in accordance with the Service
Information.
Perform ABS VERIFICATION TEST - VER 1.
39
BRAKES (CAB)
Page 1217 of 4284
TABLE OF CONTENTS - Continued
P0703-BRAKE SWITCH SIGNAL CKTS PLAUS W/REDUNDANT CONTACT
AFTER INITIALIZATION.................................................149
P0833-CLUTCH PEDAL PLAUSIBILITY....................................153
P1130-FUEL RAIL PRESSURE MALFUNCTION LEAKAGE DETECTED..........155
P1130-FUEL RAIL PRESSURE MALFUNCTION PRESSURE TOO HIGH-SHUT
OFF .................................................................155
P1130-FUEL RAIL PRESSURE MALFUNCTION PRESSURE TOO LOW.........155
P1130-FUEL RAIL PRESSURE MALFUNCTION SOLENOID OPEN.............155
P1131-FUEL PRESSURE SOLENOID OPEN CIRCUIT........................158
P1131-FUEL PRESSURE SOLENOID PLAUSIBILITY IN AFTER-RUN............158
P1131-FUEL PRESSURE SOLENOID SHORT CIRCUIT.......................158
P1511-BATTERY SENSE LINE 1 VOLTAGE TOO HIGH.......................162
P1511-BATTERY SENSE LINE 1 VOLTAGE TOO LOW.......................164
P1605-IGNITION SWITCH PLAUSIBILITY..................................166
P1685-SKIM SYSTEM INVALID KEY CODE RECEIVED.......................168
P1685-SKIM SYSTEM INVALID SECRET KEY IN EEPROM....................168
P1685-SKIM SYSTEM KEY COMMUNICATION TIMED OUT...................168
P1685-SKIM SYSTEM SKIM ERROR......................................168
P1685-SKIM SYSTEM WRITE ACCESS TO EEPROM FAILURE................168
P2120-ACC PEDAL POSITION SENSOR 1 CKT PLAUSIBILITY................170
P2120-ACC PEDAL POSITION SENSOR 1 CKT PLAUSIBILITY WITH BRAKE
SWITCH..............................................................170
P2120-ACC PEDAL POSITION SENSOR 1 CKT PLAUSIBILITY WITH
POTENTIOMETER.....................................................170
P2120-ACC PEDAL POSITION SENSOR 1 CKT SIGNAL VOLTAGE TOO HIGH . . .170
P2120-ACC PEDAL POSITION SENSOR 1 CKT SIGNAL VOLTAGE TOO LOW . . .170
P2120-ACC PEDAL POSITION SENSOR 1 CKT SUPPLY VOLTAGE TOO
HIGH OR LOW........................................................170
*CHECKING THE A/C CLUTCH OPERATION...............................179
*CHECKING THE ACCELERATOR PEDAL POSITION SENSOR CALIBRATION . . .181
*CHECKING THE BOOST PRESSURE SENSOR CALIBRATION................182
*CHECKING THE ECM POWER AND GROUND CIRCUITS....................183
*CHECKING THE EGR SYSTEM..........................................185
*CHECKING THE ELECTRIC RADIATOR FAN OPERATION...................186
*CHECKING THE ENGINE COOLANT TEMPERATURE SENSOR CALIBRATION . .193
*CHECKING THE ENGINE MECHANICAL SYSTEMS.........................194
*CHECKING THE GLOW PLUG OPERATION...............................195
*CHECKING THE LIFT PUMP MOTOR OPERATION.........................197
*CHECKING THE MAF SENSOR CALIBRATION.............................200
*CHECKING THE SPEED CONTROL OPERATION...........................201
*CHECKING THE VEHICLE SPEED SIGNAL................................204
*ENGINE CRANKS BUT WILL NOT START.................................207
*ENGINE WILL NOT CRANK.............................................210
VEHICLE THEFT/SECURITY
ANTENNA FAILURE....................................................214
COP FAILURE.........................................................214
EEPROM FAILURE.....................................................214
INTERNAL FAULT......................................................214
RAM FAILURE.........................................................214
SERIAL LINK INTERNAL FAULT..........................................214
STACK OVERFLOW FAILURE............................................214
PCM STATUS FAILURE.................................................216
iv
Page 1219 of 4284
TABLE OF CONTENTS - Continued
A/C COMPRESSOR CLUTCH RELAY......................................242
ECM/PCM RELAY (DIESEL).............................................242
FUEL HEATER RELAY (DIESEL)..........................................242
LIFT PUMP RELAY (DIESEL).............................................242
STARTER MOTOR RELAY...............................................242
RADIATOR FAN NO. 1 (DIESEL) - GRAY 2 WAY.............................242
RADIATOR FAN NO. 2 (DIESEL) - GRAY 2 WAY.............................243
RADIATOR FAN RELAY NO. 1 (DIESEL) - BLUE 9 WAY......................243
RADIATOR FAN RELAY NO. 2 (DIESEL) - BLUE 9 WAY......................243
RADIATOR FAN RELAY NO. 3 (DIESEL) - BLUE 9 WAY......................243
RIGHT SPEED CONTROL SWITCH - WHITE 2 WAY.........................244
SENTRY KEY IMMOBILIZER MODULE - BLACK 6 WAY......................244
VEHICLE SPEED SENSOR (MTX/ATX) - BLACK 3 WAY......................244
WATER IN FUEL SENSOR (DIESEL) - BLACK 2 WAY........................244
10.0 SCHEMATIC DIAGRAMS................................................245
10.12001 RG 2.5L TURBO DIESEL......................................245
11.0 CHARTS AND GRAPHS................................................247
vi