2001 CHRYSLER VOYAGER relay
[x] Cancel search: relayPage 4114 of 4284
responding element is applied. If a switch fails to
close, it is retested, If it fails the second test, the
code is set.
Transmission Effects:The MIL illuminates and
the transmission system defaults to Relay Open
limp-in mode.
Possible causes:
> Pressure switch sense circuit shorted to battery
between TCM and solenoid pack.
> Low line pressure
> Solenoid Pack
Name of code:P1791(35) - Loss Of Prime
When monitored:If the transmission is slipping
in any forward gear and the pressure switches are
not indicating pressure, a loss of prime test is run.
Set condition:If the transmission begins to slip in
any forward gear, and the pressure switch or
switches that should be closed for a given gear are
open, a loss of prime test begins. All available
elements (in 1st gear L-R, 2-4 and OD, in 2nd, 3rd,
and 4th gear 2-4 and OD) are turned on by the
Transmission Control Module (TCM) to see if pump
prime exists. The code is set if none of the pressure
switches respond. The TCM will continue to run the
loss of prime test until pump pressure returns.
Theory of operation:The loss of prime test is
used to prevent transmission defaults which can be
caused by a lack of pump prime.
Transmission Effects:Vehicle will not move or
transmission slips. Normal operation will continue
if pump prime returns.
Possible causes:
> Low transmission fluid level
> PRNDL indicates a valid OD code in the hydrau-
lic reverse position
> Transmission fluid filter clogged or damaged
> Transmission fluid filter improperly installed
(Bolts loose or O-ring missing)
> Oil pump - If a customer has a problem when the
transmission is cold whereby he shifts to reverse,
gets reverse, and then shifts to OD and does not
get OD (gets a neutral condition), and then can
not get reverse or OD for between 3-20 seconds,
replace the oil pump. High side clearance in the
oil pump will set a code 35. The pump will prime
upon start-up, but as the torque converter purges
air (drain down) the air will leak across the inner
rotor into the pump suction port and cause a loss
of prime right after the shift into OD. After 3- 20
seconds, pump prime will return and normal
operation will continue. The pump should be
replaced only after all other possible causes
above have been checked and verified.Name of code:P1790(36) - Fault Immediately
After Shift
When monitored:After a gear ratio error is
stored.
Set condition:This code is set if the associated
gear ratio code is stored within 1.3 seconds after a
shift.
Theory of operation:This code will only be stored
along with a 50 series code. If this code is set, it
indicates the problem is mechanical in nature.
When this code exists, diagnosing the transmission
should be based on the associated gear ratio code
and primarily mechanical causes should be consid-
ered.
Transmission Effects:None
Possible causes:
> Mechanical causes as listed under associated
gear ratio code.
Name of code:P1775(37) - Solenoid Switch Valve
Latched in TCC Position
When monitored:During an attempted shift into
1st gear.
Set condition:This code is set if three unsuccess-
ful attempts are made to get into 1st gear in one
given key start.
Theory of operation:The solenoid switch valve
(SSV) controls the direction of the transmission
fluid when the L-R/TCC solenoid is energized. The
SSV will be in the downshifted position in 1st gear,
thus directing the fluid to the L-R clutch circuit. In
2nd, 3rd, and 4th, it will be in the upshifted position
and directs the fluid into the torque converter
clutch (TCC).
When shifting into 1st gear, a special hydraulic
sequence is performed to ensure SSV movement
into the downshifted position. The L-R pressure
switch is monitored to confirm SSV movement. If
movement is not confirmed (the L-R pressure
switch does not close), 2nd gear is substituted for
1st.
Transmission Effects:Transmission will have no
1st gear (2nd gear will be substituted), and no
EMCC operation.
Possible causes:
> PRNDL indicates a valid OD code in the hydrau-
lic reverse position
> Valve body- - Solenoid valve stuck in TCC posi-
tion
> High idle speed
> Solenoid malfunction - L-R pressure switch will
not close
> L-R Pressure Switch Sense circuit shorted to
battery
10
GENERAL INFORMATION
Page 4116 of 4284
the L-R pressure switch does not indicate pressure.
A second detection of L-R pressure results in setting
the code.
Transmission Effects:At speeds above 72 Km/h
(45 MPH), EMCC is inhibited. Once speed falls
below 72 Km/h (45 MPH), the transmission will go
into relay open limp-in mode and the MIL will
illuminate.
Possible causes:
> Valve body - Solenoid valve stuck in L-R position
> Intermittent short to ground or open circuit in
L-R Pressure Switch Sense circuit (with code 24
only)
> Solenoid pack (with code P1784(24) only)
> TCM (with code P1784(24) only)
Name of Code:P1793(48) - Torque Reduction
(TRD) Link Communication Error
Note: The MIL may set on some engines (3.3L, 3.8L,
3.5L)
When Monitored:Whenever the engine is run-
ning
Set condition:This code is set when the TCM
sends multiple torque reduction messages to the
PCM and the TCM does not receive a response from
the PCM.
Theory of Operation:During high torque shifts
the TCM will send a message requesting that the
PCM reduce engine power until the shift is com-
pleted. This message is sent from the TCM to the
Powertrain Control Module across the Torque Man-
agement Request Sense Circuit. The PCM will
acknowledge the TCM request by sending a mes-
sage across the PCI bus within a specific amount of
time. The TRD Link communication is also tested
periodically for operation whenever the engine is
running and the vehicle is not moving with zero
degrees throttle.
Transmission Effects:Maximum throttle angle
used by TCM will be 54 degrees. As a result a
customer my complain about loss of performance or
of short shifting when driving aggressively.
Possible Causes:
> Sticky Throttle Position Sensor (TPS)
> Wiring or Connector problems in the Torque
Management Request Sense Circuit
> PCM
> TCM
Name of code:P0736(50) - Gear Ratio Error in
Reverse
P0731(51) - Gear Ratio Error in 1st
P0732(52) - Gear Ratio Error in 2nd
P0733(53) - Gear Ratio Error in 3rd
P0734(54) - Gear Ratio Error in 4th
P0715(56) - Input Speed Sensor Error
P0720(57) - Output Speed Sensor Error
P1794(58) - Speed Sensor Ground Error
When monitored:The transmission gear ratio is
monitored continuously while the transmission is in
gear.
Set condition:This code is set if the gear ratio is
not correct for a period of time.
± Codes 50 through 54 sets if the ratio of the
input RPM (Nt) to the output RPM (No) does
not match the given gear ratio.
± Code 56 sets if there is an excessive change in
input RPM in any gear
± Code 57 sets if there is an excessive change in
output RPM in any gear
± Code 58 sets after a TCM reset in neutral and
Nt/No equals a ratio of input to output of 2.50
A hard code sets within 3 seconds, an intermit-
tent code sets within 15 seconds.
Theory of operation:The transmission system
uses two speed sensors, one to measure input RPM
and one to measure output RPM. These inputs are
essential for proper transmission operation. There-
fore, the integrity of this data is verified through
the following checks:
1. When in gear, if the gear ratio does not compare
to a known gear ratio, the corresponding in-gear
trouble code is set (codes 50 through 54).
2. An excessive change in input or output speeds
indicating signal intermittent will result in
codes 56 and/or 57 being set.
3. After a TCM reset in neutral, observing erratic
output and input speed sensor signals indicates
a loss of the common speed sensors ground. This
sets a code 58.
Transmission Effects:The transmission will not
go into relay open limp-in mode until three gear
ratio error events occur in a given key start. This
allows for intermittent problems to correct them-
selves without opening the relay. However, if a gear
ratio error develops, a code is always set, but if the
condition corrects itself the transmission will con-
tinue without requiring the ignition key to be cycled
on and off. Many different events could occur given
the range of failures possible for codes 50 through
58. The following are a few examples:
± Codes 51, 52, 53, 54, 56, and 57 at speeds
above 72 Km/h (45 MPH) - The appropriate
code is set, EMCC is aborted and current gear
is maintained. If while still traveling above 72
Km/h (45 MPH), the gear ratio becomes valid
again, EMCC will reengage and normal oper-
ation will resume. If the gear ratio becomes
intermittent and recovers three times in a
given key start, the current gear will be main-
tained and EMCC inhibited, then the trans-
mission will go into relay open limp-in mode if
12
GENERAL INFORMATION
Page 4117 of 4284
throttle is applied below 72 Km/h (45 MPH) or
at 35 Km/h (22 MPH) with closed throttle.
± Codes 51, 52, 53, 54, 56, and 57 (at speeds
between 35 and 72 Km/h (22 and 45 MPH) - If
one of these codes is set between 35 and 72
Km/h (22 and 45 MPH), the current gear will
be maintained until the gear ratio problem
corrects itself. If throttle is applied, the trans
will go to 2nd gear. If this happens and the
gear ratio problem goes away, normal opera-
tion will resume. If three gear ratio problems
are identified in a given key start, the current
gear will be frozen until throttle is applied.
The transmission will then go into relay open
limp-in mode with throttle applied at speeds
between 35 and 72 Km/h (22 and 45 MPH).
± Codes 51, 52, 53, 54, 56, and 57 (at speeds
below 35 Km/h (22 MPH) - If a gear ratio
problem is identified below 35 Km/h (22 MPH),
the transmission will immediately substitute
second gear for the current gear. If the gear
ratio problem goes away, normal operation will
resume. If three gear ratio problems are iden-
tified in a given key start, the transmission
will go into relay open limp-in mode.
Possible causes:
Code P0736(50) - Excludes geartrain failures which
should be obvious upon disassembly
> If code P1791(35) is also set, follow diagnostic
procedure for code P1791(35) first
> Valve body - #1 ball check or LR switch valve
sticking - may also set code P0731(51)
> Speed sensor or associated wiring
± may also set codes P0731(51), P0715(56), or
P0720(57)
> Failed or slipping LR clutch - may also set code
P0731(51)
> LR seal leakage (Intermittent no drive or re-
verse)
> Sticky LR accumulator seals (Intermittent no
drive or reverse)
> Failed reverse clutch (hard code)
± OD/Rev lip seal leakage
± Worn reaction shaft support seal rings
± Snap ring out of position
Code P0731(51) - Excludes geartrain failures which
should be obvious upon disassembly
> If code P1791(35) is also set, follow diagnostic
procedure for code P1791(35) first
> Valve body - #1 ball check or LR switch valve
sticking - may also set code P0736(56) or have no
Reverse
> Speed sensor or associated wiring - may also set
codes P0736(50), P0715(56), or P0720(57)> Failed or intermittent slipping UD clutch - may
also set P0732(52), or P0733(53)
± UD seal leakage (intermittent)
± Worn input clutch hub bushing (hard code at
heavy throttle)
± Sticky UD accumulator seals (intermittent)
± Worn reaction shaft support seal rings (hard
code at heavy throttle)
± Solenoid pack (UD pressure in 4th gear)
> Failed or slipping LR clutch - may also set code
P0736(56) or have no Reverse
± LR seal leakage (Intermittent)
± Sticky LR accumulator seals (Intermittent)
Code P0732(52) - Excludes geartrain failures which
should be obvious upon disassembly
> If code P1791(35) is also set, follow diagnostic
procedure for code P1791(35) first
> Failed or slipping 2-4 clutch - may also set code
P0734(54)
± 2-4 seal leakage (intermittent)
± Sticky accumulator seals (intermittent)
> Failed or intermittent slipping UD clutch - may
also set code P0731(51) and/or P0733(53)
± UD seal leakage (intermittent)
± Worn input clutch hub bushing (hard code at
heavy throttle)
± Sticky UD accumulator seals (intermittent)
± Worn reaction shaft support seal rings (hard
code at heavy throttle)
± Solenoid pack (UD pressure in 4th gear)
Code P0733(53) - Excludes geartrain failures which
should be obvious upon disassembly
> If code P1791(35) is also set, follow diagnostic
procedure for code P1791(35) first
> Failed or slipping OD clutch - may also set code
P0734(54)
± OD and Reverse inner and outer lip seal leak-
age (usually hard code)
± Sticky OD accumulator seals (intermittent)
± Worn reaction shaft support seal rings (hard
code at heavy throttle)
± Broken OD/UD tapered snap ring - (hard code
at heavy throttle)
> Failed or intermittent slipping UD clutch - may
also set code P0731(51) and/or P0732(52)
± UD seal leakage (intermittent)
± Worn input clutch hub bushing (hard code at
heavy throttle)
± Sticky UD accumulator seals (intermittent)
± Worn reaction shaft support seal rings (hard
code at heavy throttle)
13
GENERAL INFORMATION
Page 4120 of 4284
since there is no power available to control the
transmission solenoids. However if power is re-
stored, the TCM will power-up and normal opera-
tion will be restored. This DTC identifies that
power to the TCM was restored when the gear
selector was in a9Drive9position while the vehicle
was moving at speeds above 32 Km/h (20 MPH). If
a person shifts to Neutral and cycles the ignition
key and quickly shifts to9Drive9while moving
before the TCM comes out of its START ROUTINE,
the DTC can be set. Therefore it is critical that this
DTC diagnosis repair procedure should only be used
if the vehicle is experiencing intermittent 2nd gear
operation and subsequently a return to normal
operation during normal driving.
Transmission Effects:No limp-in condition. The
DTC is for information only when trying to diagno-
sis intermittent 2nd gear operation and subse-
quently a return to normal operation.
Possible Causes:
± No Problem if vehicle is started in9neutral9at
speeds above 32 Km/h (20 MPH) and shifted
quickly to9Drive9before TCM comes out of the
START ROUTINE.
FOR INTERMITTENT 2ND GEAR OPER-
ATION AND THEN A SUBSEQUENT RE-
TURN TO NORMAL OPERATION WITH-
OUT CYCLING THE IGNITION KEY
± Intermittent Direct Battery connection be-
tween TCM (60-way pin 56) and battery.
± Intermittent Fused Ignition Switch Output
between TCM (60-way pin 11) and ignition
switch.
± Intermittent Ground to TCM (60 way pins 53
and 57).
Name of code:P1717(77) - No Communication
with Mechanical Instrument Cluster (MIC)
When monitored:Continuously with key on.
Set condition:If no PCI bus messages are received
from the Mechanical Instrument Cluster (MIC) for
25 seconds.
Theory of operation:The TCM communicates
with the MIC using the PCI bus. It relies on certain
information to function properly. The TCM contin-
uously monitors the PCI bus to check for messages
broadcast from the PCM.
Transmission Effects:Possible improper TCM
AutoStick configuration.
Possible causes:
> Open or shorted PCI bus circuit from MIC
> MIC
> TCM (If other communications codes are stored
in the TCM only)
Name of code:P0600(78) - Serial Communication
Link Malfunction
When monitored:Continuously with key on.
Set condition:If no PCI bus messages are received
by the Transmission Control Module (TCM) for 10
seconds.
Theory of operation:The TCM communicates
with the other modules in the vehicle using the PCI
bus. It relies on certain information to function
properly. The TCM continuously monitors the PCI
bus to check for messages broadcast from the cer-
tain modules.
Transmission Effects:Possible improper TCM
AutoStick configuration and delayed 3-4 shifts. No
EMCC and early 3-4 shifts for a few minutes after
engine is started.
Possible causes:
> Open or shorted PCI bus circuit from BCM
> TCM
Name of code:P1714(79) Low Battery Voltage
When monitored:Continuously with engine run-
ning and Transmission Relay energized.
Set condition:If the voltage sensed at the Trans-
mission Control Relay Output circuit (pins 16 and
17 at TCM) for 15 seconds.
Theory of operation:The Transmission system
requires sufficient battery voltage in order to ener-
gize the transmission solenoids. The TCM continu-
ously monitors the voltage available to the sole-
noids.
Transmission Effects:At speeds above 72 Km/h
(45 MPH) the transmission system will default to
neutral. Below 72 Km/h (45 MPH) the transmission
system will default to relay open limp-in mode.
Park, Reverse, and Neutral are still available.
Possible causes:
> Charging system problem
> Poor/High resistance connection between TCM
and Battery/Alternator
> TCM pin 16 and 17 high resistance or poor
connection
> TCM ground pins 53 and 57 high resistance or
poor connection
> High resistance in Transmission Control Relay
contacts
> TCM
3.3.8 QUICK LEARN
The Quick Learn function customizes adaptive
parameters of the TCM to the transmission charac-
teristics of a vehicle. This gives the customer im-
proved9as received9shift quality compared to the
initial parameters stored in the TCM.
Notes about Quick Learn Features
The nature of the Quick Learn function requires
that certain features must be taken into consider-
ation.
16
GENERAL INFORMATION
Page 4122 of 4284
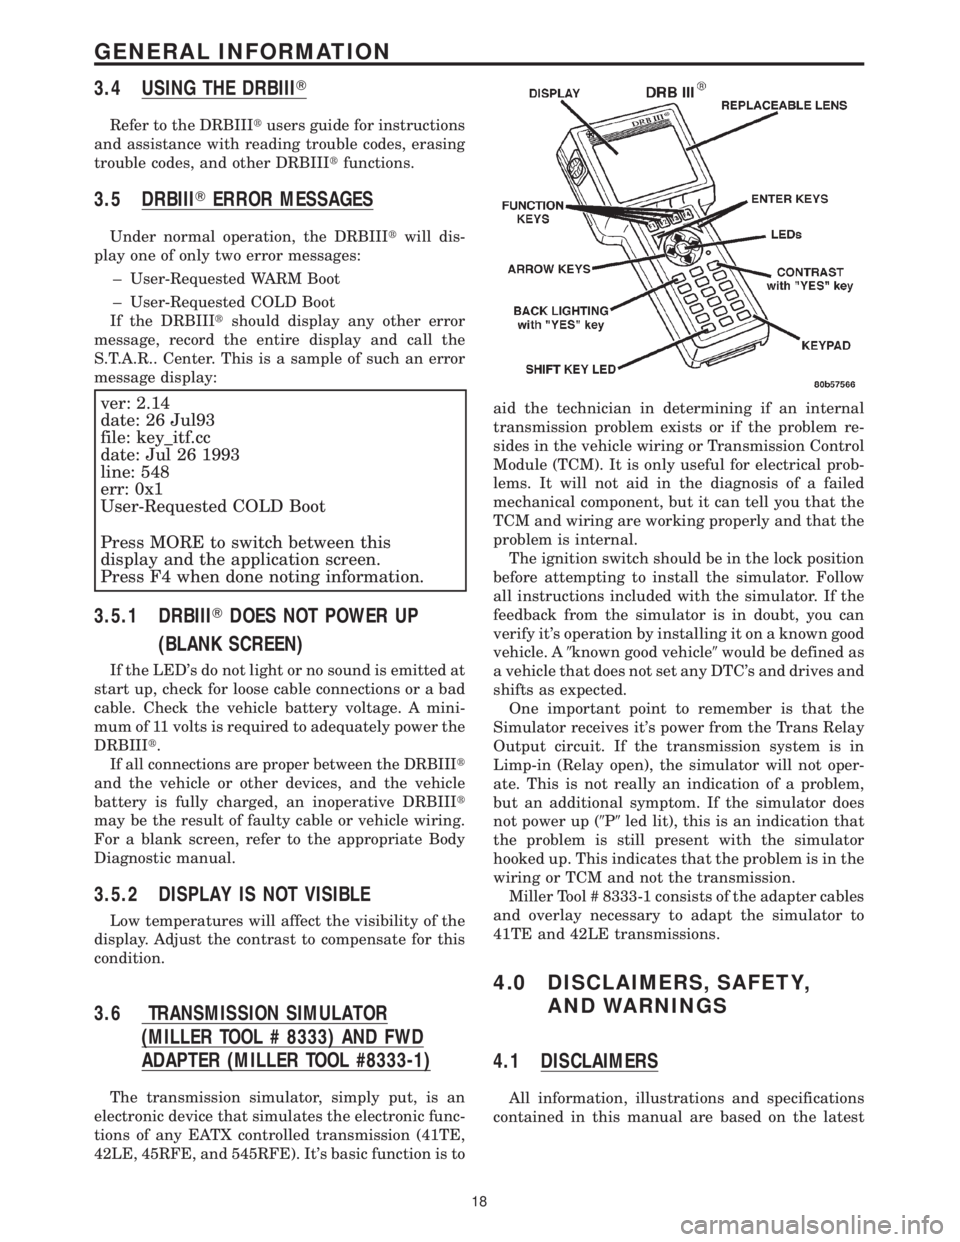
3.4 USING THE DRBIIIT
Refer to the DRBIIItusers guide for instructions
and assistance with reading trouble codes, erasing
trouble codes, and other DRBIIItfunctions.
3.5 DRBIIITERROR MESSAGES
Under normal operation, the DRBIIItwill dis-
play one of only two error messages:
± User-Requested WARM Boot
± User-Requested COLD Boot
If the DRBIIItshould display any other error
message, record the entire display and call the
S.T.A.R.. Center. This is a sample of such an error
message display:
ver: 2.14
date: 26 Jul93
file: key_itf.cc
date: Jul 26 1993
line: 548
err: 0x1
User-Requested COLD Boot
Press MORE to switch between this
display and the application screen.
Press F4 when done noting information.
3.5.1 DRBIIITDOES NOT POWER UP
(BLANK SCREEN)
If the LED's do not light or no sound is emitted at
start up, check for loose cable connections or a bad
cable. Check the vehicle battery voltage. A mini-
mum of 11 volts is required to adequately power the
DRBIIIt.
If all connections are proper between the DRBIIIt
and the vehicle or other devices, and the vehicle
battery is fully charged, an inoperative DRBIIIt
may be the result of faulty cable or vehicle wiring.
For a blank screen, refer to the appropriate Body
Diagnostic manual.
3.5.2 DISPLAY IS NOT VISIBLE
Low temperatures will affect the visibility of the
display. Adjust the contrast to compensate for this
condition.
3.6 TRANSMISSION SIMULATOR
(MILLER TOOL # 8333) AND FWD
ADAPTER (MILLER TOOL #8333-1)
The transmission simulator, simply put, is an
electronic device that simulates the electronic func-
tions of any EATX controlled transmission (41TE,
42LE, 45RFE, and 545RFE). It's basic function is toaid the technician in determining if an internal
transmission problem exists or if the problem re-
sides in the vehicle wiring or Transmission Control
Module (TCM). It is only useful for electrical prob-
lems. It will not aid in the diagnosis of a failed
mechanical component, but it can tell you that the
TCM and wiring are working properly and that the
problem is internal.
The ignition switch should be in the lock position
before attempting to install the simulator. Follow
all instructions included with the simulator. If the
feedback from the simulator is in doubt, you can
verify it's operation by installing it on a known good
vehicle. A9known good vehicle9would be defined as
a vehicle that does not set any DTC's and drives and
shifts as expected.
One important point to remember is that the
Simulator receives it's power from the Trans Relay
Output circuit. If the transmission system is in
Limp-in (Relay open), the simulator will not oper-
ate. This is not really an indication of a problem,
but an additional symptom. If the simulator does
not power up (9P9led lit), this is an indication that
the problem is still present with the simulator
hooked up. This indicates that the problem is in the
wiring or TCM and not the transmission.
Miller Tool # 8333-1 consists of the adapter cables
and overlay necessary to adapt the simulator to
41TE and 42LE transmissions.
4.0 DISCLAIMERS, SAFETY,
AND WARNINGS
4.1 DISCLAIMERS
All information, illustrations and specifications
contained in this manual are based on the latest
18
GENERAL INFORMATION
Page 4137 of 4284
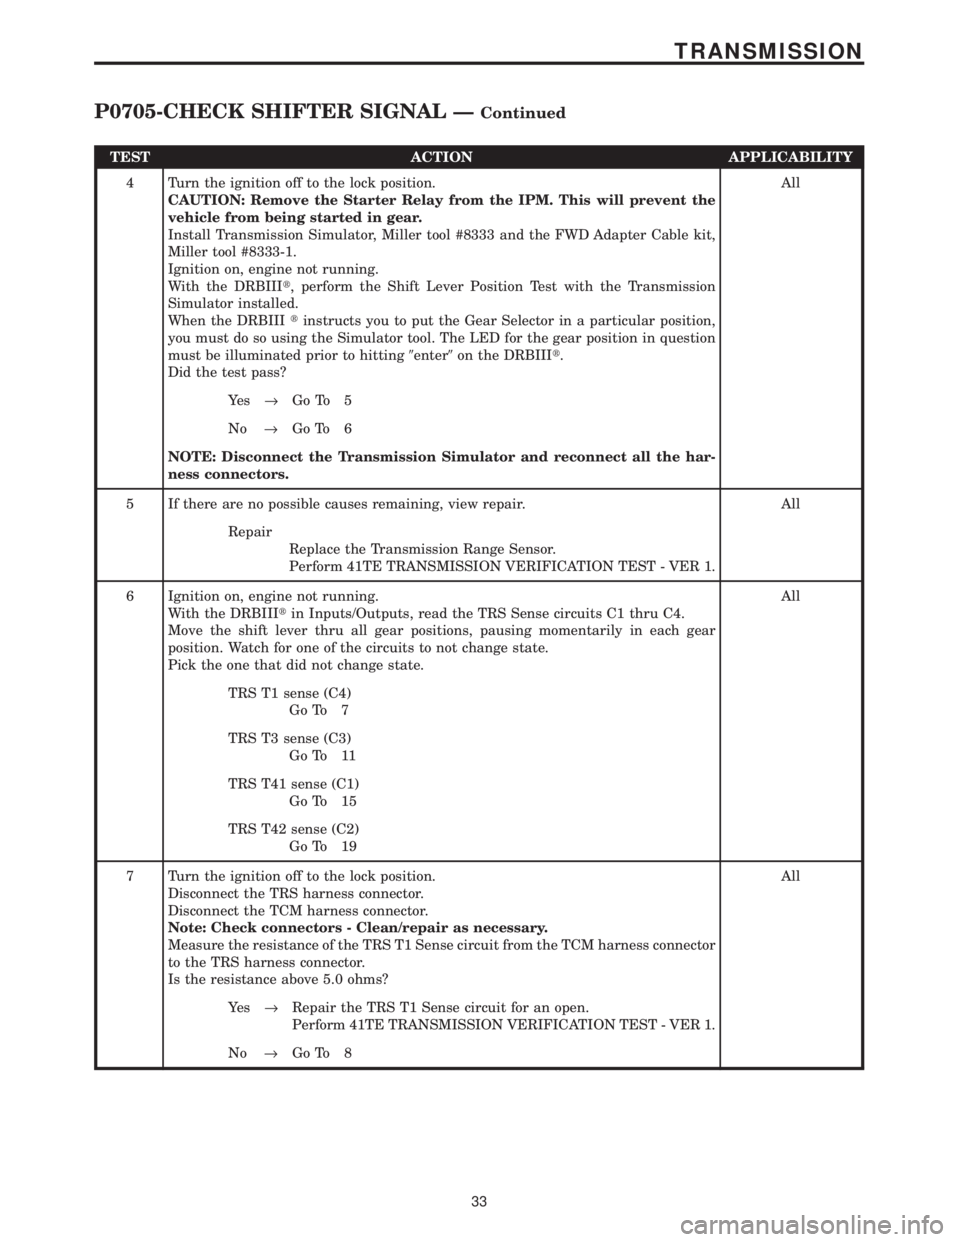
TEST ACTION APPLICABILITY
4 Turn the ignition off to the lock position.
CAUTION: Remove the Starter Relay from the IPM. This will prevent the
vehicle from being started in gear.
Install Transmission Simulator, Miller tool #8333 and the FWD Adapter Cable kit,
Miller tool #8333-1.
Ignition on, engine not running.
With the DRBIIIt, perform the Shift Lever Position Test with the Transmission
Simulator installed.
When the DRBIIItinstructs you to put the Gear Selector in a particular position,
you must do so using the Simulator tool. The LED for the gear position in question
must be illuminated prior to hitting9enter9on the DRBIIIt.
Did the test pass?All
Ye s®Go To 5
No®Go To 6
NOTE: Disconnect the Transmission Simulator and reconnect all the har-
ness connectors.
5 If there are no possible causes remaining, view repair. All
Repair
Replace the Transmission Range Sensor.
Perform 41TE TRANSMISSION VERIFICATION TEST - VER 1.
6 Ignition on, engine not running.
With the DRBIIItin Inputs/Outputs, read the TRS Sense circuits C1 thru C4.
Move the shift lever thru all gear positions, pausing momentarily in each gear
position. Watch for one of the circuits to not change state.
Pick the one that did not change state.All
TRS T1 sense (C4)
Go To 7
TRS T3 sense (C3)
Go To 11
TRS T41 sense (C1)
Go To 15
TRS T42 sense (C2)
Go To 19
7 Turn the ignition off to the lock position.
Disconnect the TRS harness connector.
Disconnect the TCM harness connector.
Note: Check connectors - Clean/repair as necessary.
Measure the resistance of the TRS T1 Sense circuit from the TCM harness connector
to the TRS harness connector.
Is the resistance above 5.0 ohms?All
Ye s®Repair the TRS T1 Sense circuit for an open.
Perform 41TE TRANSMISSION VERIFICATION TEST - VER 1.
No®Go To 8
33
TRANSMISSION
P0705-CHECK SHIFTER SIGNAL ÐContinued
Page 4138 of 4284
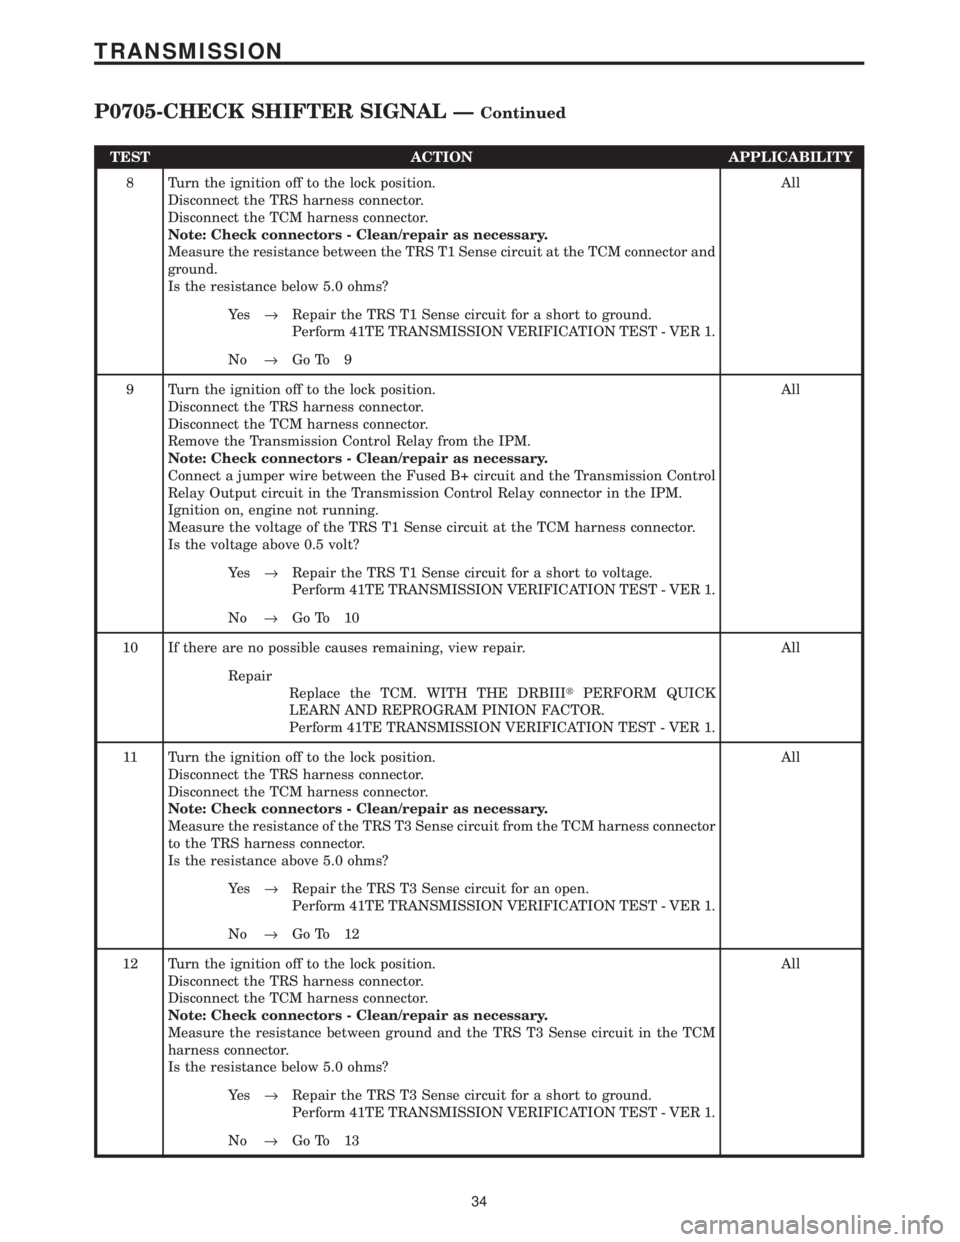
TEST ACTION APPLICABILITY
8 Turn the ignition off to the lock position.
Disconnect the TRS harness connector.
Disconnect the TCM harness connector.
Note: Check connectors - Clean/repair as necessary.
Measure the resistance between the TRS T1 Sense circuit at the TCM connector and
ground.
Is the resistance below 5.0 ohms?All
Ye s®Repair the TRS T1 Sense circuit for a short to ground.
Perform 41TE TRANSMISSION VERIFICATION TEST - VER 1.
No®Go To 9
9 Turn the ignition off to the lock position.
Disconnect the TRS harness connector.
Disconnect the TCM harness connector.
Remove the Transmission Control Relay from the IPM.
Note: Check connectors - Clean/repair as necessary.
Connect a jumper wire between the Fused B+ circuit and the Transmission Control
Relay Output circuit in the Transmission Control Relay connector in the IPM.
Ignition on, engine not running.
Measure the voltage of the TRS T1 Sense circuit at the TCM harness connector.
Is the voltage above 0.5 volt?All
Ye s®Repair the TRS T1 Sense circuit for a short to voltage.
Perform 41TE TRANSMISSION VERIFICATION TEST - VER 1.
No®Go To 10
10 If there are no possible causes remaining, view repair. All
Repair
Replace the TCM. WITH THE DRBIIItPERFORM QUICK
LEARN AND REPROGRAM PINION FACTOR.
Perform 41TE TRANSMISSION VERIFICATION TEST - VER 1.
11 Turn the ignition off to the lock position.
Disconnect the TRS harness connector.
Disconnect the TCM harness connector.
Note: Check connectors - Clean/repair as necessary.
Measure the resistance of the TRS T3 Sense circuit from the TCM harness connector
to the TRS harness connector.
Is the resistance above 5.0 ohms?All
Ye s®Repair the TRS T3 Sense circuit for an open.
Perform 41TE TRANSMISSION VERIFICATION TEST - VER 1.
No®Go To 12
12 Turn the ignition off to the lock position.
Disconnect the TRS harness connector.
Disconnect the TCM harness connector.
Note: Check connectors - Clean/repair as necessary.
Measure the resistance between ground and the TRS T3 Sense circuit in the TCM
harness connector.
Is the resistance below 5.0 ohms?All
Ye s®Repair the TRS T3 Sense circuit for a short to ground.
Perform 41TE TRANSMISSION VERIFICATION TEST - VER 1.
No®Go To 13
34
TRANSMISSION
P0705-CHECK SHIFTER SIGNAL ÐContinued
Page 4139 of 4284
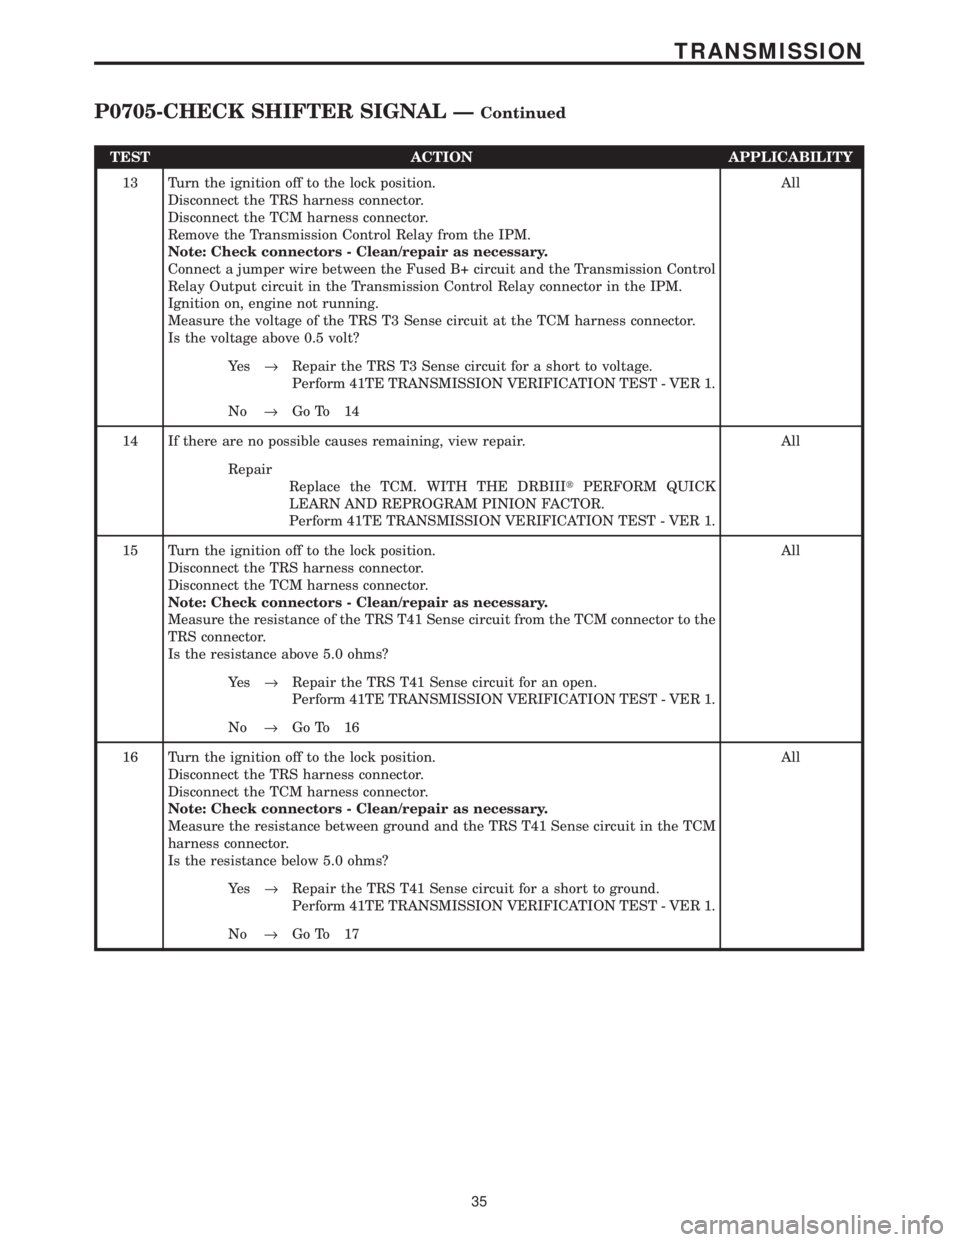
TEST ACTION APPLICABILITY
13 Turn the ignition off to the lock position.
Disconnect the TRS harness connector.
Disconnect the TCM harness connector.
Remove the Transmission Control Relay from the IPM.
Note: Check connectors - Clean/repair as necessary.
Connect a jumper wire between the Fused B+ circuit and the Transmission Control
Relay Output circuit in the Transmission Control Relay connector in the IPM.
Ignition on, engine not running.
Measure the voltage of the TRS T3 Sense circuit at the TCM harness connector.
Is the voltage above 0.5 volt?All
Ye s®Repair the TRS T3 Sense circuit for a short to voltage.
Perform 41TE TRANSMISSION VERIFICATION TEST - VER 1.
No®Go To 14
14 If there are no possible causes remaining, view repair. All
Repair
Replace the TCM. WITH THE DRBIIItPERFORM QUICK
LEARN AND REPROGRAM PINION FACTOR.
Perform 41TE TRANSMISSION VERIFICATION TEST - VER 1.
15 Turn the ignition off to the lock position.
Disconnect the TRS harness connector.
Disconnect the TCM harness connector.
Note: Check connectors - Clean/repair as necessary.
Measure the resistance of the TRS T41 Sense circuit from the TCM connector to the
TRS connector.
Is the resistance above 5.0 ohms?All
Ye s®Repair the TRS T41 Sense circuit for an open.
Perform 41TE TRANSMISSION VERIFICATION TEST - VER 1.
No®Go To 16
16 Turn the ignition off to the lock position.
Disconnect the TRS harness connector.
Disconnect the TCM harness connector.
Note: Check connectors - Clean/repair as necessary.
Measure the resistance between ground and the TRS T41 Sense circuit in the TCM
harness connector.
Is the resistance below 5.0 ohms?All
Ye s®Repair the TRS T41 Sense circuit for a short to ground.
Perform 41TE TRANSMISSION VERIFICATION TEST - VER 1.
No®Go To 17
35
TRANSMISSION
P0705-CHECK SHIFTER SIGNAL ÐContinued