Page 358 of 4284

Symptom:
CABIN HEATER CONTROL CIRCUIT SHORT TO BATTERY (AC-
TIVE)
When Monitored and Set Condition:
CABIN HEATER CONTROL CIRCUIT SHORT TO BATTERY (ACTIVE)
When Monitored: During DCHA activation and operation.
Set Condition: This DTC will set if the FCM sees a voltage between 5.0 and 15.0 volts on
the Cabin Heater Assist Control circuit.
POSSIBLE CAUSES
DCHA CONTROL UNIT FAULT
CABIN HEATER ASSIST CONTROL CIRCUIT SHORTED TO THE FUSED B(+) CIRCUIT
FCM FAULT
CABIN HEATER ASSIST CONTROL CIRCUIT SHORTED HIGH
TEST ACTION APPLICABILITY
1WARNING: DO NOT OPERATE THE DCHA IN AN ENCLOSED AREA SUCH
AS A GARAGE THAT DOES NOT HAVE EXHAUST VENTILATION FACILI-
TIES. ALWAYS VENT THE DCHA's EXHAUST WHEN OPERATING THE
DCHA. FAILURE TO FOLLOW THESE INSTRUCTIONS MAY RESULT IN
PERSONAL INJURY OR DEATH.
WARNING: ALLOW THE DCHA ASSEMBLY TO COOL BEFORE PERFORM-
ING A COMPONENT INSPECTION/REPAIR/REPLACEMENT. FAILURE TO
FOLLOW THESE INSTRUCTIONS MAY RESULT IN PERSONAL INJURY.
Turn the ignition off.
NOTE: Check connectors - Clean/repair as necessary.
Disconnect the Cabin Heater Assist C1 harness connector.
Turn the ignition on.
With the DRBIIItin FCM, read the active DTCs.
Is the Cabin Heater Relay Short To Battery DTC still active?All
Ye s®Go To 2
No®Replace the DCHA Heater Module in accordance with the Service
Information.
Perform CABIN HEATER VERIFICATION TEST - VER 1.
329
CABIN HEATER
Page 445 of 4284

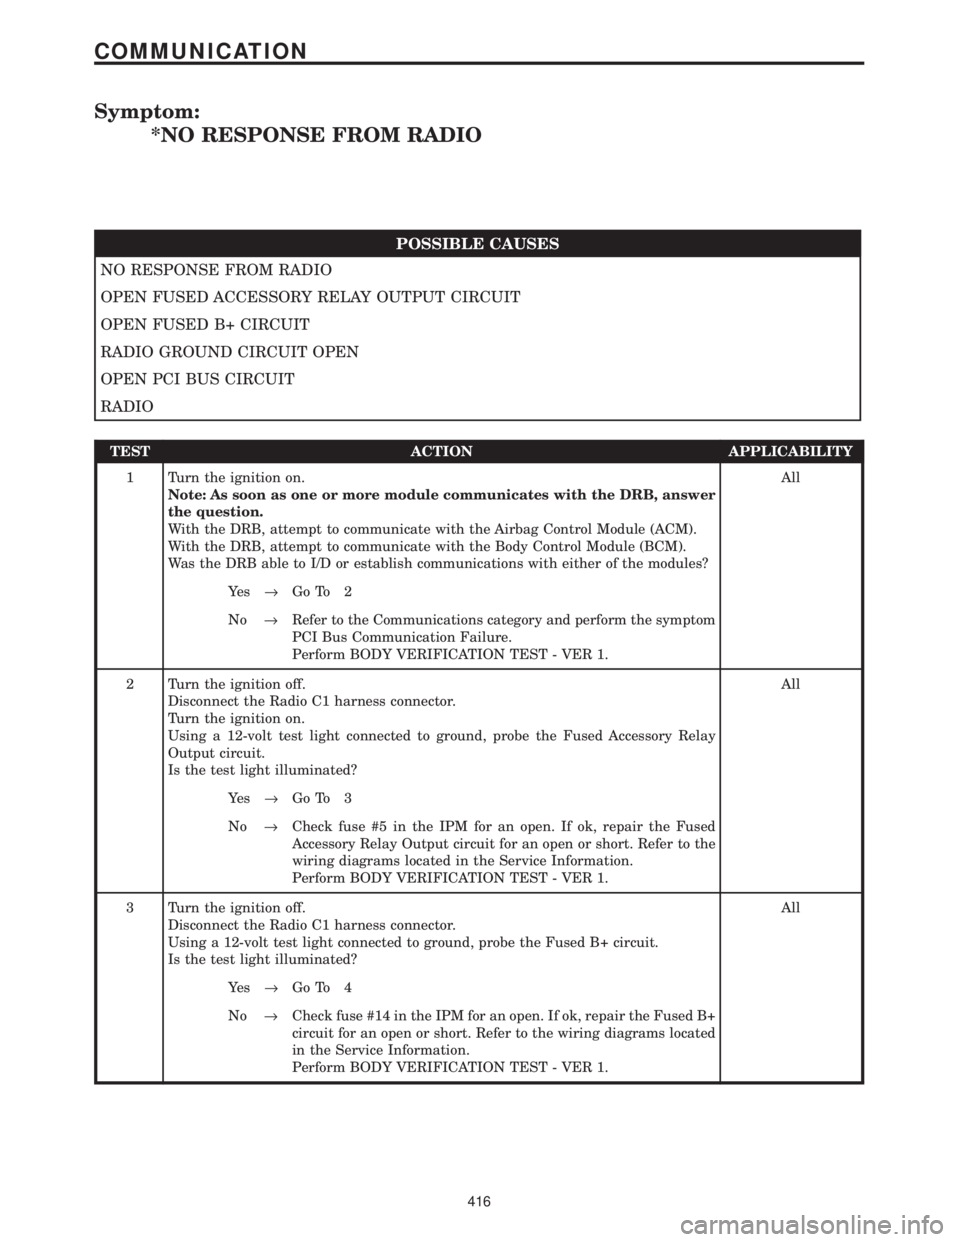
Symptom:
*NO RESPONSE FROM RADIO
POSSIBLE CAUSES
NO RESPONSE FROM RADIO
OPEN FUSED ACCESSORY RELAY OUTPUT CIRCUIT
OPEN FUSED B+ CIRCUIT
RADIO GROUND CIRCUIT OPEN
OPEN PCI BUS CIRCUIT
RADIO
TEST ACTION APPLICABILITY
1 Turn the ignition on.
Note: As soon as one or more module communicates with the DRB, answer
the question.
With the DRB, attempt to communicate with the Airbag Control Module (ACM).
With the DRB, attempt to communicate with the Body Control Module (BCM).
Was the DRB able to I/D or establish communications with either of the modules?All
Ye s®Go To 2
No®Refer to the Communications category and perform the symptom
PCI Bus Communication Failure.
Perform BODY VERIFICATION TEST - VER 1.
2 Turn the ignition off.
Disconnect the Radio C1 harness connector.
Turn the ignition on.
Using a 12-volt test light connected to ground, probe the Fused Accessory Relay
Output circuit.
Is the test light illuminated?All
Ye s®Go To 3
No®Check fuse #5 in the IPM for an open. If ok, repair the Fused
Accessory Relay Output circuit for an open or short. Refer to the
wiring diagrams located in the Service Information.
Perform BODY VERIFICATION TEST - VER 1.
3 Turn the ignition off.
Disconnect the Radio C1 harness connector.
Using a 12-volt test light connected to ground, probe the Fused B+ circuit.
Is the test light illuminated?All
Ye s®Go To 4
No®Check fuse #14 in the IPM for an open. If ok, repair the Fused B+
circuit for an open or short. Refer to the wiring diagrams located
in the Service Information.
Perform BODY VERIFICATION TEST - VER 1.
416
COMMUNICATION
Page 450 of 4284

TEST ACTION APPLICABILITY
3 Turn the ignition off.
Disconnect the TCM harness connector.
Remove the starter relay from the IPM.
Using a 12-volt test light connected to ground, probe the Ignition Switch Output
(Start) circuit.
Note: The light must illuminate brightly, if it does not light, or lights dimly,
the circuit must be repaired. If there is any doubt, compare the brightness
when testing the circuit, to the brightness when connected directly to the
battery positive post.
Observe the test light while momentarily turning the ignition switch to the Start
position.
Is the test light illuminated?All
Ye s®Go To 4
No®Repair the Ignition Switch Output (Start) circuit for an open.
Refer to the wiring diagrams located in the Service Information.
Perform 41TE TRANSMISSION VERIFICATION TEST - VER 1.
Note: Reinstall the original Starter Relay.
4 Turn the ignition off.
Disconnect the TCM harness connector.
Using a 12-volt test light connected to ground, probe the Fused B(+) circuit.
Note: The light must illuminate brightly, if it does not light, or lights dimly,
the circuit must be repaired. If there is any doubt, compare the brightness
when testing the circuit, to the brightness when connected directly to the
battery positive post.
Is the test light illuminated?All
Ye s®Go To 5
No®Check IPM fuse #15 for an open. If OK, repair the Fused B(+)
circuit for an open. Refer to the wiring diagrams located in the
Service Information.
Perform 41TE TRANSMISSION VERIFICATION TEST - VER 1.
5 Turn the ignition off.
Disconnect the TCM harness connector.
Using a 12-volt test light connected to 12-volts, probe each ground circuit in the TCM
connector.
NOTE: The light must illuminate brightly, if it does not light, or lights dimly,
the circuit must be repaired. If there is any doubt, compare the brightness
when testing the circuit, to the brightness when connected directly to the
battery negative post.
Is the light illuminated at all ground circuits?All
Ye s®Go To 6
No®Repair the Ground circuit(s) for an open. Check the main ground
connection to engine block and/or chassis. Refer to the wiring
diagrams located in the Service Information.
Perform 41TE TRANSMISSION VERIFICATION TEST - VER 1.
421
COMMUNICATION
*NO RESPONSE FROM TRANSMISSION CONTROL MODULE ÐContinued
Page 469 of 4284

Symptom:
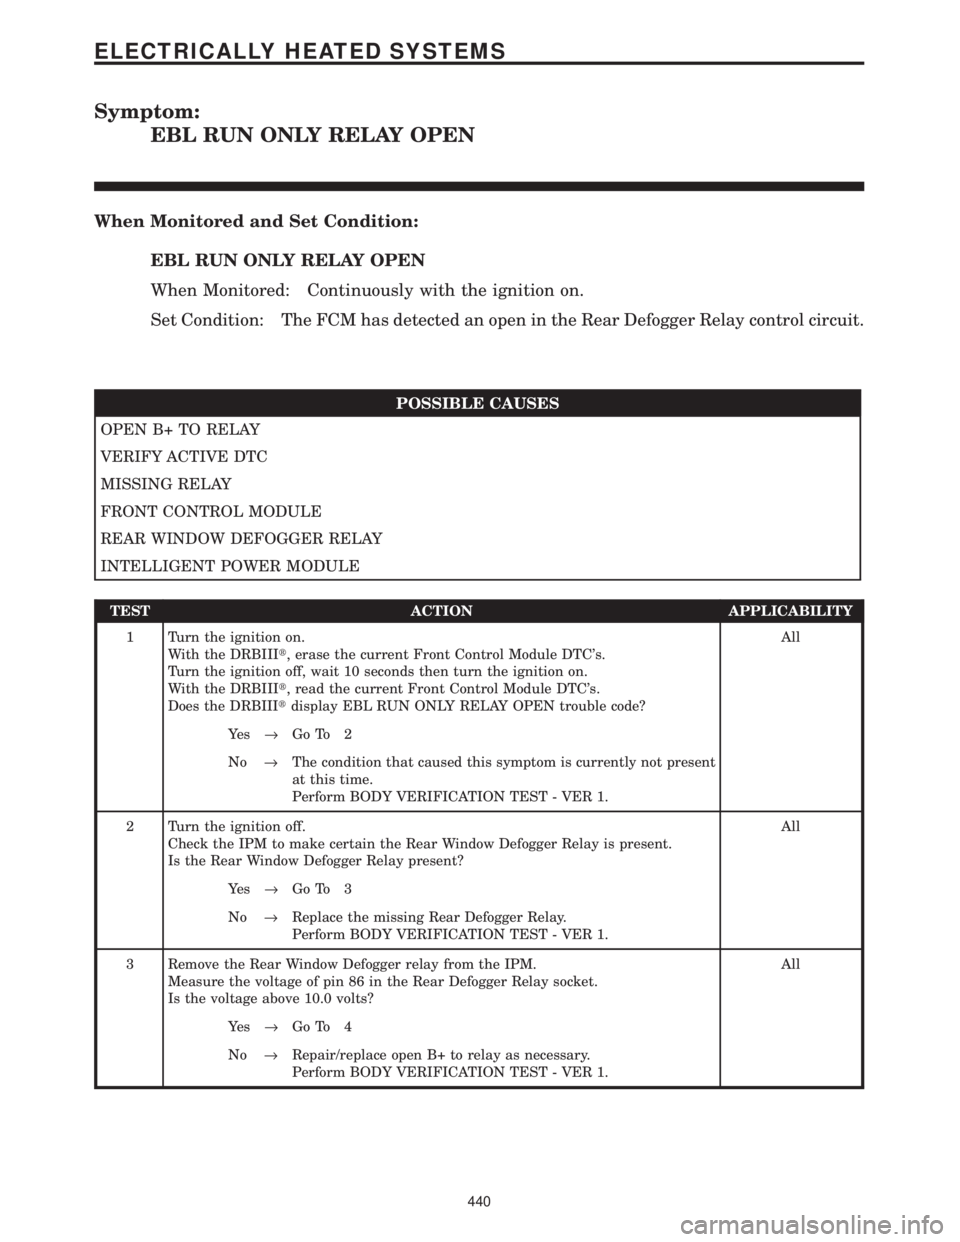
EBL RUN ONLY RELAY OPEN
When Monitored and Set Condition:
EBL RUN ONLY RELAY OPEN
When Monitored: Continuously with the ignition on.
Set Condition: The FCM has detected an open in the Rear Defogger Relay control circuit.
POSSIBLE CAUSES
OPEN B+ TO RELAY
VERIFY ACTIVE DTC
MISSING RELAY
FRONT CONTROL MODULE
REAR WINDOW DEFOGGER RELAY
INTELLIGENT POWER MODULE
TEST ACTION APPLICABILITY
1 Turn the ignition on.
With the DRBIIIt, erase the current Front Control Module DTC's.
Turn the ignition off, wait 10 seconds then turn the ignition on.
With the DRBIIIt, read the current Front Control Module DTC's.
Does the DRBIIItdisplay EBL RUN ONLY RELAY OPEN trouble code?All
Ye s®Go To 2
No®The condition that caused this symptom is currently not present
at this time.
Perform BODY VERIFICATION TEST - VER 1.
2 Turn the ignition off.
Check the IPM to make certain the Rear Window Defogger Relay is present.
Is the Rear Window Defogger Relay present?All
Ye s®Go To 3
No®Replace the missing Rear Defogger Relay.
Perform BODY VERIFICATION TEST - VER 1.
3 Remove the Rear Window Defogger relay from the IPM.
Measure the voltage of pin 86 in the Rear Defogger Relay socket.
Is the voltage above 10.0 volts?All
Ye s®Go To 4
No®Repair/replace open B+ to relay as necessary.
Perform BODY VERIFICATION TEST - VER 1.
440
ELECTRICALLY HEATED SYSTEMS
Page 470 of 4284
TEST ACTION APPLICABILITY
4 Turn the ignition off.
Install a known good relay in place of the Rear Window Defogger relay.
Turn the ignition on.
Attempt to operate the Rear Window Defogger.
With the DRBIIIt, read the current Front Control Module DTC's.
Does the DTC reset?All
Ye s®Go To 5
No®Replace the Rear Defogger Relay.
Perform BODY VERIFICATION TEST - VER 1.
5 Turn the ignition off.
Disconnect the Front Control Module from the Fuse and Relay Center.
Remove the Rear Window Defogger Relay.
Measure the resistance of the Rear Window Defogger Relay Control Circuit in the
Fuse and Relay Center.
Is the resistance below 5.0 ohms?All
Ye s®Replace the Front Control Module.
Perform BODY VERIFICATION TEST - VER 1.
No®Replace the Fuse and Relay Center.
Perform BODY VERIFICATION TEST - VER 1.
441
ELECTRICALLY HEATED SYSTEMS
EBL RUN ONLY RELAY OPEN ÐContinued
Page 471 of 4284

Symptom:
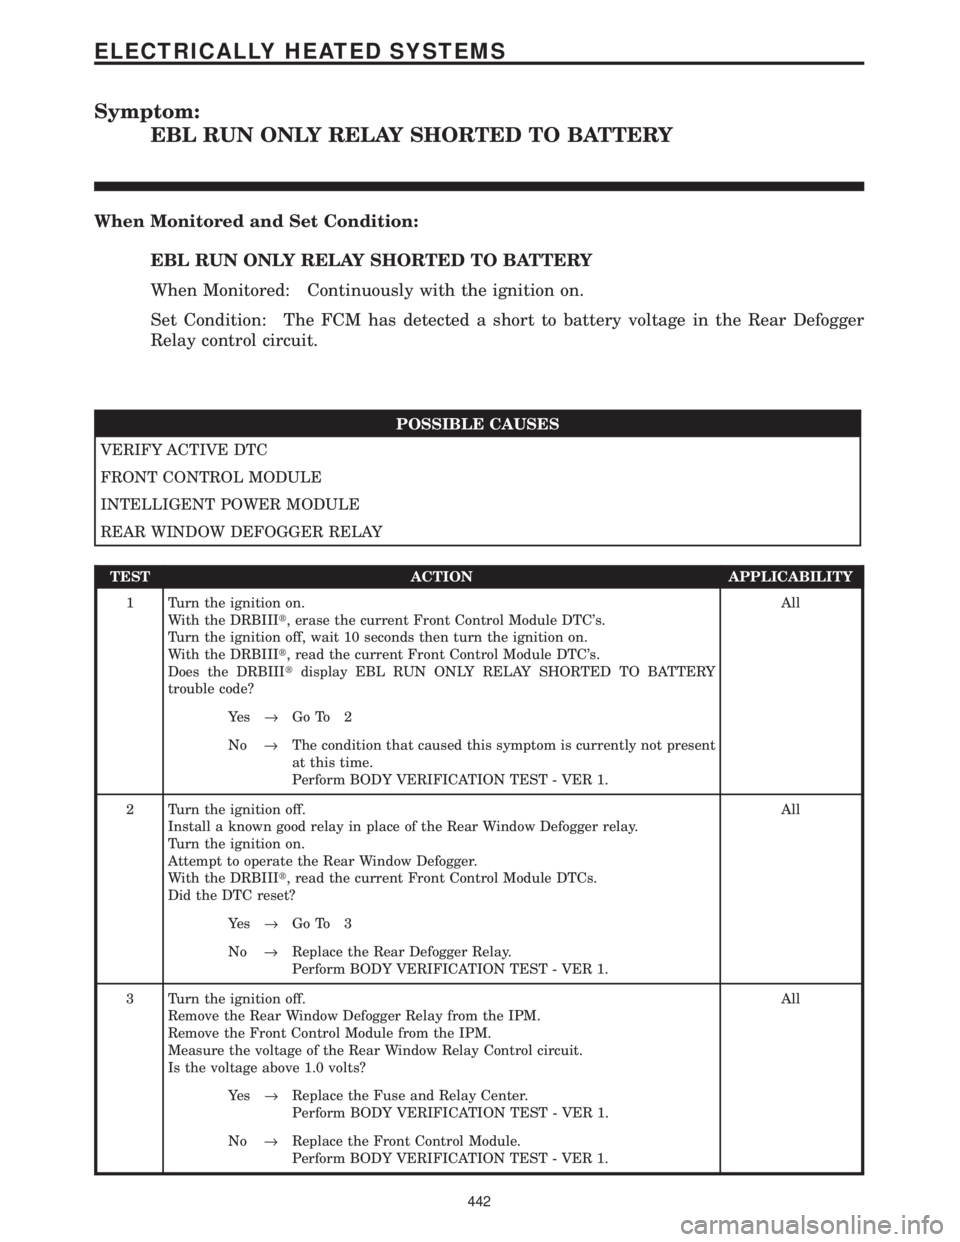
EBL RUN ONLY RELAY SHORTED TO BATTERY
When Monitored and Set Condition:
EBL RUN ONLY RELAY SHORTED TO BATTERY
When Monitored: Continuously with the ignition on.
Set Condition: The FCM has detected a short to battery voltage in the Rear Defogger
Relay control circuit.
POSSIBLE CAUSES
VERIFY ACTIVE DTC
FRONT CONTROL MODULE
INTELLIGENT POWER MODULE
REAR WINDOW DEFOGGER RELAY
TEST ACTION APPLICABILITY
1 Turn the ignition on.
With the DRBIIIt, erase the current Front Control Module DTC's.
Turn the ignition off, wait 10 seconds then turn the ignition on.
With the DRBIIIt, read the current Front Control Module DTC's.
Does the DRBIIItdisplay EBL RUN ONLY RELAY SHORTED TO BATTERY
trouble code?All
Ye s®Go To 2
No®The condition that caused this symptom is currently not present
at this time.
Perform BODY VERIFICATION TEST - VER 1.
2 Turn the ignition off.
Install a known good relay in place of the Rear Window Defogger relay.
Turn the ignition on.
Attempt to operate the Rear Window Defogger.
With the DRBIIIt, read the current Front Control Module DTCs.
Did the DTC reset?All
Ye s®Go To 3
No®Replace the Rear Defogger Relay.
Perform BODY VERIFICATION TEST - VER 1.
3 Turn the ignition off.
Remove the Rear Window Defogger Relay from the IPM.
Remove the Front Control Module from the IPM.
Measure the voltage of the Rear Window Relay Control circuit.
Is the voltage above 1.0 volts?All
Ye s®Replace the Fuse and Relay Center.
Perform BODY VERIFICATION TEST - VER 1.
No®Replace the Front Control Module.
Perform BODY VERIFICATION TEST - VER 1.
442
ELECTRICALLY HEATED SYSTEMS
Page 475 of 4284

Symptom:
FRONT FOG LAMP RELAY OPEN
When Monitored and Set Condition:
FRONT FOG LAMP RELAY OPEN
When Monitored: Ignition On.
Set Condition: The IPM detects high current from the fog lamp relay control circuit.
POSSIBLE CAUSES
MISSING RELAY
OPEN FUSE
FOG LAMP RELAY
INTERMITTENT CONDITION
FOG LAMP RELAY CONTROL CIRCUIT OPEN
FRONT CONTROL MODULE
INTELLIGENT POWER MODULE
TEST ACTION APPLICABILITY
1 Turn the ignition on.
With the DRBIIIt, clear all IPM DTC's.
Turn the Fog Lamps on.
With the DRBIIIt, read the DTC information.
Does the DRBIIItread: Front Fog Lamp Relay Open?All
Ye s®Go To 2
No®Go To 5
2 Turn the ignition off.
Check the IPM to make certain the Fog Lamp Relay is present.
Is the Fog Lamp Relay present?All
Ye s®Go To 3
No®Replace the missing Fog Lamp Relay.
Perform BODY VERIFICATION TEST - VER 1.
3 Turn the ignition off.
Install a known good relay in place of the fog lamp relay.
Turn the Fog Lamps On.
Do the Fog Lamps operate normally?All
Ye s®Replace the Fog Lamp Relay.
Perform BODY VERIFICATION TEST - VER 1.
No®Go To 4
446
EXTERIOR LIGHTING
Page 476 of 4284

TEST ACTION APPLICABILITY
4 Turn the ignition off
Remove the Fog Lamp Relay.
Measure the voltage of the Fused B+ circuit of the fog lamp relay.
Is the voltage above 10 volts?All
Ye s®Replace the Front Control Module.
Perform BODY VERIFICATION TEST - VER 1.
No®Replace the Intelligent Power Module.
Perform BODY VERIFICATION TEST - VER 1.
5 Turn the ignition off.
Check the IPM Fog Lamp fuse #1.
Is the fuse open?All
Ye s®Replace the open fuse.
Perform BODY VERIFICATION TEST - VER 1.
No®Go To 6
6 Turn the ignition off.
Disconnect the Front Control Module from the IPM.
Remove the Fog Lamp Relay.
Measure the resistance of the Fog Lamp Relay Control Circuit.
Is the resistance below 5.0 ohms?All
Ye s®The condition that caused the symptom is currently not present.
Inspect the related wiring for a possible intermittent condition.
Look for any chafed, pierced,pinched, or partially broken wires.
Perform BODY VERIFICATION TEST - VER 1.
No®Repair the Fog Lamp Relay Control Circuit.
Perform BODY VERIFICATION TEST - VER 1.
447
EXTERIOR LIGHTING
FRONT FOG LAMP RELAY OPEN ÐContinued