2001 CHRYSLER VOYAGER sensor
[x] Cancel search: sensorPage 1353 of 4284
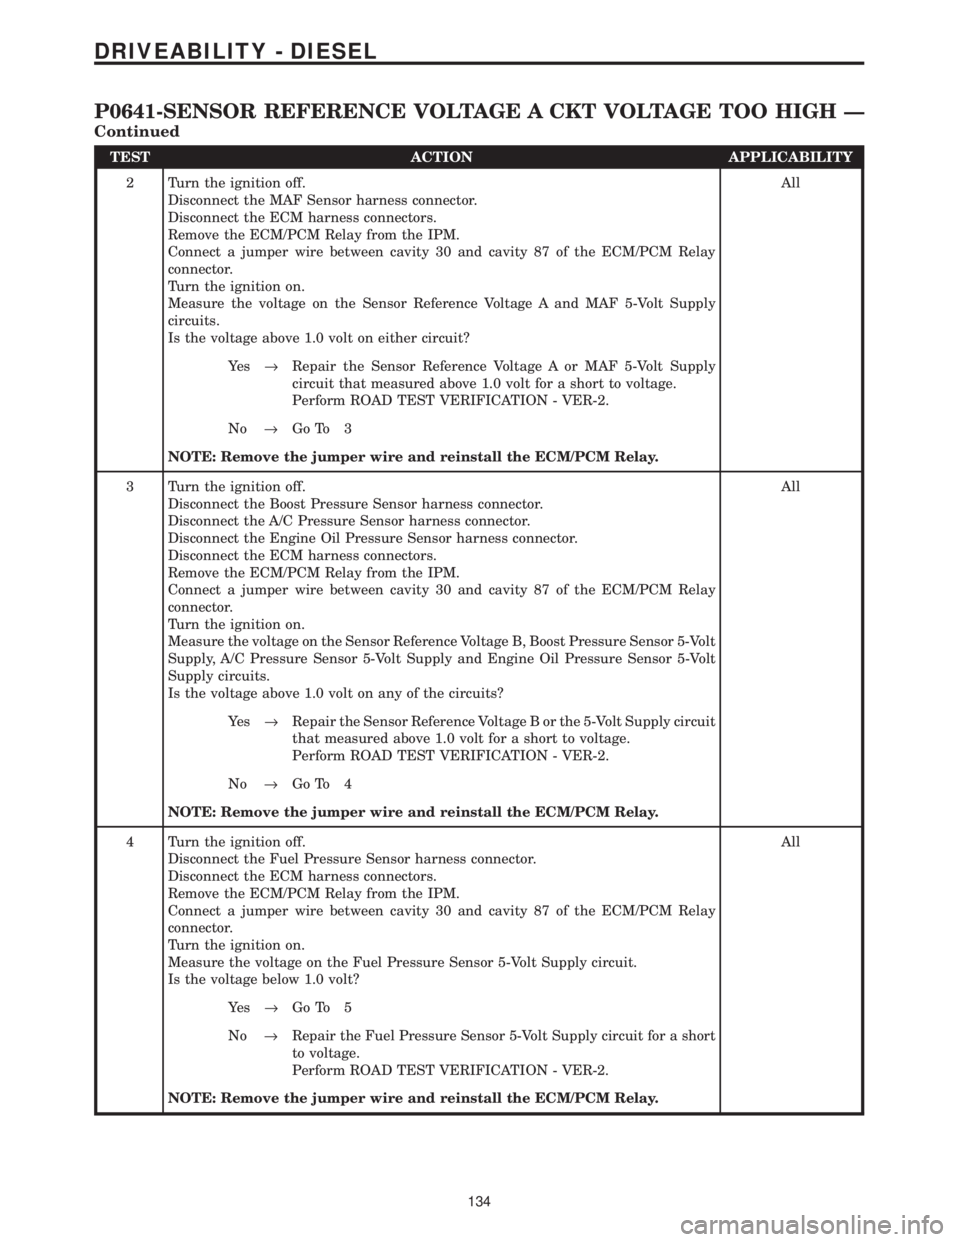
TEST ACTION APPLICABILITY
2 Turn the ignition off.
Disconnect the MAF Sensor harness connector.
Disconnect the ECM harness connectors.
Remove the ECM/PCM Relay from the IPM.
Connect a jumper wire between cavity 30 and cavity 87 of the ECM/PCM Relay
connector.
Turn the ignition on.
Measure the voltage on the Sensor Reference Voltage A and MAF 5-Volt Supply
circuits.
Is the voltage above 1.0 volt on either circuit?All
Ye s®Repair the Sensor Reference Voltage A or MAF 5-Volt Supply
circuit that measured above 1.0 volt for a short to voltage.
Perform ROAD TEST VERIFICATION - VER-2.
No®Go To 3
NOTE: Remove the jumper wire and reinstall the ECM/PCM Relay.
3 Turn the ignition off.
Disconnect the Boost Pressure Sensor harness connector.
Disconnect the A/C Pressure Sensor harness connector.
Disconnect the Engine Oil Pressure Sensor harness connector.
Disconnect the ECM harness connectors.
Remove the ECM/PCM Relay from the IPM.
Connect a jumper wire between cavity 30 and cavity 87 of the ECM/PCM Relay
connector.
Turn the ignition on.
Measure the voltage on the Sensor Reference Voltage B, Boost Pressure Sensor 5-Volt
Supply, A/C Pressure Sensor 5-Volt Supply and Engine Oil Pressure Sensor 5-Volt
Supply circuits.
Is the voltage above 1.0 volt on any of the circuits?All
Ye s®Repair the Sensor Reference Voltage B or the 5-Volt Supply circuit
that measured above 1.0 volt for a short to voltage.
Perform ROAD TEST VERIFICATION - VER-2.
No®Go To 4
NOTE: Remove the jumper wire and reinstall the ECM/PCM Relay.
4 Turn the ignition off.
Disconnect the Fuel Pressure Sensor harness connector.
Disconnect the ECM harness connectors.
Remove the ECM/PCM Relay from the IPM.
Connect a jumper wire between cavity 30 and cavity 87 of the ECM/PCM Relay
connector.
Turn the ignition on.
Measure the voltage on the Fuel Pressure Sensor 5-Volt Supply circuit.
Is the voltage below 1.0 volt?All
Ye s®Go To 5
No®Repair the Fuel Pressure Sensor 5-Volt Supply circuit for a short
to voltage.
Perform ROAD TEST VERIFICATION - VER-2.
NOTE: Remove the jumper wire and reinstall the ECM/PCM Relay.
134
DRIVEABILITY - DIESEL
P0641-SENSOR REFERENCE VOLTAGE A CKT VOLTAGE TOO HIGH Ð
Continued
Page 1354 of 4284
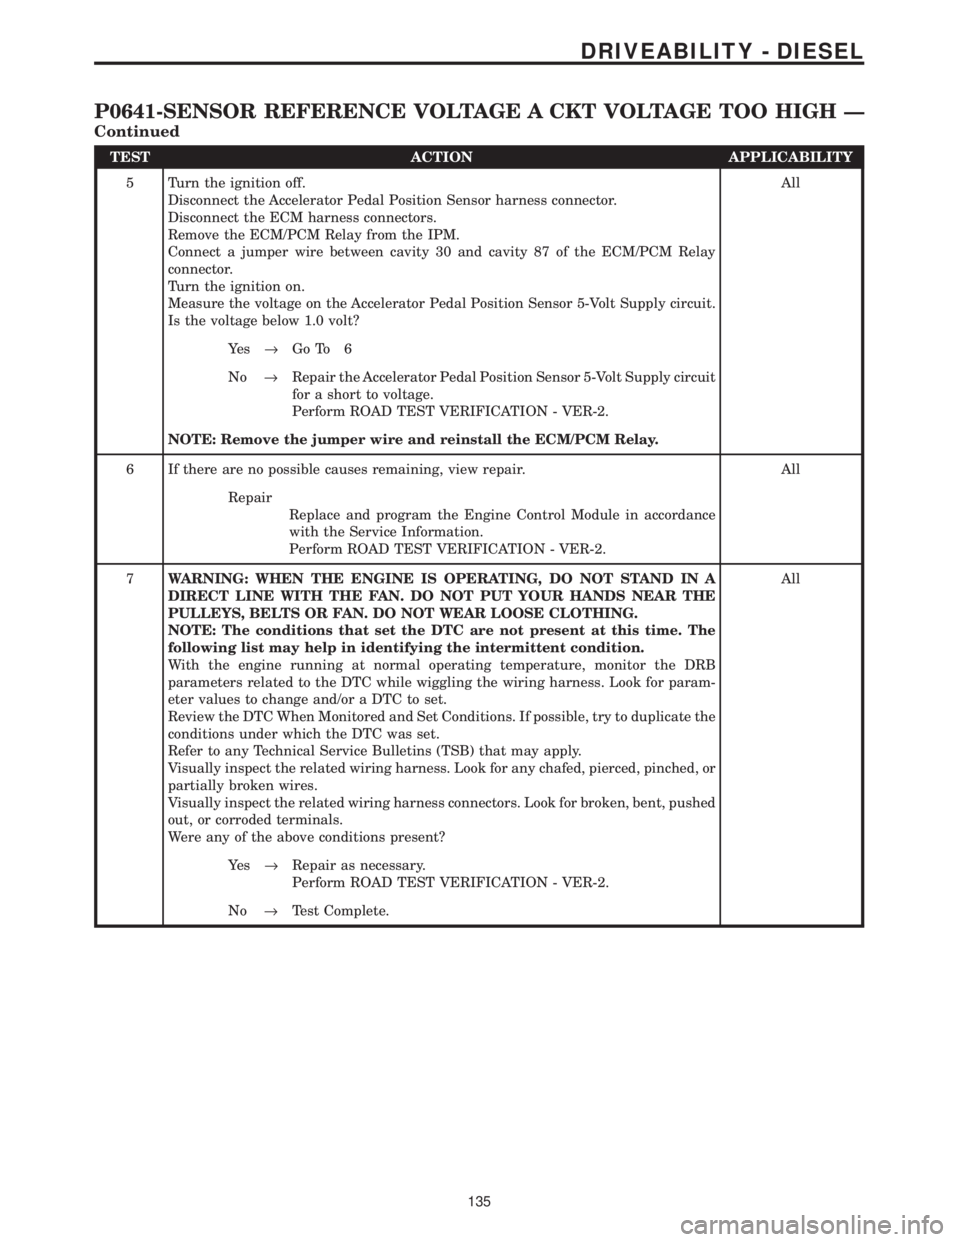
TEST ACTION APPLICABILITY
5 Turn the ignition off.
Disconnect the Accelerator Pedal Position Sensor harness connector.
Disconnect the ECM harness connectors.
Remove the ECM/PCM Relay from the IPM.
Connect a jumper wire between cavity 30 and cavity 87 of the ECM/PCM Relay
connector.
Turn the ignition on.
Measure the voltage on the Accelerator Pedal Position Sensor 5-Volt Supply circuit.
Is the voltage below 1.0 volt?All
Ye s®Go To 6
No®Repair the Accelerator Pedal Position Sensor 5-Volt Supply circuit
for a short to voltage.
Perform ROAD TEST VERIFICATION - VER-2.
NOTE: Remove the jumper wire and reinstall the ECM/PCM Relay.
6 If there are no possible causes remaining, view repair. All
Repair
Replace and program the Engine Control Module in accordance
with the Service Information.
Perform ROAD TEST VERIFICATION - VER-2.
7WARNING: WHEN THE ENGINE IS OPERATING, DO NOT STAND IN A
DIRECT LINE WITH THE FAN. DO NOT PUT YOUR HANDS NEAR THE
PULLEYS, BELTS OR FAN. DO NOT WEAR LOOSE CLOTHING.
NOTE: The conditions that set the DTC are not present at this time. The
following list may help in identifying the intermittent condition.
With the engine running at normal operating temperature, monitor the DRB
parameters related to the DTC while wiggling the wiring harness. Look for param-
eter values to change and/or a DTC to set.
Review the DTC When Monitored and Set Conditions. If possible, try to duplicate the
conditions under which the DTC was set.
Refer to any Technical Service Bulletins (TSB) that may apply.
Visually inspect the related wiring harness. Look for any chafed, pierced, pinched, or
partially broken wires.
Visually inspect the related wiring harness connectors. Look for broken, bent, pushed
out, or corroded terminals.
Were any of the above conditions present?All
Ye s®Repair as necessary.
Perform ROAD TEST VERIFICATION - VER-2.
No®Test Complete.
135
DRIVEABILITY - DIESEL
P0641-SENSOR REFERENCE VOLTAGE A CKT VOLTAGE TOO HIGH Ð
Continued
Page 1355 of 4284
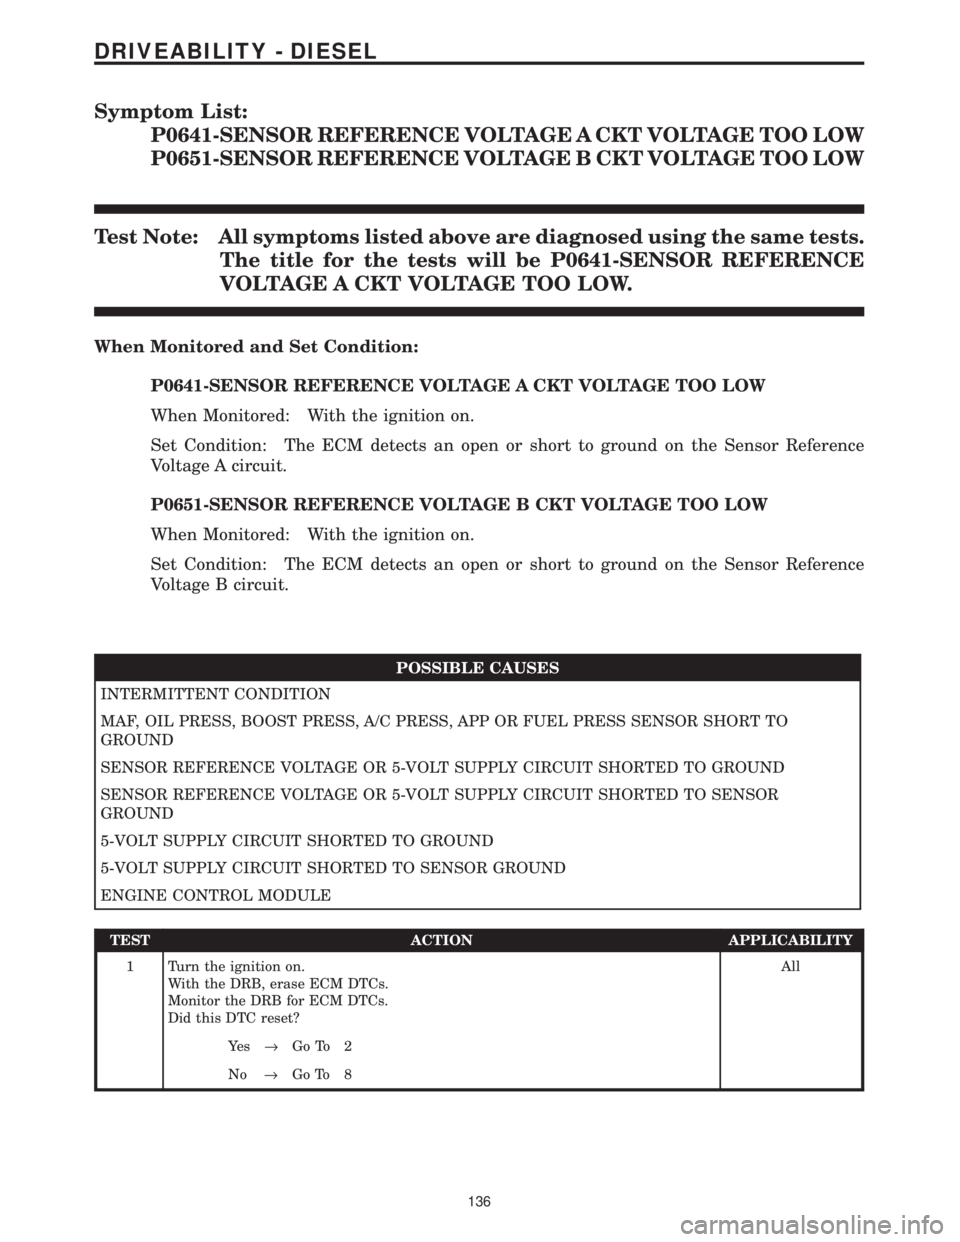
Symptom List:
P0641-SENSOR REFERENCE VOLTAGE A CKT VOLTAGE TOO LOW
P0651-SENSOR REFERENCE VOLTAGE B CKT VOLTAGE TOO LOW
Test Note: All symptoms listed above are diagnosed using the same tests.
The title for the tests will be P0641-SENSOR REFERENCE
VOLTAGE A CKT VOLTAGE TOO LOW.
When Monitored and Set Condition:
P0641-SENSOR REFERENCE VOLTAGE A CKT VOLTAGE TOO LOW
When Monitored: With the ignition on.
Set Condition: The ECM detects an open or short to ground on the Sensor Reference
Voltage A circuit.
P0651-SENSOR REFERENCE VOLTAGE B CKT VOLTAGE TOO LOW
When Monitored: With the ignition on.
Set Condition: The ECM detects an open or short to ground on the Sensor Reference
Voltage B circuit.
POSSIBLE CAUSES
INTERMITTENT CONDITION
MAF, OIL PRESS, BOOST PRESS, A/C PRESS, APP OR FUEL PRESS SENSOR SHORT TO
GROUND
SENSOR REFERENCE VOLTAGE OR 5-VOLT SUPPLY CIRCUIT SHORTED TO GROUND
SENSOR REFERENCE VOLTAGE OR 5-VOLT SUPPLY CIRCUIT SHORTED TO SENSOR
GROUND
5-VOLT SUPPLY CIRCUIT SHORTED TO GROUND
5-VOLT SUPPLY CIRCUIT SHORTED TO SENSOR GROUND
ENGINE CONTROL MODULE
TEST ACTION APPLICABILITY
1 Turn the ignition on.
With the DRB, erase ECM DTCs.
Monitor the DRB for ECM DTCs.
Did this DTC reset?All
Ye s®Go To 2
No®Go To 8
136
DRIVEABILITY - DIESEL
Page 1356 of 4284
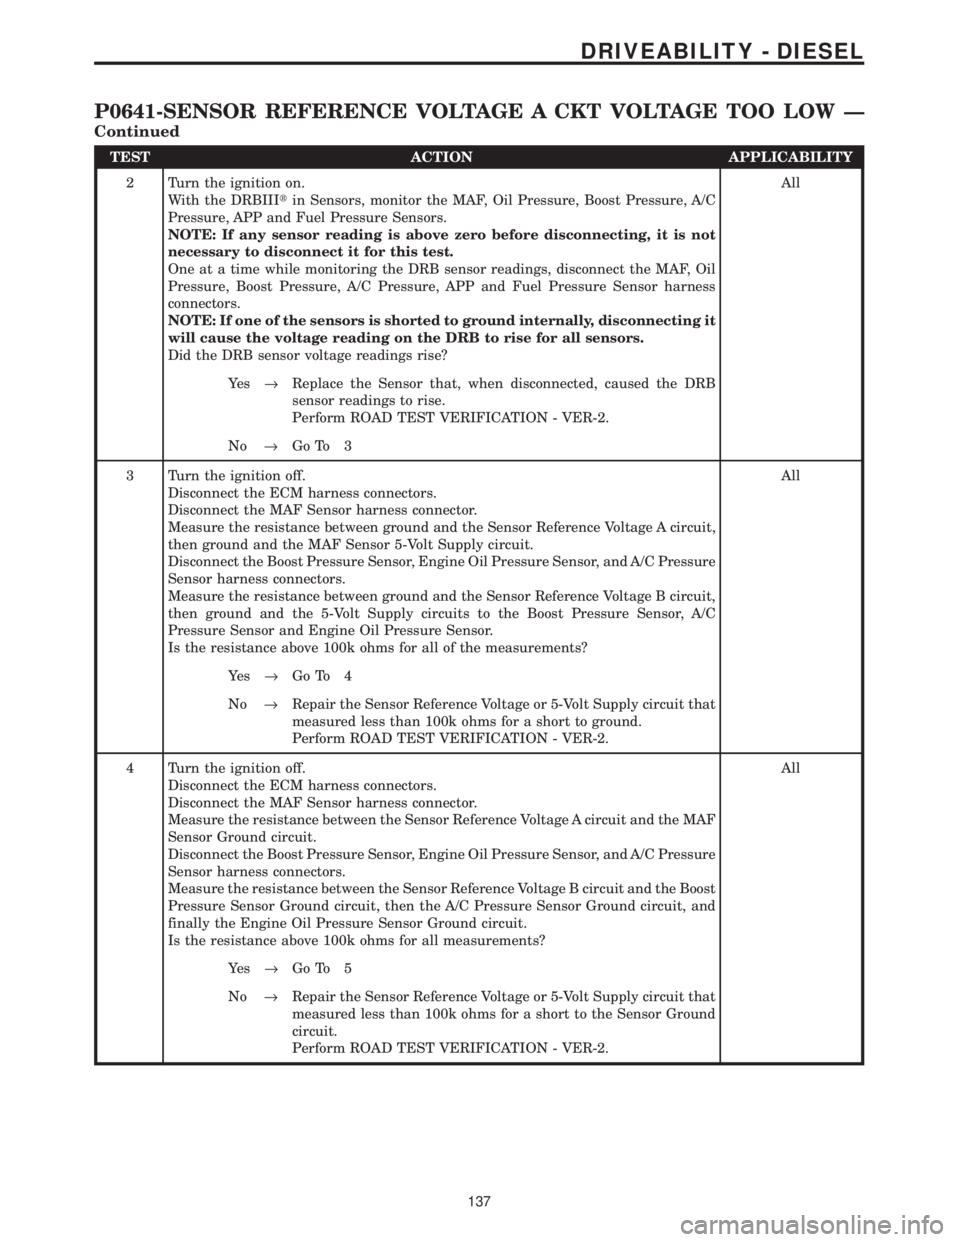
TEST ACTION APPLICABILITY
2 Turn the ignition on.
With the DRBIIItin Sensors, monitor the MAF, Oil Pressure, Boost Pressure, A/C
Pressure, APP and Fuel Pressure Sensors.
NOTE: If any sensor reading is above zero before disconnecting, it is not
necessary to disconnect it for this test.
One at a time while monitoring the DRB sensor readings, disconnect the MAF, Oil
Pressure, Boost Pressure, A/C Pressure, APP and Fuel Pressure Sensor harness
connectors.
NOTE: If one of the sensors is shorted to ground internally, disconnecting it
will cause the voltage reading on the DRB to rise for all sensors.
Did the DRB sensor voltage readings rise?All
Ye s®Replace the Sensor that, when disconnected, caused the DRB
sensor readings to rise.
Perform ROAD TEST VERIFICATION - VER-2.
No®Go To 3
3 Turn the ignition off.
Disconnect the ECM harness connectors.
Disconnect the MAF Sensor harness connector.
Measure the resistance between ground and the Sensor Reference Voltage A circuit,
then ground and the MAF Sensor 5-Volt Supply circuit.
Disconnect the Boost Pressure Sensor, Engine Oil Pressure Sensor, and A/C Pressure
Sensor harness connectors.
Measure the resistance between ground and the Sensor Reference Voltage B circuit,
then ground and the 5-Volt Supply circuits to the Boost Pressure Sensor, A/C
Pressure Sensor and Engine Oil Pressure Sensor.
Is the resistance above 100k ohms for all of the measurements?All
Ye s®Go To 4
No®Repair the Sensor Reference Voltage or 5-Volt Supply circuit that
measured less than 100k ohms for a short to ground.
Perform ROAD TEST VERIFICATION - VER-2.
4 Turn the ignition off.
Disconnect the ECM harness connectors.
Disconnect the MAF Sensor harness connector.
Measure the resistance between the Sensor Reference Voltage A circuit and the MAF
Sensor Ground circuit.
Disconnect the Boost Pressure Sensor, Engine Oil Pressure Sensor, and A/C Pressure
Sensor harness connectors.
Measure the resistance between the Sensor Reference Voltage B circuit and the Boost
Pressure Sensor Ground circuit, then the A/C Pressure Sensor Ground circuit, and
finally the Engine Oil Pressure Sensor Ground circuit.
Is the resistance above 100k ohms for all measurements?All
Ye s®Go To 5
No®Repair the Sensor Reference Voltage or 5-Volt Supply circuit that
measured less than 100k ohms for a short to the Sensor Ground
circuit.
Perform ROAD TEST VERIFICATION - VER-2.
137
DRIVEABILITY - DIESEL
P0641-SENSOR REFERENCE VOLTAGE A CKT VOLTAGE TOO LOW Ð
Continued
Page 1357 of 4284
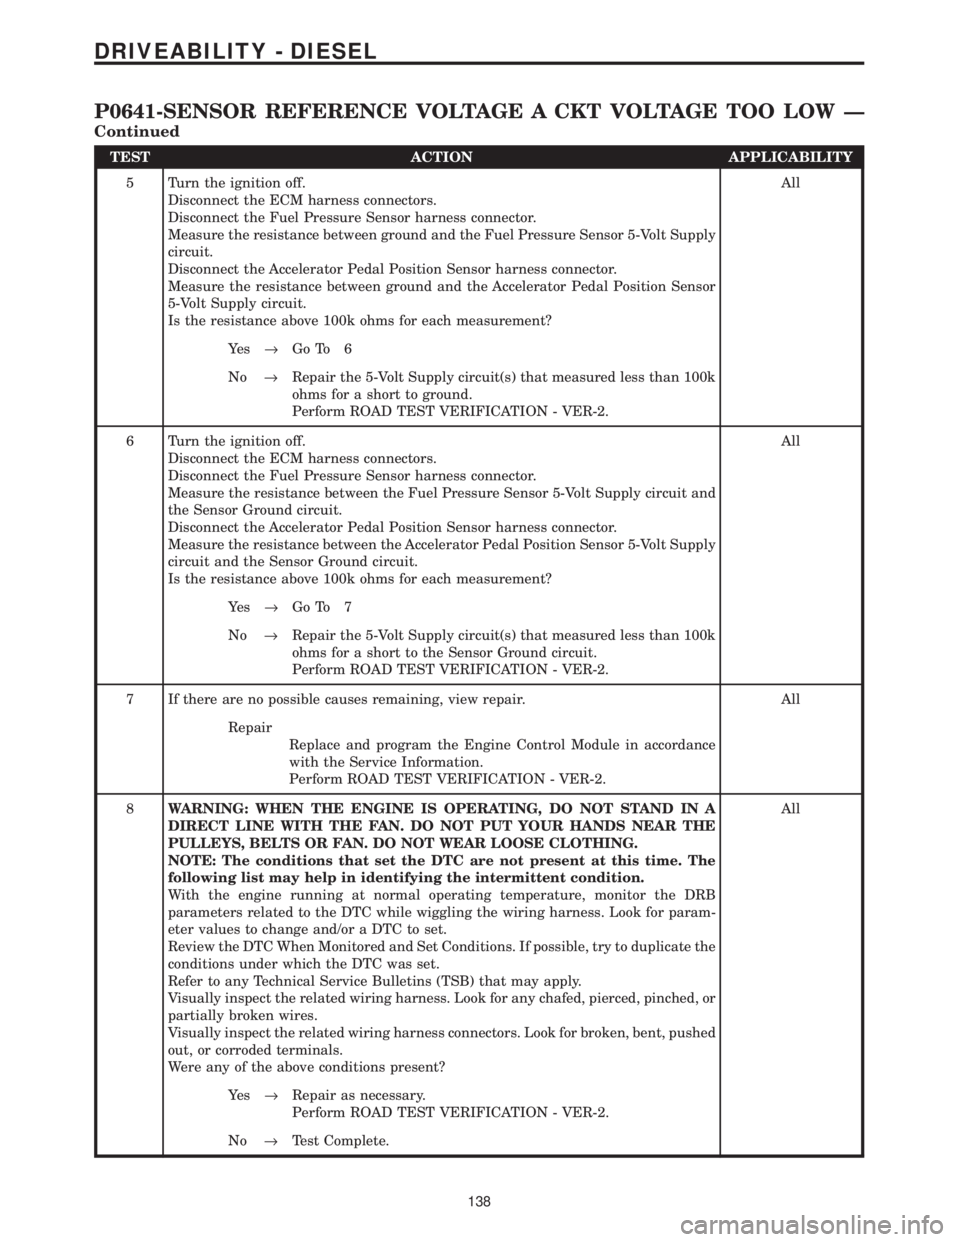
TEST ACTION APPLICABILITY
5 Turn the ignition off.
Disconnect the ECM harness connectors.
Disconnect the Fuel Pressure Sensor harness connector.
Measure the resistance between ground and the Fuel Pressure Sensor 5-Volt Supply
circuit.
Disconnect the Accelerator Pedal Position Sensor harness connector.
Measure the resistance between ground and the Accelerator Pedal Position Sensor
5-Volt Supply circuit.
Is the resistance above 100k ohms for each measurement?All
Ye s®Go To 6
No®Repair the 5-Volt Supply circuit(s) that measured less than 100k
ohms for a short to ground.
Perform ROAD TEST VERIFICATION - VER-2.
6 Turn the ignition off.
Disconnect the ECM harness connectors.
Disconnect the Fuel Pressure Sensor harness connector.
Measure the resistance between the Fuel Pressure Sensor 5-Volt Supply circuit and
the Sensor Ground circuit.
Disconnect the Accelerator Pedal Position Sensor harness connector.
Measure the resistance between the Accelerator Pedal Position Sensor 5-Volt Supply
circuit and the Sensor Ground circuit.
Is the resistance above 100k ohms for each measurement?All
Ye s®Go To 7
No®Repair the 5-Volt Supply circuit(s) that measured less than 100k
ohms for a short to the Sensor Ground circuit.
Perform ROAD TEST VERIFICATION - VER-2.
7 If there are no possible causes remaining, view repair. All
Repair
Replace and program the Engine Control Module in accordance
with the Service Information.
Perform ROAD TEST VERIFICATION - VER-2.
8WARNING: WHEN THE ENGINE IS OPERATING, DO NOT STAND IN A
DIRECT LINE WITH THE FAN. DO NOT PUT YOUR HANDS NEAR THE
PULLEYS, BELTS OR FAN. DO NOT WEAR LOOSE CLOTHING.
NOTE: The conditions that set the DTC are not present at this time. The
following list may help in identifying the intermittent condition.
With the engine running at normal operating temperature, monitor the DRB
parameters related to the DTC while wiggling the wiring harness. Look for param-
eter values to change and/or a DTC to set.
Review the DTC When Monitored and Set Conditions. If possible, try to duplicate the
conditions under which the DTC was set.
Refer to any Technical Service Bulletins (TSB) that may apply.
Visually inspect the related wiring harness. Look for any chafed, pierced, pinched, or
partially broken wires.
Visually inspect the related wiring harness connectors. Look for broken, bent, pushed
out, or corroded terminals.
Were any of the above conditions present?All
Ye s®Repair as necessary.
Perform ROAD TEST VERIFICATION - VER-2.
No®Test Complete.
138
DRIVEABILITY - DIESEL
P0641-SENSOR REFERENCE VOLTAGE A CKT VOLTAGE TOO LOW Ð
Continued
Page 1374 of 4284
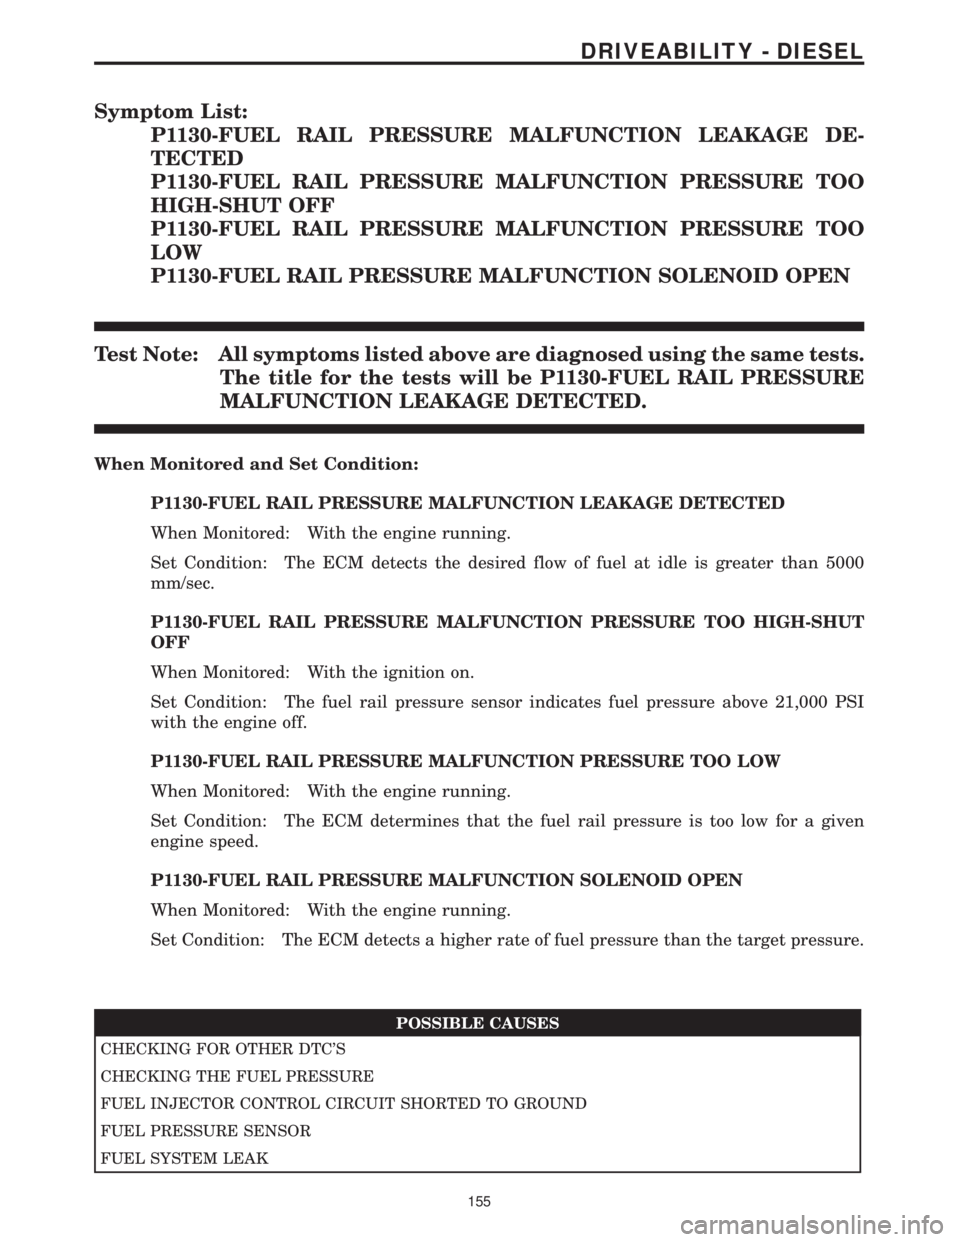
Symptom List:
P1130-FUEL RAIL PRESSURE MALFUNCTION LEAKAGE DE-
TECTED
P1130-FUEL RAIL PRESSURE MALFUNCTION PRESSURE TOO
HIGH-SHUT OFF
P1130-FUEL RAIL PRESSURE MALFUNCTION PRESSURE TOO
LOW
P1130-FUEL RAIL PRESSURE MALFUNCTION SOLENOID OPEN
Test Note: All symptoms listed above are diagnosed using the same tests.
The title for the tests will be P1130-FUEL RAIL PRESSURE
MALFUNCTION LEAKAGE DETECTED.
When Monitored and Set Condition:
P1130-FUEL RAIL PRESSURE MALFUNCTION LEAKAGE DETECTED
When Monitored: With the engine running.
Set Condition: The ECM detects the desired flow of fuel at idle is greater than 5000
mm/sec.
P1130-FUEL RAIL PRESSURE MALFUNCTION PRESSURE TOO HIGH-SHUT
OFF
When Monitored: With the ignition on.
Set Condition: The fuel rail pressure sensor indicates fuel pressure above 21,000 PSI
with the engine off.
P1130-FUEL RAIL PRESSURE MALFUNCTION PRESSURE TOO LOW
When Monitored: With the engine running.
Set Condition: The ECM determines that the fuel rail pressure is too low for a given
engine speed.
P1130-FUEL RAIL PRESSURE MALFUNCTION SOLENOID OPEN
When Monitored: With the engine running.
Set Condition: The ECM detects a higher rate of fuel pressure than the target pressure.
POSSIBLE CAUSES
CHECKING FOR OTHER DTC'S
CHECKING THE FUEL PRESSURE
FUEL INJECTOR CONTROL CIRCUIT SHORTED TO GROUND
FUEL PRESSURE SENSOR
FUEL SYSTEM LEAK
155
DRIVEABILITY - DIESEL
Page 1376 of 4284
TEST ACTION APPLICABILITY
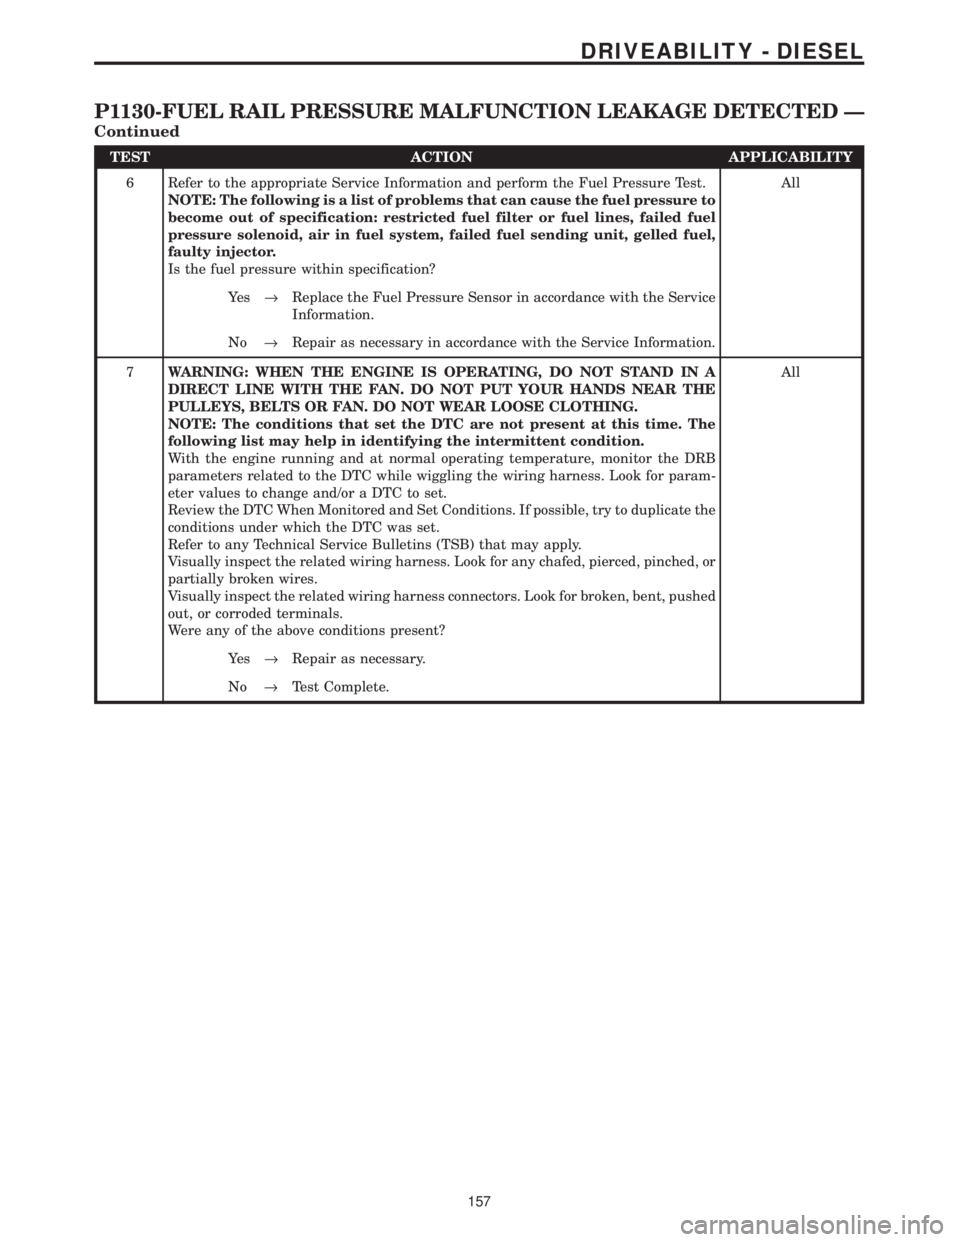
6 Refer to the appropriate Service Information and perform the Fuel Pressure Test.
NOTE: The following is a list of problems that can cause the fuel pressure to
become out of specification: restricted fuel filter or fuel lines, failed fuel
pressure solenoid, air in fuel system, failed fuel sending unit, gelled fuel,
faulty injector.
Is the fuel pressure within specification?All
Ye s®Replace the Fuel Pressure Sensor in accordance with the Service
Information.
No®Repair as necessary in accordance with the Service Information.
7WARNING: WHEN THE ENGINE IS OPERATING, DO NOT STAND IN A
DIRECT LINE WITH THE FAN. DO NOT PUT YOUR HANDS NEAR THE
PULLEYS, BELTS OR FAN. DO NOT WEAR LOOSE CLOTHING.
NOTE: The conditions that set the DTC are not present at this time. The
following list may help in identifying the intermittent condition.
With the engine running and at normal operating temperature, monitor the DRB
parameters related to the DTC while wiggling the wiring harness. Look for param-
eter values to change and/or a DTC to set.
Review the DTC When Monitored and Set Conditions. If possible, try to duplicate the
conditions under which the DTC was set.
Refer to any Technical Service Bulletins (TSB) that may apply.
Visually inspect the related wiring harness. Look for any chafed, pierced, pinched, or
partially broken wires.
Visually inspect the related wiring harness connectors. Look for broken, bent, pushed
out, or corroded terminals.
Were any of the above conditions present?All
Ye s®Repair as necessary.
No®Test Complete.
157
DRIVEABILITY - DIESEL
P1130-FUEL RAIL PRESSURE MALFUNCTION LEAKAGE DETECTED Ð
Continued
Page 1389 of 4284
Symptom List:
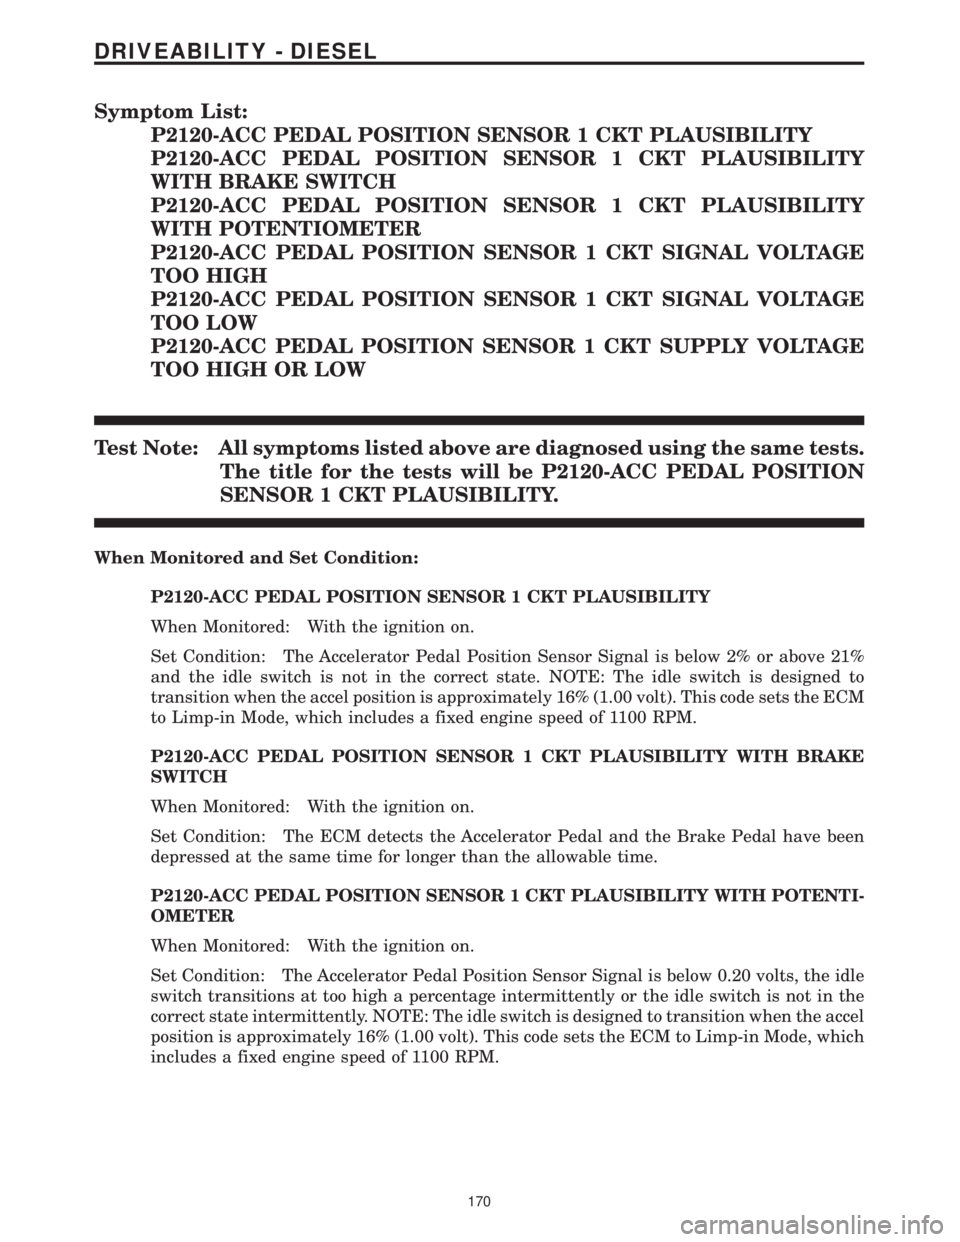
P2120-ACC PEDAL POSITION SENSOR 1 CKT PLAUSIBILITY
P2120-ACC PEDAL POSITION SENSOR 1 CKT PLAUSIBILITY
WITH BRAKE SWITCH
P2120-ACC PEDAL POSITION SENSOR 1 CKT PLAUSIBILITY
WITH POTENTIOMETER
P2120-ACC PEDAL POSITION SENSOR 1 CKT SIGNAL VOLTAGE
TOO HIGH
P2120-ACC PEDAL POSITION SENSOR 1 CKT SIGNAL VOLTAGE
TOO LOW
P2120-ACC PEDAL POSITION SENSOR 1 CKT SUPPLY VOLTAGE
TOO HIGH OR LOW
Test Note: All symptoms listed above are diagnosed using the same tests.
The title for the tests will be P2120-ACC PEDAL POSITION
SENSOR 1 CKT PLAUSIBILITY.
When Monitored and Set Condition:
P2120-ACC PEDAL POSITION SENSOR 1 CKT PLAUSIBILITY
When Monitored: With the ignition on.
Set Condition: The Accelerator Pedal Position Sensor Signal is below 2% or above 21%
and the idle switch is not in the correct state. NOTE: The idle switch is designed to
transition when the accel position is approximately 16% (1.00 volt). This code sets the ECM
to Limp-in Mode, which includes a fixed engine speed of 1100 RPM.
P2120-ACC PEDAL POSITION SENSOR 1 CKT PLAUSIBILITY WITH BRAKE
SWITCH
When Monitored: With the ignition on.
Set Condition: The ECM detects the Accelerator Pedal and the Brake Pedal have been
depressed at the same time for longer than the allowable time.
P2120-ACC PEDAL POSITION SENSOR 1 CKT PLAUSIBILITY WITH POTENTI-
OMETER
When Monitored: With the ignition on.
Set Condition: The Accelerator Pedal Position Sensor Signal is below 0.20 volts, the idle
switch transitions at too high a percentage intermittently or the idle switch is not in the
correct state intermittently. NOTE: The idle switch is designed to transition when the accel
position is approximately 16% (1.00 volt). This code sets the ECM to Limp-in Mode, which
includes a fixed engine speed of 1100 RPM.
170
DRIVEABILITY - DIESEL