2001 CHRYSLER VOYAGER torque
[x] Cancel search: torquePage 2818 of 4284
(8) Fit the liners in the crankcase making sure
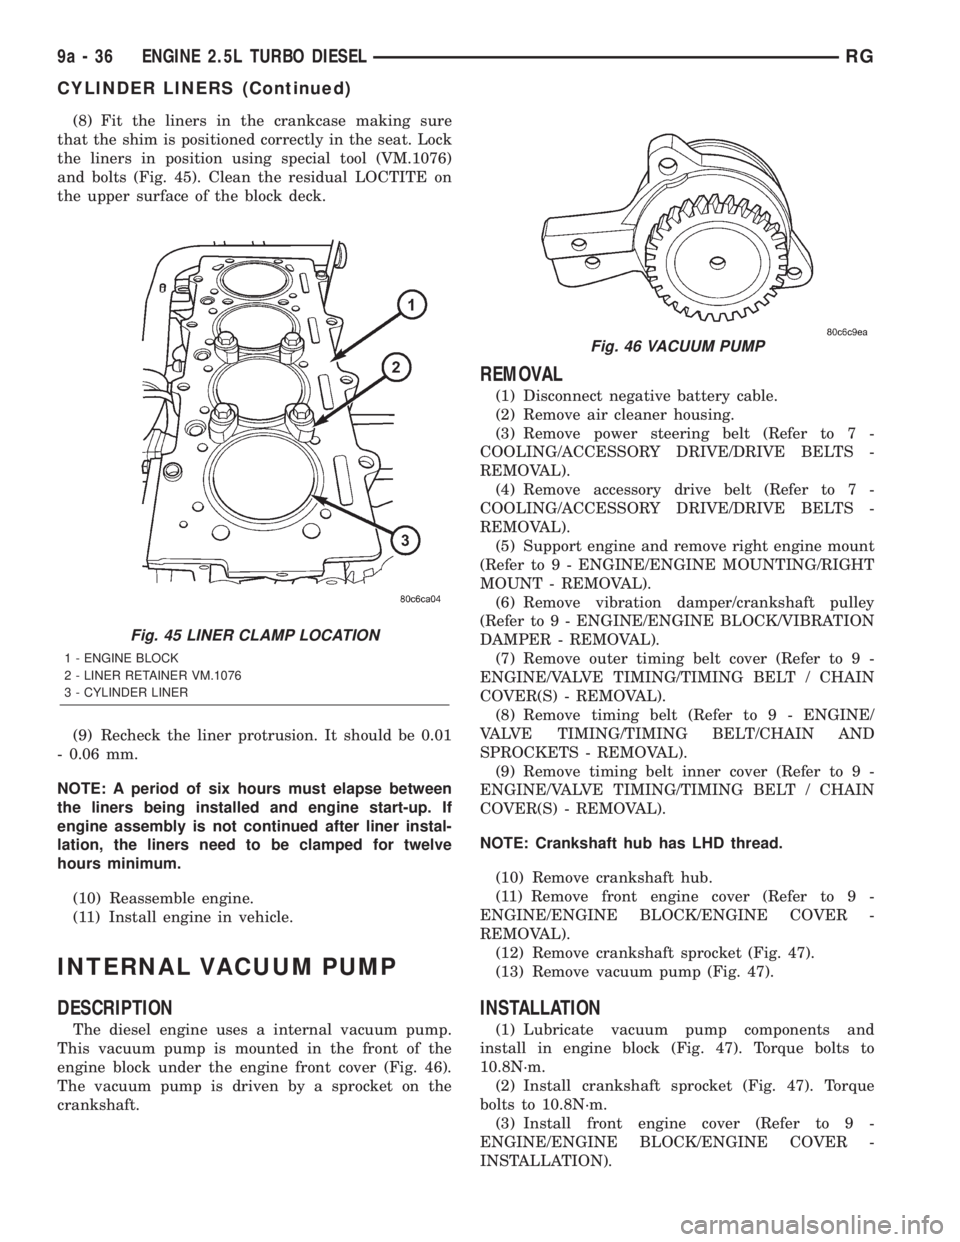
that the shim is positioned correctly in the seat. Lock
the liners in position using special tool (VM.1076)
and bolts (Fig. 45). Clean the residual LOCTITE on
the upper surface of the block deck.
(9) Recheck the liner protrusion. It should be 0.01
- 0.06 mm.
NOTE: A period of six hours must elapse between
the liners being installed and engine start-up. If
engine assembly is not continued after liner instal-
lation, the liners need to be clamped for twelve
hours minimum.
(10) Reassemble engine.
(11) Install engine in vehicle.
INTERNAL VACUUM PUMP
DESCRIPTION
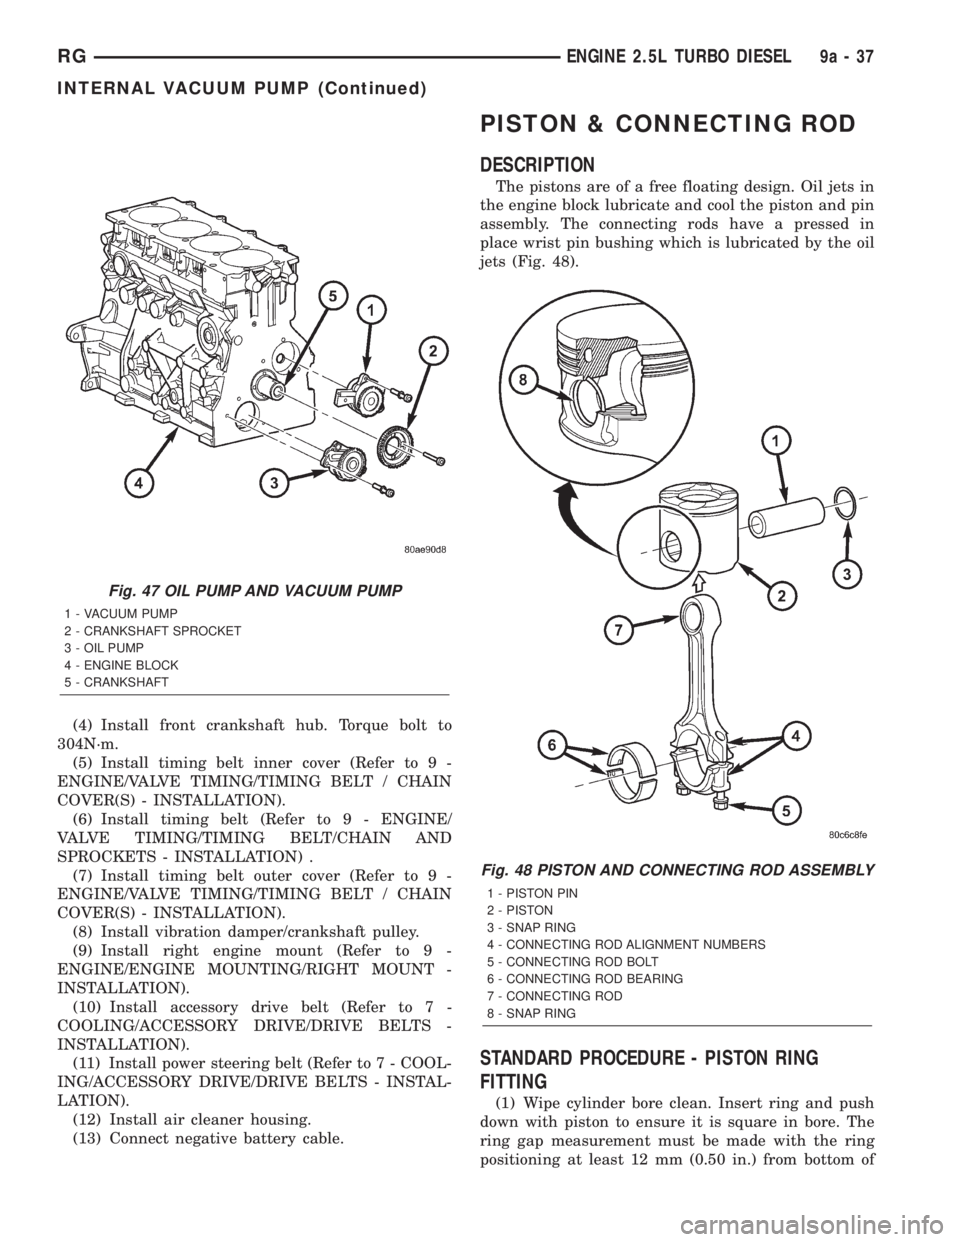
The diesel engine uses a internal vacuum pump.
This vacuum pump is mounted in the front of the
engine block under the engine front cover (Fig. 46).
The vacuum pump is driven by a sprocket on the
crankshaft.
REMOVAL
(1) Disconnect negative battery cable.
(2) Remove air cleaner housing.
(3) Remove power steering belt (Refer to 7 -
COOLING/ACCESSORY DRIVE/DRIVE BELTS -
REMOVAL).
(4) Remove accessory drive belt (Refer to 7 -
COOLING/ACCESSORY DRIVE/DRIVE BELTS -
REMOVAL).
(5) Support engine and remove right engine mount
(Refer to 9 - ENGINE/ENGINE MOUNTING/RIGHT
MOUNT - REMOVAL).
(6) Remove vibration damper/crankshaft pulley
(Refer to 9 - ENGINE/ENGINE BLOCK/VIBRATION
DAMPER - REMOVAL).
(7) Remove outer timing belt cover (Refer to 9 -
ENGINE/VALVE TIMING/TIMING BELT / CHAIN
COVER(S) - REMOVAL).
(8) Remove timing belt (Refer to 9 - ENGINE/
VALVE TIMING/TIMING BELT/CHAIN AND
SPROCKETS - REMOVAL).
(9) Remove timing belt inner cover (Refer to 9 -
ENGINE/VALVE TIMING/TIMING BELT / CHAIN
COVER(S) - REMOVAL).
NOTE: Crankshaft hub has LHD thread.
(10) Remove crankshaft hub.
(11) Remove front engine cover (Refer to 9 -
ENGINE/ENGINE BLOCK/ENGINE COVER -
REMOVAL).
(12) Remove crankshaft sprocket (Fig. 47).
(13) Remove vacuum pump (Fig. 47).
INSTALLATION
(1) Lubricate vacuum pump components and
install in engine block (Fig. 47). Torque bolts to
10.8N´m.
(2) Install crankshaft sprocket (Fig. 47). Torque
bolts to 10.8N´m.
(3) Install front engine cover (Refer to 9 -
ENGINE/ENGINE BLOCK/ENGINE COVER -
INSTALLATION).
Fig. 45 LINER CLAMP LOCATION
1 - ENGINE BLOCK
2 - LINER RETAINER VM.1076
3 - CYLINDER LINER
Fig. 46 VACUUM PUMP
9a - 36 ENGINE 2.5L TURBO DIESELRG
CYLINDER LINERS (Continued)
Page 2819 of 4284
(4) Install front crankshaft hub. Torque bolt to
304N´m.
(5) Install timing belt inner cover (Refer to 9 -
ENGINE/VALVE TIMING/TIMING BELT / CHAIN
COVER(S) - INSTALLATION).
(6) Install timing belt (Refer to 9 - ENGINE/
VALVE TIMING/TIMING BELT/CHAIN AND
SPROCKETS - INSTALLATION) .
(7) Install timing belt outer cover (Refer to 9 -
ENGINE/VALVE TIMING/TIMING BELT / CHAIN
COVER(S) - INSTALLATION).
(8) Install vibration damper/crankshaft pulley.
(9) Install right engine mount (Refer to 9 -
ENGINE/ENGINE MOUNTING/RIGHT MOUNT -
INSTALLATION).
(10) Install accessory drive belt (Refer to 7 -
COOLING/ACCESSORY DRIVE/DRIVE BELTS -
INSTALLATION).
(11) Install power steering belt (Refer to 7 - COOL-
ING/ACCESSORY DRIVE/DRIVE BELTS - INSTAL-
LATION).
(12) Install air cleaner housing.
(13) Connect negative battery cable.
PISTON & CONNECTING ROD
DESCRIPTION
The pistons are of a free floating design. Oil jets in
the engine block lubricate and cool the piston and pin
assembly. The connecting rods have a pressed in
place wrist pin bushing which is lubricated by the oil
jets (Fig. 48).
STANDARD PROCEDURE - PISTON RING
FITTING
(1) Wipe cylinder bore clean. Insert ring and push
down with piston to ensure it is square in bore. The
ring gap measurement must be made with the ring
positioning at least 12 mm (0.50 in.) from bottom of
Fig. 47 OIL PUMP AND VACUUM PUMP
1 - VACUUM PUMP
2 - CRANKSHAFT SPROCKET
3 - OIL PUMP
4 - ENGINE BLOCK
5 - CRANKSHAFT
Fig. 48 PISTON AND CONNECTING ROD ASSEMBLY
1 - PISTON PIN
2 - PISTON
3 - SNAP RING
4 - CONNECTING ROD ALIGNMENT NUMBERS
5 - CONNECTING ROD BOLT
6 - CONNECTING ROD BEARING
7 - CONNECTING ROD
8 - SNAP RING
RGENGINE 2.5L TURBO DIESEL9a-37
INTERNAL VACUUM PUMP (Continued)
Page 2823 of 4284
(2) Before installing the ring compressor, make
sure the oil ring expander ends are butted together.
(3) Immerse the piston head and rings in clean
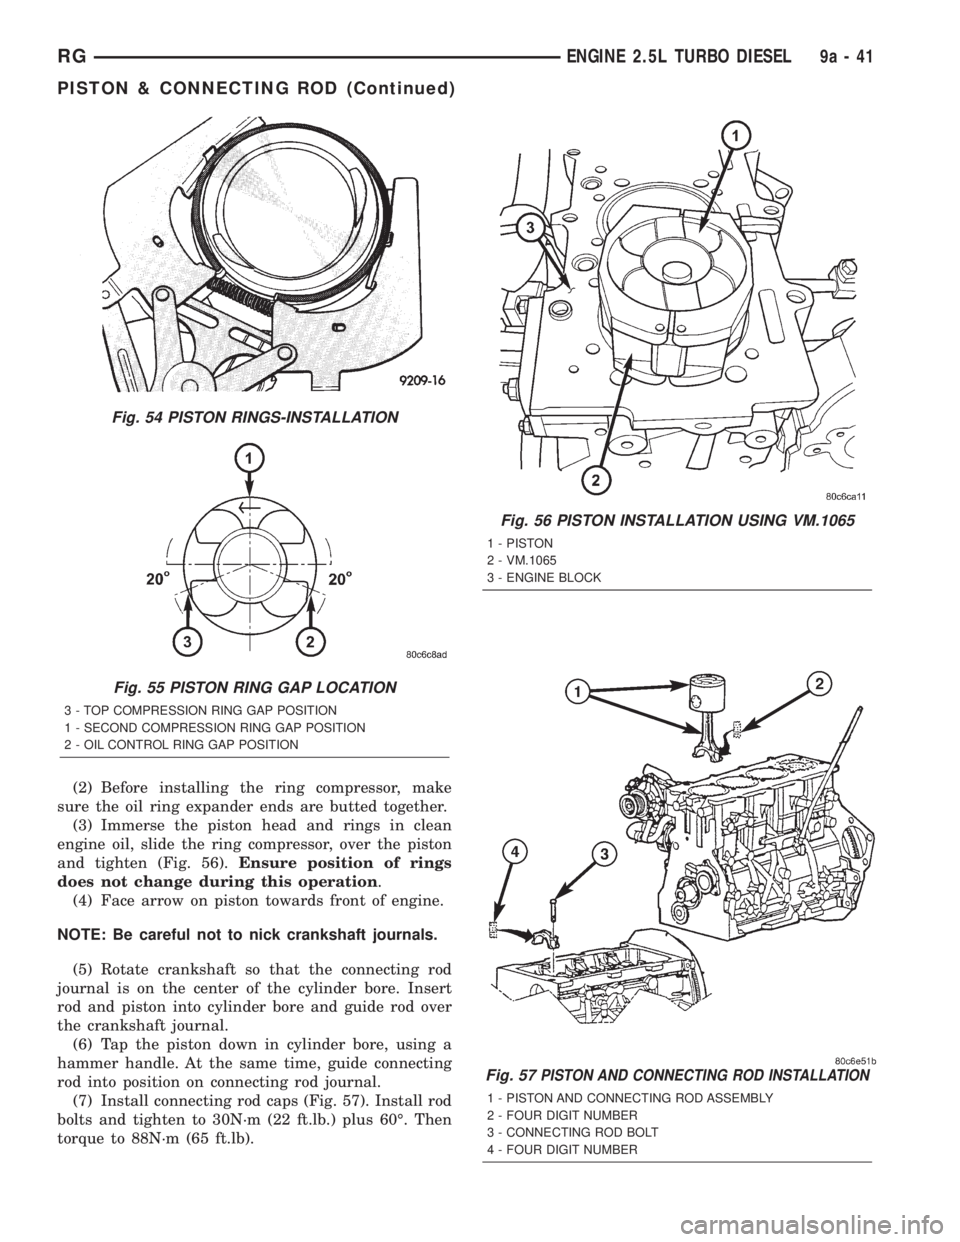
engine oil, slide the ring compressor, over the piston
and tighten (Fig. 56).Ensure position of rings
does not change during this operation.
(4) Face arrow on piston towards front of engine.
NOTE: Be careful not to nick crankshaft journals.
(5) Rotate crankshaft so that the connecting rod
journal is on the center of the cylinder bore. Insert
rod and piston into cylinder bore and guide rod over
the crankshaft journal.
(6) Tap the piston down in cylinder bore, using a
hammer handle. At the same time, guide connecting
rod into position on connecting rod journal.
(7) Install connecting rod caps (Fig. 57). Install rod
bolts and tighten to 30N´m (22 ft.lb.) plus 60É. Then
torque to 88N´m (65 ft.lb).
Fig. 54 PISTON RINGS-INSTALLATION
Fig. 55 PISTON RING GAP LOCATION
3 - TOP COMPRESSION RING GAP POSITION
1 - SECOND COMPRESSION RING GAP POSITION
2 - OIL CONTROL RING GAP POSITION
Fig. 56 PISTON INSTALLATION USING VM.1065
1 - PISTON
2 - VM.1065
3 - ENGINE BLOCK
Fig. 57PISTON AND CONNECTING ROD INSTALLATION
1 - PISTON AND CONNECTING ROD ASSEMBLY
2 - FOUR DIGIT NUMBER
3 - CONNECTING ROD BOLT
4 - FOUR DIGIT NUMBER
RGENGINE 2.5L TURBO DIESEL9a-41
PISTON & CONNECTING ROD (Continued)
Page 2824 of 4284
(8) Install cylinder head (Refer to 9 - ENGINE/
CYLINDER HEAD - INSTALLATION).
(9) Install balance shaft assembly (Refer to 9 -
ENGINE/VALVE TIMING/BALANCE SHAFT -
INSTALLATION).
(10) Install oil pump pickup tube (Refer to 9 -
ENGINE/LUBRICATION/OIL PUMP - INSTALLA-
TION).
(11) Install oil pan (Refer to 9 - ENGINE/LUBRI-
CATION/OIL PAN - INSTALLATION).
(12) Connect negative battery cable.
CRANKSHAFT OIL SEAL -
FRONT
REMOVAL
(1) Disconnect negative battery cable.
(2) Remove air cleaner housing.
(3) Support engine and remove right engine mount
(Refer to 9 - ENGINE/ENGINE MOUNTING/RIGHT
MOUNT - REMOVAL).
(4) Remove power steering belt (Refer to 7 -
COOLING/ACCESSORY DRIVE/DRIVE BELTS -
REMOVAL).
(5) Remove accessory drive belt (Refer to 7 -
COOLING/ACCESSORY DRIVE/DRIVE BELTS -
REMOVAL).
(6) Remove vibration damper/crankshaft pulley
(Refer to 9 - ENGINE/ENGINE BLOCK/VIBRATION
DAMPER - REMOVAL).
(7) Remove outer timing belt cover (Refer to 9 -
ENGINE/VALVE TIMING/TIMING BELT / CHAIN
COVER(S) - REMOVAL).
(8) Remove timing belt (Refer to 9 - ENGINE/
VALVE TIMING/TIMING BELT/CHAIN AND
SPROCKETS - REMOVAL).
(9) Remove timing belt inner cover (Refer to 9 -
ENGINE/VALVE TIMING/TIMING BELT / CHAIN
COVER(S) - REMOVAL).
NOTE: Crankshaft hub retaining bolt has LHD
thread.
(10) Remove crankshaft hub.
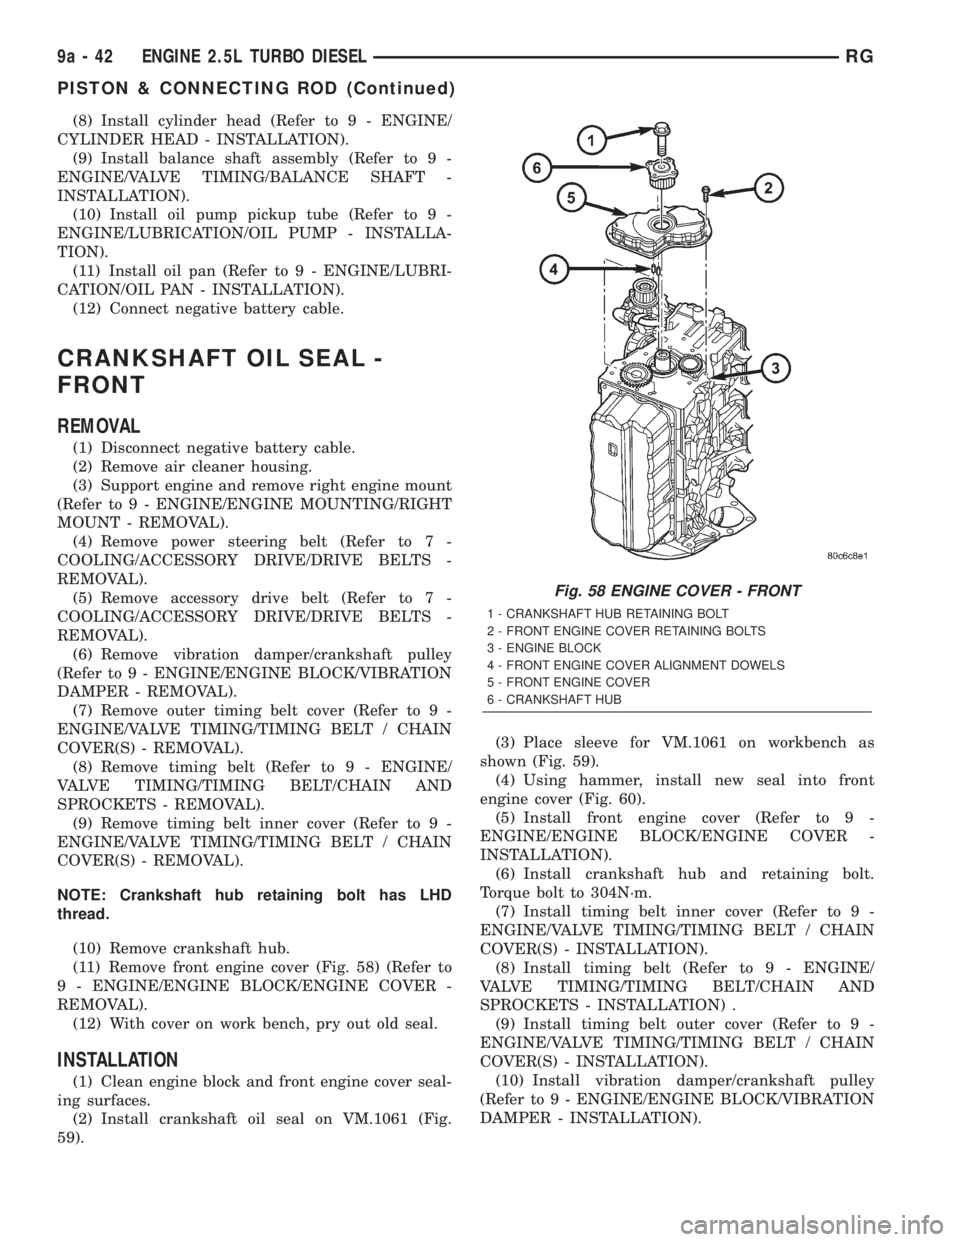
(11) Remove front engine cover (Fig. 58) (Refer to
9 - ENGINE/ENGINE BLOCK/ENGINE COVER -
REMOVAL).
(12) With cover on work bench, pry out old seal.
INSTALLATION
(1) Clean engine block and front engine cover seal-
ing surfaces.
(2) Install crankshaft oil seal on VM.1061 (Fig.
59).(3) Place sleeve for VM.1061 on workbench as
shown (Fig. 59).
(4) Using hammer, install new seal into front
engine cover (Fig. 60).
(5) Install front engine cover (Refer to 9 -
ENGINE/ENGINE BLOCK/ENGINE COVER -
INSTALLATION).
(6) Install crankshaft hub and retaining bolt.
Torque bolt to 304N´m.
(7) Install timing belt inner cover (Refer to 9 -
ENGINE/VALVE TIMING/TIMING BELT / CHAIN
COVER(S) - INSTALLATION).
(8) Install timing belt (Refer to 9 - ENGINE/
VALVE TIMING/TIMING BELT/CHAIN AND
SPROCKETS - INSTALLATION) .
(9) Install timing belt outer cover (Refer to 9 -
ENGINE/VALVE TIMING/TIMING BELT / CHAIN
COVER(S) - INSTALLATION).
(10) Install vibration damper/crankshaft pulley
(Refer to 9 - ENGINE/ENGINE BLOCK/VIBRATION
DAMPER - INSTALLATION).
Fig. 58 ENGINE COVER - FRONT
1 - CRANKSHAFT HUB RETAINING BOLT
2 - FRONT ENGINE COVER RETAINING BOLTS
3 - ENGINE BLOCK
4 - FRONT ENGINE COVER ALIGNMENT DOWELS
5 - FRONT ENGINE COVER
6 - CRANKSHAFT HUB
9a - 42 ENGINE 2.5L TURBO DIESELRG
PISTON & CONNECTING ROD (Continued)
Page 2826 of 4284
INSTALLATION
(1) Install vibration damper and retaining bolts
(Fig. 61). Torque bolts to 27.5N´m.
(2) Install accessory drive belt (Refer to 7 - COOL-
ING/ACCESSORY DRIVE/DRIVE BELTS - INSTAL-
LATION).
(3) Install power steering belt (Refer to 7 - COOL-
ING/ACCESSORY DRIVE/DRIVE BELTS - INSTAL-
LATION).
ENGINE COVER - FRONT
DESCRIPTION
The front engine cover on this engine is a stamped
steel cover which covers the oil pump and vacuum
pump.
REMOVAL
(1) Disconnect negative battery cable.
(2) Remove air cleaner housing.
(3) Support engine and remove right engine mount
(Refer to 9 - ENGINE/ENGINE MOUNTING/RIGHT
MOUNT - REMOVAL).
(4) Remove power steering belt (Refer to 7 -
COOLING/ACCESSORY DRIVE/DRIVE BELTS -
REMOVAL).
(5) Remove accessory drive belt (Refer to 7 -
COOLING/ACCESSORY DRIVE/DRIVE BELTS -
REMOVAL).
(6) Remove vibration damper (Refer to 9 -
ENGINE/ENGINE BLOCK/VIBRATION DAMPER -
REMOVAL).
(7) Remove timing belt outer cover (Refer to 9 -
ENGINE/VALVE TIMING/TIMING BELT / CHAIN
COVER(S) - REMOVAL).
CAUTION: Before removing the cylinder head cover/
intake manifold or timing belt the engine must put
at 90É after TDC. Failure to do so could result in
valve and/or piston damage during reassembly.
(Refer to 9 - ENGINE/VALVE TIMING - STANDARD
PROCEDURE)(8) Remove timing belt (Refer to 9 - ENGINE/
VALVE TIMING/TIMING BELT/CHAIN AND
SPROCKETS - REMOVAL).
(9) Remove timing belt inner cover (Refer to 9 -
ENGINE/VALVE TIMING/TIMING BELT / CHAIN
COVER(S) - REMOVAL).
NOTE: Crankshaft hub has LHD thread.
(10) Remove crankshaft hub.
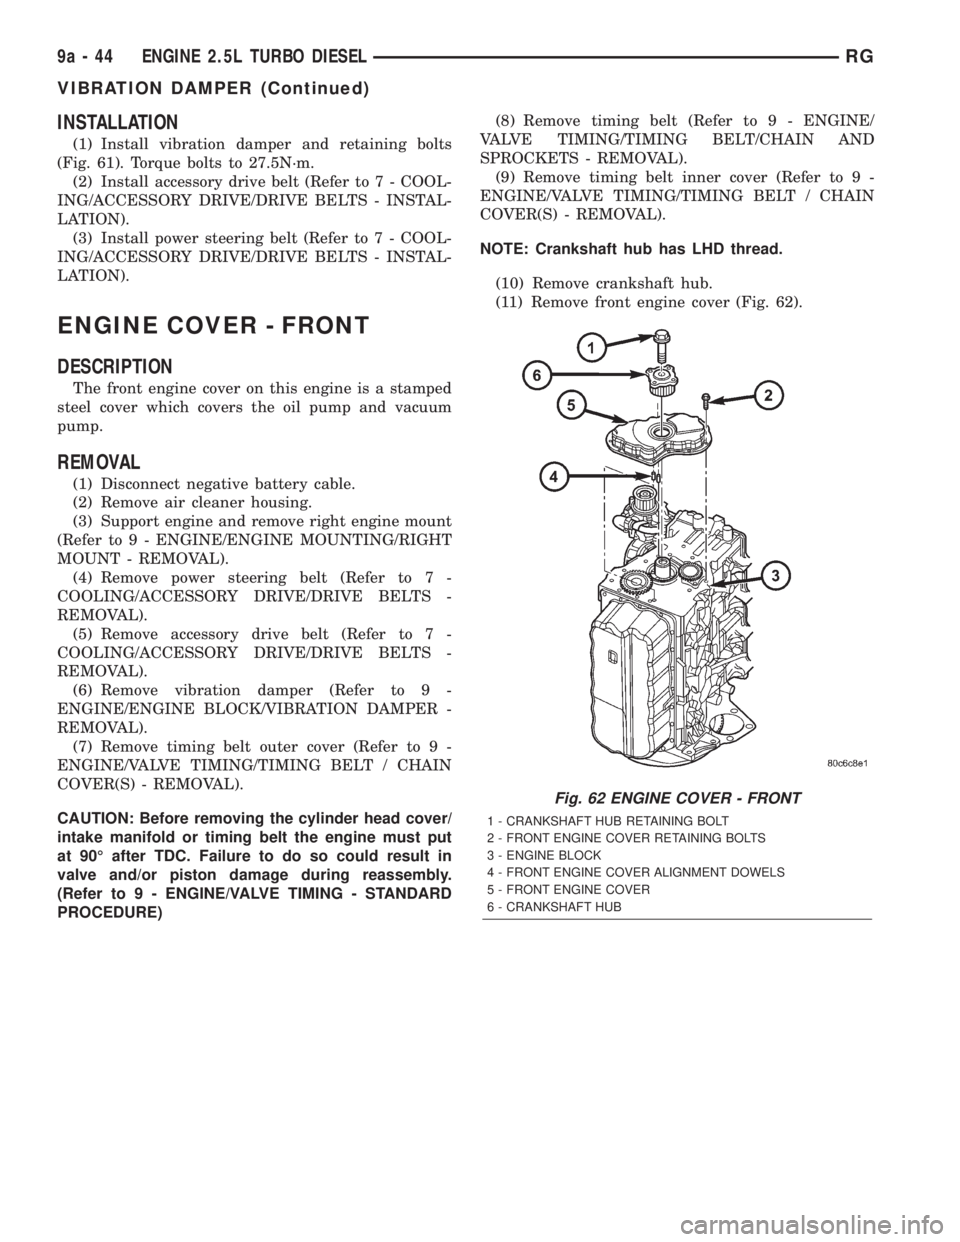
(11) Remove front engine cover (Fig. 62).
Fig. 62 ENGINE COVER - FRONT
1 - CRANKSHAFT HUB RETAINING BOLT
2 - FRONT ENGINE COVER RETAINING BOLTS
3 - ENGINE BLOCK
4 - FRONT ENGINE COVER ALIGNMENT DOWELS
5 - FRONT ENGINE COVER
6 - CRANKSHAFT HUB
9a - 44 ENGINE 2.5L TURBO DIESELRG
VIBRATION DAMPER (Continued)
Page 2827 of 4284
INSTALLATION
(1) Clean engine block and front engine cover seal-
ing surfaces.
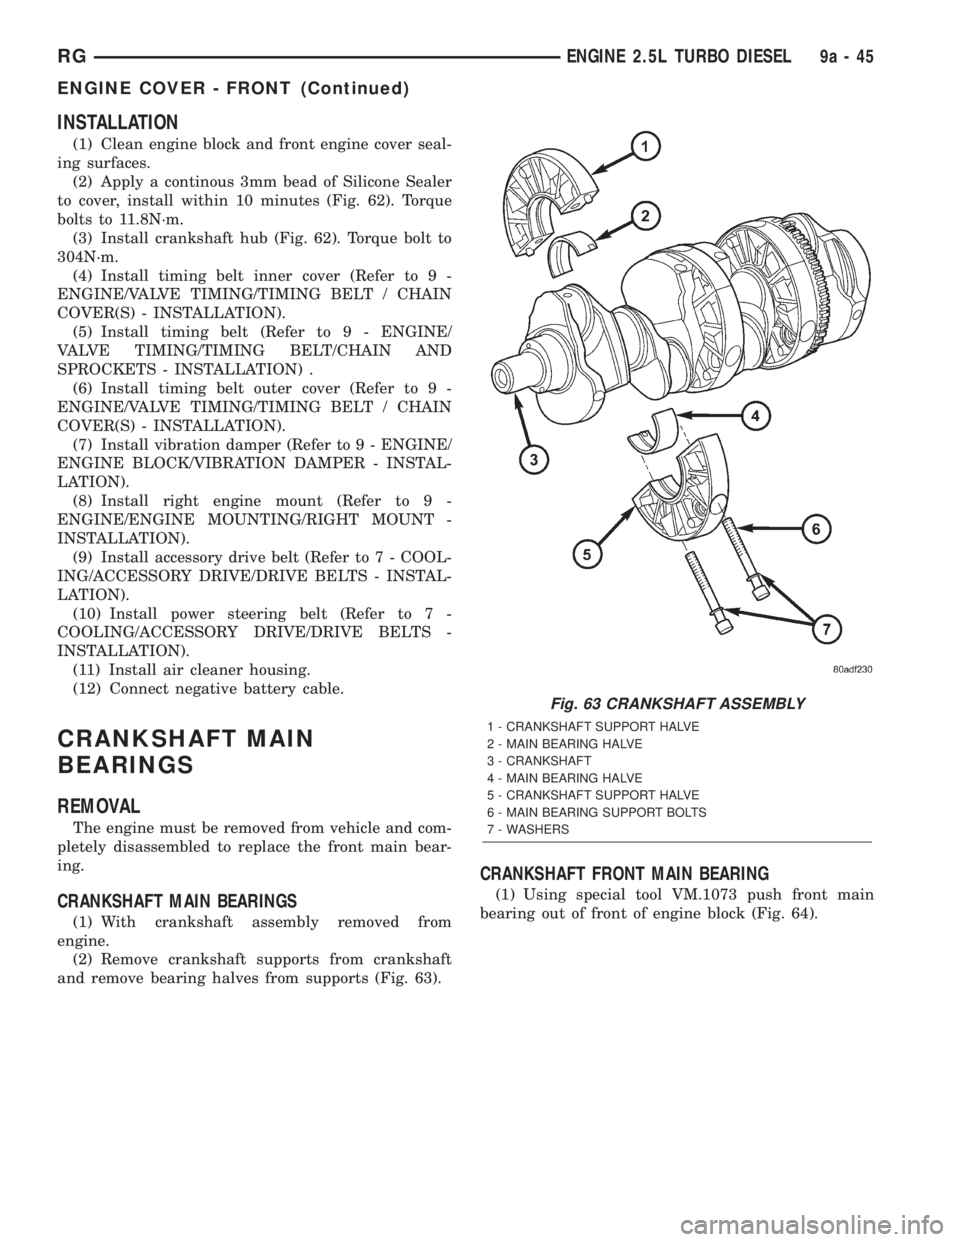
(2) Apply a continous 3mm bead of Silicone Sealer
to cover, install within 10 minutes (Fig. 62). Torque
bolts to 11.8N´m.
(3) Install crankshaft hub (Fig. 62). Torque bolt to
304N´m.
(4) Install timing belt inner cover (Refer to 9 -
ENGINE/VALVE TIMING/TIMING BELT / CHAIN
COVER(S) - INSTALLATION).
(5) Install timing belt (Refer to 9 - ENGINE/
VALVE TIMING/TIMING BELT/CHAIN AND
SPROCKETS - INSTALLATION) .
(6) Install timing belt outer cover (Refer to 9 -
ENGINE/VALVE TIMING/TIMING BELT / CHAIN
COVER(S) - INSTALLATION).
(7) Install vibration damper (Refer to 9 - ENGINE/
ENGINE BLOCK/VIBRATION DAMPER - INSTAL-
LATION).
(8) Install right engine mount (Refer to 9 -
ENGINE/ENGINE MOUNTING/RIGHT MOUNT -
INSTALLATION).
(9) Install accessory drive belt (Refer to 7 - COOL-
ING/ACCESSORY DRIVE/DRIVE BELTS - INSTAL-
LATION).
(10) Install power steering belt (Refer to 7 -
COOLING/ACCESSORY DRIVE/DRIVE BELTS -
INSTALLATION).
(11) Install air cleaner housing.
(12) Connect negative battery cable.
CRANKSHAFT MAIN
BEARINGS
REMOVAL
The engine must be removed from vehicle and com-
pletely disassembled to replace the front main bear-
ing.
CRANKSHAFT MAIN BEARINGS
(1) With crankshaft assembly removed from
engine.
(2) Remove crankshaft supports from crankshaft
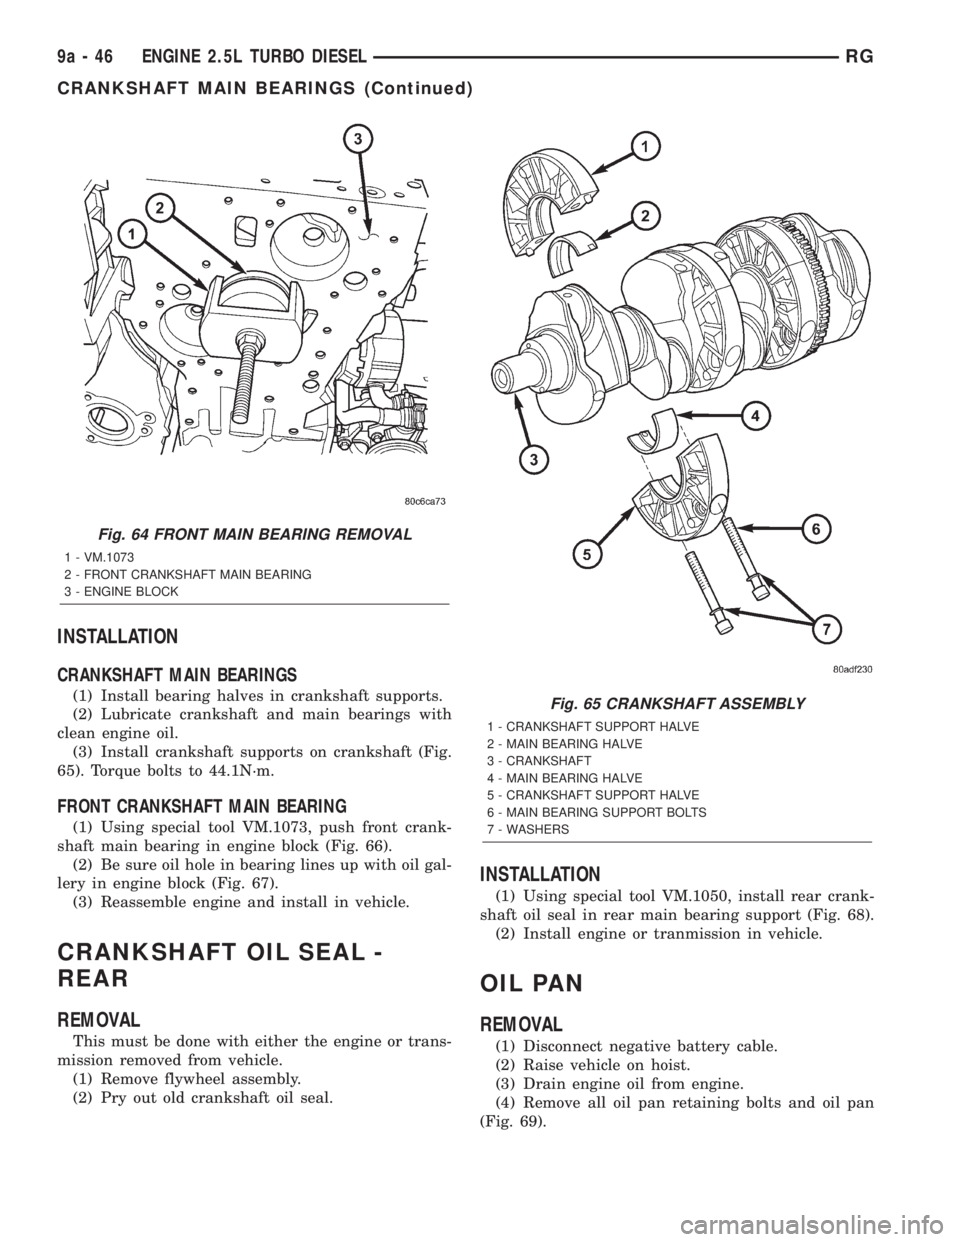
and remove bearing halves from supports (Fig. 63).
CRANKSHAFT FRONT MAIN BEARING
(1) Using special tool VM.1073 push front main
bearing out of front of engine block (Fig. 64).
Fig. 63 CRANKSHAFT ASSEMBLY
1 - CRANKSHAFT SUPPORT HALVE
2 - MAIN BEARING HALVE
3 - CRANKSHAFT
4 - MAIN BEARING HALVE
5 - CRANKSHAFT SUPPORT HALVE
6 - MAIN BEARING SUPPORT BOLTS
7 - WASHERS
RGENGINE 2.5L TURBO DIESEL9a-45
ENGINE COVER - FRONT (Continued)
Page 2828 of 4284
INSTALLATION
CRANKSHAFT MAIN BEARINGS
(1) Install bearing halves in crankshaft supports.
(2) Lubricate crankshaft and main bearings with
clean engine oil.
(3) Install crankshaft supports on crankshaft (Fig.
65). Torque bolts to 44.1N´m.
FRONT CRANKSHAFT MAIN BEARING
(1) Using special tool VM.1073, push front crank-
shaft main bearing in engine block (Fig. 66).
(2) Be sure oil hole in bearing lines up with oil gal-
lery in engine block (Fig. 67).
(3) Reassemble engine and install in vehicle.
CRANKSHAFT OIL SEAL -
REAR
REMOVAL
This must be done with either the engine or trans-
mission removed from vehicle.
(1) Remove flywheel assembly.
(2) Pry out old crankshaft oil seal.
INSTALLATION
(1) Using special tool VM.1050, install rear crank-
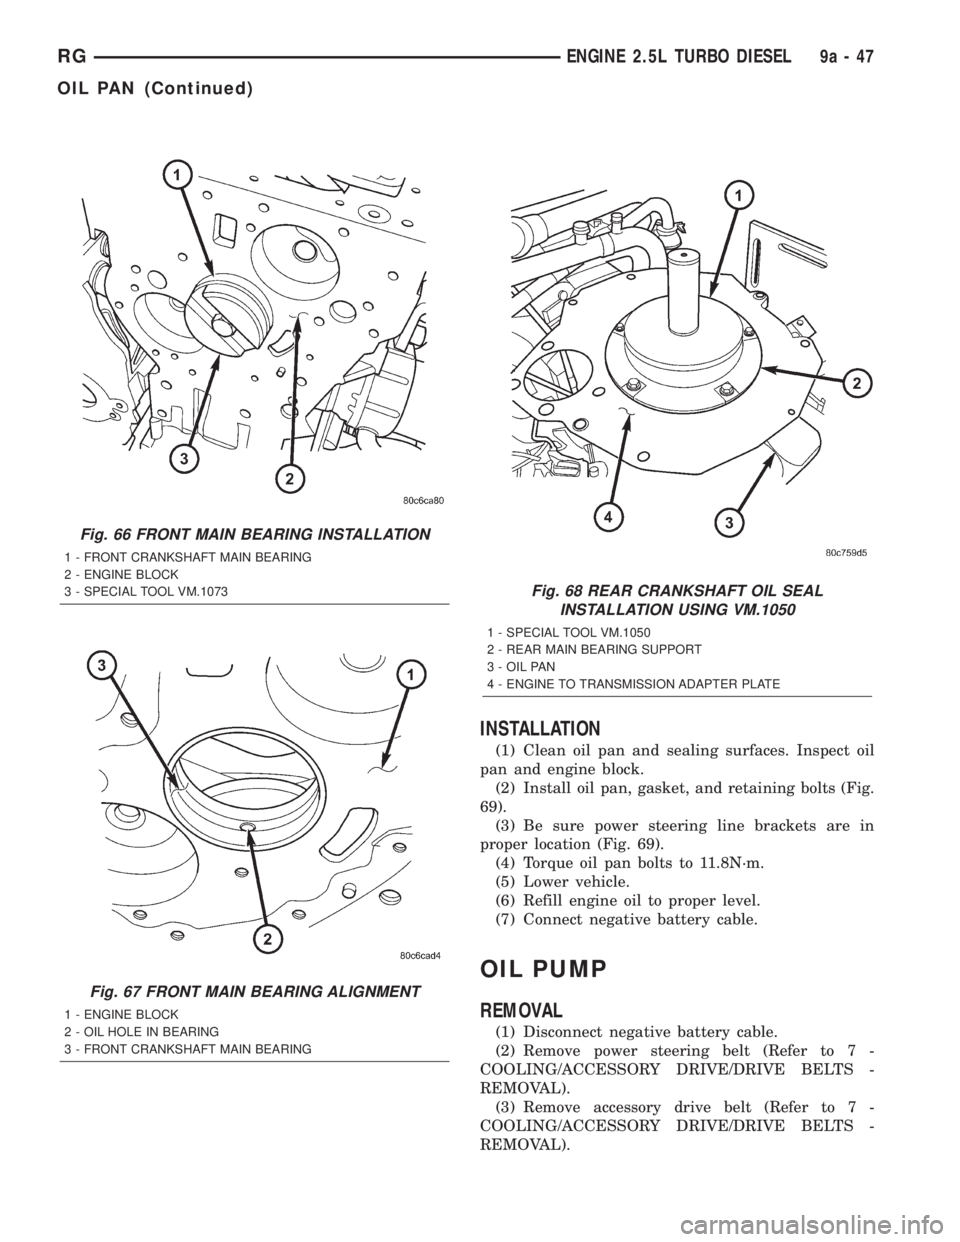
shaft oil seal in rear main bearing support (Fig. 68).
(2) Install engine or tranmission in vehicle.
OIL PAN
REMOVAL
(1) Disconnect negative battery cable.
(2) Raise vehicle on hoist.
(3) Drain engine oil from engine.
(4) Remove all oil pan retaining bolts and oil pan
(Fig. 69).
Fig. 64 FRONT MAIN BEARING REMOVAL
1 - VM.1073
2 - FRONT CRANKSHAFT MAIN BEARING
3 - ENGINE BLOCK
Fig. 65 CRANKSHAFT ASSEMBLY
1 - CRANKSHAFT SUPPORT HALVE
2 - MAIN BEARING HALVE
3 - CRANKSHAFT
4 - MAIN BEARING HALVE
5 - CRANKSHAFT SUPPORT HALVE
6 - MAIN BEARING SUPPORT BOLTS
7 - WASHERS
9a - 46 ENGINE 2.5L TURBO DIESELRG
CRANKSHAFT MAIN BEARINGS (Continued)
Page 2829 of 4284
INSTALLATION
(1) Clean oil pan and sealing surfaces. Inspect oil
pan and engine block.
(2) Install oil pan, gasket, and retaining bolts (Fig.
69).
(3) Be sure power steering line brackets are in
proper location (Fig. 69).
(4) Torque oil pan bolts to 11.8N´m.
(5) Lower vehicle.
(6) Refill engine oil to proper level.
(7) Connect negative battery cable.
OIL PUMP
REMOVAL
(1) Disconnect negative battery cable.
(2) Remove power steering belt (Refer to 7 -
COOLING/ACCESSORY DRIVE/DRIVE BELTS -
REMOVAL).
(3) Remove accessory drive belt (Refer to 7 -
COOLING/ACCESSORY DRIVE/DRIVE BELTS -
REMOVAL).
Fig. 66 FRONT MAIN BEARING INSTALLATION
1 - FRONT CRANKSHAFT MAIN BEARING
2 - ENGINE BLOCK
3 - SPECIAL TOOL VM.1073
Fig. 67 FRONT MAIN BEARING ALIGNMENT
1 - ENGINE BLOCK
2 - OIL HOLE IN BEARING
3 - FRONT CRANKSHAFT MAIN BEARING
Fig. 68 REAR CRANKSHAFT OIL SEAL
INSTALLATION USING VM.1050
1 - SPECIAL TOOL VM.1050
2 - REAR MAIN BEARING SUPPORT
3 - OIL PAN
4 - ENGINE TO TRANSMISSION ADAPTER PLATE
RGENGINE 2.5L TURBO DIESEL9a-47
OIL PAN (Continued)