Page 73 of 111

PERIODIC MAINTENANCE AND MINOR REPAIR
6-23
6
EW000095
WARNING
@ Operating the motorcycle with ex-
cessively worn tires decrease riding
stability and can lead to loss of con-
trol. Have excessively worn tires re-
placed by a Yamaha dealer
immediately. Brakes, tires, and relat-
ed wheel parts replacement should
be left to a Yamaha Service Techni-
cian. @CE-26ENOTE:@ These limits may be different by regula-
tion from country to country. If so, con-
form to the limits specified by the
regulations of your own country. @Tire information
This motorcycle is equipped with tube-
less tires, tire valves and cast wheels.
EW000080
WARNING
@ l
After extensive tests, the tires
mentioned below have been ap-
proved by Yamaha Motor Co.,
Ltd. for this model. No guaran-
tee for handling characteristics
can be given if tire combina-
tions other than what is ap-
proved are used on this
motorcycle. The front and rear
tires should be of the same
manufacture and design.
l
The use of tire valves and valve
cores other than listed below
could cause tire deflation dur-
ing extreme high speed riding.
Always use genuine parts or
their equivalent for replace-
ment.
l
Be sure to install the valve caps
securely, as these are important
to prevent air pressure leakage
during extreme high speed
riding.
@
CE-10E
CE-12E
Minimum tire tread depth
(front and rear)1.6 mm
1. Tire valve
2. Valve core
3. Valve cap with sealFRONT
Manufacturer Size Type
Bridgestone 120/60 ZR17 (55W) BT56FE
Dunlop 120/60 ZR17 (55W) D207FJ
REAR
Manufacturer Size Type
Bridgestone 180/55 ZR17 (73W) BT56RE
Dunlop 180/55 ZR17 (73W) D207N
Type
Tire valve TR412
Valve core #9000A (original)
E_5eb_Periodic.fm Page 23 Thursday, November 18, 1999 4:06 PM
Page 74 of 111

PERIODIC MAINTENANCE AND MINOR REPAIR
6-24
6
EAU00684
WARNING
@ This motorcycle is fitted with super
high-speed running tires. The fol-
lowing points must be observed in
order for you to make fully effective
use of these tires.l
Never fail to use the specified
tires in tire replacement. Other
tires may have a danger of
bursting at super high-speeds.
l
New tires have a relatively low
grip on the road surface until
they have been slightly worn.
Therefore, approximately
100 km should be traveled at
normal speed before any high-
speed riding is done.
l
Before any high-speed runs, the
tires should be warmed-up suf-
ficiently.
l
Always inflate to the correct tire
pressure according to the oper-
ating conditions.
@
EAU00687
WheelsTo ensure maximum performance,
long service, and safe operation, note
the following:l
Always inspect the wheels before
a ride. Check for cracks, bends, or
warpage of the wheels. If any ab-
normal condition exists in a wheel,
consult a Yamaha dealer. Do not
attempt even small repairs to the
wheel. If a wheel is deformed or
cracked, it must be replaced.
l
Tires and wheels should be bal-
anced whenever either one is
changed or replaced. Failure to
have a wheel balanced can result
in poor performance, adverse han-
dling characteristics, and short-
ened tire life.
l
Ride at moderate speeds after
changing a tire since the tire sur-
face must first be broken in for it to
develop its optimal characteristics.
E_5eb_Periodic.fm Page 24 Thursday, November 18, 1999 4:06 PM
Page 75 of 111

PERIODIC MAINTENANCE AND MINOR REPAIR
6-25
6
EAU01356
Clutch lever free play
adjustmentThe clutch lever free play should be ad-
justed to 10 ~ 15 mm.
1. Turn the adjusting bolt at the
clutch lever in direction
a to in-
crease free play or in direction
b
to decrease free play. If the speci-
fied free play cannot be obtained,
proceed with the following steps.
2. Turn the adjusting bolt at the
clutch lever in direction
a to loos-
en the cable.3. Remove cowling A. (See page 6-6
for removal and installation proce-
dures.)
4. Loosen the locknut at the crank-
case side.
5. Turn the adjusting nut at the
crankcase in direction
a to in-
crease free play or in direction
b
to decrease free play. Then tight-
en the locknut.
6. Install the cowling.
EAU00713
Brake light switch adjustmentThe rear brake light switch is activated
by the brake pedal and is properly ad-
justed when the brake light comes on
just before braking takes effect. To ad-
just the rear brake light switch, hold the
switch body so it does not rotate while
turning the adjusting nut.
Turn the adjusting nut in direction
a to
make the brake light come on earlier.
Turn the adjusting nut in direction
b to
make the brake light come on later.
1. Adjusting bolt
2. Free play
1. Locknut
2. Adjusting nut
1. Brake light switch
2. Adjusting nut
E_5eb_Periodic.fm Page 25 Thursday, November 18, 1999 4:06 PM
Page 76 of 111
PERIODIC MAINTENANCE AND MINOR REPAIR
6-26
6
EAU00721
Checking the front and rear
brake pads
EAU00725
Front brake
A wear indicator groove is provided on
each brake pad. This indicator allows
checking of brake pad wear without
disassembling the brake. Inspect the
groove. If the groove has almost disap-
peared, ask a Yamaha dealer to re-
place the pads.
EAU01641
Rear brake
A wear indicator groove is provided on
each brake pad. This indicator allows
checking of brake pad wear without
disassembling the brake. Remove the
rear caliper bolt and tilt the caliper for-
ward. Inspect the groove. If the groove has
almost disappeared, ask a Yamaha
dealer to replace the pads. Install the
caliper and caliper bolt, then tighten the
bolt to the specified torque.
1. Wear indicator groove
1. Caliper bolt
1. Wear indicator grooveTightening torque:
Caliper bolt:
40 Nm (4.0 m·kg)
E_5eb_Periodic.fm Page 26 Thursday, November 18, 1999 4:06 PM
Page 77 of 111

PERIODIC MAINTENANCE AND MINOR REPAIR
6-27
6
EAU00731
Inspecting the brake fluid
levelInsufficient brake fluid may let air enter
the brake system, possibly causing the
brakes to become ineffective.
Before riding, check that the brake fluid
is above the minimum level and replen-
ish when necessary.
Observe these precautions:l
When checking the fluid level,
make sure the top of the master
cylinder is level by turning the han-
dlebars.
l
Use only the designated quality
brake fluid. Otherwise, the rubber
seals may deteriorate, causing
leakage and poor brake perfor-
mance.
l
Refill with the same type of brake
fluid. Mixing fluids may result in a
harmful chemical reaction and
lead to poor brake performance.
l
Be careful that water does not en-
ter the master cylinder when refill-
ing. Water will significantly lower
the boiling point of the fluid and
may result in vapor lock.
l
Brake fluid may deteriorate paint-
ed surfaces or plastic parts. Al-
ways clean up spilled fluid
immediately.
l
Have a Yamaha dealer check the
cause if the brake fluid level goes
down.
1. Minimum level mark
1. Minimum level mark
Recommended brake fluid: DOT 4
E_5eb_Periodic.fm Page 27 Thursday, November 18, 1999 4:06 PM
Page 78 of 111
PERIODIC MAINTENANCE AND MINOR REPAIR
6-28
6
EAU00742
Brake fluid replacementThe brake fluid should be replaced only
by trained Yamaha service personnel.
Have the Yamaha dealer replace the
following components during periodic
maintenance or when they are dam-
aged or leaking:l
oil seals (every two years)
l
brake hoses (every four years)
EAU00744
Drive chain slack checkNOTE:@ Spin the wheel several times and find
the tightest position of the chain. Check
and/or adjust the chain slack while it’s
in this tightest position. @To check the chain slack the motor-
cycle must be held straight up with both
wheels on the ground and without rider.
Check the slack at the position shown
in the illustration. Normal slack is ap-
proximately 40 ~ 50 mm. If the slack
exceeds 50 mm, adjust.a. Chain slack
E_5eb_Periodic.fm Page 28 Thursday, November 18, 1999 4:06 PM
Page 79 of 111

PERIODIC MAINTENANCE AND MINOR REPAIR
6-29
6
EAU01251
Drive chain slack adjustment1. Loosen the axle nut.
2. Loosen the locknuts on each side.
To tighten the chain, turn the chain
adjusting bolts in direction
a. To
loosen the chain, turn the adjust-
ing bolts in direction
b and push
the wheel forward. Turn each ad-
justing bolt exactly the same
amount to maintain correct axle
alignment. There are marks on
each side of the swingarm. Use
these marks to align the rear
wheel.
EC000096
CAUTION:@ Too little chain slack will overload
the engine and other vital parts.
Keep the slack within the specified
limits. @3. After adjusting, tighten the lock-
nuts. Then tighten the axle nut to
the specified torque.
EAU03006
Drive chain lubricationThe chain consists of many parts which
work with each other. If the chain is not
maintained properly, it will wear out
quickly. Therefore, the chain must be
serviced regularly. This service is es-
pecially necessary when riding in dusty
areas. This motorcycle is equipped
with a sealed type chain. Steam clean-
ing, high-pressure washers, and sol-
vents can damage the drive chain, so
do not use these for cleaning it. Use
only kerosene to clean the drive chain.
Wipe it dry, and thoroughly lubricate it
with SAE 30 ~ 50W motor oil. Do not
use any other lubricants on the drive
chain. They may contain solvents that
could damage the sealed chain.
EC000097
CAUTION:@ Be sure to oil the chain after wash-
ing the motorcycle or riding in the
rain. @
1. Axle nut
2. Adjusting bolt
3. Locknut
4. Alignment marks
Tightening torque:
Axle nut:
150 Nm (15.0 m·kg)
E_5eb_Periodic.fm Page 29 Thursday, November 18, 1999 4:06 PM
Page 80 of 111

PERIODIC MAINTENANCE AND MINOR REPAIR
6-30
6
EAU02962
Cable inspection and
lubrication
EW000112
WARNING
@ Damage to the outer housing of ca-
bles may lead to internal rusting and
interfere with the cable movement.
Replace damaged cables as soon as
possible to prevent unsafe condi-
tions. @Lubricate the cables and cable ends. If
a cable does not operate smoothly, ask
a Yamaha dealer to replace it.
EAU00773
Throttle cable and grip
lubricationThe throttle twist grip assembly should
be greased at the time that the cable is
lubricated, since the grip must be re-
moved to get at the end of the throttle
cable. After removing the screws, hold
the end of the cable up in the air and
put in several drops of lubricant. With
the throttle grip disassembled, coat the
metal surface of the grip assembly with
a suitable all-purpose grease.
EAU01290*
Brake pedal lubricationLubricate the pivoting parts.
Recommended lubricant:
Engine oilRecommended lubricant:
Engine oil
E_5eb_Periodic.fm Page 30 Thursday, November 18, 1999 4:06 PM
 1
1 2
2 3
3 4
4 5
5 6
6 7
7 8
8 9
9 10
10 11
11 12
12 13
13 14
14 15
15 16
16 17
17 18
18 19
19 20
20 21
21 22
22 23
23 24
24 25
25 26
26 27
27 28
28 29
29 30
30 31
31 32
32 33
33 34
34 35
35 36
36 37
37 38
38 39
39 40
40 41
41 42
42 43
43 44
44 45
45 46
46 47
47 48
48 49
49 50
50 51
51 52
52 53
53 54
54 55
55 56
56 57
57 58
58 59
59 60
60 61
61 62
62 63
63 64
64 65
65 66
66 67
67 68
68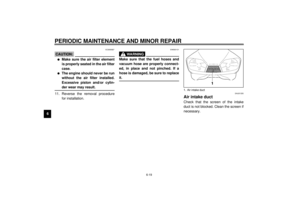 69
69 70
70 71
71 72
72 73
73 74
74 75
75 76
76 77
77 78
78 79
79 80
80 81
81 82
82 83
83 84
84 85
85 86
86 87
87 88
88 89
89 90
90 91
91 92
92 93
93 94
94 95
95 96
96 97
97 98
98 99
99 100
100 101
101 102
102 103
103 104
104 105
105 106
106 107
107 108
108 109
109 110
110
