Page 89 of 111
PERIODIC MAINTENANCE AND MINOR REPAIR
6-39
6
EAU01247
Rear wheel removal
EW000122
WARNING
@ l
It is advisable to have a Yamaha
dealer service the wheel.
l
Securely support the motor-
cycle so there is no danger of it
falling over.
@1. Loosen the axle nut and caliper
bolts.
2. Elevate the rear wheel.3. Remove the axle nut, caliper bolts
and caliper.
4. Loosen the locknuts on each side
of the swingarm.
5. Turn the chain adjusting bolts fully
inward.
6. Push the wheel forward and re-
move the drive chain.
7. Pull out the wheel axle and re-
move the wheel assembly by pull-
ing backwards.
NOTE:@ l
Do not depress the brake pedal
when the caliper is off the disc as
the brake pads will be forced shut.
l
You do not have to disassemble
the chain in order to remove or in-
stall the rear wheel.
@
1. Axle nut
2. Adjusting bolt
3. Locknut
1. Caliper bolt (´ 2)
E_5eb_Periodic.fm Page 39 Thursday, November 18, 1999 4:06 PM
Page 90 of 111

PERIODIC MAINTENANCE AND MINOR REPAIR
6-40
6
EAU01246
Rear wheel installation1. Install the wheel assembly and in-
sert the axle.
2. Install and adjust the drive chain.
(See page 6-28 for details about
adjusting the drive chain slack.)
3. Install the axle nut and let the
motorcycle down.
4. Install the caliper and caliper bolts.
Make sure there is enough gap
between the brake pads before in-
stalling the caliper onto the brake
disc.
5. Tighten the axle nut and caliper
bolts to the specified torques.
EAU01008
TroubleshootingAlthough Yamaha motorcycles receive
a rigid inspection before shipment from
the factory, trouble may occur during
operation.
Any problem in the fuel, compression,
or ignition systems can cause poor
starting and loss of power. The trouble-
shooting chart describes a quick, easy
procedure for making checks.
If your motorcycle requires any repair,
bring it to a Yamaha dealer. The skilled
technicians at a Yamaha dealership
have the tools, experience, and know-
how to properly service your motor-
cycle. Use only genuine Yamaha parts
on your motorcycle. Imitation parts may
look like Yamaha parts, but they are of-
ten inferior. Consequently, they have a
shorter service life and can lead to ex-
pensive repair bills. Tightening torque:
Axle nut:
150 Nm (15.0 m·kg)
Caliper bolt:
40 Nm (4.0 m·kg)
E_5eb_Periodic.fm Page 40 Thursday, November 18, 1999 4:06 PM
Page 91 of 111
PERIODIC MAINTENANCE AND MINOR REPAIR
6-41
6
EAU02990
Troubleshooting chart
EW000125
WARNING
@ Never check the fuel system while smoking or in the vicinity of an open flame. @
Check if there is fuel
in the fuel tank.1. Fuel
Enough fuel.
No fuel.
Go to compression check.
Supply fuel.
Engine doesn’t start, go to compression check.
Use the electric starter.2. Compression
There is compression.
No compression.
Go to ignition check.
Ask a Yamaha dealer to
inspect.
Remove spark plugs
and check electrodes.3. Ignition
Wet.
Dry.
Wipe clean with dry cloth and correct
spark gap or replace spark plugs.
Ask a Yamaha dealer to inspect.
Engine doesn’t start, ask a Yamaha
dealer to inspect.Engine doesn’t start, go to battery
check.Open throttle half-way and start
the engine.
Use the electric starter.4. Battery
Engine turns over
quickly.
Engine turns over
slowly.
Battery good.Check connections or
recharge.
E_5eb_Periodic.fm Page 41 Thursday, November 18, 1999 4:06 PM
Page 92 of 111

PERIODIC MAINTENANCE AND MINOR REPAIR
6-42
6
5. Engine overheating
EW000070
WARNING
@ Do not remove the radiator cap when the engine and radiator are hot. Scalding hot fluid and steam may be blown
out under pressure, which could cause serious injury. Open the radiator cap as follows. Wait until the engine has
cooled. Remove the radiator cap stopper by removing the screw. Place a thick rag like a towel over the radiator cap
and slowly rotate the cap counterclockwise to the detent. This procedure allows any residual pressure to escape.
When the hissing sound has stopped, press down on the cap while turning counterclockwise and remove it. @NOTE:@ If it is difficult to get the recommended coolant, tap water can be temporarily used, provided that it is changed to the recom-
mended coolant as soon as possible. @
Wait until the
engine has cooled.
Check the coolant level in the
reservoir tank and/or radiator.
Level is OK.Level is low, check the
cooling system for leakage.
No
leakage.Leakage.
Ask a Yamaha dealer to inspect
and repair the cooling system.Add coolant. (See NOTE.)
Restart the engine. If the engine overheats again, ask a
Yamaha dealer to inspect and repair the cooling system.
E_5eb_Periodic.fm Page 42 Thursday, November 18, 1999 4:06 PM
Page 93 of 111
E_5eb_Periodic.fm Page 43 Thursday, November 18, 1999 4:06 PM
Page 94 of 111
7
MOTORCYCLE CARE AND STORAGE
Care ................................................................................................... 7-1
Storage............................................................................................... 7-4
E_5eb_CleaningTOC.fm Page 1 Thursday, November 18, 1999 4:07 PM
Page 95 of 111

7-1
7
EAU01637
7-MOTORCYCLE CARE AND STORAGECareThe exposure of its technology makes
a motorcycle charming but also vulner-
able. Although high-quality compo-
nents are used, they are not all rust-
resistant. While a rusty exhaust pipe
may remain unnoticed on a car, it does
look unattractive on a motorcycle. Fre-
quent and proper care, however, will
keep your motorcycle looking good, ex-
tend its life and maintain its perfor-
mance. Moreover, the warranty states
that the vehicle must be properly taken
care of. For all these reasons, it is rec-
ommended that you observe the follow-
ing cleaning and storing precautions.Before cleaning
1. Cover up the muffler outlet with a
plastic bag.
2. Make sure that all caps and covers
as well as all electrical couplers
and connectors, including the
spark plug caps, are tightly in-
stalled.
3. Remove extremely stubborn dirt,
like oil burnt onto the crankcase,
with a degreasing agent and a
brush, but never apply such prod-
ucts onto seals, gaskets, sprock-
ets, the drive chain and wheel
axles. Always rinse the dirt and
degreaser off with water.Cleaning
After normal use
Remove dirt with warm water, a neutral
detergent and a soft clean sponge,
then rinse with plenty of clean water.
Use a tooth or bottle brush for hard-to-
reach parts. Tougher dirt and insects
will come off more easily if the area is
covered with a wet cloth for a few min-
utes before cleaning. There is a special
sponge included in the plastic bag con-
taining the owners manual. Use this
sponge to clean the muffler and to re-
move any discoloration from the muf-
fler.
E_5eb_Cleaning.fm Page 1 Thursday, November 18, 1999 4:08 PM
Page 96 of 111

MOTORCYCLE CARE AND STORAGE
7-2
7
ECA00010
CAUTION:@ l
Avoid using strong acidic wheel
cleaners, especially on spoked
wheels. If you do use such
products for hard-to-remove
dirt, do not leave it on any long-
er than instructed, then thor-
oughly rinse it off with water,
immediately dry the area and
apply a corrosion protection
spray.
l
Improper cleaning can damage
windshields, cowlings, panels
and other plastic parts. Use
only a soft, clean cloth or
sponge with mild detergent and
water to clean plastic.
l
Do not use any harsh chemical
products on plastic parts. Be
sure to avoid using cloths or
sponges which have been in
contact with strong or abrasive
cleaning products, solvent or
thinner, fuel (gasoline), rust re-
movers or inhibitors, brake flu-
id, antifreeze or electrolyte.
l
Do not use high-pressure wash-
ers or steam-jet cleaners since
they cause water seepage and
deterioration in the following ar-
eas: seals (of wheel bearings,
swingarm bearings, forks and
brakes), electric components
(couplers, connectors, instru-
ments, switches and lights),
breather hoses and vents.
l
For motorcycles equipped with
a windshield: Do not use strong
cleaners or hard sponges as
they will cause dulling or
scratching. Some cleaning
compounds for plastic may
leave scratches on the wind-
shield. Test the product on a
small hidden part of the wind-
shield to make sure they do not
leave any marks. If the wind-
shield is scratched, use a quali-
ty plastic polishing compound
after washing.
@After riding in the rain, near the sea oron salt-sprayed roadsSince sea salt or salt sprayed on the
roads in the winter are extremely corro-
sive in combination with water, carry
out the following steps after each ride
in the rain, near the sea or on salt-
sprayed roads. (Salt sprayed in the
winter may remain on the roads well
into spring.)
E_5eb_Cleaning.fm Page 2 Thursday, November 18, 1999 4:08 PM
 1
1 2
2 3
3 4
4 5
5 6
6 7
7 8
8 9
9 10
10 11
11 12
12 13
13 14
14 15
15 16
16 17
17 18
18 19
19 20
20 21
21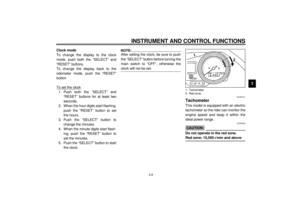 22
22 23
23 24
24 25
25 26
26 27
27 28
28 29
29 30
30 31
31 32
32 33
33 34
34 35
35 36
36 37
37 38
38 39
39 40
40 41
41 42
42 43
43 44
44 45
45 46
46 47
47 48
48 49
49 50
50 51
51 52
52 53
53 54
54 55
55 56
56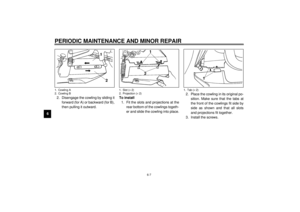 57
57 58
58 59
59 60
60 61
61 62
62 63
63 64
64 65
65 66
66 67
67 68
68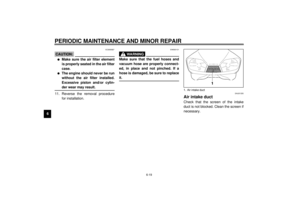 69
69 70
70 71
71 72
72 73
73 74
74 75
75 76
76 77
77 78
78 79
79 80
80 81
81 82
82 83
83 84
84 85
85 86
86 87
87 88
88 89
89 90
90 91
91 92
92 93
93 94
94 95
95 96
96 97
97 98
98 99
99 100
100 101
101 102
102 103
103 104
104 105
105 106
106 107
107 108
108 109
109 110
110


