Page 81 of 111
PERIODIC MAINTENANCE AND MINOR REPAIR
6-31
6
EAU02985
Brake and clutch lever
lubricationLubricate the pivoting parts.
EAU02986
Sidestand lubricationLubricate the sidestand pivoting point
and metal-to-metal contact surfaces.
Check that the sidestand moves up
and down smoothly.
EW000113
WARNING
@ If the sidestand does not move
smoothly, consult a Yamaha dealer. @
EAU00791
Rear suspension lubricationLubricate the pivoting parts.
Recommended lubricant:
Engine oil
Recommended lubricant:
Engine oil
Recommended lubricant:
Lithium soap base grease
E_5eb_Periodic.fm Page 31 Thursday, November 18, 1999 4:06 PM
Page 82 of 111

PERIODIC MAINTENANCE AND MINOR REPAIR
6-32
6
EAU02939
Front fork inspectionVisual check
EW000115
WARNING
@ Securely support the motorcycle so
there is no danger of it falling over. @Check for scratches or damage on the
inner tube and excessive oil leakage
from the front fork.
Operation check
1. Place the motorcycle on a level
place.
2. Hold the motorcycle in an upright
position and apply the front brake.
3. Push down hard on the handle-
bars several times and check if the
fork rebounds smoothly.
EC000098
CAUTION:@ If any damage or unsmooth move-
ment is found with the front fork,
consult a Yamaha dealer. @
EAU00794
Steering inspectionPeriodically inspect the condition of the
steering. Worn out or loose steering
bearings may be dangerous. Place a
stand under the engine to raise the
front wheel off the ground. Hold the
lower end of the front forks and try to
move them forward and backward. If
any free play can be felt, ask a Yamaha
dealer to inspect and adjust the steer-
ing. Inspection is easier if the front
wheel is removed.
EW000115
WARNING
@ Securely support the motorcycle so
there is no danger of it falling over. @
E_5eb_Periodic.fm Page 32 Thursday, November 18, 1999 4:06 PM
Page 83 of 111

PERIODIC MAINTENANCE AND MINOR REPAIR
6-33
6
EAU01144
Wheel bearingsIf there is play in the front or rear wheel
hub or if the wheel does not turn
smoothly, have a Yamaha dealer in-
spect the wheel bearings.
EAU01291
BatteryThis motorcycle is equipped with a
sealed-type battery. Therefore it is not
necessary to check the electrolyte or fill
the battery with distilled water.l
If the battery seems to have dis-
charged, consult a Yamaha deal-
er.
l
If the motorcycle is equipped with
optional electrical accessories, the
battery tends to discharge more
quickly, so be sure to recharge it
periodically.
EW000116
WARNING
@ Battery electrolyte is poisonous and
dangerous, causing severe burns,
etc. It contains sulfuric acid. Avoid
contact with skin, eyes or clothing.
ANTIDOTE:l
EXTERNAL: Flush with water.
l
INTERNAL: Drink large quanti-
ties of water or milk. Follow with
milk of magnesia, beaten egg,
or vegetable oil. Call a physi-
cian immediately.
l
EYES: Flush with water for
15 minutes and get prompt
medical attention.
Batteries produce explosive gases.
Keep sparks, flame, cigarettes etc.,
away. Ventilate when charging or
using in an enclosed space. Always
shield your eyes when working near
batteries.
KEEP OUT OF REACH OF CHIL-
DREN.
@
E_5eb_Periodic.fm Page 33 Thursday, November 18, 1999 4:06 PM
Page 84 of 111

PERIODIC MAINTENANCE AND MINOR REPAIR
6-34
6 Battery storage
This motorcycle is equipped with a dig-
ital speedometer and the odometer
memory tends to drain the battery.
When the motorcycle is not used for a
month or longer, be sure to remove the
battery, fully charge it and store it in a
cool, dry place.
EC000102
CAUTION:@ l
Completely recharge the bat-
tery before storing. Storing a
discharged battery can cause
permanent battery damage.
l
Use a battery charger designed
for a sealed-type (MF) battery.
Using a conventional battery
charger will cause battery dam-
age. If you do not have a sealed-
type battery charger, contact
your Yamaha dealer.
l
Always make sure the connec-
tions are correct when reinstall-
ing the battery.
@
EAU01754
Fuse replacementThe fuse boxes are located under the
rider seat. If any fuse is blown, turn off
the main switch and the switch of the
circuit in question. Install a new fuse of
specified amperage. Turn on the
switches and see if the electrical device
operates. If the fuse immediately blows
again, consult a Yamaha dealer.
EC000103
CAUTION:@ Do not use fuses of higher amper-
age rating than those recommend-
ed. Substitution of a fuse of
improper rating can cause extensive
electrical system damage and pos-
sibly a fire. @
1. Ignition fuse
2. Headlight fuse
3. Signaling system fuse
4. Spare fuse (´ 3)
5. Radiator fan fuse
6. Odometer fuse
1. Main fuse
2. Spare fuse
E_5eb_Periodic.fm Page 34 Thursday, November 18, 1999 4:06 PM
Page 85 of 111
PERIODIC MAINTENANCE AND MINOR REPAIR
6-35
6
EAU01822*
Headlight bulb replacementThis motorcycle is equipped with a
quartz bulb headlight.
If the headlight bulb burns out, replace
the bulb as follows:
1. Remove panel C. (See page 6-8
for panel removal and installation
procedures.)
2. Remove the headlight connector
and the bulb holder cover.3. Unhook the bulb holder and re-
move the defective bulb.
EW000119
WARNING
@ Keep flammable products and your
hands away from a bulb while it is
on, as it is hot. Do not touch a bulb
until it cools down. @4. Put a new bulb into position and
secure it in place with the bulb
holder. Specified fuses:
Main fuse: 30 A
Headlight fuse: 20 A
Signaling system fuse: 20 A
Radiator fan fuse: 7.5 A
Ignition fuse: 15 A
Odometer fuse: 7.5 A
1. Connector
2. Bulb holder cover
1. Bulb holder
E_5eb_Periodic.fm Page 35 Thursday, November 18, 1999 4:06 PM
Page 86 of 111

PERIODIC MAINTENANCE AND MINOR REPAIR
6-36
6
EC000104
CAUTION:@ To prevent damage to the following:l
Headlight bulb
Avoid touching the glass part of
the bulb. Keep it free from oil;
otherwise, the transparency of
the glass, life of the bulb, and il-
luminous flux will be adversely
affected. If oil gets on the bulb,
thoroughly clean it with a cloth
moistened with alcohol or lac-
quer thinner.
l
Headlight lens
• Do not affix any type of tinted
film or stickers to the head-
light lens.
• Do not use headlight bulbs of
wattage higher than speci-
fied.
@5. Install the bulb holder cover and
reconnect the headlight connec-
tor.
If the headlight beam adjustment is
necessary, ask a Yamaha dealer to
make that adjustment.
EAU01823
Tail/brake light bulb
replacement1. Remove the passenger seat. (See
page 3-15 for seat removal and in-
stallation procedures.)
2. To remove the socket, turn it coun-
terclockwise.
3. To remove the defective bulb, turn
it counterclockwise.
4. Push a new bulb into the socket
and turn it clockwise.
5. Install the socket and turn it clock-
wise.
6. Install the passenger seat.
EAU01095
Turn signal light bulb
replacement1. Remove the screw and the lens.
2. Remove the defective bulb by
pushing it inward and turning it
counterclockwise.
3. Install a new bulb by pushing it in-
ward and turning it clockwise.
4. Install the lens and tighten the
screw.
1. Bulb socket
1. Screw
E_5eb_Periodic.fm Page 36 Thursday, November 18, 1999 4:06 PM
Page 87 of 111

PERIODIC MAINTENANCE AND MINOR REPAIR
6-37
6
EAU01579
Supporting the motorcycleSince the Yamaha YZF-R6 has no cen-
terstand, follow these precautions
when removing the front and rear
wheel or performing other mainte-
nance requiring the motorcycle to
stand upright. Check that the motor-
cycle is in a stable and level position
before starting any maintenance. A
strong wooden box can be placed un-
der the engine for added stability.
Front wheel service
To stabilize the rear of the motorcycle,
either use a motorcycle stand or place
a motorcycle jack under the frame in
front of the rear wheel to prevent it from
moving from side to side. Then use a
motorcycle stand to elevate the front
wheel off of the ground.Rear wheel service
Use a motorcycle stand or motorcycle
jack to elevate the motorcycle so the
rear wheel is off the ground. Alterna-
tively, two jacks can be placed under
the frame or swingarm.
EAU01617
Front wheel removal
EW000122
WARNING
@ l
It is advisable to have a Yamaha
dealer service the wheel.
l
Securely support the motor-
cycle so there is no danger of it
falling over.
@1. Loosen the pinch bolt and caliper
bolts.
2. Loosen the wheel axle by using a
19-mm hexagon wrench.1. Wheel axle
2. Pinch bolt
E_5eb_Periodic.fm Page 37 Thursday, November 18, 1999 4:06 PM
Page 88 of 111

PERIODIC MAINTENANCE AND MINOR REPAIR
6-38
6 3. Elevate the front wheel.
4. Remove the brake hose holders
and calipers.
NOTE:@ Do not depress the brake lever when
the calipers are off the discs as the
brake pads will be forced shut. @5. Pull out the wheel axle and re-
move the wheel by pulling it back-
wards.
EAU01638
Front wheel installation1. Lift up the wheel between the front
fork legs.
2. Install the wheel axle and let the
motorcycle down.
3. Push down hard on the handle-
bars several times to check for
proper fork operation.
4. Install the calipers, caliper bolts
and brake hose holders. Make
sure there is enough gap between
the brake pads before installing
the calipers onto the brake discs.
5. Tighten the wheel axle, pinch bolt
and caliper bolts to the specified
torques.
1. Brake hose holder bolt
2. Caliper bolt (´ 2)
Tightening torque:
Wheel axle:
72 Nm (7.2 m·kg)
Pinch bolt:
20 Nm (2.0 m·kg)
Caliper bolt:
40 Nm (4.0 m·kg)
E_5eb_Periodic.fm Page 38 Thursday, November 18, 1999 4:06 PM
 1
1 2
2 3
3 4
4 5
5 6
6 7
7 8
8 9
9 10
10 11
11 12
12 13
13 14
14 15
15 16
16 17
17 18
18 19
19 20
20 21
21 22
22 23
23 24
24 25
25 26
26 27
27 28
28 29
29 30
30 31
31 32
32 33
33 34
34 35
35 36
36 37
37 38
38 39
39 40
40 41
41 42
42 43
43 44
44 45
45 46
46 47
47 48
48 49
49 50
50 51
51 52
52 53
53 54
54 55
55 56
56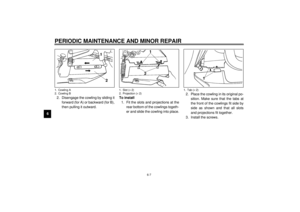 57
57 58
58 59
59 60
60 61
61 62
62 63
63 64
64 65
65 66
66 67
67 68
68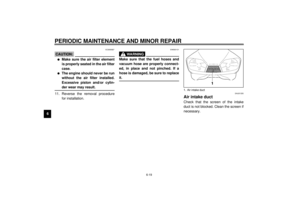 69
69 70
70 71
71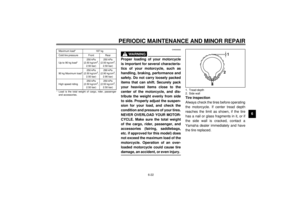 72
72 73
73 74
74 75
75 76
76 77
77 78
78 79
79 80
80 81
81 82
82 83
83 84
84 85
85 86
86 87
87 88
88 89
89 90
90 91
91 92
92 93
93 94
94 95
95 96
96 97
97 98
98 99
99 100
100 101
101 102
102 103
103 104
104 105
105 106
106 107
107 108
108 109
109 110
110
