Page 11 of 121
2-1
2
EAU00026
2-DESCRIPTIONLeft view1. Shift pedal (page 3-11)
2. Starter (choke) knob (page 3-15)
3. Fuel tank cap (page 3-12)
4. Fuel cock (page 3-14)
5. Battery (page 7-29)
6. Coolant reservoir tank (page 7-14)7. Fuse box B (page 7-31)
8. Saddlebag (page 3-17)
9. Helmet holder (page 3-16)
10. Licence light (page 7-34)
11. Tail/brake light (page 7-33)
12. Rear turn signal lights (page 7-33)
E_5jc_Description.fm Page 1 Saturday, October 16, 1999 1:07 PM
Page 12 of 121
DESCRIPTION
2-2
2
13. Muffler
14. Tool kit (page 7-1)
15. Helmet holder (page 3-16)
16. Travel trunk (page 3-18)
17. Passenger seat
18. Rear shock absorber air valve (page 3-21)
19. Rider seat (page 3-15)
20. Fuel tank (page 3-12)21. Front fork air valve (page 3-19)
22. Headlight (page 7-32)
23. Front turn signal lights (Page 7-33)
24. Fuse box A (page 7-31)
25. Rear brake pedal (page 3-11)
26. Rider footrest
27. Coolant reservoir tank (page 7-14)
28. Passenger footrestRight view
E_5jc_Description.fm Page 2 Saturday, October 16, 1999 1:07 PM
Page 14 of 121

3
INSTRUMENT AND CONTROL FUNCTIONS
Main switch/steering lock ...................................... 3-1
Indicator lights ...................................................... 3-3
Speedometer ........................................................ 3-5
Cruise control system ........................................... 3-7
Antitheft alarm (optional) ...................................... 3-8
Fuel gauge ............................................................ 3-9
Handlebar switches .............................................. 3-9
Clutch lever ......................................................... 3-10
Shift pedal ........................................................... 3-11
Front brake lever ................................................. 3-11
Rear brake pedal ................................................ 3-11
Fuel tank cap ...................................................... 3-12Fuel .................................................................... 3-13
Fuel tank breather hose ..................................... 3-13
Fuel cock ............................................................ 3-14
Starter (choke) knob .......................................... 3-15
Rider seat........................................................... 3-15
Helmet holders ................................................... 3-16
Saddlebags and travel trunk .............................. 3-17
Front fork adjustment ......................................... 3-19
Rear shock absorber adjustment ....................... 3-21
Sidestand ........................................................... 3-21
Sidestand/clutch switch operation check............ 3-22
Auxiliary DC jack and terminal ........................... 3-23
E_5jc_FunctionsTOC.fm Page 1 Saturday, October 16, 1999 1:07 PM
Page 17 of 121
INSTRUMENT AND CONTROL FUNCTIONS
3-3
3
EAU00056
Indicator lights
EAU00058
1. Turn indicator lights “ ” / “ ”
The corresponding indicator flashes
when the turn switch is moved to the
left or right.
EAU00063
2. High beam indicator light “ ”
This indicator comes on when the
headlight high beam is used.
EAU01209
3. Oil level indicator light “ ”
This indicator light will come on if the oil
level is low. To check that the indicator
light is working properly:
l
Turn the engine stop switch to
“ ” and the main switch to “ON”.
l
Put the transmission in neutral or
apply the clutch lever.
l
Push the start switch.
If the indicator light does not come on
while pushing the start switch, have a
Yamaha dealer inspect the electrical
circuit.
NOTE:@ Even if the oil is filled to the specified
level, the indicator light may flicker
when riding on a slope or during sud-
den acceleration or deceleration, but
this is normal. @
E_5jc_Functions.fm Page 3 Saturday, October 16, 1999 1:08 PM
Page 18 of 121

INSTRUMENT AND CONTROL FUNCTIONS
3-4
3
EAU01774
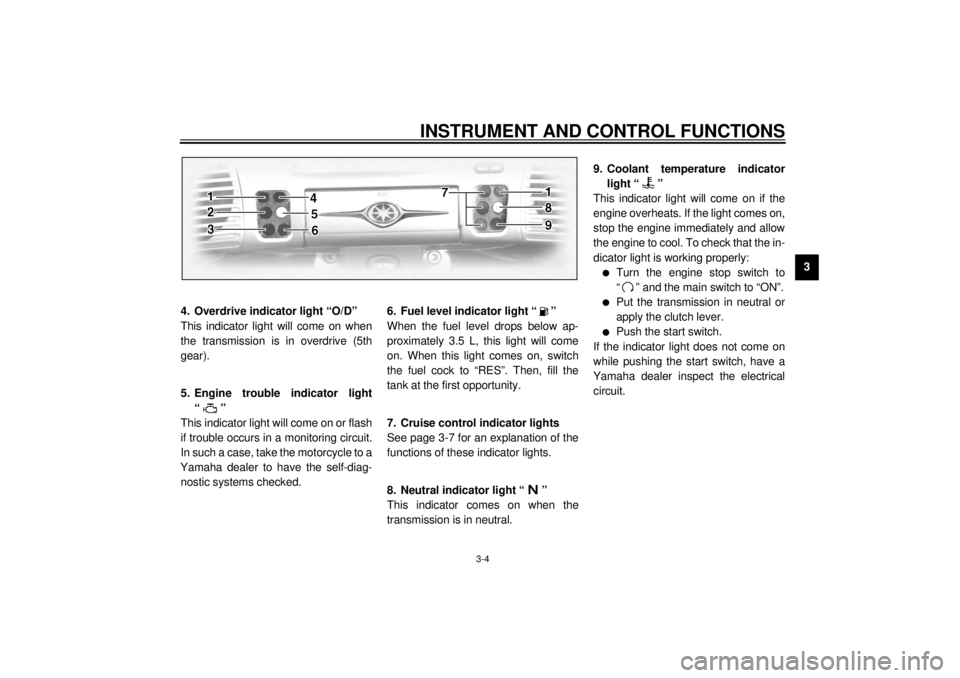
4. Overdrive indicator light “O/D”
This indicator light will come on when
the transmission is in overdrive (5th
gear).
EAU00091
5. Engine trouble indicator light
“”
This indicator light will come on or flash
if trouble occurs in a monitoring circuit.
In such a case, take the motorcycle to a
Yamaha dealer to have the self-diag-
nostic systems checked.
EAU00079
6. Fuel level indicator light “ ”
When the fuel level drops below ap-
proximately 3.5 L, this light will come
on. When this light comes on, switch
the fuel cock to “RES”. Then, fill the
tank at the first opportunity.
EAU01773
7. Cruise control indicator lights
See page 3-7 for an explanation of the
functions of these indicator lights.
EAU00061
8. Neutral indicator light “ ”
This indicator comes on when the
transmission is in neutral.
EAU01257*
9. Coolant temperature indicator
light “ ”
This indicator light will come on if the
engine overheats. If the light comes on,
stop the engine immediately and allow
the engine to cool. To check that the in-
dicator light is working properly:l
Turn the engine stop switch to
“ ” and the main switch to “ON”.
l
Put the transmission in neutral or
apply the clutch lever.
l
Push the start switch.
If the indicator light does not come on
while pushing the start switch, have a
Yamaha dealer inspect the electrical
circuit.
E_5jc_Functions.fm Page 4 Saturday, October 16, 1999 1:08 PM
Page 22 of 121

INSTRUMENT AND CONTROL FUNCTIONS
3-8
3 creased by more than 8 km/h, cruise
control will be deactivated until the trav-
eling speed returns to within 8 km/h of
the set speed.
Deactivating cruise control
Applying the front or rear brake or dis-
engaging the clutch will automatically
deactivate cruise control.
Push the “CANCEL” switch to manually
deactivate cruise control and return to
normal throttle operation.
NOTE:@ l
When cruise control is deactivat-
ed, the “RES” (resume) indicator
light will come on.
l
The traveling speed starts de-
creasing as soon as cruise control
is deactivated, unless the throttle
grip is turned.
@
Push the “RES/ACC” side of the cruise
control button to reactivate cruise con-
trol. The traveling speed will return to
the previously set speed. The “RES” in-
dicator light will flash during this time
and then go off. Finally, the “SET” indi-
cator light will come on.
Push the “CRUISE” switch to the right
to turn the cruise control system off
completely.
EWA00019
WARNING
@ If some trouble occurs in the cruise
control system, the “SET” and
“RES” indicator lights will flash si-
multaneously. If this occurs, turn off
the cruise control system and have
a Yamaha dealer check it. @
EAU00109
Antitheft alarm (optional)An antitheft alarm can be equipped to
this motorcycle. Consult your Yamaha
dealer to obtain and install the alarm.
E_5jc_Functions.fm Page 8 Saturday, October 16, 1999 1:08 PM
Page 24 of 121

INSTRUMENT AND CONTROL FUNCTIONS
3-10
3
EAU00138
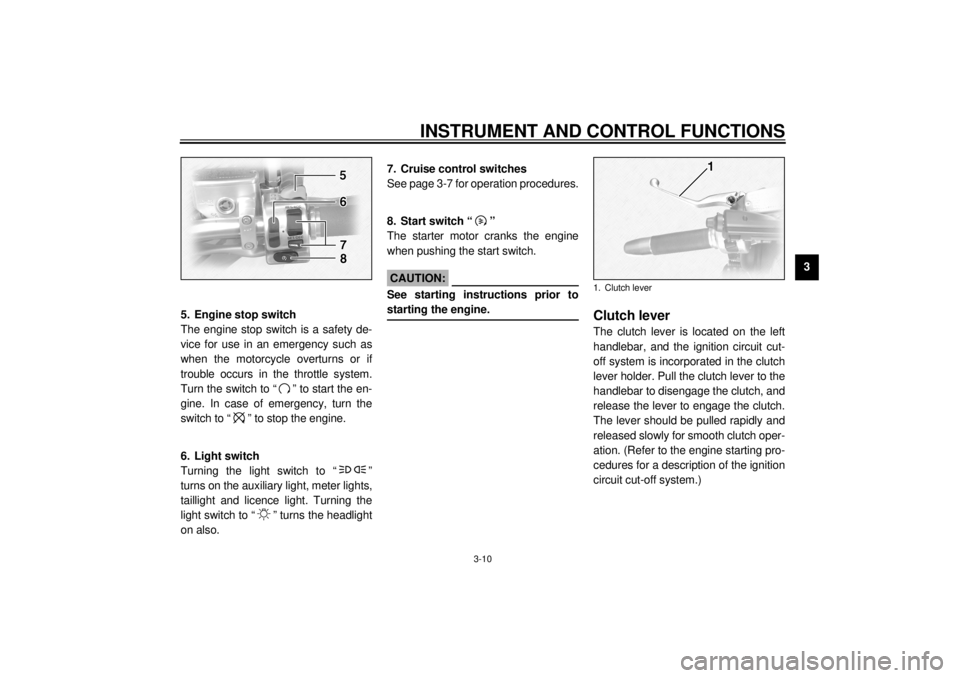
5. Engine stop switch
The engine stop switch is a safety de-
vice for use in an emergency such as
when the motorcycle overturns or if
trouble occurs in the throttle system.
Turn the switch to “ ” to start the en-
gine. In case of emergency, turn the
switch to “ ” to stop the engine.
EAU01871
6. Light switch
Turning the light switch to “ ”
turns on the auxiliary light, meter lights,
taillight and licence light. Turning the
light switch to “ ” turns the headlight
on also.
EAU01859
7. Cruise control switches
See page 3-7 for operation procedures.
EAU00143
8. Start switch “ ”
The starter motor cranks the engine
when pushing the start switch.
EC000005
CAUTION:@ See starting instructions prior to
starting the engine. @
EAU00152
Clutch leverThe clutch lever is located on the left
handlebar, and the ignition circuit cut-
off system is incorporated in the clutch
lever holder. Pull the clutch lever to the
handlebar to disengage the clutch, and
release the lever to engage the clutch.
The lever should be pulled rapidly and
released slowly for smooth clutch oper-
ation. (Refer to the engine starting pro-
cedures for a description of the ignition
circuit cut-off system.)1. Clutch lever
E_5jc_Functions.fm Page 10 Saturday, October 16, 1999 1:08 PM
Page 58 of 121
PRE-OPERATION CHECKS
5-2
5
NOTE:Pre-operation checks should be made each time the motorcycle is used. Such an inspection can be thoroughly accom-
plished in a very short time; and the added safety it assures is more than worth the time involved.
WARNING
If any item in the PRE-OPERATION CHECK is not working properly, have it inspected and repaired before operating
the motorcycle.Chassis fasteners• Make sure that all nuts, bolts and screws are properly tightened.
• Tighten if necessary.—
Fuel• Check fuel level.
• Fill with fuel if necessary.3-12 ~ 3-13
Lights, signals and
switches• Check for proper operation. 7-32 ~ 7-34 ITEM CHECKS PAGE
E_5jc_Preop.fm Page 2 Saturday, October 16, 1999 1:10 PM