2000 DODGE NEON turn signal bulb
[x] Cancel search: turn signal bulbPage 316 of 1285
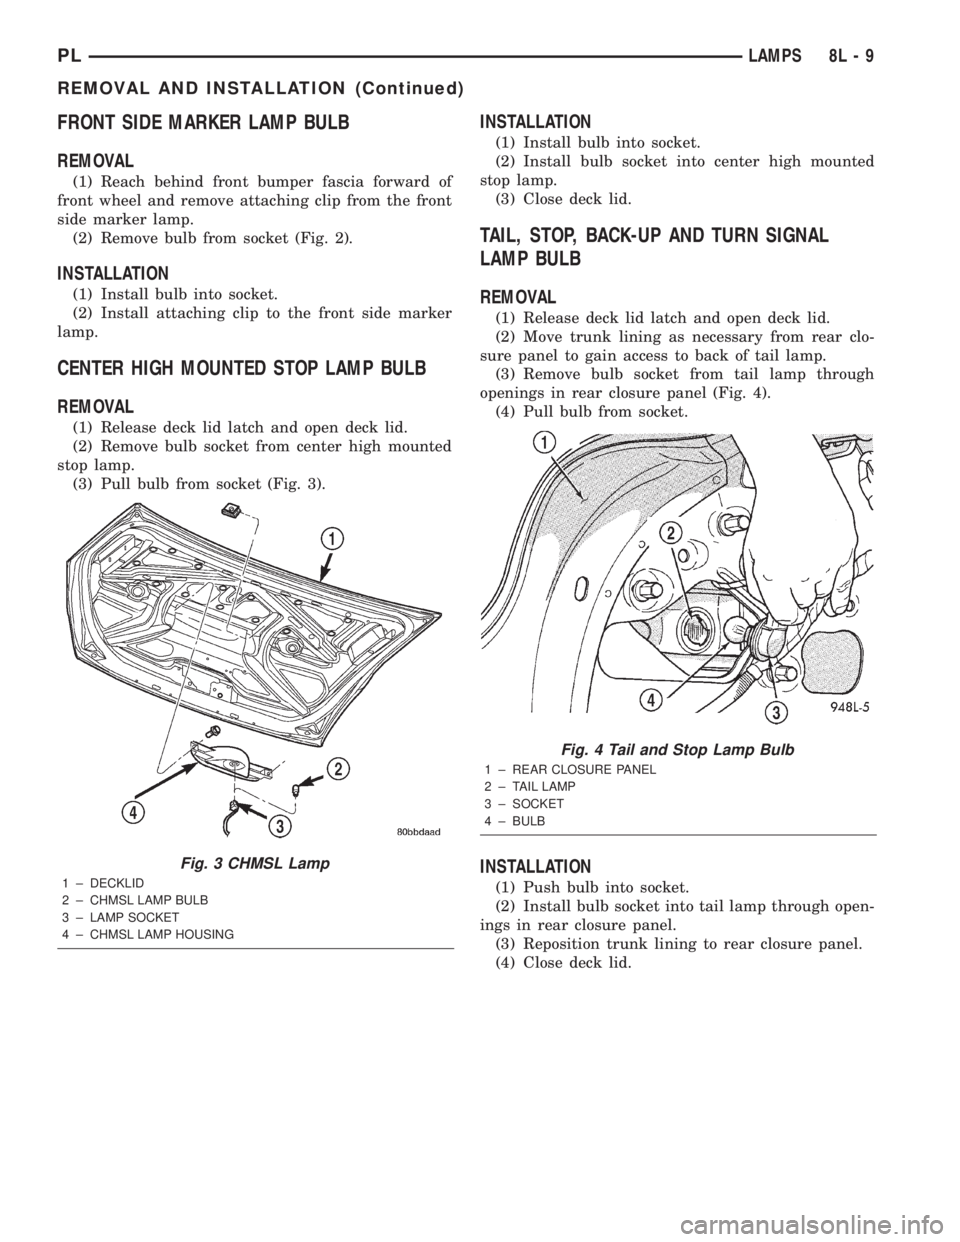
FRONT SIDE MARKER LAMP BULB
REMOVAL
(1) Reach behind front bumper fascia forward of
front wheel and remove attaching clip from the front
side marker lamp.
(2) Remove bulb from socket (Fig. 2).
INSTALLATION
(1) Install bulb into socket.
(2) Install attaching clip to the front side marker
lamp.
CENTER HIGH MOUNTED STOP LAMP BULB
REMOVAL
(1) Release deck lid latch and open deck lid.
(2) Remove bulb socket from center high mounted
stop lamp.
(3) Pull bulb from socket (Fig. 3).
INSTALLATION
(1) Install bulb into socket.
(2) Install bulb socket into center high mounted
stop lamp.
(3) Close deck lid.
TAIL, STOP, BACK-UP AND TURN SIGNAL
LAMP BULB
REMOVAL
(1) Release deck lid latch and open deck lid.
(2) Move trunk lining as necessary from rear clo-
sure panel to gain access to back of tail lamp.
(3) Remove bulb socket from tail lamp through
openings in rear closure panel (Fig. 4).
(4) Pull bulb from socket.
INSTALLATION
(1) Push bulb into socket.
(2) Install bulb socket into tail lamp through open-
ings in rear closure panel.
(3) Reposition trunk lining to rear closure panel.
(4) Close deck lid.
Fig. 3 CHMSL Lamp
1 ± DECKLID
2 ± CHMSL LAMP BULB
3 ± LAMP SOCKET
4 ± CHMSL LAMP HOUSING
Fig. 4 Tail and Stop Lamp Bulb
1 ± REAR CLOSURE PANEL
2 ± TAIL LAMP
3 ± SOCKET
4 ± BULB
PLLAMPS 8L - 9
REMOVAL AND INSTALLATION (Continued)
Page 319 of 1285
LAMP SERVICE
TABLE OF CONTENTS
page page
DESCRIPTION AND OPERATION
LAMP ASSEMBLIES.......................12
REMOVAL AND INSTALLATION
HEADLAMP MODULE.....................12
FOG LAMP..............................13
PARK AND TURN SIGNAL LAMP BULB........13
FRONT SIDE MARKER LAMP...............13
CENTER HIGH MOUNTED STOP LAMP
(CHMSL)..............................14TAIL, STOP AND TURN SIGNAL LAMP........14
LICENSE PLATE LAMP....................14
UNDERHOOD LAMP......................14
REAR CARGO LAMP......................15
DOME LAMP............................15
GLOVE BOX LAMP BULB..................15
FLOOR CONSOLE LAMP BULB..............15
VISOR VANITY LAMP......................15
DESCRIPTION AND OPERATION
LAMP ASSEMBLIES
The lamp assemblies or modules generally consist
of a housing, reflector(s) and lens that directs a light
source. Vehicles use many different types of lamps:
²Headlamp
²Fog Lamp
²Tail Lamp
²Stop Lamp
²Turn Signal Lamp
²Back up Lamp
²Dome Lamp
²Transaxle Range Indicator Lamp (PRNDL)
²Glove Box Lamp
²Floor Console Lamp
²Rear Cargo Lamp
²Visor Vanity Lamp
²Underhood Lamp
²etc.
REMOVAL AND INSTALLATION
HEADLAMP MODULE
REMOVAL
(1) Release hood latch and open hood.
(2) Remove screws attaching headlamp module to
upper crossmember.
(3) Remove headlamp module from vehicle.
(4) Disconnect wire connectors from back of head-
lamp module.
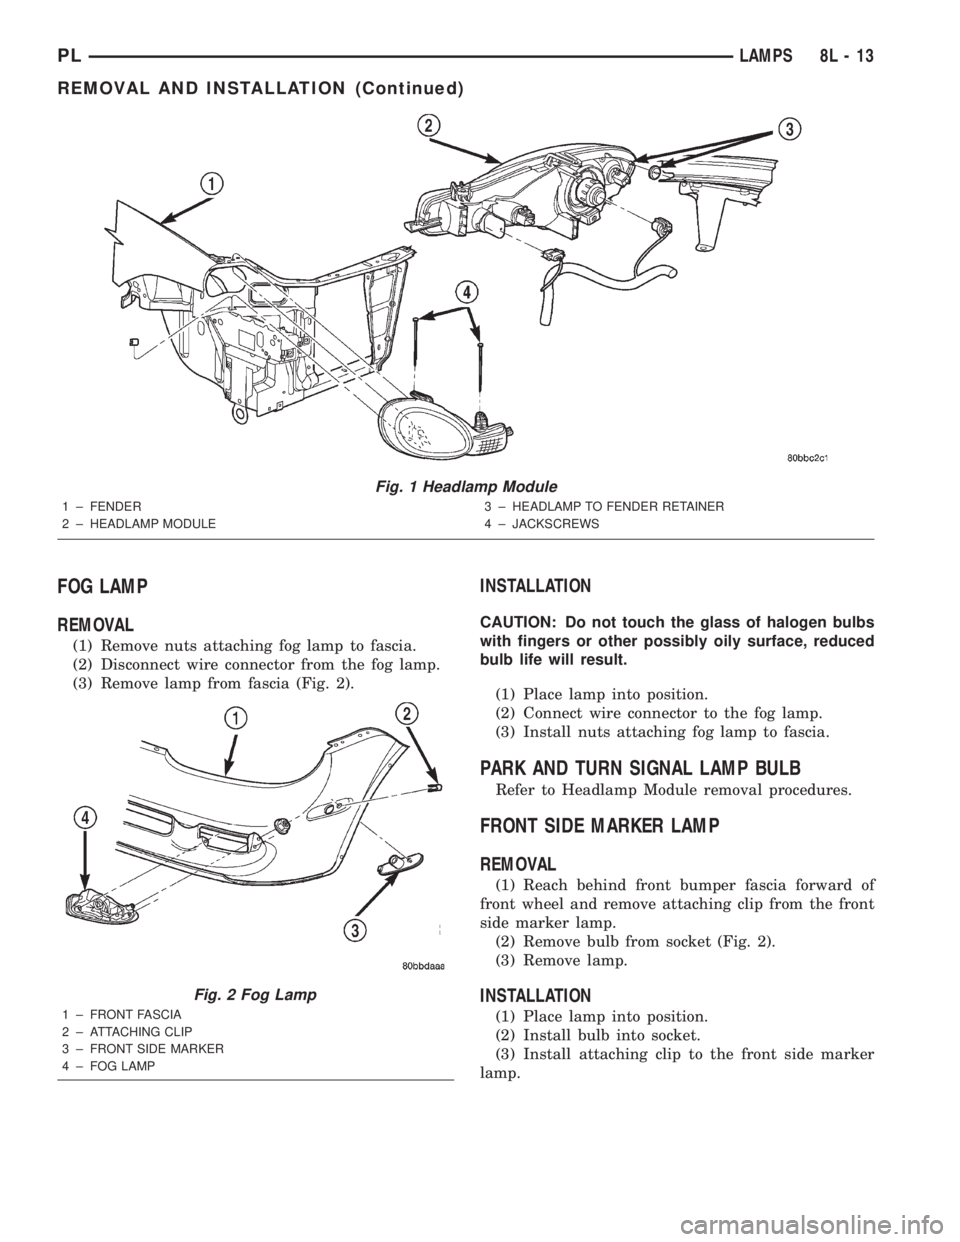
(5) Remove headlamp module (Fig. 1).
INSTALLATION
CAUTION: Do not touch the glass of halogen bulbs
with fingers or other possibly oily surface, reduced
bulb life will result.
(1) Connect wire connectors to the back of head-
lamp module.
(2) Place headlamp module in position.
(3) Install screws attaching headlamp module to
upper crossmember.
(4) Close hood.
8L - 12 LAMPSPL
Page 320 of 1285
FOG LAMP
REMOVAL
(1) Remove nuts attaching fog lamp to fascia.
(2) Disconnect wire connector from the fog lamp.
(3) Remove lamp from fascia (Fig. 2).
INSTALLATION
CAUTION: Do not touch the glass of halogen bulbs
with fingers or other possibly oily surface, reduced
bulb life will result.
(1) Place lamp into position.
(2) Connect wire connector to the fog lamp.
(3) Install nuts attaching fog lamp to fascia.
PARK AND TURN SIGNAL LAMP BULB
Refer to Headlamp Module removal procedures.
FRONT SIDE MARKER LAMP
REMOVAL
(1) Reach behind front bumper fascia forward of
front wheel and remove attaching clip from the front
side marker lamp.
(2) Remove bulb from socket (Fig. 2).
(3) Remove lamp.
INSTALLATION
(1) Place lamp into position.
(2) Install bulb into socket.
(3) Install attaching clip to the front side marker
lamp.
Fig. 1 Headlamp Module
1 ± FENDER
2 ± HEADLAMP MODULE3 ± HEADLAMP TO FENDER RETAINER
4 ± JACKSCREWS
Fig. 2 Fog Lamp
1 ± FRONT FASCIA
2 ± ATTACHING CLIP
3 ± FRONT SIDE MARKER
4 ± FOG LAMP
PLLAMPS 8L - 13
REMOVAL AND INSTALLATION (Continued)
Page 321 of 1285
CENTER HIGH MOUNTED STOP LAMP
(CHMSL)
REMOVAL
(1) Release deck lid latch and open deck lid.
(2) Remove socket and bulb from lamp.
(3) Remove screws attaching center high mounted
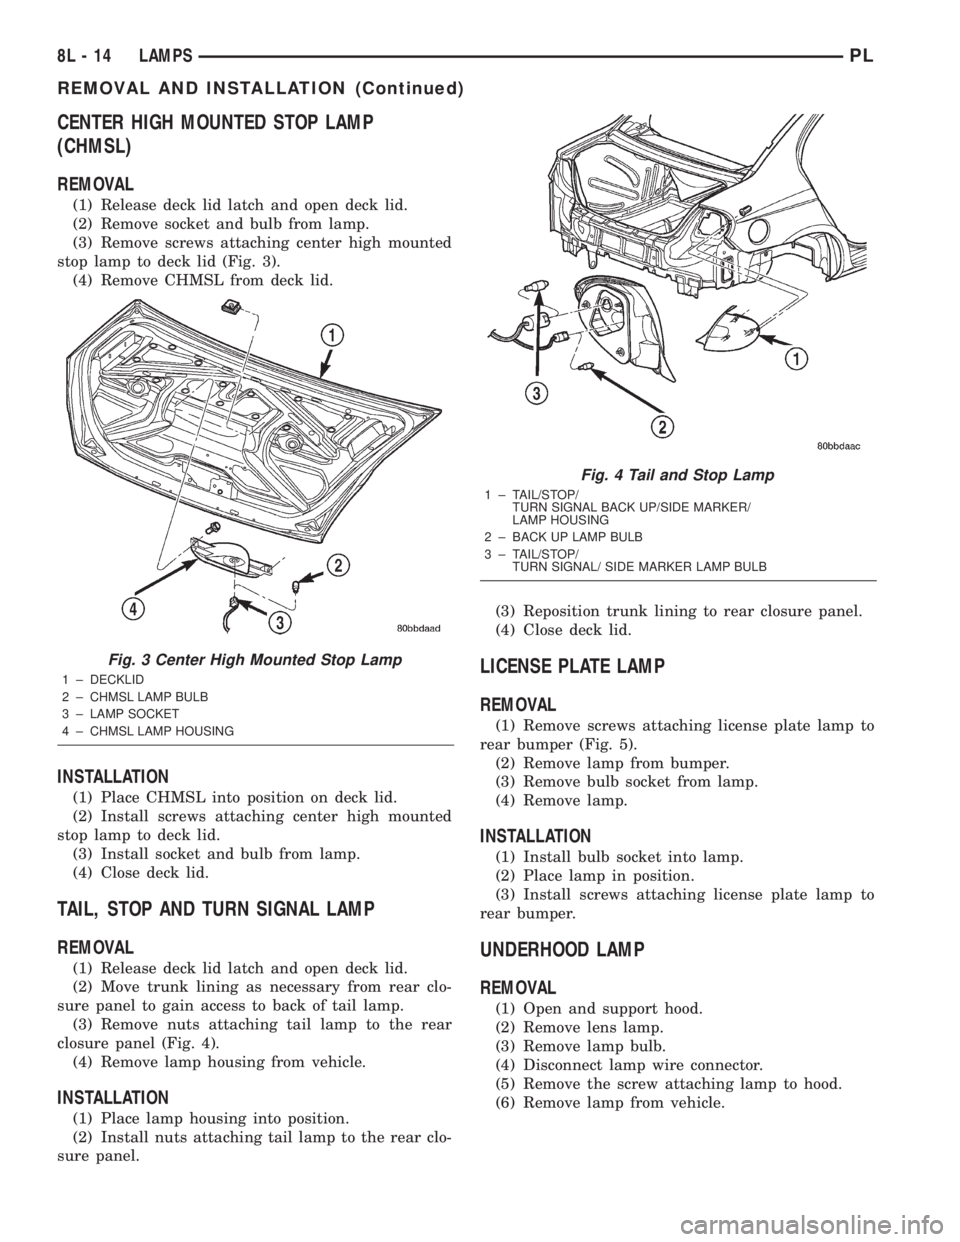
stop lamp to deck lid (Fig. 3).
(4) Remove CHMSL from deck lid.
INSTALLATION
(1) Place CHMSL into position on deck lid.
(2) Install screws attaching center high mounted
stop lamp to deck lid.
(3) Install socket and bulb from lamp.
(4) Close deck lid.
TAIL, STOP AND TURN SIGNAL LAMP
REMOVAL
(1) Release deck lid latch and open deck lid.
(2) Move trunk lining as necessary from rear clo-
sure panel to gain access to back of tail lamp.
(3) Remove nuts attaching tail lamp to the rear
closure panel (Fig. 4).
(4) Remove lamp housing from vehicle.
INSTALLATION
(1) Place lamp housing into position.
(2) Install nuts attaching tail lamp to the rear clo-
sure panel.(3) Reposition trunk lining to rear closure panel.
(4) Close deck lid.
LICENSE PLATE LAMP
REMOVAL
(1) Remove screws attaching license plate lamp to
rear bumper (Fig. 5).
(2) Remove lamp from bumper.
(3) Remove bulb socket from lamp.
(4) Remove lamp.
INSTALLATION
(1) Install bulb socket into lamp.
(2) Place lamp in position.
(3) Install screws attaching license plate lamp to
rear bumper.
UNDERHOOD LAMP
REMOVAL
(1) Open and support hood.
(2) Remove lens lamp.
(3) Remove lamp bulb.
(4) Disconnect lamp wire connector.
(5) Remove the screw attaching lamp to hood.
(6) Remove lamp from vehicle.
Fig. 3 Center High Mounted Stop Lamp
1 ± DECKLID
2 ± CHMSL LAMP BULB
3 ± LAMP SOCKET
4 ± CHMSL LAMP HOUSING
Fig. 4 Tail and Stop Lamp
1 ± TAIL/STOP/
TURN SIGNAL BACK UP/SIDE MARKER/
LAMP HOUSING
2 ± BACK UP LAMP BULB
3 ± TAIL/STOP/
TURN SIGNAL/ SIDE MARKER LAMP BULB
8L - 14 LAMPSPL
REMOVAL AND INSTALLATION (Continued)
Page 324 of 1285
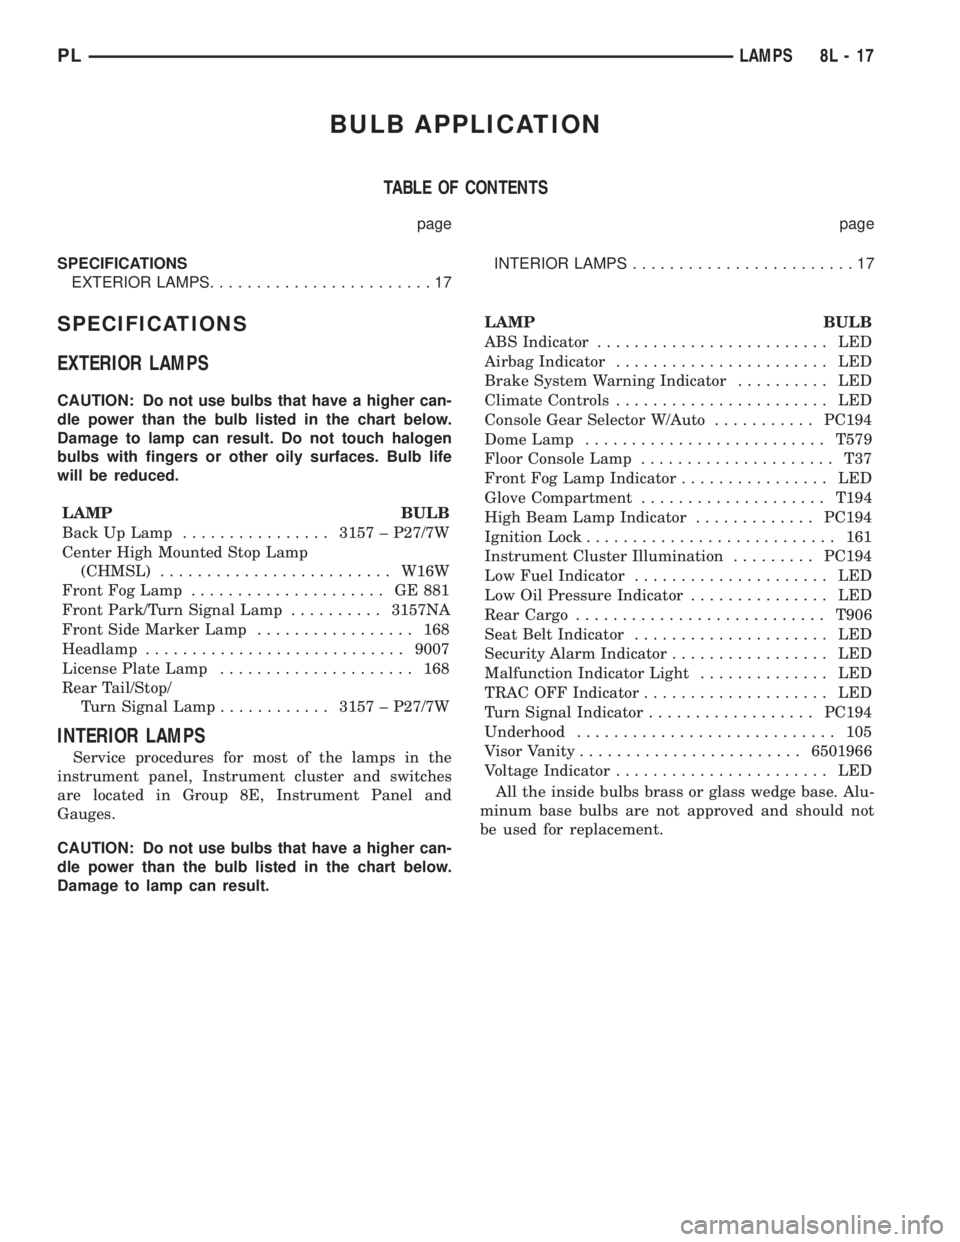
BULB APPLICATION
TABLE OF CONTENTS
page page
SPECIFICATIONS
EXTERIOR LAMPS........................17INTERIOR LAMPS........................17
SPECIFICATIONS
EXTERIOR LAMPS
CAUTION: Do not use bulbs that have a higher can-
dle power than the bulb listed in the chart below.
Damage to lamp can result. Do not touch halogen
bulbs with fingers or other oily surfaces. Bulb life
will be reduced.
LAMP BULB
Back Up Lamp................3157 ± P27/7W
Center High Mounted Stop Lamp
(CHMSL).........................W16W
Front Fog Lamp..................... GE881
Front Park/Turn Signal Lamp..........3157NA
Front Side Marker Lamp................. 168
Headlamp............................9007
License Plate Lamp..................... 168
Rear Tail/Stop/
Turn Signal Lamp............3157 ± P27/7W
INTERIOR LAMPS
Service procedures for most of the lamps in the
instrument panel, Instrument cluster and switches
are located in Group 8E, Instrument Panel and
Gauges.
CAUTION: Do not use bulbs that have a higher can-
dle power than the bulb listed in the chart below.
Damage to lamp can result.LAMP BULB
ABS Indicator......................... LED
Airbag Indicator....................... LED
Brake System Warning Indicator.......... LED
Climate Controls....................... LED
Console Gear Selector W/Auto...........PC194
Dome Lamp..........................T579
Floor Console Lamp..................... T37
Front Fog Lamp Indicator................ LED
Glove Compartment....................T194
High Beam Lamp Indicator.............PC194
Ignition Lock........................... 161
Instrument Cluster Illumination.........PC194
Low Fuel Indicator..................... LED
Low Oil Pressure Indicator............... LED
Rear Cargo...........................T906
Seat Belt Indicator..................... LED
Security Alarm Indicator................. LED
Malfunction Indicator Light.............. LED
TRAC OFF Indicator.................... LED
Turn Signal Indicator..................PC194
Underhood............................ 105
Visor Vanity........................6501966
Voltage Indicator....................... LED
All the inside bulbs brass or glass wedge base. Alu-
minum base bulbs are not approved and should not
be used for replacement.
PLLAMPS 8L - 17
Page 329 of 1285
LAMP BULB SERVICE
TABLE OF CONTENTS
page page
REMOVAL AND INSTALLATION
CENTER HIGH MOUNTED STOP LAMP BULB....4
FRONT TURN SIGNAL LAMP BULB............4
FRONT POSITION LAMP BULB...............5
FRONT FOG LAMP BULB...................6
HEADLAMP BULB.........................6REAR LICENSE PLATE LAMP BULBS..........7
REAR FOG LAMP BULB....................8
SIDE REPEATER LAMP BULB................9
TAIL, STOP, BACK-UP AND TURN SIGNAL
LAMP BULBS..........................10
REMOVAL AND INSTALLATION
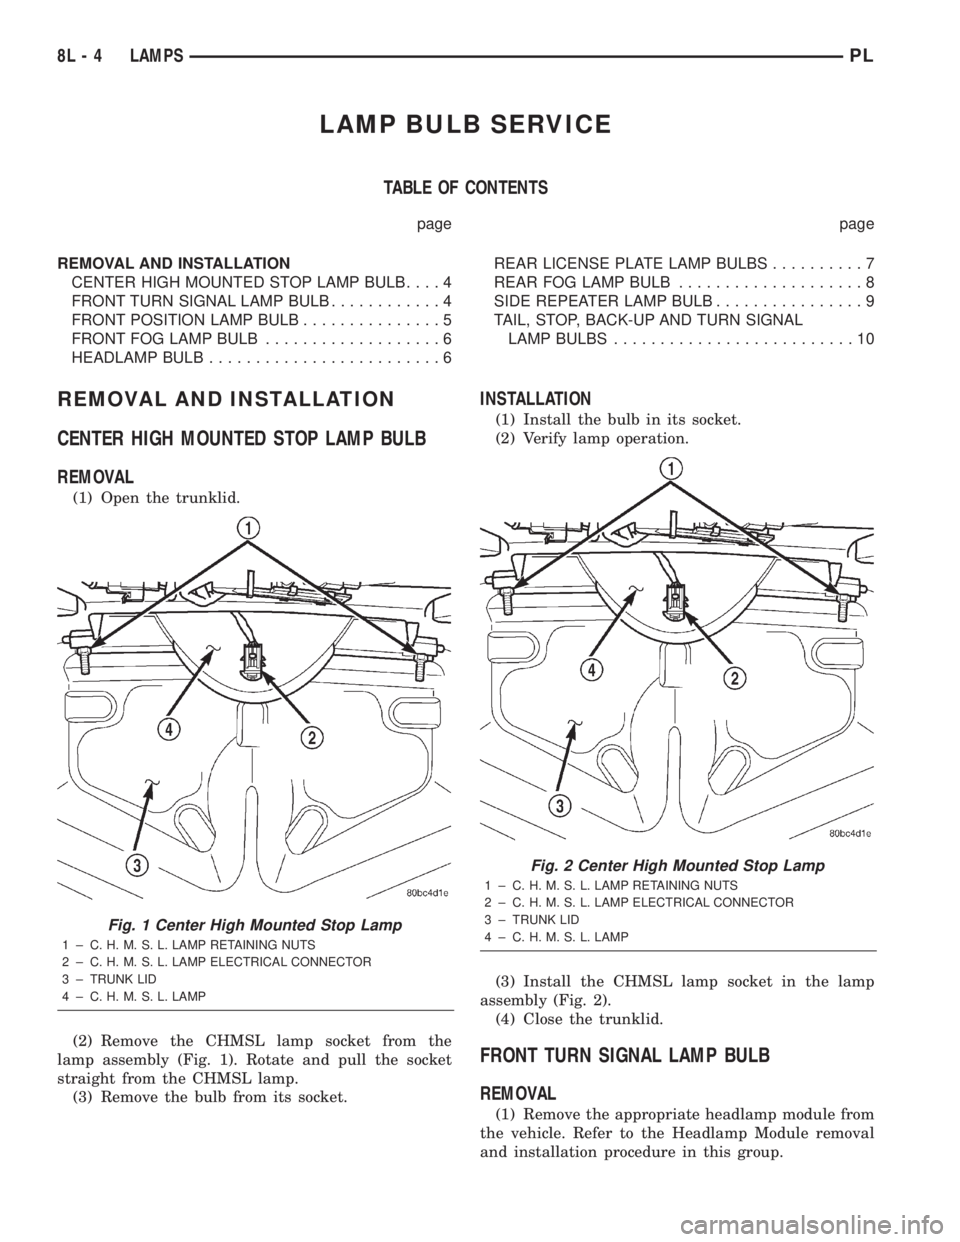
CENTER HIGH MOUNTED STOP LAMP BULB
REMOVAL
(1) Open the trunklid.
(2) Remove the CHMSL lamp socket from the
lamp assembly (Fig. 1). Rotate and pull the socket
straight from the CHMSL lamp.
(3) Remove the bulb from its socket.
INSTALLATION
(1) Install the bulb in its socket.
(2) Verify lamp operation.
(3) Install the CHMSL lamp socket in the lamp
assembly (Fig. 2).
(4) Close the trunklid.
FRONT TURN SIGNAL LAMP BULB
REMOVAL
(1) Remove the appropriate headlamp module from
the vehicle. Refer to the Headlamp Module removal
and installation procedure in this group.
Fig. 1 Center High Mounted Stop Lamp
1 ± C. H. M. S. L. LAMP RETAINING NUTS
2 ± C. H. M. S. L. LAMP ELECTRICAL CONNECTOR
3 ± TRUNK LID
4 ± C. H. M. S. L. LAMP
Fig. 2 Center High Mounted Stop Lamp
1 ± C. H. M. S. L. LAMP RETAINING NUTS
2 ± C. H. M. S. L. LAMP ELECTRICAL CONNECTOR
3 ± TRUNK LID
4 ± C. H. M. S. L. LAMP
8L - 4 LAMPSPL
Page 330 of 1285
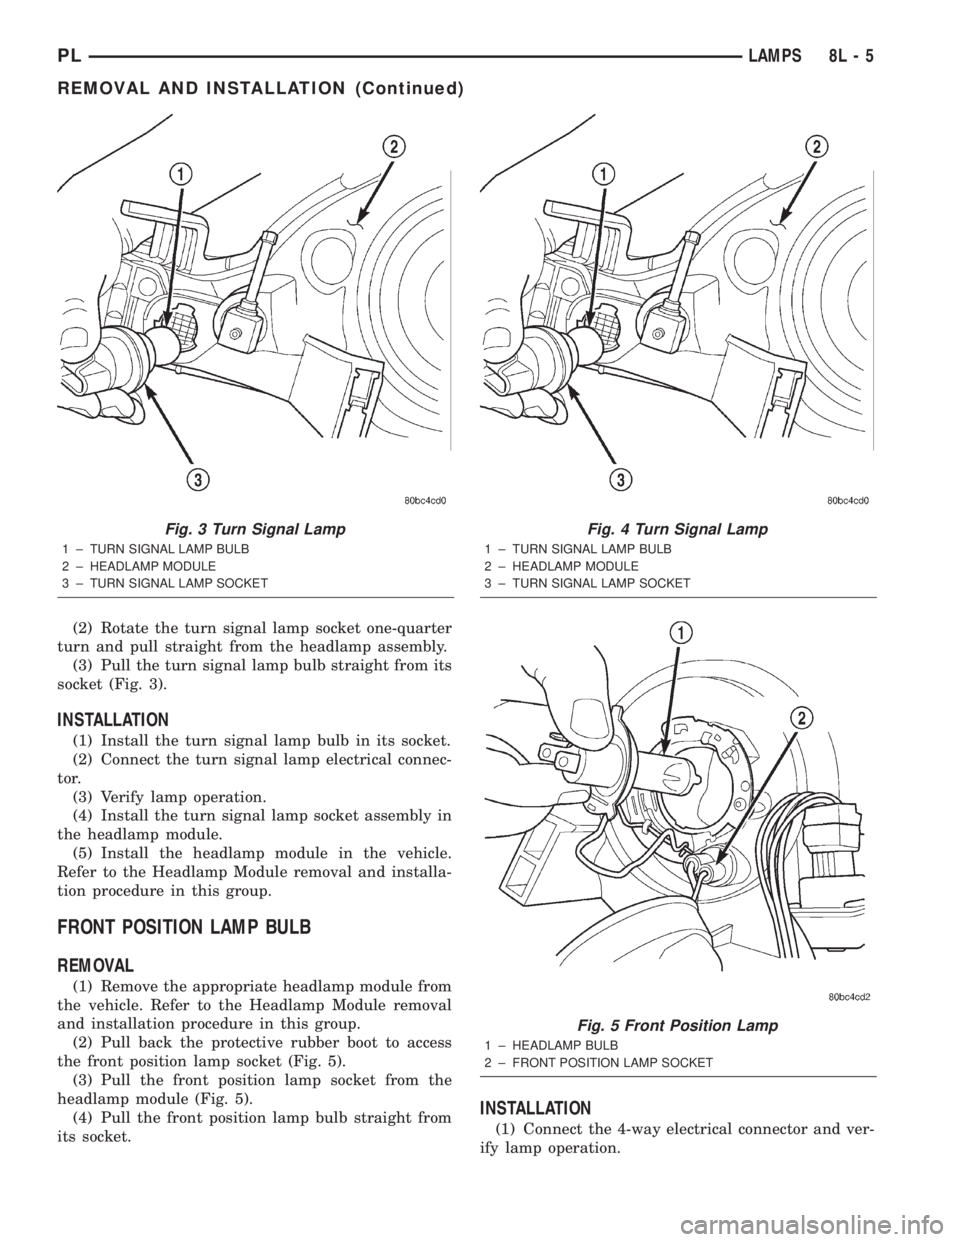
(2) Rotate the turn signal lamp socket one-quarter
turn and pull straight from the headlamp assembly.
(3) Pull the turn signal lamp bulb straight from its
socket (Fig. 3).
INSTALLATION
(1) Install the turn signal lamp bulb in its socket.
(2) Connect the turn signal lamp electrical connec-
tor.
(3) Verify lamp operation.
(4) Install the turn signal lamp socket assembly in
the headlamp module.
(5) Install the headlamp module in the vehicle.
Refer to the Headlamp Module removal and installa-
tion procedure in this group.
FRONT POSITION LAMP BULB
REMOVAL
(1) Remove the appropriate headlamp module from
the vehicle. Refer to the Headlamp Module removal
and installation procedure in this group.
(2) Pull back the protective rubber boot to access
the front position lamp socket (Fig. 5).
(3) Pull the front position lamp socket from the
headlamp module (Fig. 5).
(4) Pull the front position lamp bulb straight from
its socket.
INSTALLATION
(1) Connect the 4-way electrical connector and ver-
ify lamp operation.
Fig. 3 Turn Signal Lamp
1 ± TURN SIGNAL LAMP BULB
2 ± HEADLAMP MODULE
3 ± TURN SIGNAL LAMP SOCKET
Fig. 4 Turn Signal Lamp
1 ± TURN SIGNAL LAMP BULB
2 ± HEADLAMP MODULE
3 ± TURN SIGNAL LAMP SOCKET
Fig. 5 Front Position Lamp
1 ± HEADLAMP BULB
2 ± FRONT POSITION LAMP SOCKET
PLLAMPS 8L - 5
REMOVAL AND INSTALLATION (Continued)
Page 335 of 1285
INSTALLATION
(1) Install the side repeater lamp bulb in its
socket.
(2) Verify lamp operation.
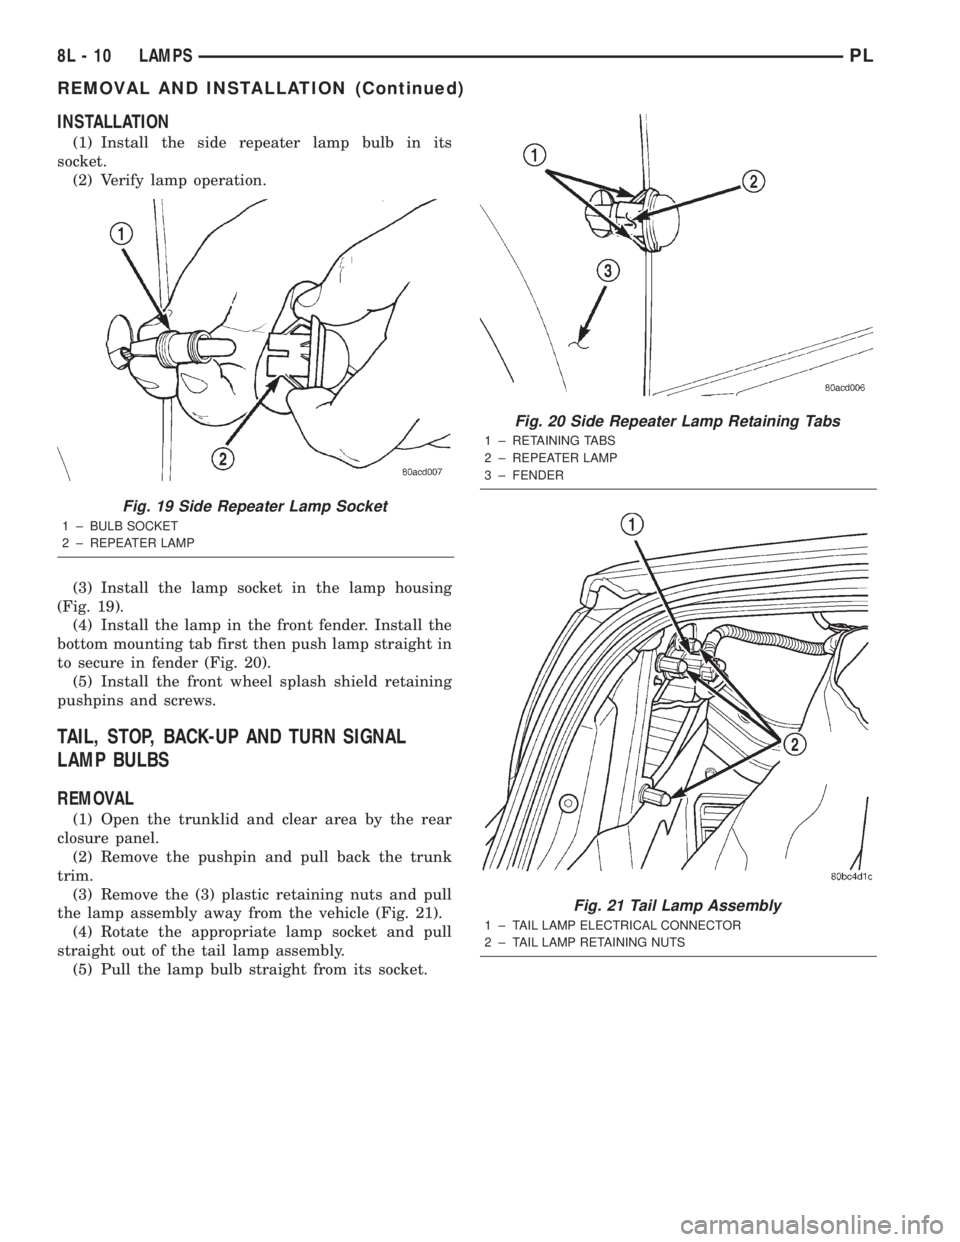
(3) Install the lamp socket in the lamp housing
(Fig. 19).
(4) Install the lamp in the front fender. Install the
bottom mounting tab first then push lamp straight in
to secure in fender (Fig. 20).
(5) Install the front wheel splash shield retaining
pushpins and screws.
TAIL, STOP, BACK-UP AND TURN SIGNAL
LAMP BULBS
REMOVAL
(1) Open the trunklid and clear area by the rear
closure panel.
(2) Remove the pushpin and pull back the trunk
trim.
(3) Remove the (3) plastic retaining nuts and pull
the lamp assembly away from the vehicle (Fig. 21).
(4) Rotate the appropriate lamp socket and pull
straight out of the tail lamp assembly.
(5) Pull the lamp bulb straight from its socket.
Fig. 19 Side Repeater Lamp Socket
1 ± BULB SOCKET
2 ± REPEATER LAMP
Fig. 20 Side Repeater Lamp Retaining Tabs
1 ± RETAINING TABS
2 ± REPEATER LAMP
3 ± FENDER
Fig. 21 Tail Lamp Assembly
1 ± TAIL LAMP ELECTRICAL CONNECTOR
2 ± TAIL LAMP RETAINING NUTS
8L - 10 LAMPSPL
REMOVAL AND INSTALLATION (Continued)