Page 65 of 96
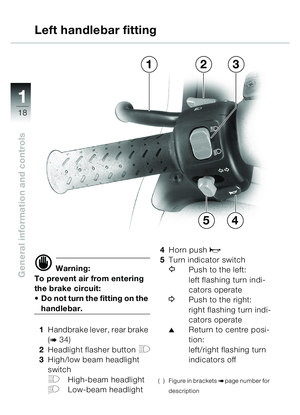
33
63
Starting – Riding – Parking
Running in
Running in new tyres
d Warning:
New tyres have a smooth sur-
face. This must be roughened
by riding in a restrained man-
ner at various heel angles
until the tyres are run in.
This running in procedure is
essential if the tyres are to
reach their maximum level of
grip.
Running in new brake
pads
d Warning:
New brake pads must “bed
down” and therefore do not
achieve their optimum friction
levels during the first 500 km
(approx. 300 miles).
This slight initial reduction in
braking efficiency can be
compensated for by exerting
greater pressure on the lever.
Try to avoid all unnecessary
hard braking applications
during this initial period.
gg ,
Page 66 of 96
 33
64
Starting – Riding – Parking
Seat belt
d Warning:
Always follow these instruc-
tions on how to use the seat
belt, as otherwise your safety
is affected and the belts abil-
ity to protect y")
33
64
Starting – Riding – Parking
Seat belt
d Warning:
Always follow these instruc-
tions on how to use the seat
belt, as otherwise your safety
is affected and the belt's abil-
ity to protect you is restricted:
Always fasten both seat
belts before pulling away
from rest.
Make sure that both seat
belts are not twisted and
that they are seated snugly
over your shoulders and
pelvis
Make sure that the belts do
not pass over hard or fragile
objects (spectacles, ball-
point pen, etc.)
Make sure that the seat
belts do not pass across
your neck, that they are not
trapped and that they can-
not rub against sharp edges
d Warning:
Always wear the seat belt as
snugly as possible. Avoid
bulky clothing and remem-
ber to pull the belt tight at
frequent intervals. If the belt
were slack the lap belt
could slide over your hips in
a head-on collision and
injury your lower body. In
addition, the restraining
effect diminishes if the seat
belt is slack.
Pregnant women riders
should also wear the seat
belt, making sure that the
lap belt is well down on the
hips and does not press on
the abdominal region.
�� �
Page 67 of 96
 33
65
Starting – Riding – Parking
Seat belt
d Warning:
Keep the seat-belt straps
clean at all times, because
foreign-matter accretions
can impair operation of the
inertia-reel mechanism.
")
33
65
Starting – Riding – Parking
Seat belt
d Warning:
Keep the seat-belt straps
clean at all times, because
foreign-matter accretions
can impair operation of the
inertia-reel mechanism.
Make sure that the belt
buckles are not clogged
with foreign matter (paper
or the like), as otherwise the
belt tongues will not
engage.
If the vehicle is involved in
an accident or if the belt
webbing, the connections,
the inertia reel or the belt
buckle is damaged, have
the seat belt in question
replaced and the belt
anchorages checked by a
specialist workshop, prefer-
ably an authorised
BMW dealer.
Important notes on using
the restraint system
In extremely severe weather
conditions and/or on account of
other influences (vehicle is
washed and a frosty night, for
example) individual belt compo-
nents might fail to function cor-
rectly. If this happens (belt
buckle frozen, or similar occur-
rence), do not under any cir-
cumstances use a heat source
to thaw the belt buckle or any
other part of the restraint
system/vehicle.
The use of BMW-approved de-
icers, however, is permitted.
Make sure that the seat belt
does not come into contact
with sharp objects which could
damage it.
If foreign matter causes the belt
buckle to malfunction, have the
fault rectified immediately by a
specialist workshop, preferably
an authorised BMW dealer.
�� �
Page 68 of 96
33
66
Starting – Riding – ParkingFastening the seat belts
\f Note:
Always fasten the lap-and-
shoulder belt first, then the
shoulder belt.
A steady pull causes the belts
to unreel, allowing you full free-
dom of movement. Sudden
braking, however, causes the
belt reels to lock.
The reels might also lock if you
ride on cobblestones or hit a
pothole.d Warning:
Make sure that both belts are
positioned about the middle
of your shoulders – never over
your neck – and that they are
snug against your torso.
Make sure that the lap belt
passes over your pelvis – not
your stomach – and that it is
snug.
If necessary, pull the belt
run over your upper body
toward your shoulder
Seat belt
�� �
Page 69 of 96
33
67
Starting – Riding – Parking
Seat belt
Special notes on using
seat belts in conjunction
with a crash helmet
L Note:
The following applies in Germa-
ny, Belgium, France, Italy, Aus-
tria, Portugal, Switzerland,
Spain and Turkey:
You are not freed from your
statutory obligation to wear a
crash helmet unless both seat
belts are fastened.
We recommend that you always
ride with both seat belts
correctly fastened.
National legislation applies in
these and in all other countries.
L Note:
The passenger is not integrated
into the safety concept of the
BMW C1, which means that
– the passenger must always wear a crash helmet.
– the passenger should wear suitable protective clothing.
�� �
Page 70 of 96
 33
68
Starting – Riding – Parking
Seat belt
\f Note:
You must fasten both seat
belts:
– before you can pull away
– The red indicator light
1 in
the instrument cluster goes
out
Fastening")
33
68
Starting – Riding – Parking
Seat belt
\f Note:
You must fasten both seat
belts:
– before you can pull away
– The red indicator light
1 in
the instrument cluster goes
out
Fastening the lap-and-
shoulder belt
Hold the tongue of the belt
and pull it slowly and steadily
over your torso and lap to the
belt buckle on the right-hand
side
Push the tongue into the right
buckle until it engages with an
audible click ( tug the belt
sharply to check! )
Fastening the shoulder
belt
Hold the tongue of the belt
and pull it slowly and steadily
over your torso to the belt
buckle on the left-hand side
Push the tongue into the left
buckle until it engages with an
audible click ( tug the belt
sharply to check! )
Releasing the seat beltsRelease the seat belts one at a
time:
Hold the belt with one hand
Press the red button on the
belt buckle
– The spring-loaded tongue
snaps out of the buckle
Allow the reel to roll up the
belt slowly
The red indicator light
1 in
the instrument cluster lights
up
�� �
Page 71 of 96
33
69
Starting – Riding – Parking
Central belt releaseThe red lever 1 on the handle-
bar releases both belts at the
same time. This is useful, for
example, in the event of an
accident, if the belt buckle is
awkward to reach!
\f Note:
Both buckles disengage at the
same time.
Take a grip on the two belts
Pull the red lever 1 on the
handlebar
– The spring-loaded tongues
snap out of their buckles
The belts slowly rewind onto
the reels
The red indicator light 1 in
the instrument cluster lights
up
Seat belt
1
�� �
Page 72 of 96
33
70
Starting – Riding – ParkingIn an emergency only:
• Move switch 1 to the
V
position.
– The electrical circuits for the BMS engine management
system, fuel pump and starter
motor are deenergised
Switching on the ignition– Kill switch 1 in the run
position
U
Deactivate the alarm system* (
bRider's Manual, optional
accessories) The ignition switch should
be ON
N (b15)
– The following warning lights
are on:
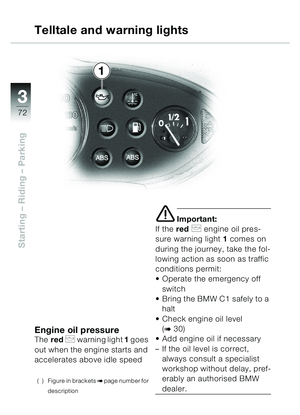
– Engine oil pressure
p
(
b72)
–Coolant temperature
j,
goes out after
approx. 5 sec (
b73)
– Fuel level
m (b73)
– ABS telltale lights* go out when the self-test com-
pletes successfully (
b79)
*Optional extra
( ) Figure in brackets
bpage number for
description
Before you start
V
U
1
�� �


 33
63
Starting – Riding – Parking
Running in
Running in new tyres
d Warning:
New tyres have a smooth sur-
face. This must be roughened
by riding in a restrained man-
ner at various heel angles
u")
 33
66
Starting – Riding – ParkingFastening the seat belts
\f Note:
Always fasten the lap-and-
shoulder belt first, then the
shoulder belt.
A steady pull causes the belts
to unreel, allowing you")
 33
67
Starting – Riding – Parking
Seat belt
Special notes on using
seat belts in conjunction
with a crash helmet
L Note:
The following applies in Germa-
ny, Belgium, France, Italy, Aus-
tria, Po")
 33
69
Starting – Riding – Parking
Central belt releaseThe red lever 1 on the handle-
bar releases both belts at the
same time. This is useful, for
example, in the event of an
accident, if the")
 33
70
Starting – Riding – ParkingIn an emergency only:
• Move switch 1 to the
V
position.
– The electrical circuits for the BMS engine management
system, fuel pump and starter
motor are d")