Page 25 of 96
111
23
General information and controls
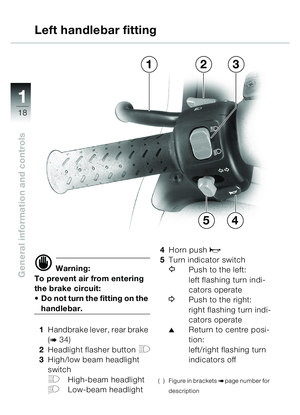
Removing backrestOpen the seat
Remove screws 1 securing
the backrest
Push the backrest up and
forwards to remove
– The coolant tank,
toolkit and
fuse box are behind the back-
rest. Instructions on topping
up coolant and replacing
fuses (
bService and Techni-
cal Booklet - Chapter 2)
e Important:
When installing the backrest,
make sure that it is securely
located.
d Warning:
Do not trap the seat belt be-
hind the backrest.
Installing backrest Engage the hooks in their
keepers
Press the backrest back and
down
Check that the seat belts are
not trapped
Install screws 1
Check that the backrest is
secure
Close the seat
( ) Figure in bracketsbpage number for
description
Backrest
1
�� �
Page 26 of 96
11
24
General information and controls
Hardtop*
d Warning:
To avoid trapping your fingers
when closing the hardtop:
Carefully press strut 1 of the
hardtop forward!
Hardtop, opening/closingPull latch 4 to the rear and lift
hardtop 2 to open
Close the hardtop as follows:
Carefully press strut 1 forward
and pull hardtop down to close
Check that the hardtop is
correctly latched
Hardtop,
removing/installing
Open the hardtop
Pull latch 3 forward and dis-
engage strut 1
Fully open hardtop 2 and lift it
off
Installation is the reverse of
the removal procedure.
*Optional extra
1
4
2
3
�� �
Page 27 of 96
111
25
General information and controls
1
2
A
B
Stowage compartment,
opening/locking
Remove rear seat** (b26) or
luggage system* (
b27), if
installed
Turn key in stowage-com-
partment lock to position 1
Lift the front of the lid up and
to the rear
– The battery and the bulbs for
the rear light and brake light
are accessible. Instructions
on removing/installing the
battery, battery maintenance
and changing bulbs
(
b Service and Technical
Booklet - Chapter 2)
– Documentation
– Repair kit for tubeless tyres
Close the lid
Turn key in stowage-com-
partment lock to position 2
Install rear seat** (
b26) or
luggage system* (
b27), as
applicable
Stowage-compartment
attachment kit*
Mounting points A,B for rear
seat** or luggage system*
*Optional extra
** Optional accessories
( ) Figure in brackets
bpage number for
description
Stowage compartment
�� �
Page 28 of 96
11
26
General information and controls
d Warning:
See the notes on using the
rear seat on pages 67 and 76 !
e Important:
Make sure that the rear seat is
correctly located and secure!
See the notes on installation on
page 55!
Rear seat,
removing/installing
Turn the key in the lock to
position 2 and hold it there
Lift seat 1 up and clear of the
latch
Pull seat 1 to the rear to
remove
Seat installation is the reverse
of the removal procedure
** Optional accessories
( ) Figure in brackets
bpage number for
description
Rear seat**
1
2
A
�� �
Page 29 of 96
111
27
General information and controls
Luggage rack*
d Warning:
After an accident or if the
BMW C1 has fallen over,
check that the luggage sys-
tem is correctly secured.
Max. load on luggage system:
20 kg (44 lbs).
Installing the luggage rack
• Seat the luggage rack in the aperture in the rear of the
backrest
Seat the luggage rack in the rear anchorage
Close handle 1 and secure
with lock 2 to prevent theft
( ) Figure in bracketsbpage number for
description
e Important:
When installing, make sure that
the luggage rack is secure and
correctly engaged and locked!
See the notes on installation on
page 55!
Removing the luggage
rack
Turn the key in lock 2 as indi-
cated by the arrow
Raise handle 1
– The luggage rack is disen- gaged
Hold handle 3 and pull the
luggage rack up and to the
rear to remove
–The stowage compartment is accessible
* Optional extra
321
�� �
Page 30 of 96
2
28
Safety check
Use the safety checklist –
before every journey
Please perform the safety
check accurately. This is to
ensure that your BMW C1 com-
plies with road-vehicle use and
safety laws.
Your vehicle must be in perfect
technical order: this is a basic
prerequisite for your safety and
the safety of other road users.
If you encounter any problems
or difficulties, it is always best to
contact your authorised BMW
dealer. He will provide the nec-
essary advice and assistance. For this reason, check the
details in the following sections
before you start the journey:
–
Coolant level
– Fuel level
– Windscreen wiper
– Handbrake levers
– Brake pressure
– Brake fluid levels
(front and rear)
– Lights
– Condition of wheels and
tyres, tread depth and tyre
pressures
– Load, gross weight
Check at regular intervals
(each 2nd/3rd stop for fuel):
– Engine oil level
– Brake pads
Checklist
�� �
Page 31 of 96
2
29
Safety check
Coolant
Checking coolant level
e Important:
Always keep the fluid level
above the minimum mark. Add
coolant only when the engine is
cold.
Place the BMW C1 on its
stand
– after making sure that the
ground is level and firm
Open the seat
Check coolant level in expan-
sion tank:
MAX Maximum level
MIN Minimum level
( ) Figure in bracketsbpage number for
description
e Important:
Never overfill the expansion
tank.
Top up the coolant if neces-
sary (Service and Technical
Booklet
b 24)
Close the seat
\f Note:
If the expansion tank is full and
coolant temperature is high (as
indicated by red warning light
\b
b 11) or coolant consumption
is excessive, consult a special-
ist workshop, preferably an au-
thorised BMW dealer.
MAX
MIN
�� �
Page 32 of 96
 2
30
Safety check
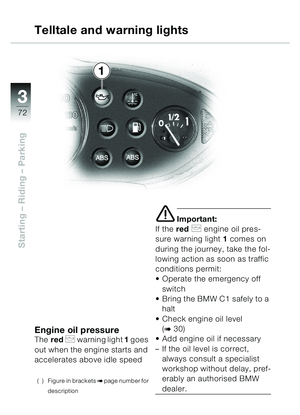
Engine oil
Winter operation
\f Note:
If temperatures under 10 °C per-
sist for lengthy periods and dur-
ing the cold season of the year,
use SAE 5 W-40 engine oil.
( ) Figure in br")
2
30
Safety check
Engine oil
Winter operation
\f Note:
If temperatures under 10 °C per-
sist for lengthy periods and dur-
ing the cold season of the year,
use SAE 5 W-40 engine oil.
( ) Figure in bracketsbpage number for
description
Checking the oil level
e Important:
The red
p (b 11) engine oil
pressure warning light indicates
that the oil pump's delivery rate
is too low: it is not an oil level
indicator. The warning light
goes out after 1-2 seconds,
once oil pressure has built up –
the red
p engine oil pressure
warning light must remain off at
all times when the vehicle is in
motion. Check the oil level reg-
ularly, each time that fuel is
added (or at least every second
time). Always check engine oil
level with the engine at its regu-
lar operating temperature. With
the engine at its regular operat-
ing temperature, wait
approx. 1 minute for the oil to
drain back into the sump.
Checking the oil level just after
the engine has been run or
when it is not properly warm will
falsify the reading and could
lead to the engine being operat-
ed with the wrong quantity of
oil.
�� �


 111
23
General information and controls
Removing backrestOpen the seat
Remove screws 1 securing
the backrest
Push the backrest up and
forwards to remove
– The coolant tank,
toolkit and
fus")
 11
24
General information and controls
Hardtop*
d Warning:
To avoid trapping your fingers
when closing the hardtop:
Carefully press strut 1 of the
hardtop forward!
Hardtop, opening/closingPull la")
 111
25
General information and controls
1
2
A
B
Stowage compartment,
opening/locking
Remove rear seat** (b26) or
luggage system* (
b27), if
installed
Turn key in stowage-com-
partment lock to pos")
 11
26
General information and controls
d Warning:
See the notes on using the
rear seat on pages 67 and 76 !
e Important:
Make sure that the rear seat is
correctly located and secure!
See the notes o")
 111
27
General information and controls
Luggage rack*
d Warning:
After an accident or if the
BMW C1 has fallen over,
check that the luggage sys-
tem is correctly secured.
Max. load on luggage system")
 2
28
Safety check
Use the safety checklist –
before every journey
Please perform the safety
check accurately. This is to
ensure that your BMW C1 com-
plies with road-vehicle use and
safety laws.")
 2
29
Safety check
Coolant
Checking coolant level
e Important:
Always keep the fluid level
above the minimum mark. Add
coolant only when the engine is
cold.
Place the BMW C1 on its
stand
– aft")