2000 AUDI ALLROAD tow
[x] Cancel search: towPage 242 of 306
Radiator
fan
The radiator fan is driven by the engine via
the V-belt. The viscous clutch regulates the
speed of the fan according to the tempera
ture of the coolant.
An auxiliary electric radiator fan switches on
and off depending on coolant temperature
and other vehicle operation conditions.
� WARNING
• Always use extreme caution to
prevent clothing. jewelry, or long
hair from getting caught in the en
gine driven radiator fan, V-belt or
other moving parts.
• Never touch the auxiliary elec
tric radiator fan. The fan can
switch on suddenly and injure you.
Always heed all WA RNINGS
on page 232. Power
steering
Yo ur vehicle is equipped with a Servotro
nic power steering. The degree of
power assistance is regulated electronically
according to road speed.
The fluid reservoir is in the engine compart
ment near the windshield washer container.
The correct fluid level in the reserv oir is im
portant for the proper functioning of power
steer ing.
The power steering fluid level is checked
during the scheduled Maintenance ser
vices.
If the electronic regulating system is not
working properly, this is most noticeable
when turning the steering wheel at low
speeds (for example when parking) -more
effort will be required than usual. The fault
should be rectified by an Audi Dealer as
soon as possible. VEH
ICLE CARE
Note
• When the engine is running, never hold
the steering wheel turned all the way to the
right or to the left for longer than 15 sec
onds. The power steering pump will over
heat the hydraulic fluid if you hold the steer
ing wheel all the way turned.
This will damage the power steering
system.
Each time the steering wheel is turned all
the way to the right or left when stopped,
you will hear noises caused by the severe
stress placed on the power steering pump.
At the same time, engine idle speed drops.
• If the power steering system
should fail, or if the engine is not
running (for example, while being
towed). you will still be able to steer
the vehicle, however. more effort
will be required.
• If the power steering system should
have a leak, or is not functioning properly,
contact your authorized Audi Dealer imme
diately.
241
Page 252 of 306
Wiper
blades
Wiper blades must be in good condition so
that you can see clearly through the wind
shield.
Clean your wiper blades regularly with a
windshield washer solution to prevent
streaking. If the blades are very dirty, for ex
ample with insects, carefully clean the
blades with a sponge or a soft brush.
If the wiper blades begin to streak t �e wind
shield, this could be caused by resrdue left
on the windshield by automatic car washes.
Fill the windshield washer container with a
special solution available at yo�r authorized
Audi Dealer to remove the resrdue.
To prevent damage to the wiping
sys tem, always loosen blades frozen
to glass before operating wipers.
Be sure to inspect the condition of your
wiper blades regularly. For safety reasons,
replace your wiper blades once o; twrce a
year if necessary. See your authonzed Audr
Dealer for replacement blades. Notes
• Commercial hot waxes applied by
automatic car washes affect the
cleanability of the windshield.
• To prevent damage to wiper
blades, do not use gasoline, kero
sene, paint thinner, or other sol
vents on or near the wiper blades.
• To prevent damage to the wiper
arms or other components, do not
attempt to move the wipers by hand. VE
HICL E CA RE
Replacing wiper blades
Removi ng
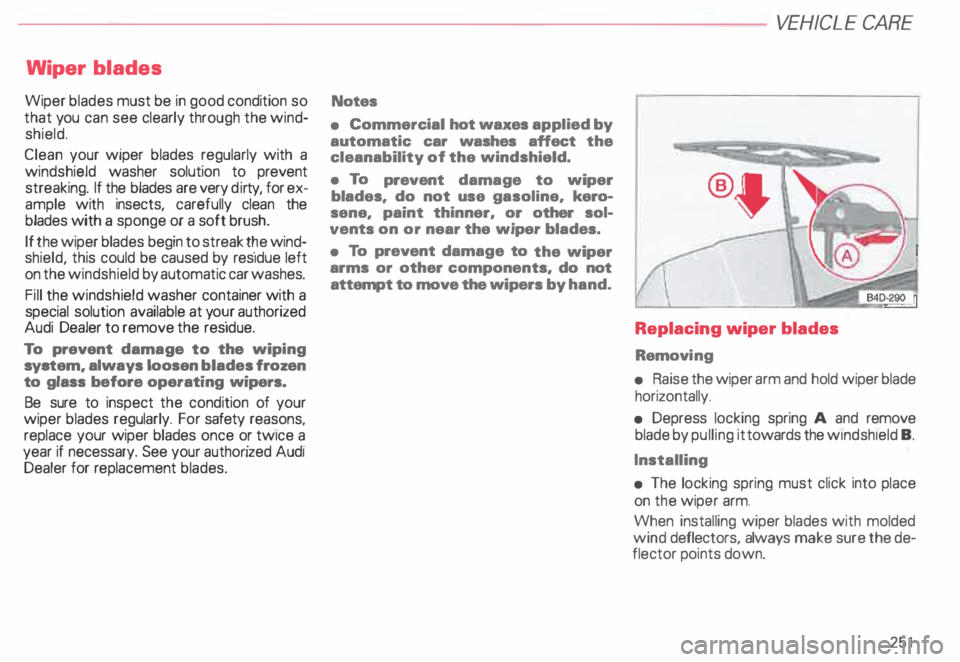
• Raise the wiper arm and hold wiper blade
horizontally.
• Depress locking spring A and remove
blade by pulling it towards the wrndsh1eld B.
Installing
• The locking spring must click into place
on the wiper arm.
When installing wiper blades with molded
wind deflectors, always make sure the de
flector points down.
251
Page 263 of 306
VE
HICLE CARE
Difficult operating
conditions
Driving under difficult
conditions
Yo ur Audi has been designed and equipped
for normal operating conditions. This also
applies to the freq uency and the extent of
service requirements as stated in the Main
tenance brochure.
If you are planning to drive your vehicle un
der difficult operating conditions (for exam
ple, continuous trailer towing, very hot or
cold weather, very dusty conditions, poor
fuel quality, etc.) you may want to make
special preparations such as changing to an
appropriate oil viscosity, having your vehicle
thoroughly inspected, etc. Furthermore, the
main tenance should always be matched to
the operating conditions (see page 228).
262 Additional
accessories, Modifications and
Parts replacement
Yo ur vehicle incorporates the latest safety
design features ensuring a high standard of
active and passive safety. This safety could
be compromised by non-approved changes
to the original new-vehicle condition. For
this reason, if parts have to be replaced or
if any modifications are made to the vehicle,
please observe the following points when
installing additional accessories:
• Always cons�lt an author ized Audi
Dealer before purchasing accessories and
before any modifications are carried out. Cl
In your own interest, we advise
you to use only expressly approved
Audi accessories and genuine Audi
spare parts.
These parts and accessories have
been specially designed to be used
on your vehicle.
• Approved Audi accessories and genuine
Audi parts are available from authorized
Audi Dealers.
These dealers also have the necessary facil
ities, tools and trained specialists to install
the parts and accessories properly.
Page 264 of 306
----------------------DO-IT-YOURSELF SERVICE
First aid kit
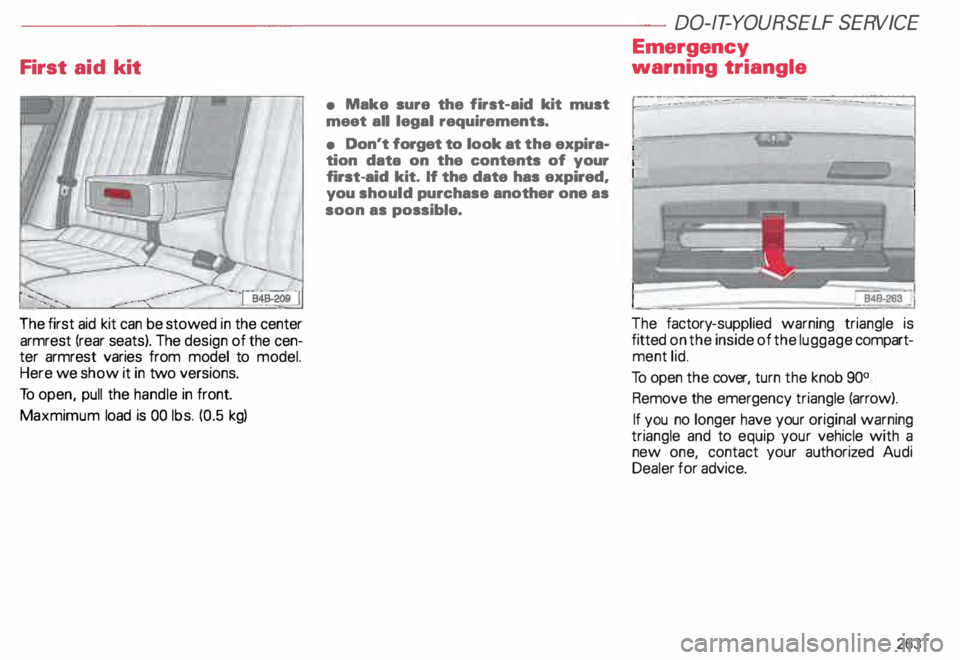
The first aid kit can be stowed in the center
armrest (rear seats). The design of the cen
ter armrest varies from model to model.
Here we show it in two versions.
To open, pull the handle in front.
Maxmimum load is 00 lbs. (0.5 kg) •
Make sure the first-aid kit must
meet all legal requirements.
• Don't forget to look at the expira
tion data on the contents of your
first-aid kit. If the date has expired,
you should purchase another one as
soon as possible. Emergency
warning triangle
The factory -supplied warning triangle is
fitted on the inside of the luggage compart
ment lid.
To open the cover, turn the knob 90°
Remove the emergency triangle (arrow).
If you no longer have your original warning
triangle and to equip your vehicle with a
new one, contact your authorized Audi
Dealer for advice.
263
Page 266 of 306
Yo
ur vehicle comes equipped with the fol
lowing tools:
- Vehicle jack
Before storing the jack, make sure it is
wound back down as far as it will go.
Hook for removing hook caps
- Lug wrench
Plastic pin for changing wheels
- Screwdriver with a hexagonal opening in
the handle for removing wheel bolts.
The screwdriver has a rever sible blade
(flat blade on one end and Phillips head
on the other).
- Open ended wrench 1 0 x 13
- Towing loop for transporting the vehicle
(see page 281). Note
Never
use the hexagonal opening in
the handle of the screwdriver to
loosen or tighten the wheel bolts.
�W ARNING
Always make sure the spare tire
and even a flat tire are secured in
place and not loose, otherwise
they could fly forward causing per
sonal injury to passengers in the
vehicle in an accident or sudden
maneuver. DO-IT-YOURSELF
SERVICE
265
Page 268 of 306

•
The deflated full size spare tire cannot be
repaired or mounted using conventional
shop equipment. This work always has to
be performed by the man ufacturer of the
collapsible tire.
• All the air must be let out of the tire after
use before stowing it in the storage area
prov ided for it in the vehicle. Once all the air
is out, the tire will return to its original form.
To let the air out of the tire, either use a
sharp object to press down on the metal pin
in the valve, or use the valve-remo ving tool
on the back side of the dust cap to unscrew
the valve stem. Changing
a wheel
�W ARNING
You or your passengers could be
injured while changing a wheel if
you do not follow safety precau
tions:
• If you have a flat tire, move a
safe distance off the road. Turn off
the engine, turn the emergency
flasher on and use other warning
devices to alert other motorists.
• Passengers must not rema in in
the vehicle when it is jacked up.
This includes children as well as
adults.
• Make sure that passengers wait
in a safe place away from the ve
hicle and well away from the road
way and traffic.
• Before you change a wheel, be
sure the ground is level and firm.
If necessary, use a sturdy board
under the jack. DO-IT-YOURSELF
SERVICE
�� WARN ING continued
• After installing the spare wheel,
make sure that you remount the
flat tire/Wheel in its storage area
properly and tighten the plastic
knurled screw securely.
• To help prevent the vehicle from
moving suddenly and possibly
slipping off the jack, always fully
set the parking brake and block
the wheel diagonally opposite the
wheel being changed. When one
front wheel is lifted off the
ground, placing the automatic
transmission in P (Park) will not
prevent vehicle movement.
267
Page 272 of 306
----------------------DO-IT-YOURSELF SERVICE
Step &
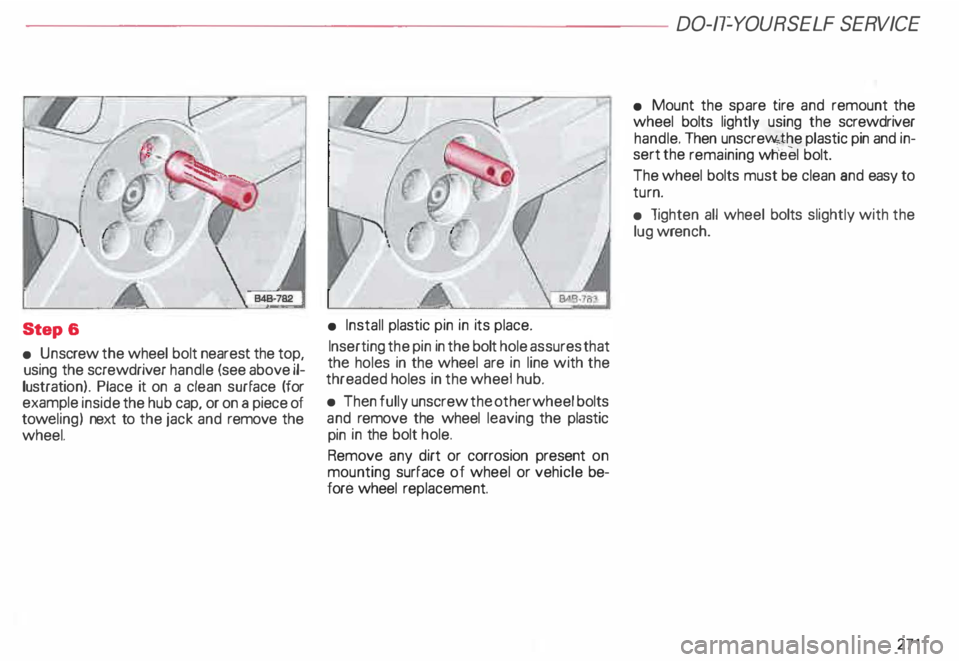
• Un screw the wheel bolt nearest the top,
using the screwdriver handle (see above il
lustratio n). Place it on a clean surface (for
example inside the hub cap, or on a piece of
tow eling) next to the jack and remove the
wheel.
l<:z�
(r.-
• Install plastic pin in its place.
Inserting the pin in the bolt hole assures that
the holes in the wheel are in line with the
threaded holes in the wheel hub.
• Then fully unscrew the other wheel bolts
and remove the wheel leaving the plastic
pin in the bolt hole.
Remove any dirt or corrosion present on
mounting surface of wheel or vehicle be
fore wheel replacement. •
Mount the spare tire and remount the
wheel bolts lightly using the screwdriver
handle. Then unscre�J'o4the plastic pin and in
sert the remaining wheel bolt.
The wheel bolts must be clean and easy to
turn.
• lighten all wheel bolts slightly with the
lug wrench.
271
Page 273 of 306

DO-IT-Y
OURSELF SERVICE----------------------
Step
7
Inflating the deflated full size
spare tire
• Remove the dust cap from the valve (1 l
by unscrewing it.
• Take the pressure compressor hose out
of the case, and screw the coupling nut se
curely onto the valve.
• Insert the compressor· connector in to
the socket located on the side of the lug
gage compartment or inset it ino the ciga
rette lighter socket -see page 181.
272 •
Turn on the compressor. The required tire
pressure wil be reached within a few min
utes. Use a pressure gauge to check the tire
pressure. Never operate the compressor
for longer than 5 minutes.
Note
Yo u'll find adhesive labels on the deflated
full size spare tire containing i nstn .1ctions for
using the tire as well as information on the
specified tire pressure.
Step S
• Un screw the pressure hose from the val
ve and screw the dust cap back on.
• To lower the vehicle, turn the handle
counter-clockwise until the jack is fully re
leased. Remove jack.
• Then go crosswise from one bolt to
another tightening them firmly.
• If necessary, press the hubcap back onto
the hub of the spare wheel. Step
9
• Slip the plastic cover over the wheel con
taining the flat tire. Then stow this wheel in
the luggage comopartment and secure it so
that it does not shift.
• Carefully observe the points on
page 288 when using the deflated
full size spare tire.
Notes
• The hex socket in the screwdriver can be
used to make it easier to handle the wheel
bolts. To do this, pull out the revers ible bla-
de. ·
Never use this plastic tool to loosen
or tighten the wheel bolts.
After you change a tire:
• Deactivating the jack moda -see
page 268.
• Use a torque wrench to check the
wheel bolt tightening torque as
soon as possible. With alloy wheels
and a deflated full size spare tire, the
torque should be 88.5 ft-lb (120
Nm).