Page 114 of 306

Ignition
switch
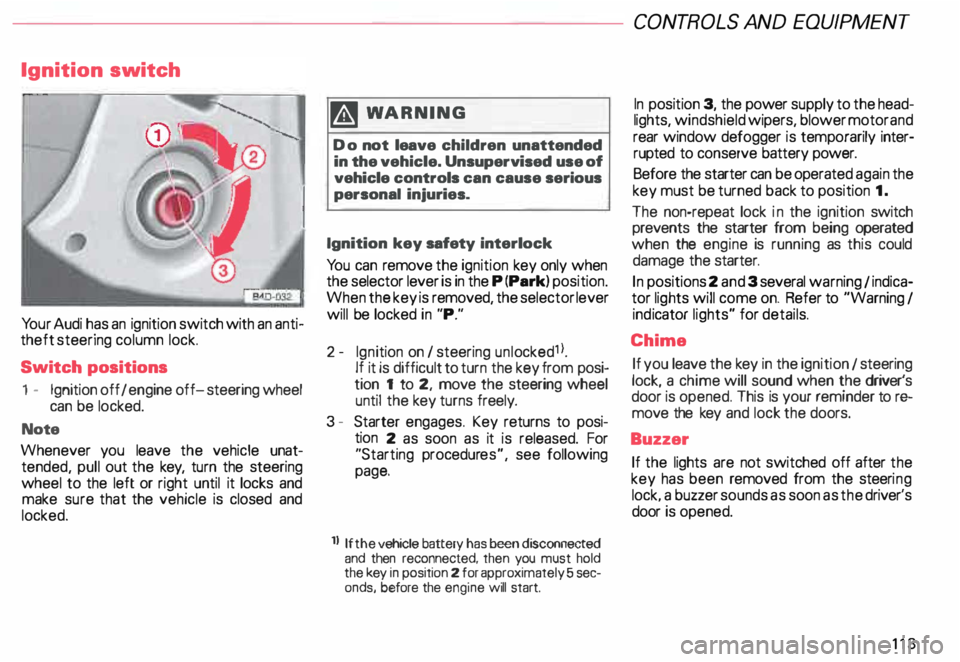
Yo ur Audi has an ignition switch with an anti
theft steering column lock.
Switch positions
1 - Ignition off I engine off-steering wheel
can be locked.
Note
Whenever you leave the vehicle unat
tended, pull out the key, turn the steering
wheel to the left or right until it locks and
make sure that the vehicle is closed and
locked. m
WARNING
Do not leave children unattended
in the vehicle. Unsupervised use of
vehicle controls can cause serious
personal injuries.
Ignition key safety interlock
Yo u can remove the ignition key only when
the selector lever is in the P (Park) position.
When the key is removed, the selector lever
will be locked in "P."
2- Ignition on I steering unlocked1 l.
If it is difficult to turn the key from posi
tion 1 to 2, move the steering wheel
until the key turns freely.
3 - Starter engages. Key returns to posi
tion 2 as soon as it is released. For
"Starting procedures", see following
page.
ll If the
vehicle battery has been disconnected
and then reconnected, then you must hold
the key in position 2 for approximately 5 sec
onds, before the engine will start. CONT
ROLS AND EQUIPMEN T
In position 3, the power supply to the head
lights, windshield wipers, blower motor and
rear window defogger is temporarily inter·
rupted to conserve battery power.
Before the starter can be operated again the
key must be turned back to position 1.
The non-repeat lock in the ignition switch
prevents the starter from being operated
when the engine is running as this could
damage the starter.
In positions 2 and 3 several warning 1 indica
tor lights will come on. Refer to "Warning I
ind icator lights" for details.
Chime If you leave the key in the ignition 1 steering
lock, a chime will sound when the driver's
door is opened. This is your reminder tor&
move the key and lock the doors.
Buzzer If the lights are not switched off after the
key has been removed from the steeri ng
lock. a buzzer sounds as soon as the driver's
door is opened.
113
Page 161 of 306

CONT
ROLS AND EQUIPMENT---------------------
Wiper and washer system
The wiper and washer system only works
when the ignition is on.
The heated washer jets do not have a
separate switch. Depending on the outside
temperature, the heated washer jets will
operate when the ignition is on.
To prevent damage to the w1pmg
system. always loosen blades frozen
to glass before operating wipers.
Notes
• Filling washer container, see page 250.
• Replacing wiper blades, see page 251.
� WARNING
Always heed WARNINGS on
page 161.
16 0 Windshield
•
Wiper off:
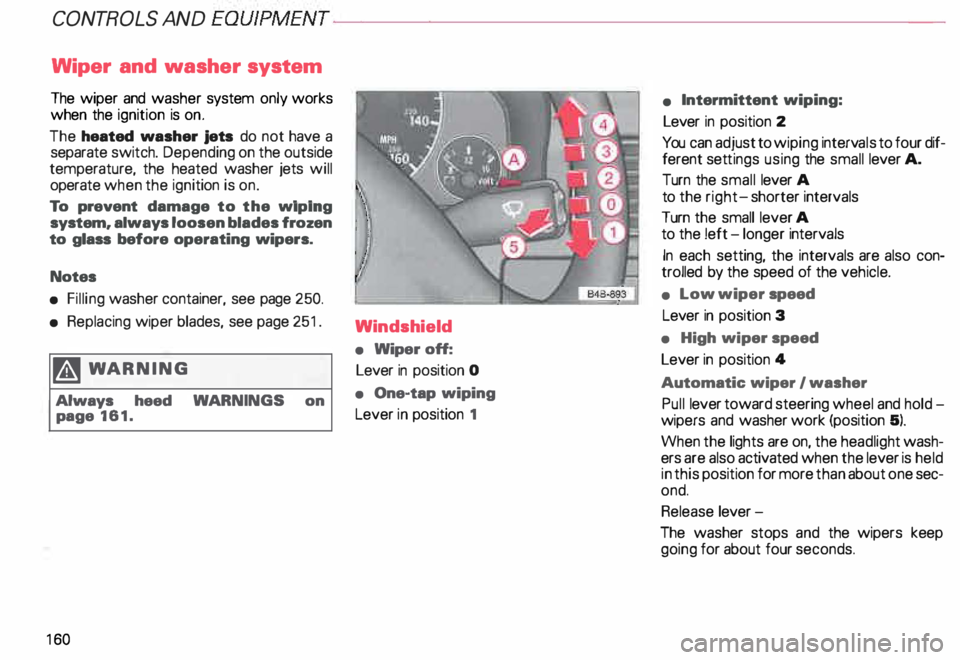
Lever in position 0
• One-tap wiping
Lever in position 1 •
Intermittent wiping:
Lever in position 2
You can adjust to wiping intervals to four dif
ferent settings using the small lever A.
Turn the small lever A
to the right- shorter intervals
Turn the small lever A
to the !eft -longer intervals
In each setting, the intervals are also con
trolled by the speed of the vehicle.
• Low wiper speed
Lever in position 3
• High wiper speed
Lever in position 4
Automatic wiper I washer
Pull lever toward steering wheel and hold
wipers and washer work (position 5).
When the lights are on, the headlight wash
ers are also activated when the lever is held
in this position for more than about one sec
ond.
Release lever-
The washer stops and the wipers keep
going for about four seconds.
Page 252 of 306

Wiper
blades
Wiper blades must be in good condition so
that you can see clearly through the wind
shield.
Clean your wiper blades regularly with a
windshield washer solution to prevent
streaking. If the blades are very dirty, for ex
ample with insects, carefully clean the
blades with a sponge or a soft brush.
If the wiper blades begin to streak t �e wind
shield, this could be caused by resrdue left
on the windshield by automatic car washes.
Fill the windshield washer container with a
special solution available at yo�r authorized
Audi Dealer to remove the resrdue.
To prevent damage to the wiping
sys tem, always loosen blades frozen
to glass before operating wipers.
Be sure to inspect the condition of your
wiper blades regularly. For safety reasons,
replace your wiper blades once o; twrce a
year if necessary. See your authonzed Audr
Dealer for replacement blades. Notes
• Commercial hot waxes applied by
automatic car washes affect the
cleanability of the windshield.
• To prevent damage to wiper
blades, do not use gasoline, kero
sene, paint thinner, or other sol
vents on or near the wiper blades.
• To prevent damage to the wiper
arms or other components, do not
attempt to move the wipers by hand. VE
HICL E CA RE
Replacing wiper blades
Removi ng
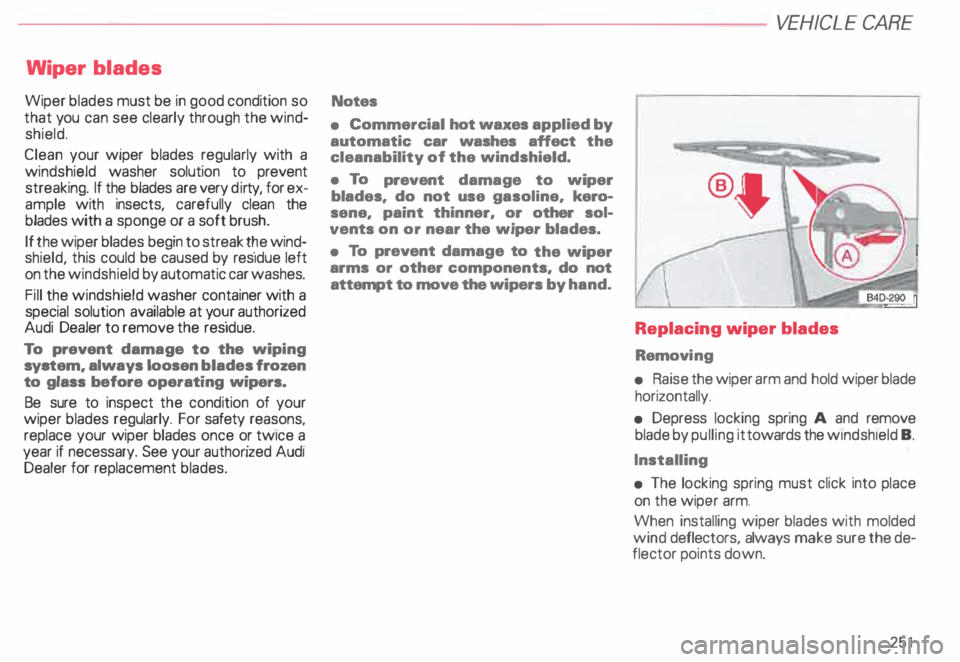
• Raise the wiper arm and hold wiper blade
horizontally.
• Depress locking spring A and remove
blade by pulling it towards the wrndsh1eld B.
Installing
• The locking spring must click into place
on the wiper arm.
When installing wiper blades with molded
wind deflectors, always make sure the de
flector points down.
251