2000 AUDI ALLROAD wheel bolts
[x] Cancel search: wheel boltsPage 256 of 306
Only
when tires show unusual wear such as
feather-e dging should they be rotated diag
� nall y. Yo ur vehicle may be equipped with
trres which have a specified rotation direc
tion. The rotation direction is identified by
arrow markings on the sides of the tires.
The rotation direction must not be revers ed.
Therefore, these tires cannot be switched
diagonally. If in doubt, discuss any unusual
tire wear with your authorized Audi Dealer's
service department.
After rotation adjust tire pressure and
torque wheel bolts diagonally to 90 tt lb
(120 Nm). Refer to "Changing a wheel" on
page 267 for details. Tire
replacement
Wheels and tires approved by the manu fac
turer have been specially matched to your
vehicle and contribute greatly to the road
holding, driving characteristics and safety of
the vehicle.
Make sure that the new tires also meet the
specifications listed on the label located on
the inside of the fuel filler flap or on the driv
er's door lock jamb.
It's �mporta nt to remember that in spite of
h �vrng the same tire designation, the actual
s1ze of a tire can vary from tire man ufacturer
to tire man ufacturer. Using different tire and
wheel rim combinations can result in re
duced clearance between the tire and the
vehicle body.
Therefore, never mount tires that
are of a different designation or
have different dimensions from
those of the factory supplied tires
which came equipped on your ve
hicle. VE
HICLE CARE
• If you must replace tires different from
those which were originally factory supplied
on your vehicle, always use the specific
brands, specifications and dimensions
which were specified by Audi for your ve
hicle.
Yo ur authorized Audi dealer or Audi Client
Relations have information regarding the
t1res and wheel rims specified for your car,
and can tell you which tires and tire
man ufacturers were approved by the fac
tory for original equipment installation.
• We recommend that you have your tires
changed by an authorized Audi Dealer, be
cause they have the special tools and nec
essary expertis e.
Furthermore, your authorized Audi Dealer
stocks a range of tires and wheels.
• If the spare tire is different from the tires
that you have mounted on your vehicle (for
example winter tires or wide profile tires),
then use the spare tire for a short period of
time only and drive with extra care. Replace
the flat tire with a tire matching the others
on your vehicle as soon as possible.
255
Page 260 of 306
-------------------------VEHICLE
CARE
Te mperature
The temperature grades are A (the highest),
8, and C, repres enting the tire's resistance to
the generation of heat and its ability to dissi
pate heat when tested under contro lled con
ditions on a specified indoor laboratory test
wheel. Sustained high temJ)erature can
cause the material of the tire to degenerate
and reduce tire life, and excessive tempera
ture can lead to sudden tire failure. The
grade C corres ponds to a level of perfor
mance which all passenger car tires must
meet under the Federal Motor Vehicle Safety
Sta ndard No. 1 09. Grades Band A represent
higher levels of performance on the laborato
ry test wheel than the minimum required by
law.
�W ARNIN G
The temperature grade for this tire
is est ablished for a tire that is
properly inflated and not over
loaded. Excessive speed, under
inflation, or excessive loading, ei
ther separately or in combination,
can causa heat buildup and pos
sible tire failure. Wheel
replacement
If you wish to equip your vehicle with tires
or wheels other than those installed at the
factory, please note the following:
• For technical reasons it is not al
ways possible to use wheels from
other vehicles -under certain condi
tions not even wheels from the same
vehicle model.
• Wheel rims and wheel bolts are
matched to fit your Audi. When
installing different wheels (for ax
ample, wheels with winter tires), the
correct wheel bolts with the proper
length and conical shape of the bolt
head must be used. The secure fit of
the wheels and the proper function
ing of the brake system and safety
are dependent upon this.
• Wheel rims and wheal bolts are
matched to fit your Audi. •
Before you plan on exchanging
steel wheels, light alloy wheals, or
winter tires already mounted on
wheel rims, consult your authorized
Audi Dealer. They have the technical
information necessary to advise you
which wheal rims and wheel bolts
are compatible with the original fac
tory installations.
1ft WARNING
• Incorrect tire/wheel parts may
cause an accident and personal in
jury. Such parts will adversely af
fect the safe operation of your ve
hicle. Always use tires, wheel rims
and wheel bolts that meat specifi
cations of the original factory
installed equipment.
• If wheel trim discs or a front
spoiler are Installed, make sura the
airflow for cooling the brakes is
not obstructed.
259
Page 266 of 306
Yo
ur vehicle comes equipped with the fol
lowing tools:
- Vehicle jack
Before storing the jack, make sure it is
wound back down as far as it will go.
Hook for removing hook caps
- Lug wrench
Plastic pin for changing wheels
- Screwdriver with a hexagonal opening in
the handle for removing wheel bolts.
The screwdriver has a rever sible blade
(flat blade on one end and Phillips head
on the other).
- Open ended wrench 1 0 x 13
- Towing loop for transporting the vehicle
(see page 281). Note
Never
use the hexagonal opening in
the handle of the screwdriver to
loosen or tighten the wheel bolts.
�W ARNING
Always make sure the spare tire
and even a flat tire are secured in
place and not loose, otherwise
they could fly forward causing per
sonal injury to passengers in the
vehicle in an accident or sudden
maneuver. DO-IT-YOURSELF
SERVICE
265
Page 270 of 306
----------------------DO-IT-YOURSELF SERVICE
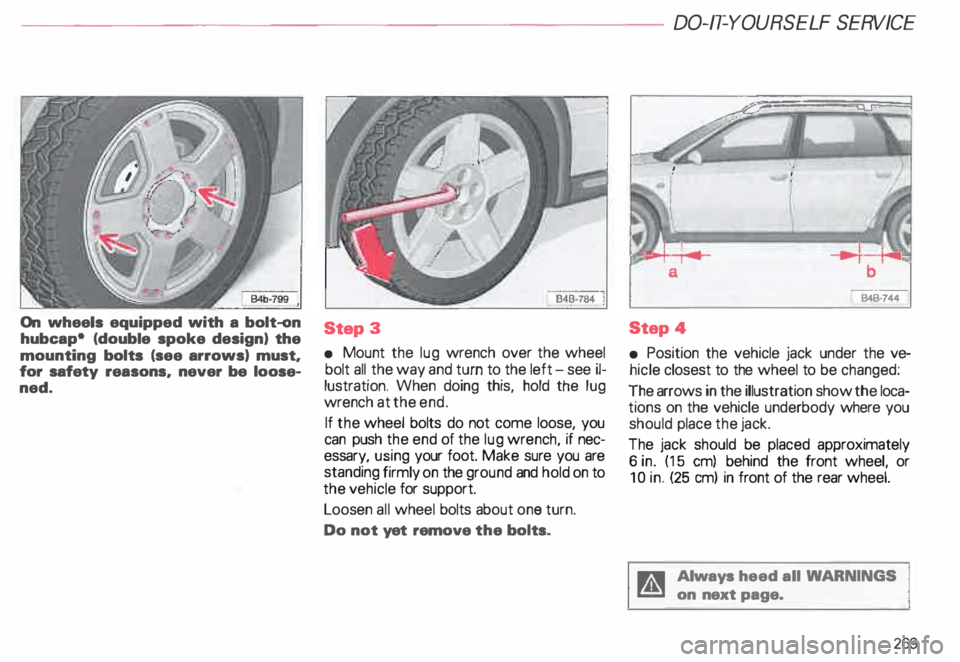
On wheels equipped with a bolt-on
hubcap• (double spoke design) the
mounting bolts (see arrows) must,
for safety reasons, never be loose
ned. Step
3
• Mount the lug wrench over the wheel
bolt all the way and turn to the left - see il
lustration. When doing this, hold the lug
wrench at the end.
If the wheel bolts do not come loose, you
can push the end of the lug wrench, if nec
essary, using your foot. Make sure you are
standing firmly on the ground and hold on to
the vehicle for support.
Loosen all wheel bolts about one turn.
Do not yet remove the -bolts . B4B·744
Step 4
• Position the vehicle jack under the ve
hicle closest to the wheel to be changed:
The arrows in the illustration show the loca
tions on the vehicle underbody where you
should place the jack.
The jack should be placed approximately
6 in. (15 em) behind the front wheel, or
10 in. (25 em) in front of the rear wheel.
Always heed all WA RNINGS
on next page.
269
Page 272 of 306
----------------------DO-IT-YOURSELF SERVICE
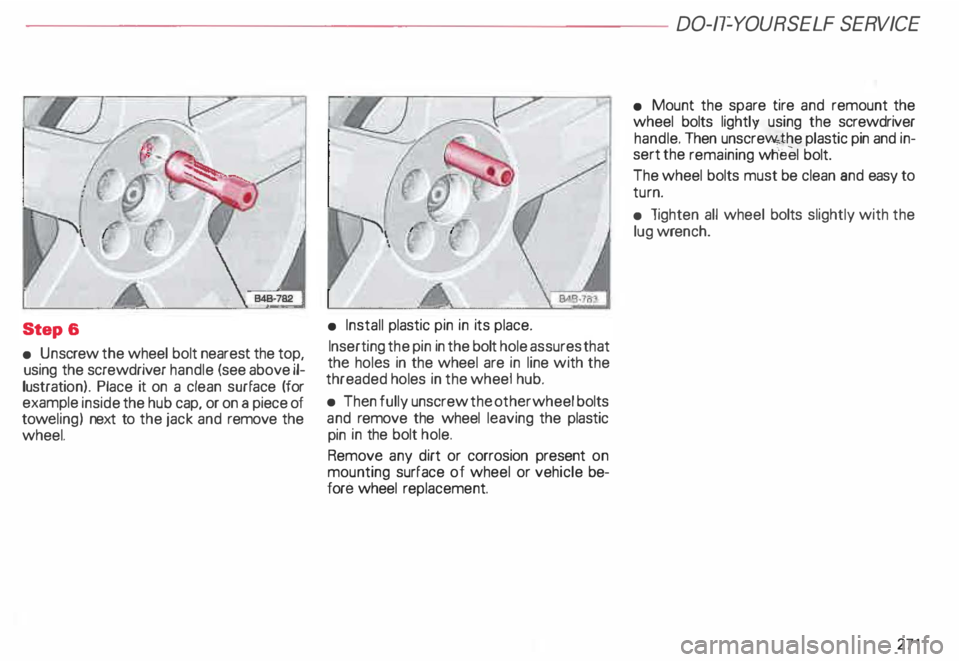
Step &
• Un screw the wheel bolt nearest the top,
using the screwdriver handle (see above il
lustratio n). Place it on a clean surface (for
example inside the hub cap, or on a piece of
tow eling) next to the jack and remove the
wheel.
l<:z�
(r.-
• Install plastic pin in its place.
Inserting the pin in the bolt hole assures that
the holes in the wheel are in line with the
threaded holes in the wheel hub.
• Then fully unscrew the other wheel bolts
and remove the wheel leaving the plastic
pin in the bolt hole.
Remove any dirt or corrosion present on
mounting surface of wheel or vehicle be
fore wheel replacement. •
Mount the spare tire and remount the
wheel bolts lightly using the screwdriver
handle. Then unscre�J'o4the plastic pin and in
sert the remaining wheel bolt.
The wheel bolts must be clean and easy to
turn.
• lighten all wheel bolts slightly with the
lug wrench.
271
Page 273 of 306

DO-IT-Y
OURSELF SERVICE----------------------
Step
7
Inflating the deflated full size
spare tire
• Remove the dust cap from the valve (1 l
by unscrewing it.
• Take the pressure compressor hose out
of the case, and screw the coupling nut se
curely onto the valve.
• Insert the compressor· connector in to
the socket located on the side of the lug
gage compartment or inset it ino the ciga
rette lighter socket -see page 181.
272 •
Turn on the compressor. The required tire
pressure wil be reached within a few min
utes. Use a pressure gauge to check the tire
pressure. Never operate the compressor
for longer than 5 minutes.
Note
Yo u'll find adhesive labels on the deflated
full size spare tire containing i nstn .1ctions for
using the tire as well as information on the
specified tire pressure.
Step S
• Un screw the pressure hose from the val
ve and screw the dust cap back on.
• To lower the vehicle, turn the handle
counter-clockwise until the jack is fully re
leased. Remove jack.
• Then go crosswise from one bolt to
another tightening them firmly.
• If necessary, press the hubcap back onto
the hub of the spare wheel. Step
9
• Slip the plastic cover over the wheel con
taining the flat tire. Then stow this wheel in
the luggage comopartment and secure it so
that it does not shift.
• Carefully observe the points on
page 288 when using the deflated
full size spare tire.
Notes
• The hex socket in the screwdriver can be
used to make it easier to handle the wheel
bolts. To do this, pull out the revers ible bla-
de. ·
Never use this plastic tool to loosen
or tighten the wheel bolts.
After you change a tire:
• Deactivating the jack moda -see
page 268.
• Use a torque wrench to check the
wheel bolt tightening torque as
soon as possible. With alloy wheels
and a deflated full size spare tire, the
torque should be 88.5 ft-lb (120
Nm).
Page 274 of 306

•
Be sure to check the tire pressure
as quickly as possible after you
install a wheal that is fitted with
new tires.
If you notice while changing a tire
that the wheal bolts are corroded
and difficult to turn, then they
should be replaced before you
check the tightening torque.
Until then, drive with extra care and
at reduced speeds. m
WARNING
• If you are going to equip your ve
hicle with tires or rims which dif
fer from those which were factory
installed, then be sure to read the
information on page 257.
• Always store damaged wheel,
jack and tools securely in luggage
compartment. DO-IT-YO
URSELF SERVICE
Note
Remember that the deflated full size
spare tire is for temporary use only!
273