2000 AUDI ALLROAD check engine light
[x] Cancel search: check engine lightPage 145 of 306

CONTROLS AND EQUIPMENT---------------------
Check
engine oil level �N
Check the engine oil level as soon as pos
sible by using the dip stick. Add engine oil
accordingly. See page 236.
Engine oil sensor
defective �ENOOR
Contact an authorized Audi dealer and have
the engine oil sensor inspected.
Speed warning 8 or 8
The stored speed h·as been exceeded. Slow
down or set new speed.
Dynamic headlight dimmer �(D
control• not functioning =1.
•
Have your authorized Audi dealer repair the
headlight dimmer control.
Refer to "Xenon lights" on page 157 for de
tails.
14 4 Speed
warning
You can store a road speed which is not to
be exceeded. As soon as you exceed that
speed by approximately 6 miles (1 0 kilome
ters), a warning tone sounds and "MPH"
("k m/h ") appears in the disp lay.
Nota Always monitor the vehicle speed by
means of the speedometer. The speed
warning device may only be used as a re
minder not to exceed the posted speed
limit. The
following describes how to store or de
lete speed warnings 1 and 2.
Speed warning 1
The ''MPH" ("km/h ") disappears when you
reduce the speed below the stored speed.
Also, the ''MPH" goes out when the driving
speed increases approximately 25 mph
(40 km/h) over the set speed for at least
1 0 seconds. The stored speed is not de
leted.
Selec ting speed limit
Press the test button for the Auto-Check
control briefly when the desired speed is in
dicated on the speedometer. The speed
warning symbol lights up when the button
is released to confirm that the selected
speed has been stored.
The set speed limit remains stored until
another speed is selected by pressing the
button again or until the memory is cleared.
Page 149 of 306
CONTROLS ANDEO�PMENT-----------------------------------------
Switches
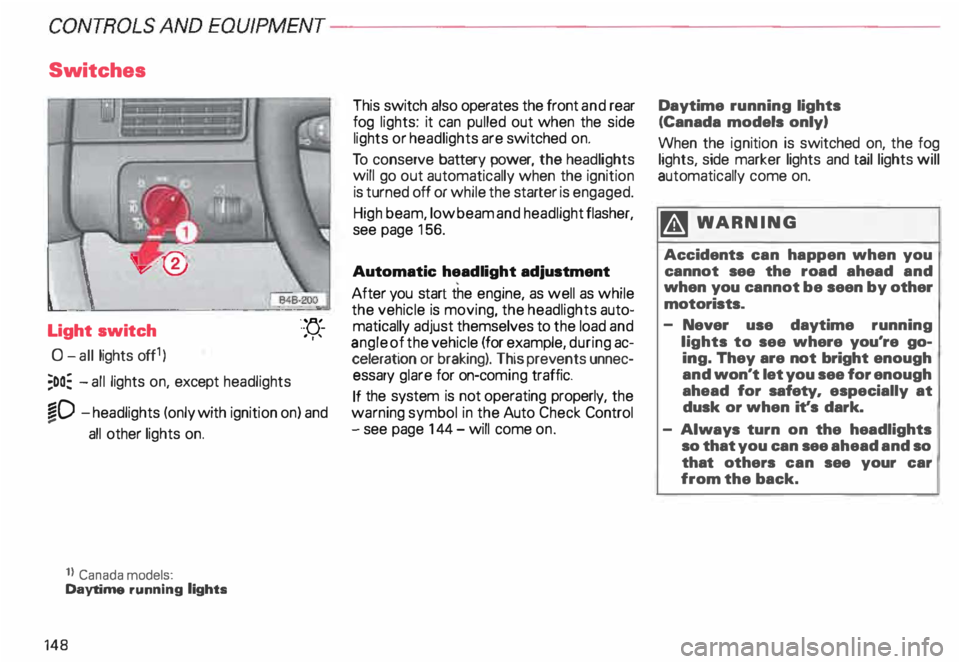
Light switch
0- all lights off1)
;oo: -all lights on, except headlights "-
YJ.-
. ''
�D -headlights (only with ignition on) and
...
all other lights on.
1} Canada models:
Daytime running lights
148 This
switch also operates the front and rear
fog lights: it can pulled out when the side
lights or headlights are switched on.
To conserve battery power, the headlights
will go out automatically when the ignition
is turned off or while the starter is engaged.
High beam, low beam and headlight flasher,
see page 156.
Automatic headlight adjustment
After you start the engine, as well as while
the vehicle is moving, the headlights auto
matically adjust themselves to the load and
angle of the vehicle (for example, during ac
celeration or braking). This prevents unnec
essary glare for on-com ing traffic.
If the system is not operating properly, the
warning symbol in the Auto Check Control
- see page 144- will come on. Daytime
running lights
(Canada models only)
When the ignition is switched on, the fog
lights, side marker lights and taillights will
automatically come on.
�W ARNING
Accidents can happen when you
cannot see the road ahead and
when you cannot be seen by other
motorists.
- Never use daytime running
lights to see where you're go
ing. They are not bright enough
and won't let you see for enough
ahead for safety, especially at
dusk or when it's dark.
- Always turn on the headlights
so that you can see ahead and so
that others can see your car
from the back.
Page 158 of 306
Headlight flasher
You can signal with your headlights by pull
ing the lever toward the steering wheel.
When flashing headlights, the blue indicator
light will come on. Xenon
lights*
After starting the engine the Xenon head
ligh ts are automatically adjusted to the load
and angle of the vehicle (for example, during
acceleration, braking). This prevents on
coming traffic from experiencing unneces
sary glare from your headlights.
If the system is not operating properly, a
warning symbol will be displayed in the
Auto Check Control -see page 144. CONTROLS
AND EQUIPMENT
157
Page 195 of 306
VEHICLE OPERA
TION-----------------------
Operate your vehicle safely
The condition of the vehicle is es
sential for driving safety.
Therefore, always be sure to observe the
following points before you drive off:
• Check lights and turn signals.
• Check fuel level.
• Adjust the mirrors.
• Make sure that all lights and all
windows are clean.
• Make sure the air Intake slot be
tween the engine hood and the
windshield is free of leaves, snow
and ice.
• Check warning and indicator
lights when starting the engine.
For driving safety, always follow the speci
fied maintenance intervals in your Mainte
nance booklet -especially for changing
the brake fluid, see page 242.
Yo ur personal driving style and your
attitude affect driving safety to a
very great extent.
19 4 Therefore,
for your own safety:
• Wear your safety belts and wear
them properly, even if you're just
driving in the city or to the corner
store -see page 14.
• Make sure that all passengers are
wearing their safety belts properly,
even those sitting in the rear -
see page 14.
Passengers not wearing safety belts endan
ger not only themselves in case of an acci
dent, but also the driver and other passen
gers.
• Make sure that children always sit
on the rear seat properly restrained
by a res traint system appropriate
for their size and age.
• Never transport a child in a rear
facing child or infant seat on the
front passenger seat.
• Adjust your seat so that you can
easily reach all controls as far away
from the airbag as possible but no
closer than 10 in. (25 em) -
see page 76. •
The seating position is very im
portant for the airbag performance
- see page 29.
• Always adjust the head restra ints
to the correct height.
For maximum protection, the upper edge of
the head restraints should be at least at
eye level, or higher .
• Always make sure that the move
ment of the pedals is not restricted
In any way-see page 102.
• Store luggage and light items
properly
in the luggage compartment
see page 88.
of the roof - see page 191.
• If you drink, do not drive.
The use of alcohol, drugs and certain medi
cations will seriously impair perception,
reactions and driving ability, and substan
tially increase the risk of an accident and
personal injury.
Page 197 of 306

VE
HICLE OPERATION------------------------
The external conditions
in which you drive also affect your fuel con
sumption.
The following conditions increase fuel con
sumption:
• Heavy traffic, especially in large cities
with many traffic lights.
• Stop-and-go driving, especially short dis
tances so that the engine never warms up
as it should.
• Driving in heavy, slow moving traffic in
low gear so that the engine speed is rela
tively high when compared to the distance
driven.
� Plan your trips ahaad of time. Or
� ganizs your trips to include sev
sral errands and to avoid heavy traf
fi c.
Of course, there are some conditions that
will affect fuel consumption that you can't
control.
For example, fuel consumption increases in
the winter or under difficult conditions (bad
roads, towing a trailer, etc.).
19 6 The
technical requirements
for optimum fuel consumption and eco
nomy were ''built" intoyourvehicle. Special
attention was paid to the environment. To
reta in and make use of these characteris
tics, please note the following points:
riJ Use only unleaded gasoline.
Leaded gasoline causes damage to the cat
alytic converter and other components of
the emission system.
t:Gh Have your vehicle serviced by an
� Audi Dealar at the specified in
tervals -see page 228 and your
Main tenance booklet.
Having your vehicle regularly serviced by an
Audi Dealer helps ensure that it runs prop
erly and economical ly, that it does not dis
turb the environment, and that it has a long
service life. t:Gh
Check
your tire pressure once a
W month.
Low tire pressure increases fuel consump
tion and tire wear, and impair s vehicle han
dling.
�W ARNING
Underinflation and overloading of
tires can lead to tire failure. Sud
den failur e on the road could cause
a serious or fata l accident. See
page 253 for inflation informa
tion.
� Do not carry unnecessary items
in the luggage compartment.
Particularly in city traffic where you must
often accelerate, weight influences fuel
consumption.
Page 203 of 306
VE
HICL E OPER ATION------------------------
Functioning of Anti-Lock Brake
System (ABS)
The ABS contributes effectively to vehicle
control since it prevents the wheels from
locking when the brakes are applied. This
means that the vehicle remains steerable
and is less likely to skid.
Nota
Yo u don't have to "pump" the brake.
Just hold the brake pedal down.
However, do not expect that the ABS short
ens braking distance under all circum
stances. When driving on gravel or on newly
fallen snow on top of icy surfaces, braking
distance may be even longer , therefore, un
der these circumstances, it is especially im
portant that you drive slowly and with great
care.
202 How the
ABS system works
An automatic check is made when a speed
of about 4 mph (6 km/h) is reached.
When this happens a pumping noise can be
heard.
If an individual wheel begins to rotate too
slowly in relation to vehicle speed and tends
to lock, the ABS automatically reduces
brake pressure to prevent that wheel from
locking.
This automatic adjustment process
will cause a slight vibration of the
brake pedal and soma noises to alert
you that vehicle speed must be
adapted to existing road and traffic
conditions. Enhanced
ABS function {Offroad
Mode)
To improve braking on loose terrain (for ex
ample: gravel, scree, mud, slush, snow),
turn off the ESP (see page 205), which will
switch the ABS to a special mode designed
for off-road requirements.
In this mode, the ABS control system is
changed to allow a "wedge" of loose rock
or soil to form in the front of the wheels.
This improves braking performance.
The ESP indicator light in the instrument
cluster will come on when you have
switched to this special ABS mode (see
page 124).
This special ABS mode will remain active up
to about 40 mph (60 km/h). ABS operation
is not affected at speeds over 40 mph
(60 km/h).
To turn his special ABS mode off, press the
ESP button (To activate ESP, see page 152).
The ABS off-road mode will also be deacti
vated when vou turn off the engine.
Page 232 of 306

Engine
hood
To unlock the engine hood, pull the re
lease lever on the left under the dashboard.
The hood pops up slightly under spring pres
sure.
Note
Before opening the engine hood,
make sure that the windshield wip
ers are folded flat against the wind
shield. Otherwise, they could dam
age the paint on the hood. To
open, pull the release lever in the direc
tion indicated by the arrow. This will release
the hook under the hood.
Open the hood all the way. It will be held up
by gas pressure in the strut. VEH
ICLE CARE
To close
Pull the hood down until the pressure from
the strut is reduced. Then Jet the hood fall
and latch in place -you do not need to
press the hood down again.
m WARNING
• A hood that is not 'completely
latched could fly up and block
your view while driving. When you
close the engine hood, check it to
make sure the safety catch has
properly engaged. The hood
should be flush with the surround
ing vehicle body parts.
• If you ever notice while driving
that the hood is not secured prop
erly, stop at once and close it.
Always heed all WA RNINGS
on next page.
231
Page 236 of 306
Engine
oil consumption
The rate of the oil consumption depends on
the quality and viscosity of oil, the speed at
which the engine is operated, the climate,
and road conditions as well as amount of
dilution and oxidation of the lubricant.
Because of these variables, no standard
rate of oil consumption can be established,
but drivers should expect higher oil con
sumption at high speeds and when the en
gine is new.
Therefore, we recommend that you check
the oil level at regular intervals (for example,
each time you are refuelling, or before going
on a long trip).
If the oil level should go below the minimal
level, the check engine oil level warn
ing light* in the instrument cluster will
come on. See page 144. You should check
the oil level using the oil dip stick as soon as
possible, and then top off the oil as neces
sary. Notes
• The engine in your vehicle de
pends on oil to lubricate and cool all
of its moving parts. Therefore the
engine oil should be checked regu
larly and kept at the required level.
• Lack of sufficient engine oil may
lead to severe engine damage.
• The oil pressure warning light is
not an oil level indicator.
A Always
heed all WAR NINGS
� on page 232.
Checking the engine oil level
The best time to check the engine oil level
is when the oil is warm.
To get a true reading, the vehicle must be on
level ground.
A Always heed all WAR NINGS
� on page 232.
• After turning off the engine, wait a few
minu tes for the oil to return to the oil pan. VE
HICLE CARE
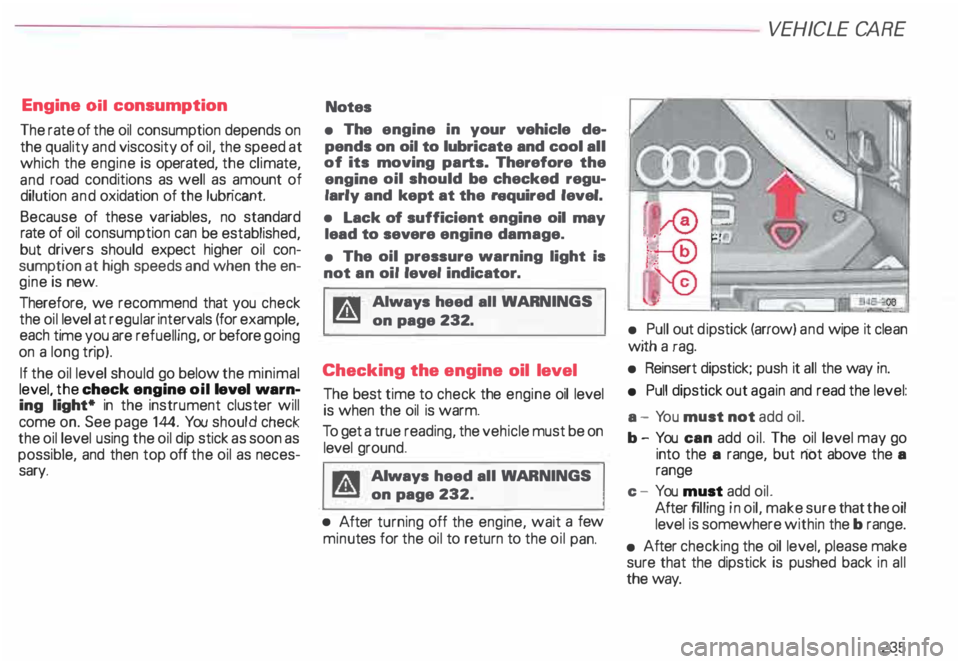
• Pull out dipstick (arrow) and wipe it clean
with a rag.
• Reinsert dipstick; push it all the way in.
• Pull dipstick out again and read the level:
a - Yo u must not add oil.
b- You can add oil. The oil level may go
into the a range, but riot above the a
range
c - You must add oil.
After filling in oil, make sure that the oil
level is somewhere within the b range.
• After checking the oil level, please make
sure that the dipstick is pushed back in all
the way.
235