2000 AUDI ALLROAD child lock
[x] Cancel search: child lockPage 6 of 306

----------------------------------------------TABLE OFCONT ENTS
I GENERAL ILLUSTRATION
General illustration 0 0 0. • • • 8
Warning and indicator lights 10
I SAFETY
FIRST
W elcome ... 0 0 0 •• •• 13
Safety first 0 0
• 0 • 0 0 0 0 • 0 •
13
Safety belts
• . . 0 0 0 • 0 0
14
Airbag system 0 ••••••• 0 0 • • • • • • • 25
Child safety ........ 0 • 0 0 0 0 0 0 0 0 0 44
I CONTROLS AND EQUIPMENT
Keys 0 0 0 0 0 0 0 0 0 0 0 •••• ••••• 0 0 • • 0
56
Power locks 0 0 0 0
Power windows
Mirrors 0 •• 0 0 0 •••
Head restraints
Front seats 0 0 0 •
0.- . 0 0 0 • • 59
69
• •• - •••• 0 ••• 0 72
75
•• 0 •• 0 76
Memory for front seats , .... 0 •• 0 81
Center armrest 0 0 0 0 0 0 0 0 0 •••••• 0 85 Rear
seats 0 0 •• 0 •• 0 • • • • • •
86
Luggage compartment , 0 0 88
Rear facing child seat bench 0 0 0 0 0 92
Ski sack 0 0 0 0 0 0 0 0 0 0 0 0 0 0 0 0.
96
Adjustable steering column
(tilt and telescopic) 0 0 0 0 • 0 0
98
Pedals 0 0 • 0 0 0 0 0 0 0 0 0 0 0 0 0 0 0 0 0 0 0 , 1 02
Parking brake lever 0 • 0 0 0 0 0 0 0 •• 0 1 03
5-speed automatic transmission
(Trptronic ®) 0 0 0 0 0 0 0 0 0 0 • 0 0 0 0 0. 0 • 104
Acoustic park assist
112
Ignition switch 0 0 0 0 0 0 0
1 13
Starting procedures . 0 • • 114
Stopping engine 0 0 0 0 0 0 • • • 115
Instrument cluster 0 0 0 0 0 0 116
Service Interval Display
121
Warning I Indic ator lights 0 0 0 0 0 0 • 122
On Board Diagnostic system 0 0 0 128
Driver information system 0 • 0 • • • 130
Menu display 0 0 0 0 0 0 0 0 0 0 0 0 0
0 131
Rear lid I door open indicator 0 0 0 137
Outside air temp erature 0 • 0 0 0 0 0 0 137 Radio
frequency display 13
8
Auto-Check system 0 0 0 o 0 138
Speed warning . 0 0 0 • 0 0 • • • • 0 • 0 0 144
Tr ip computer 0 0 0 0 0 0 •• 0
146
Switches 0 • 0 •• 0 0 0 0 • 0 0 0 0 148
Ride height adjustment
(4 Level Air Suspension) 0
153
Turn signals,
headlight dimmer switch lever 0 0 156
Cruise control 0 0 0 0 0 0 0 0 0 0 0 0 0 0 0 • • 158
Wiper and washer system 0 ••• 0 0 150
Climate controls 0 0 0 0 0 0 0 0 0 0 0 • 0 152
Power roof 0 0 0 0 0 0 0 • 0 0 0 0 0 • • • • • • 168
Int erior lights, reading lights 171
Luggage compartment light 0 0 0 0 172
Audi Homelink ®
Uni versal Transmitter . 0 0 • • • •
173
Sun visors 00 00 00 00 ... • .. •
177
Sun shade 0 0 0 0 0 0 0 0 •• , • • • ••• 0 0 177
Glo ve compartment
Coat hooks
Ashtray 178
179
180
5
Page 19 of 306

SAFETY RRST---------------------------------------------------
How to wear safety belts
properly
Safety belts must always be prop
erly positioned across the strongest
bones of your body.
�W ARNING
Always fasten your safety belts
before driving off. Always make
sure your passengers are properly
restra ined -even those sitting in
the rear.
Safety belts can work only when
used properly. Never wear safety
belts in any other way than illus
trated and described in this sec
tion. Always observe the follow
ing precautions:
• Never wear belts twisted.
18 '41
WARNING continued
• Never strap more than one par
son, including small children, into
any belt. It is especially dangerous
to place a safety belt over a child
sitting on your lap.
• Never place your feet on the in
strument panel or on the seat.
Always keep both feet on the floor
in front of the seat.
• Never wear belts over rigid or
breakable objects in or on your
clothing, such as eye glasses,
pens, keys, etc., as these may
cause injury.
• Do not wear the shoulder part of
the belt under your arm or other
wise out of position.
• Several layers of heavy clothing
may interfere with proper posi
tioning of belts and reduce the
overall effectiveness of the sys
tem. �
WARNING continued
• Never allow safety belts to be
come damaged by being caught in
door or seat hardware. Always
keep belt buckles free of any ob
struction that may prevent secure
locking.
• Never use comfort clips or de
vices that create slack in the
shoulder belt portion. However,
clips may be required for the
proper use of some child restraint
systems.
• To rn or frayed safety belts can
tear and damaged belt hardware
can break in an accident. Inspect
belts periodically.
If belts show damage to webbing,
bindings, buckles. or retractors,
have them replaced.
Page 20 of 306

fh1
WARNING continued
• Keep the belts clean.
Dirty belts may not work properly
- see also .. Cleaning and protec
tion .. page 218.
• Safety belts that have been
worn and loaded in an accident
must be replaced with the correct
replacement safety belt by an au
thorized Audi Dealer. Replace
ment may be necessary even if
damage cannot be clearly seen.
• Safety belt anchorages that
have been loaded in an accident
must be inspected by a qualified
workshop or an authorized Audi
Dealer.
• Never modify. disassemble, or
try to repair your safety belts. Seating capacity
Your Audi has 5 seating positions, 2 in the
front and 3 in the rear. Each seating position
has a safety belt.
�W ARNING
Never let more people ride in the
vehicle than there are seat belts
available. Be sure everyone riding
in the vehicle is correctly re
strained with a separate seat belt. SA
FETY FIRST
Lap- shoulder belt
The front and rear seats are equipped with
three-point safety belts.
The three-point belts in the front passenger
and rear positions each have a convertible
locking feature in addition to the emergency
locking feature. The convertible locking fea
ture is used when a child seat is installed,
see page 51.
The retractors in the combination lap-shoul
der belts allow the system to adjust to your
size and movements as long as the pull on
the belt is slow.
Hard braking or a collision locks the belt. The
belt will a I so lock when you drive up or down
a steep hill or in a sharp curve.
19
Page 24 of 306

For
occupants who may be smaller, the
position of the belt should be adjusted by
placing the belt in the guide, if otherwise the
belt would run across the wearer's neck
instead of over the center of the shoulder
(see illustration).
If the occupant moves a long way to one
side and the belt slides out of the gu id e . it
must be placed back in the guide by hand. Convert
ible Locking Retractor
(CLR)
The convertible locking retractor is neces
sary to secure child restraint systems.
The retractors for the front passenger's seat
and the rear seat three point safety belts are
equipped with an automatic locking feature
in addition to the emergency locking fea
ture.
If you need to install a child restraint system
on the front passenger's seat or on one of
the rear seats, it must be secured by use of
the belt after activating the locking feature
-see pages 32 and 51 for important safety
information related to the use of child re
straints on the front seat.
Activating the locking retractor
• Slowly pull the belt all the way out.
• Insert the belt tongue into the buckle for
tha t seating position (pull on it to check!)
a n d guide the rest of the belt with your hand
back in place; while doing this you should
hear a clicking sound. This sound signals
that the locking retractor has been acti
vated. SA
FETY FIRST
Deactivating the locking retractor
The locking retractor is deactivated by un
fas te n ing the safety belt and allowing the
safety belt to retract completely to its
stowed position. The safety belt can now be
used as an ordinary three-point safety belt
without the additional locking feature.
If a person sitting In the passenger
seat or rear wearing the safety belt
should activate the locking retrac
tor. then the safety belt must be un
fastened in order to deactivate the
locking retractor.
� WARN ING
Never unfasten the safety belt to
deactivate the locking retractor
while the vehicle is in motion. You
would not be protected at all and
could suffer serious injury in an ac
cident.
Page 52 of 306

Securing a child seat
Convertible Locking Retractor
The retractors for the rear seat three-po int
safety belts and the front passenger three
point safety belt have a conver tible locking
feature in addition to the emergency locking
feature.
If you need to install a child seat at an outer
seating position, you must first activate the
conver tible locking feature. Then secure the
child seat by using the seat belt. �W
ARNING
• Never install rear-facing child
seats or infant carriers on the front
passenger seat. A child will be se
riously injured and can be killed
when the passenger airbag in
flates.
• The inflating airbag will hit the
child seat or infant carrier with
great force and will smash the
child seat and child against the
backrest. center arm rest. or door.
• Always install rear-facing child
seats or infant carriers on the rear
seat if the front passenger airbag
has not been deactivated. SA
FETY FIRST
�W ARNING
• Forward-fa cing child seats or in
fant carriers installed on the front
passenger's seat may interfere
with the deployment of the airbag
and cause serious injury to the
child. Allow a child to travel on the
front passenger's seat only in a for
ward- facing child restraint system
specif ically designed and ap
proved by the child restraint
manufacturer for use in the front
with airbags. Make sure the pas
senger seat is in the rearmost posi
tion. It is always safer to install a
child seat in the rear.
51
Page 53 of 306

SA
FETYRRST---------------------------------------------------
Activ ating the convertible
locking retractor
• Slowly pull the belt all the way out.
• Hold on to the safety belt while securing
the safety belt around the child restraint per
the instructions found in the child restraint's
owner's manual.
• Insert the belt tongue into the buckle for
that seating position. Pull on the belt to
make sure the safety belt is properly
fas tened.
• Guide the remaining portion of the belt
back in place, allowing the retractor to take
up the slack. Press the child restraint
against the seat cushion as you guide the
belt into the retractor so that the belt ten
sion holds the child restraint firmly in place.
• While the safety belt is retra cting, you
will hear a continuous clicking noise from
the retractor; that means that the convert
ible locking retractor has been activated.
52 •
To covert the safety belt into standard
use after the child restraint is removed, re
lease the tongue from the buckle and allow
the safety belt to fully retract again. The re
tractor will then operate in the normal emer
gency locking mode for the occupant re
straint.
�W ARNING
Always buckle the child seat firm
ly in place even if your child is not
sitting in it. A loose child seat can
fly around during a sudden stop or
in an accident.
Deactivating the convertible
locking retractor
The convertible locking retractor is deacti
vated by unfaste ning the safety belt (see
page 24). Allow the safety belt to retract
completely to its stowed position. The
safety belt can now be used as an ordinary
three-point safety belt without the addi
tional locking feature. If
the convertible locking feature has been
inadvertently activated, the safety belt
must be unfastened to deactivate this fea
ture. If the convertible locking feature is not
deactivated, the safety belt will gradually
become tighter and uncomfortable to wear.
The convertible locking feature must be de
activated to restore normal belt operation
and greater occupant comfort.
�W ARNING
Never unfasten the safety belt to
deactivate the convertible locking
retractor while the vehicle is in
motion. You would not be pro
tected at all and could suffer seri
ous injury in an accident.
Page 54 of 306

Child
restra int anchorages for
the rear seats
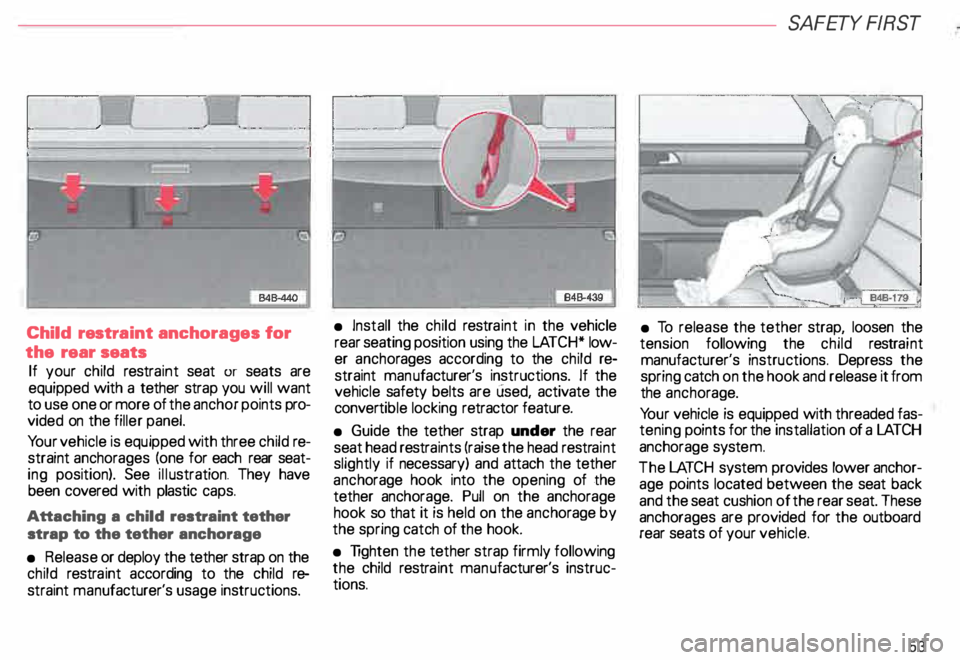
If your child restraint seat or seats are
equipped with a tether strap you will want
to use one or more of the anchor points pro
vided on the filler panel.
Yo ur vehicle is equipped with three child re
straint anchorages (one for each rear seat
ing position). See illustration. They have
been covered with plastic caps.
Attaching a child restraint tether
strap to the tether anchorage
• Release or deploy the tether strap on the
child restraint according to the child re
straint manufacturer's usage instructions. •
Install the child restra int in the vehicle
rear seating position using the LATCH* low
er ancho rages according to the child re
straint manufacturer's instructions. If the
vehicle safety belts are used, activate the
conver tible locking retractor feature.
• Guide the tether strap under the rear
seat head restraints (raise the head restraint
slightly if necessary) and attach the tether
anch orage hook into the opening of the
tether anchorage. Pull on the anchorage
hook so that it is held on the anch orage by
the spring catch of the hook.
• Tighten the tether strap firmly following
the child restra int man ufacturer's instruc
tions. SA
FETY FIRST
• To release the tether strap, loosen the
tension following the child restraint
manufacturer's instructions. Depress the
spring catch on the hook and release it from
the anch orage.
Yo ur vehicle is equipped with threaded fas
tening points for the installation of a LA TCH
anchorage system.
The LATCH system provides lower anchor
age points located between the seat back
and the seat cushion of the rear seat. These
anchorages are provided for the outboard
rear seats of your vehicle.
53
Page 57 of 306

CONT
ROLS AND
EQUIPMENT---------------------
Keys
@ !
848-371
Yo ur Audi comes with tour keys and a plas
tic tag.
�W ARNING
Do not leave your vehicle unat
tended with the key in the ignition
lock. Entry by unauthorized per-
sons could endanger you or harm
the vehicle. Always lock all doors
and take the key.
All keys can be inserted into locks either
way.
56 B48-374
A -F olding master keys with
remote control
To fold the key out, press the release button
(arrow).
To told the key back in, press the release
button again.
The master key fits all the locks on your ve
hicle.
The function of the remote control is de
scribed on page 59.
To replace batteries see page 57. B-V
alet key
The valet key has a workshop symbol on it
and fits only the driver's door and ignition
lock.
If you have to leave a key with somebody
else, it may be advisable to give them this
key only.
C -E mergency key
This key fits all locks on the vehicle.
The emergency key is only for temporary
use if the vehicle key should be lost or mis
placed.
�W ARNING
Do not leave children unattended
in the vehicle, especially with ac
cess to vehicle keys. Unsupervised
use of the keys can result in start
ing of the engine or use of vehicle
systems such as the power win
dows, etc. which could result in
serious injury.