2000 AUDI ALLROAD lights
[x] Cancel search: lightsPage 68 of 306

---------------------CONTROLS
AND EQUIPMENT
• Certification
The remote control device complies with
Part 15 of the FCC Rules. Operation is sub
ject to the following conditions:
1 - this device may not cause harmful in
terfere nce, and
2 - this device must accept any interfer
ence received, including interference
that may cause undesir ed operation.
The manufacturer is not responsible for
ANY RADIO OR TV Interference caused by
una uthorized modifications to this equip
ment. Such modifications could void the
user's authority to operate the equipment. Anti-theft
alarm system
The anti-theft alarm system triggers an
acoustic alarm and switches on the emer
genc y flasher if it senses unauthorized inter
ference with the vehicle.
When the vehicle is locked the alarm sy
stem monitors and protects the following
parts of the vehicle:
• engine compartment
• luggage compartment
• doors
• factory installed radio
• passenger compartment
• ignition.
The alarm system is switched on or off
whenever you lock or unlock the vehicle.
Simply tum the key to the lock or unlock
position or use the remote control.
The system is activated about 30 seconds
after the vehicle is locked, and the indicator
lights on the front door window sills start
flashing. The
horn sounds briefly when the car is
locked to confirm that the alarm system is
operative and that all doors, hood and rear
lid are properly closed. If the hom does not
sound, or the indicator lights do not flash,
check all doors, rear lid and hood and close
them properly. The horn will also sound if
the door, lid and hood are closed when the
system is already switched on.
The rear lid can be opened separately even
when the system is active. When the rear
lid is closed the luggage compartment will
again be included in the alarm circuit.
When the system is switched on the alarm
will be triggered if one of the doors, the en
gine hood or the rear lid are opened, or if the
ign ition is switched on or the radio re
moved.
When the alarm is triggered the hom
sounds and all four turn signals flash simul
taneously. The engine cannot be started un
til the system is switched off with the key
or the remote control.
67
Page 69 of 306

CONT
ROLS AND
EQUIPMENT---------------------
If the alarm has sounded one time, and then
the vehicle is forced open again (for exam
ple, someone tries to forcibly open a door,
and then tries to force open the rear lid), the
signal will sound once again.
You can also trigger the alarm by pressing
the PANIC switch on your remote control
to alert other people in case of emergency
or when in another difficult situation. The
alarm can be switched off by pressing the
PA NIC switch again.
Warn ing lights
After you lock the vehicle, the warning light
on the window sills will blink quickly first for
30 seconds and will then blink slowly. This
is to let you know that the anti-theft alarm
system is activated, including the interior
move ment sensors.
If the warning lights come on continuously
for about 30 seconds instead of flashing
when the vehicle is locked, this indicates
that the interior movement sensor is defec
tive.
68 Swit
ching off the interior
movement sensors l
Yo u should switch off the interior move
ment sensors if there is the possibility that
the alarm system could be set off, for exam
ple by a pet left in the vehicle. •
Press the switch in the door pillar (see il
lustration). The indicator light in the switch
will come on. The indicator light on the win
dow sills will come on for approx imately
3 seconds. This verifies that the interior
movement sensors have been deactivat ed.
The sensors will be reactivated when you
unlo ck and lock the vehicle again.
• Lock the vehicle.
The indi cator lights in the doorpillarwill blink
quickly for approximately 3 seconds at first.
Then, after approximately 30 seconds, the
light will flash slowly.
Page 70 of 306

·--------------------CONT
ROLS AND EQUIPMENT
Power windows
The switches are located in the driver's
door. Also, the front passenger's door and
each rear door has its own power window
switch.
If the respective switch is pushed or pulled
the window will open or close.
• Switches A and B operate the front door
win dows.
• Switches C and D operate the rear win
dows.
• Safety switch S The
safety switch {S) in the armrest on the
driver's door can turn off the rear power win
dows. This feature has been provided for
the safety of small children riding in the rear
of the vehicle.
A symbol lights up in the safety switch
when the switches in the rear doors are de
activated.
Normally , the power windows can be
opened and closed only with the ignition on.
However, when the ignition is off the win
dows can still be operated by means of the
control switches as long as the driver's and
front passenger's doors are closed. yvhen
either door is opened, the power w1ndow
operation will be deactivated.
�W ARNING
• Do not leave children unat
tended In the vehicle, especially
with access to vehicle keys. Unsu
pervised use of the keys can result
in sta rting of the engine and use of
vehicle systems such as power
windows, etc. which could result
in serious injury. m
WARNING continued
• Remember also that the power
windows will continue to operate
until the ignition key has been re
moved and one of the front doors
has been opened.
• Be careful when closing the win
dows. Check to see that no one is
in the way, or serious injury could
result I
• Switch off the power to the rear
windows -if necessary -using the
safety switch S.
• Always remove the ignition key
whenever you leave your vehicle.
• If you lock your vehicle from the
outside, no one especially children
should remain in the vehicle. The
windows will not open in case of
an emergency.
• Do not stick anything on the
windows or the windshield that
may Interfere with the driver's vi
sion.
69
Page 73 of 306

CONT
ROLS AND EQUIPMENT
Mir rors
Adjust the outside and inside mi rrors before
driving and after adjusting your seat to prop
er driving position. It is im porta nt for safe
driving that you have good vision to the rear.
Inside dey-night mirror
Manual anti-glare adjustment
Yo u can adjust the day -night mirror from
clear daylight visibility to non-glare visibility
at night by moving the lever at the bottom
of the mirror.
To ensure the best possible antiillare ef
fect, the lever on the lower edge of the mir
ror should be pointing forwards when the
basic setting is made.
Daylight driving -lever to front
Night driving -lever to rear.
72 Automatic
anti-glare adjustment•
When the ignition is switc hed on the interior
mirror will darken automatically depending
on the amount of light shinin g into the car
from the rear (e. g. headlights).
When you move the selector lever I gear
shift lever into Reverse R or when you
switch the interior lights on, the inside mir
ror will return to its original position (dim
ming effect off).
The mirror will return to the original position
(i. e. not anti-dazzle) when the selector lever
I gearshift lever is moved to position R. Outside
mirrors
Adjust the outside mirrors so that the side
of your own vehicle can just be seen. This
setting ensures the best possible field of
view, and in addition it serves as an instant
check on the mirror setti ng.
Self-d imming day I night outside
mirrors
The dimming of the outside mirrors is con
trolled by the inside day I night mirror.
The dimming of the outside mirrors works
only properly and without any interference,
if the rear window shade* is rolled up and I
or the light shining on the inside mirror is not
blocked by other objects.
Page 85 of 306

CONTROLS AND EQ
UIPMEN T---------------------
Retrieving using the
memory buttons
• With the passenger's door open, de
press and release the desired memory but
ton. The seat will automatically adjust to the
stored position.
• If the door has been closed, you must
then depress and hold the memory button
until the seat has reached its stored posi
tion.
Note
You can not reca ll the stored seat adjust
ment for the front passenger's seat using
the remote control in the master key.
84 Emergency
Off
In an emergency, you can interrupt
any retrieval procedure by
• pressing the '"STOP'" button (see il
lustration on page 81 and 83). or
• tapping one of the memory buttons.
Pushing the"ON/OFF"button to the OFF
position only switches off the Memory. The
stored settings will not be erased.
It's a good idea to turn the Memory off if the
vehicle is going to be used temporarily by a
driver whose driving position will not be
memorized.
The advantage is that the personal settings
that have already been memorized will re
main intact and will not change each time
the vehicle is unlocked using the remote
control. Note
The memory function is switched off when
the STOP button is pressed. The word
''OFF" lights up if the headlights are
switched on. However, the programmed
seat, outside mirrors and steering wheel
positions remain stored in the memory.
Page 114 of 306

Ignition
switch
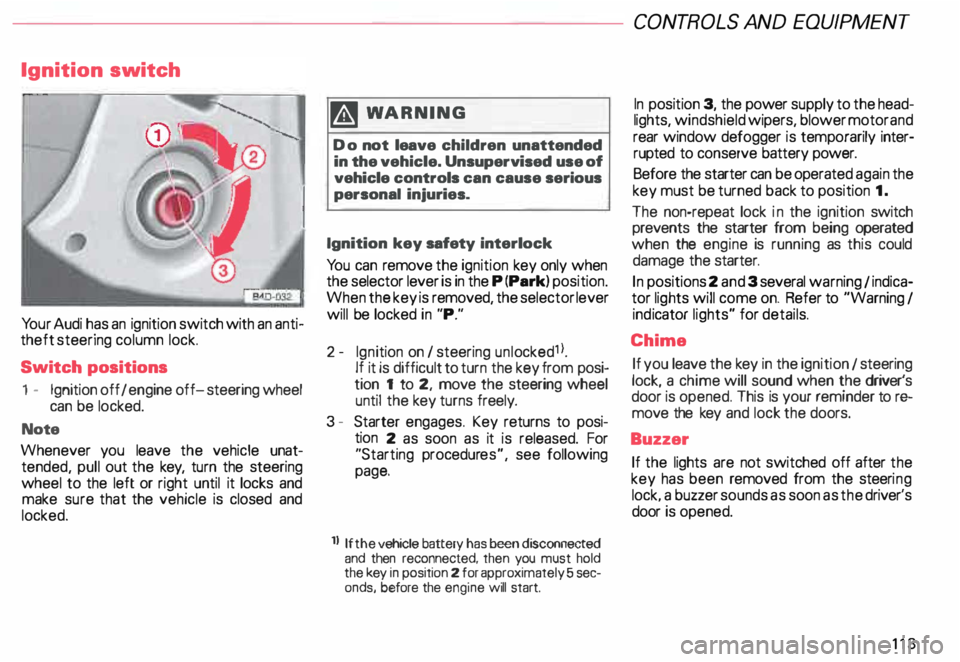
Yo ur Audi has an ignition switch with an anti
theft steering column lock.
Switch positions
1 - Ignition off I engine off-steering wheel
can be locked.
Note
Whenever you leave the vehicle unat
tended, pull out the key, turn the steering
wheel to the left or right until it locks and
make sure that the vehicle is closed and
locked. m
WARNING
Do not leave children unattended
in the vehicle. Unsupervised use of
vehicle controls can cause serious
personal injuries.
Ignition key safety interlock
Yo u can remove the ignition key only when
the selector lever is in the P (Park) position.
When the key is removed, the selector lever
will be locked in "P."
2- Ignition on I steering unlocked1 l.
If it is difficult to turn the key from posi
tion 1 to 2, move the steering wheel
until the key turns freely.
3 - Starter engages. Key returns to posi
tion 2 as soon as it is released. For
"Starting procedures", see following
page.
ll If the
vehicle battery has been disconnected
and then reconnected, then you must hold
the key in position 2 for approximately 5 sec
onds, before the engine will start. CONT
ROLS AND EQUIPMEN T
In position 3, the power supply to the head
lights, windshield wipers, blower motor and
rear window defogger is temporarily inter·
rupted to conserve battery power.
Before the starter can be operated again the
key must be turned back to position 1.
The non-repeat lock in the ignition switch
prevents the starter from being operated
when the engine is running as this could
damage the starter.
In positions 2 and 3 several warning 1 indica
tor lights will come on. Refer to "Warning I
ind icator lights" for details.
Chime If you leave the key in the ignition 1 steering
lock, a chime will sound when the driver's
door is opened. This is your reminder tor&
move the key and lock the doors.
Buzzer If the lights are not switched off after the
key has been removed from the steeri ng
lock. a buzzer sounds as soon as the driver's
door is opened.
113
Page 117 of 306

CONTROLS AND EQUIPMENT---------------------
Instrument cluster
Pos. see page
1 - Engine oil temperature gauge ... 117
2 - Tachometer ...... ........... .. 117
with digital clock and date display 117
3- Warning I ind icator lights ..... .. 122
4 - Engine coolant temperature gauge 118
5- Fuel gauge
119 Pos.
6 · Speedometer
with odometer,
trip odometer display ... .
7 - Vo ltmeter ............ .
8 - Set I check knob for see
page
119
12 0
12 0
Setting the clock . . . . . .
118
Auto -check system ............ 140
Clock and Odometer lighting .... 12 0
Service indicator . . . . . . . . . . . . . . 121 Pos.
see page
9 - Driver information system
Auto-C heck System display . . . . 138
Outside air temperature display .
137
Trip computer display . . . . . . . . 146
Selector lever position display . .
1 07
Radio frequency display ........ 138
Service interval display . . . . . . 121
1 0 -Reset knob for
Trip odometer ......•.. _ ..... .. 120
Service indicator . . . . . . . . . . . . 121
Page 119 of 306

CONTROLS AND
EQUIPMENT-----------------------------------------
Setting the time I date
• Pull the knob to set the hour. The hour
display will flash. Set the desired hour dis
play by turning the knob clockwise or coun
terclockwise.
• To set the minutes, pull the knob out
as often as needed to make the minutes dis
play flash. You can then set the minutes dis
play by turning the knob clockwise or coun
terclockwise.
• To set the date, pull the knob out as
often as needed to make the day, month or
year display flash. You can then set the day,
month or year display by turning the knob
clockwise or counterclockwise.
Yo ur clock will be set once the display stops
flashing after you operate the setting knob.
118 Changing
time zones
If you enter a new time zone, simply change
the hour display to the correct time -see
"Setting the time I date".
Tu rning the date display on and off
• Pull out the knob as often as needed to
make the date display flash.
o Turn the knob counterclockwise to deac
tivate the display, or clockwise to activate it.
The setting will be accepted as soon as the
display stop flashing after you operate the
setti ng knob.
3 - Warning and indicator lights
See page 122. 4
- Engine coolant -¥
-
temperature gauge
The needle in the coolant temperature
gauge will indicate the temperature of the
coolant when the ignition is switched on.
Engine cold
Avoid high engine speeds and heavy
throttle when the needle is still at the left of
the dial.
Normal temperature
During normal running, the needle will re
main somewhere in the middle of the dial.
If the engine is working hard at high outside
temperatures, the needle may also go fur
ther to the right, but this Is no cause for
concern as long as the coolant tem
perature warning light does not
flash.