2000 AUDI ALLROAD oil pressure
[x] Cancel search: oil pressurePage 11 of 306

GENERA L
ILL USTR ATION----------------------
Warning and indicator lights
Symbol Page Symbol
Page
EPC Electronic
power control
123 Brake
• 126
BRAKE
(USA models)
;oo� Side
marker lights I headlights 123
� Self-le
veling suspension 12
3 (CD) Brake
• 12
6
(Canada models)
@ Electronic
Stability Program (ESP) 12
4
0 Gener
ator, Battery voltage
127, 143
� Electronic
immobilizer 12
4
t Safety
belt 127
¢!:} Turn
signals, emergency flasher 12
5, 152
� D High
beam 125
� Malfunction Indicator Lamp (MIL) 12
5
CHECK
AIR Airbag system 25, 125
BAG OK
Auto-Check
system ok I no failure
140
in the checked systems
-�- Coolant
temperature
• 141
and level
� Oil pressure
• 14
3
ABS Anti-lock
brake system
125
(USA models) BRAKE
Brake
lights malfunc tion
141
LIGHT (USA
models)
9) Anti-lock
brake system
125
(Canada models) (@) Brake
lights malfunc tion
141
(Canada models)
10
Page 118 of 306

The illustration on previous page shows the
arrangement of the instrument cluster in a
U.S. vehicle.
1 - Engine oil temperature
gauge �
Of (C)
Engine oil temperature ranges from 150 OF
(60 °C) to 350 °F (180 °C). With the needle
around 150 °F (60 °C), do not accelerate un
der full load.
If the needle moves into the upper zone in
excepti onal cases, reduce your speed. The
needle should then return to the normal
zone.
If the needle stays in upper zone, stop the
vehicle, switch off the engine and check the
oil leve l. If the oil level is correct and the oil
pressure warning light does not flash when
the engine is started, you can drive to the
next authorized Audi Dealer but do·not run
engine at high speeds. 2
- Ta chometer with clock
Ta chometer
The red area at the end of the scale indi
cates maximum permissible engine rpm
(rev olutions per minute) for all gears after
the break-in period. Before reaching this
area, the next higher gear or selector lever
position "D" should be selected or the foot
eased off the accelerator pedal.
r.Gb Upshifting early saves fuel and
1!/!:i reduces engine noise.
Shift to the next lower gear when engine
rpm drops below 1,500 rpm. CONT
ROLS AND EQUIPMENT
Digital clock with date display
The clock and date are located in the
tachometer dial. Adjusting the clock I date:
see next page.
When the ignition is off the clock I date dis
play can be illuminated by pressing the set
butt on. See illustration above.
117
Page 139 of 306

CONT
ROLS AND EQUIPMEN T-------------------------------------------
Radio frequency display
If the radio is switched on and no second
priority faults are present, the OK symbol
will go out and the display will show the fre
quenc y selected and various other informa
tion. This feature depends on the type of ra
dio fitted.
These displays are in addition to the radio
display -see separate operating instruc
tions for radio.
13 8 Auto-Check
system
In addition to the warning lights the Auto
Check System consistently monitors cer
tain individual functions and components of
the vehicle as soon as the ignition is turned
on and when the vehicle is moving.
Malfunctions or urgent repairs are audi bly
signaled as well as displayed by red (prior
ity 1) or yellow (priority 2) light symbols in
the instrument cluster.
You are thus reminded that a problem exists
which should be corrected for your conve
nience and safety, and to prevent the risk of
considerable damage to your vehicle due to
cert ain malfunctions.
The Auto-Check System incorporates a
speed warning feature and is also used
to display certain radio information_
The following malfunctions or warnings can
be displayed: Red Symbols (priority
1)
Engine coolant level is too low/
Engine temperature is too high
(moving symbol).
Engine oil pressure is too low
(moving symbol).
Page 144 of 306

---------------------CONTROLS AND EQUIPMENT
Engine oil pressure
If this warning light comes on, 1t Indi cates
that the engine oil pressure is too low.
• Stop the engine immediately,
check the engine oil level and
add oil if necessary.
If engine oil level is normal but the
light comes on again, do not con
tinua to operate the vehicle. This
could damage the engine.
Tu rn the engine off and contact the nearest
Audi Dealer for assistance.
The oil pressure warning light is not
an indicator for low engine oil level.
To check the oil level, always use
dipstick (sea page 235).
Make it a habit to have the engine oil
level checked with every fuel filling.
A Always heed all WA RNINGS
� on page 232. Brake
pads worn
0
See your Audi Dealer promptly to have front
and rear brake pads checked and replaced
as necessary.
Headlights I tail lights
�
Check, repair or replace:
• Light bulbs
• Fuses
• Electrical connections.
Washer fluid
Replenish the windshield washer
fluid in the container (see page 250).
Fuel Pull into the next filling station and
fill up. Battery
voltage too high
t::::1
or too low
See your Audi Dealer promptly to locate and
correct the problem. The battery may be run
down, the generator may be overcharging,
or the V-belt tension may need adjustment.
The voltage in the electrical system is dis
played on the voltmeter. See page 120 for
additional details.
143
Page 202 of 306

Braking
General notes
• The brakes on today's automobiles are
still subject to wear, depending largely on
operating conditions and driving habits. On
vehicles which are driven mostly in stop
an d-go city traffic or which are driven hard,
the brake pads should be checked by your
authorized Audi Dealer more often than
specified in the Maintenance booklet.
• On steep slopes, you should use the
braking effect of the engine. This way, you
prevent unnecessary wear to the brake sys
tem. If you must use your brakes, do not
hold the brakes down continu ously. Pump
the brakes at interv als.
• Under certain conditions, for example,
when driving through water or very heavy
rain, or even after washing your vehicle, the
braking effect can be reduced due to the
wet brake pads or pads which are iced-up in
the winter. A few cautious brake applica
tions should dry off the brake pads or re
move ice coati ngs. The
effect iveness of the brakes can be re
duced when the vehicle is driven on a salt
covered road and the brakes are not used.
Clean off accumulated salt coating from
brake discs and pads with a few cautious
brake applications.
�W ARNING
• If you damage the front spoiler,
or if you install a different spoiler,
be sure the air flow to the front
brakes is not obstructed, other
wise the brake system could over
heat reducing the effectiveness of
the entire brake aystem.
• Failure of one brake circuit will
impair the braking capability re
sulting in an increased stopping
distance.
Avo id driving the vehicle and have
it towed to the nearest authorized
Audi Dealer or qualified work
shop. VEH
ICLE OPERATION
Brake booster
�W ARNING
• The brake booster works with
vacuum pressure which is created
only when the engine is running.
Never let the vehicle roll to a stop
with the angina shut off.
• If the brake booster is not work
ing, for example when towing your
vehicle, or because the brake boo
ster has somehow been damaged,
the brake pedal must be pressed
harder to make up for the lack of
booster assistance.
201
Page 203 of 306

VE
HICL E OPER ATION------------------------
Functioning of Anti-Lock Brake
System (ABS)
The ABS contributes effectively to vehicle
control since it prevents the wheels from
locking when the brakes are applied. This
means that the vehicle remains steerable
and is less likely to skid.
Nota
Yo u don't have to "pump" the brake.
Just hold the brake pedal down.
However, do not expect that the ABS short
ens braking distance under all circum
stances. When driving on gravel or on newly
fallen snow on top of icy surfaces, braking
distance may be even longer , therefore, un
der these circumstances, it is especially im
portant that you drive slowly and with great
care.
202 How the
ABS system works
An automatic check is made when a speed
of about 4 mph (6 km/h) is reached.
When this happens a pumping noise can be
heard.
If an individual wheel begins to rotate too
slowly in relation to vehicle speed and tends
to lock, the ABS automatically reduces
brake pressure to prevent that wheel from
locking.
This automatic adjustment process
will cause a slight vibration of the
brake pedal and soma noises to alert
you that vehicle speed must be
adapted to existing road and traffic
conditions. Enhanced
ABS function {Offroad
Mode)
To improve braking on loose terrain (for ex
ample: gravel, scree, mud, slush, snow),
turn off the ESP (see page 205), which will
switch the ABS to a special mode designed
for off-road requirements.
In this mode, the ABS control system is
changed to allow a "wedge" of loose rock
or soil to form in the front of the wheels.
This improves braking performance.
The ESP indicator light in the instrument
cluster will come on when you have
switched to this special ABS mode (see
page 124).
This special ABS mode will remain active up
to about 40 mph (60 km/h). ABS operation
is not affected at speeds over 40 mph
(60 km/h).
To turn his special ABS mode off, press the
ESP button (To activate ESP, see page 152).
The ABS off-road mode will also be deacti
vated when vou turn off the engine.
Page 214 of 306

Washing
The best protection against environmental
influences is frequent washing and waxing.
How often this is required depends on how
much the vehicle is used, where it is parked
(garage, in the open under trees, etc.), the
seasonal and weather conditions as well as
env ironmental influences. The longer bird
droppings, insects, tree resin, road and in
dustrial grime, tar, soot, road salt and other
materials remain on the vehicle paint, the
more lasting their destructive effect will be.
High temperatures, as from strong sunlight,
intensify the corrosive effect.
Under certain circumstances, weekly
washing may be necessary. Under other
conditions. a monthly washing and waxing
may be adequate.
After the winter, the underside of the ve
hicle should be thoroughly washed. Automatic
car wash
The vehicle paint is so durable that the ve
hicle can normally be washed without prob
lems in an automatic car wash. However,
the effect on the paint depends to a large
extent on the design of the facil ity, the filter
ing of the wash water, the type of wash and
care material, etc. If the paint has a dull ap
pearance after going through the car wash
or is scratched, bring this to the atte ntion of
the operator immediately. If necessary use
a different car wash.
Notes
• Before going through a car wash, be sure
to take the usual precautions such as clos
ing the windows and sunroof*.
• You don't have to remove the factory
installed radio antenna. However, if your ve
hicle is equipped with the Navigation Sys
tem*, then you must remove the antenna.
• If you have installed additional accesso
ries on the vehicle -such as spoilers, roof
rack, etc. -it is best to ask the car wash op
erator if these should be remov ed. VE
HICLE CARE
Washing the vehicle by hand
� In the intsi'Sst of the environ
� msnt, the vehicle should only be
washed in special wash bays.
First soften the dirt with plenty of water and
rinse off as well as possible.
Then clean the vehicle with a soft sponge,
glove or brush starting on the roof and work
ing down using only slight pressure. Special
car wash soap should only be used for very
persistent dirt.
Rinse the sponge or glove thoroughly and
oft en.
Clean wheels .and sill panels last, using a dif
ferent sponge if pos sible.
After washing the vehicle, rinse thoroughly
with water and wipe it off.
213
Page 236 of 306

Engine
oil consumption
The rate of the oil consumption depends on
the quality and viscosity of oil, the speed at
which the engine is operated, the climate,
and road conditions as well as amount of
dilution and oxidation of the lubricant.
Because of these variables, no standard
rate of oil consumption can be established,
but drivers should expect higher oil con
sumption at high speeds and when the en
gine is new.
Therefore, we recommend that you check
the oil level at regular intervals (for example,
each time you are refuelling, or before going
on a long trip).
If the oil level should go below the minimal
level, the check engine oil level warn
ing light* in the instrument cluster will
come on. See page 144. You should check
the oil level using the oil dip stick as soon as
possible, and then top off the oil as neces
sary. Notes
• The engine in your vehicle de
pends on oil to lubricate and cool all
of its moving parts. Therefore the
engine oil should be checked regu
larly and kept at the required level.
• Lack of sufficient engine oil may
lead to severe engine damage.
• The oil pressure warning light is
not an oil level indicator.
A Always
heed all WAR NINGS
� on page 232.
Checking the engine oil level
The best time to check the engine oil level
is when the oil is warm.
To get a true reading, the vehicle must be on
level ground.
A Always heed all WAR NINGS
� on page 232.
• After turning off the engine, wait a few
minu tes for the oil to return to the oil pan. VE
HICLE CARE
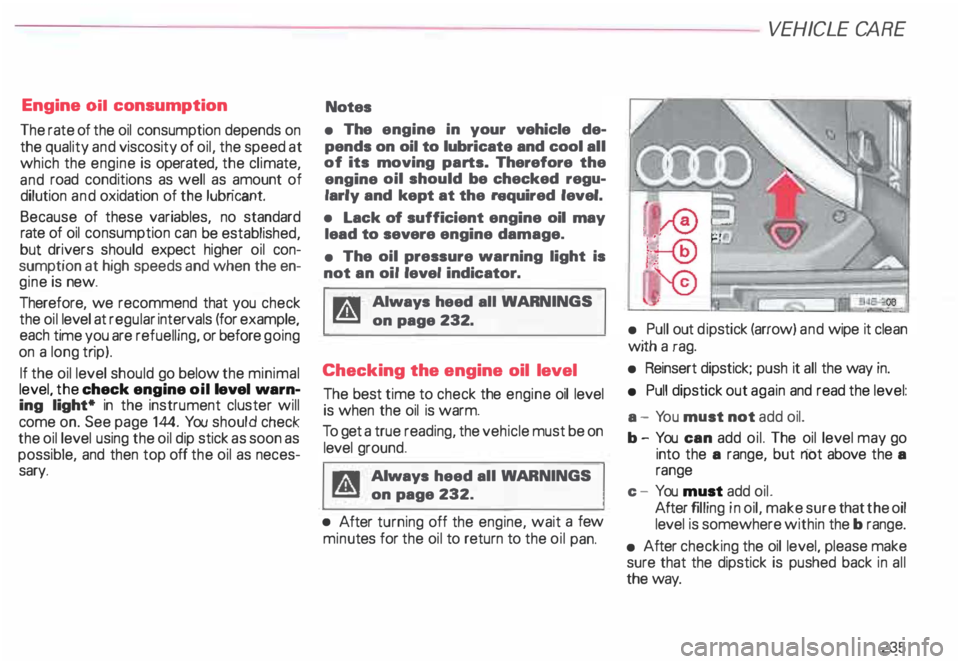
• Pull out dipstick (arrow) and wipe it clean
with a rag.
• Reinsert dipstick; push it all the way in.
• Pull dipstick out again and read the level:
a - Yo u must not add oil.
b- You can add oil. The oil level may go
into the a range, but riot above the a
range
c - You must add oil.
After filling in oil, make sure that the oil
level is somewhere within the b range.
• After checking the oil level, please make
sure that the dipstick is pushed back in all
the way.
235