Page 1778 of 4592
DI±566
± DIAGNOSTICSANTI±LOCK BRAKE SYSTEM (BOSCH Made)
801 Author�: Date�:
2 Is DTC output?
Check DTC on page DI±539.
YES Repair circuit indicated by the code output.
NO
Check for short circuit in harness and connector between ABS warning light, DLC1, DLC2, and
ECU (See page IN±31).
Page 1779 of 4592
F00120
LG±RECU
A6 IK212 J/C
J3
E1
J23: (5S±FE)4
J22: (1MZ±FE)B Tc
A12
3LG±R LG±R
LG±RB B
Tc
E
1J/C
A ADLC2
BR
DLC1
11II3
ECBR
BR
BR311
BRTc II3J/C
J8
J7C
B 6
LG±RECU
A6 IK212 J/C
J3
E1
J23: (5S±FE)4
J22: (1MZ±FE)B Tc
A12
3LG±R LG±R
LG±RB B
Tc
E
1J/C
A ADLC2
BR
DLC1
11II3
ECBR
BR
BR311
BRTc II3J/C
J8
J7C
B 6
P±B (1MZ±FE)
LG±R (5S±FE)
F02607 F00445F02612
DLC2
DLC1
Tc E
1
Tc E
1
± DIAGNOSTICSANTI±LOCK BRAKE SYSTEM (BOSCH Made)
DI±567
802 Author�: Date�:
Tc Terminal Circuit
CIRCUIT DESCRIPTION
Connecting between terminals Tc and E1 of the DLC1 or the DLC2 causes the ECU to display the DTC by
flashing the ABS warning light.
WIRING DIAGRAM
INSPECTION PROCEDURE
1 Check voltage between terminals Tc and E1 of DLC2 or DLC1.
CHECK:
(a) Turn the ignition switch ON.
(b) Measure voltage between terminals Tc and E
1 of DLC2 or
DLC1.
OK:
Voltage: 10 ± 14 V
OK If ABS warning light does not blink even after Tc
and E
1 are connected, the ECU may be defec-
tive.
NG
DI049±08
Page 1781 of 4592
F00095
11ECU
R±Y
AA6 IK2
3
J/CDLC1
BR
Ts
J22: (1MZ±FE)16
EC5
E
1Ts
BRAII38
J23: (5S±FE)R±Y
11ECU
R±Y
AA6 IK2
3
J/CDLC1
BR
Ts
J22: (1MZ±FE)165
E
1Ts
BRAII38
J23: (5S±FE)R±Y B±Y (1MZ±FE)
LG (5S±FE)
AB0119S08096
F00446DLC1 DLC1
DLC1
DLC1
DLC1
Ts
DLC1 E1
ON
± DIAGNOSTICSANTI±LOCK BRAKE SYSTEM (BOSCH Made)
DI±569
804 Author�: Date�:
Ts Terminal Circuit
CIRCUIT DESCRIPTION
The sensor check circuit detects abnormalities in the speed sensor signal which cannot be detected with
the DTC check.
Connecting terminals Ts and E
1 of the DLC1 in the engine compartment starts the check.
WIRING DIAGRAM
INSPECTION PROCEDURE
1 Check voltage between terminals Ts and E1 of DLC1.
CHECK:
(a) Turn the ignition switch ON.
(b) Measure voltage between terminals Ts and E
1 of DLC1.
OK:
Voltage: 10 ± 14 V
OK If ABS warning light does not blink even after Ts
and E
1 are connected, the ECU may be defec-
tive.
NG
DI04A±08
Page 1785 of 4592
DI04D±02
ABS & TRAC Check Sheet
Inspector 's
Name:
Customer 's Name
Date Vehicle
Brought InRegistration Year Registration No.
Frame No.
Odometer Reading/ /
/ /
Date Problem First Occurred
Frequency Problem Occurs/ /
ContinuousIntermittent ( times a day)
Remains ONDoes not Light Up
DTC Check1st Time
2nd TimeNormal Code
Malfunction Code (Code )
Normal CodeMalfunction Code (Code )
Symptomskm
miles
Check ItemNormal
ABS does not operate.
ABS Warning Light
AbnormalABS does not operate efficiently.
Malfunction
Indicator LightMalfunction Code (Code )
TRAC does not operate. (Wheels spin when starting rapidly.)
TRAC OFF Indicator
Light Abnormal
SLIP Indicator
Light Abnormal
Remains ON
Remains ON Does not Light UpBlinks Does not Light Up
± DIAGNOSTICSABS & TRACTION CONTROL SYSTEM
DI±573
808 Author�: Date�:
CUSTOMER PROBLEM ANALYSIS CHECK
Page 1786 of 4592

DI04E±04
F00075
S-17-1 Iei-23-1-A
F00041
DLC2
Tc E
1
DLC1
E
1Tc
R01346
Normal Code
0.25 sec.
0.25 sec. 2 sec.
ON
OFF
ON
OFF0.5 sec. 0.5 sec.
Code 11 and 21
4 sec.1.5 sec.
2.5 sec.
Code 11 Code 21
DI±574
± DIAGNOSTICSABS & TRACTION CONTROL SYSTEM
809 Author�: Date�:
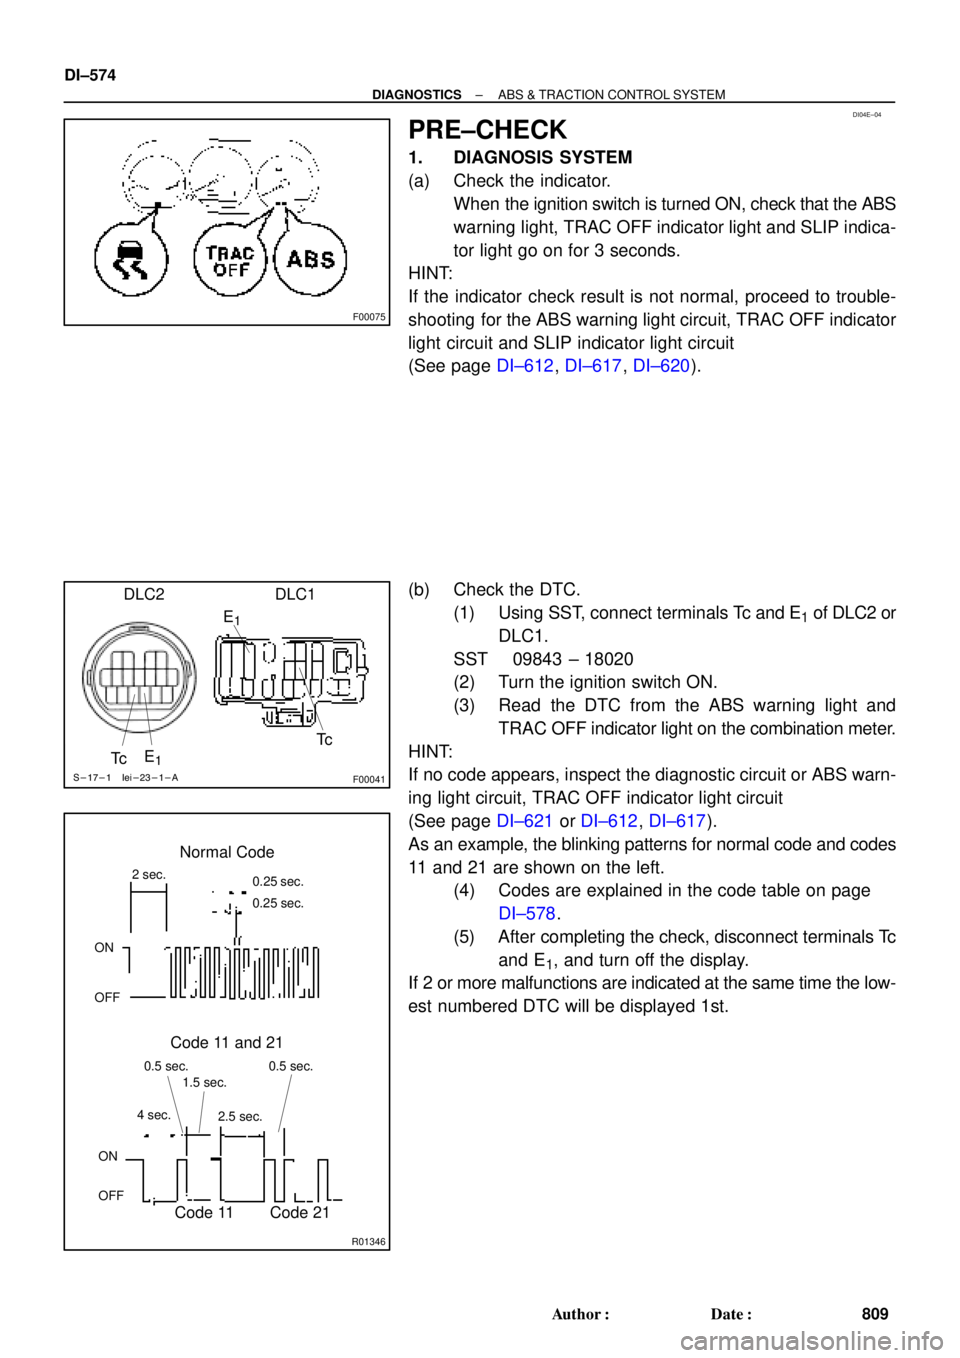
PRE±CHECK
1. DIAGNOSIS SYSTEM
(a) Check the indicator.
When the ignition switch is turned ON, check that the ABS
warning light, TRAC OFF indicator light and SLIP indica-
tor light go on for 3 seconds.
HINT:
If the indicator check result is not normal, proceed to trouble-
shooting for the ABS warning light circuit, TRAC OFF indicator
light circuit and SLIP indicator light circuit
(See page DI±612, DI±617, DI±620).
(b) Check the DTC.
(1) Using SST, connect terminals Tc and E
1 of DLC2 or
DLC1.
SST 09843 ± 18020
(2) Turn the ignition switch ON.
(3) Read the DTC from the ABS warning light and
TRAC OFF indicator light on the combination meter.
HINT:
If no code appears, inspect the diagnostic circuit or ABS warn-
ing light circuit, TRAC OFF indicator light circuit
(See page DI±621 or DI±612, DI±617).
As an example, the blinking patterns for normal code and codes
11 and 21 are shown on the left.
(4) Codes are explained in the code table on page
DI±578.
(5) After completing the check, disconnect terminals Tc
and E
1, and turn off the display.
If 2 or more malfunctions are indicated at the same time the low-
est numbered DTC will be displayed 1st.
Page 1787 of 4592

H07517
TOYOTA
Hand±held Tester
DLC2
BR3890
N09348
Hand±held Tester
Break±out±boxECUTOYOTA
TOYOTA
± DIAGNOSTICSABS & TRACTION CONTROL SYSTEM
DI±575
810 Author�: Date�:
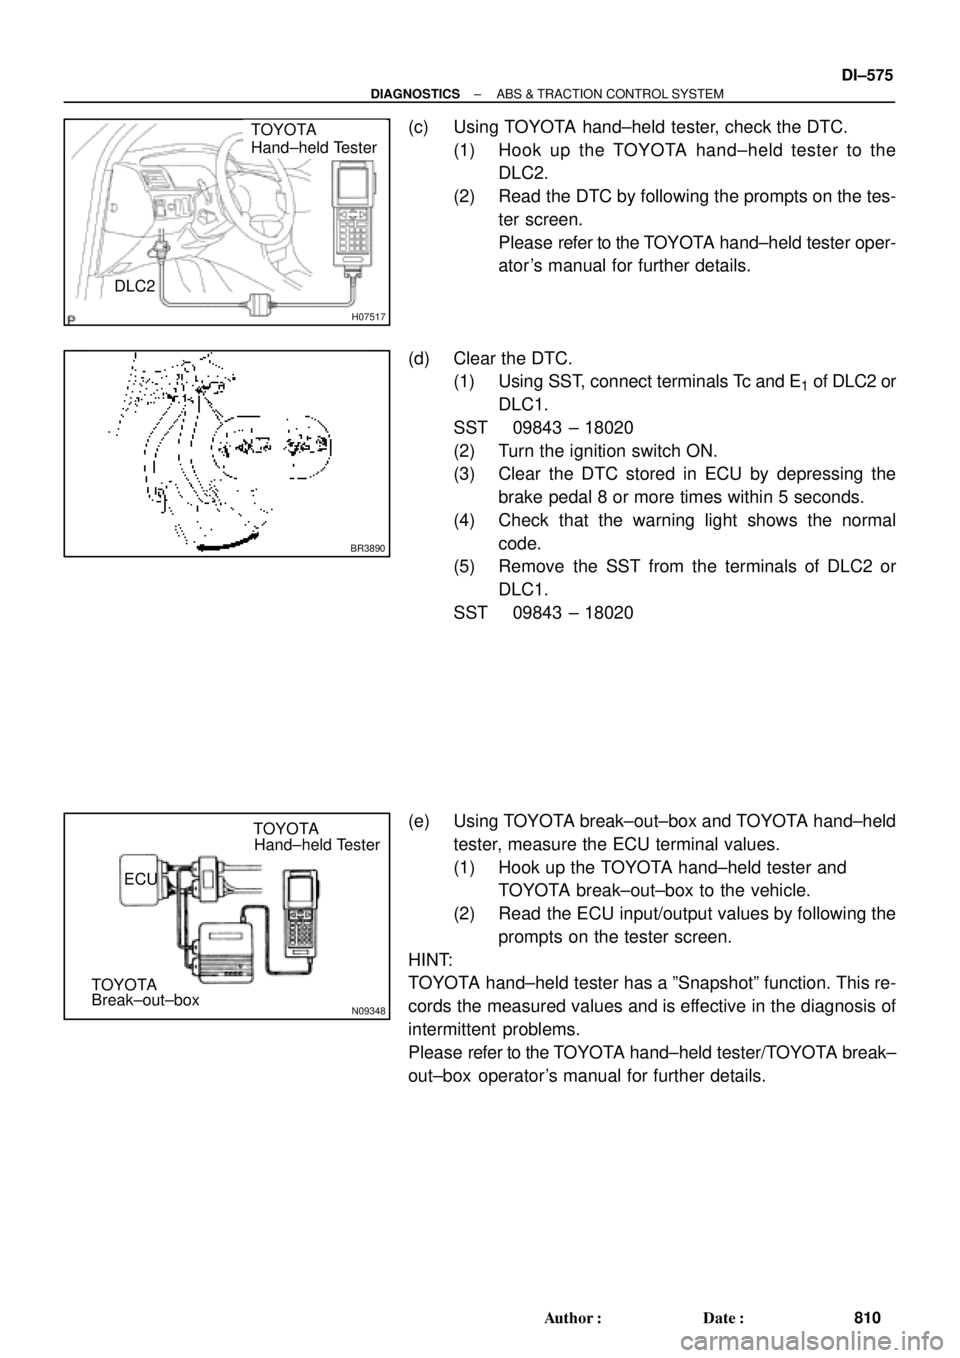
(c) Using TOYOTA hand±held tester, check the DTC.
(1) Hook up the TOYOTA hand±held tester to the
DLC2.
(2) Read the DTC by following the prompts on the tes-
ter screen.
Please refer to the TOYOTA hand±held tester oper-
ator 's manual for further details.
(d) Clear the DTC.
(1) Using SST, connect terminals Tc and E
1 of DLC2 or
DLC1.
SST 09843 ± 18020
(2) Turn the ignition switch ON.
(3) Clear the DTC stored in ECU by depressing the
brake pedal 8 or more times within 5 seconds.
(4) Check that the warning light shows the normal
code.
(5) Remove the SST from the terminals of DLC2 or
DLC1.
SST 09843 ± 18020
(e) Using TOYOTA break±out±box and TOYOTA hand±held
tester, measure the ECU terminal values.
(1) Hook up the TOYOTA hand±held tester and
TOYOTA break±out±box to the vehicle.
(2) Read the ECU input/output values by following the
prompts on the tester screen.
HINT:
TOYOTA hand±held tester has a ºSnapshotº function. This re-
cords the measured values and is effective in the diagnosis of
intermittent problems.
Please refer to the TOYOTA hand±held tester/TOYOTA break±
out±box operator's manual for further details.
Page 1788 of 4592

F02201
DLC1
TsTc E
1
BR3904
0.13 sec. 0.13 sec.
ON
OFF
BR3893
Malfunction Code (Example Code 72, 76)
72 67
ON
OFF
0.5 sec. 0.5 sec. 0.5 sec. 0.5 sec.1.5 sec.
2.5 sec.4 sec.
Repeat DI±576
± DIAGNOSTICSABS & TRACTION CONTROL SYSTEM
811 Author�: Date�:
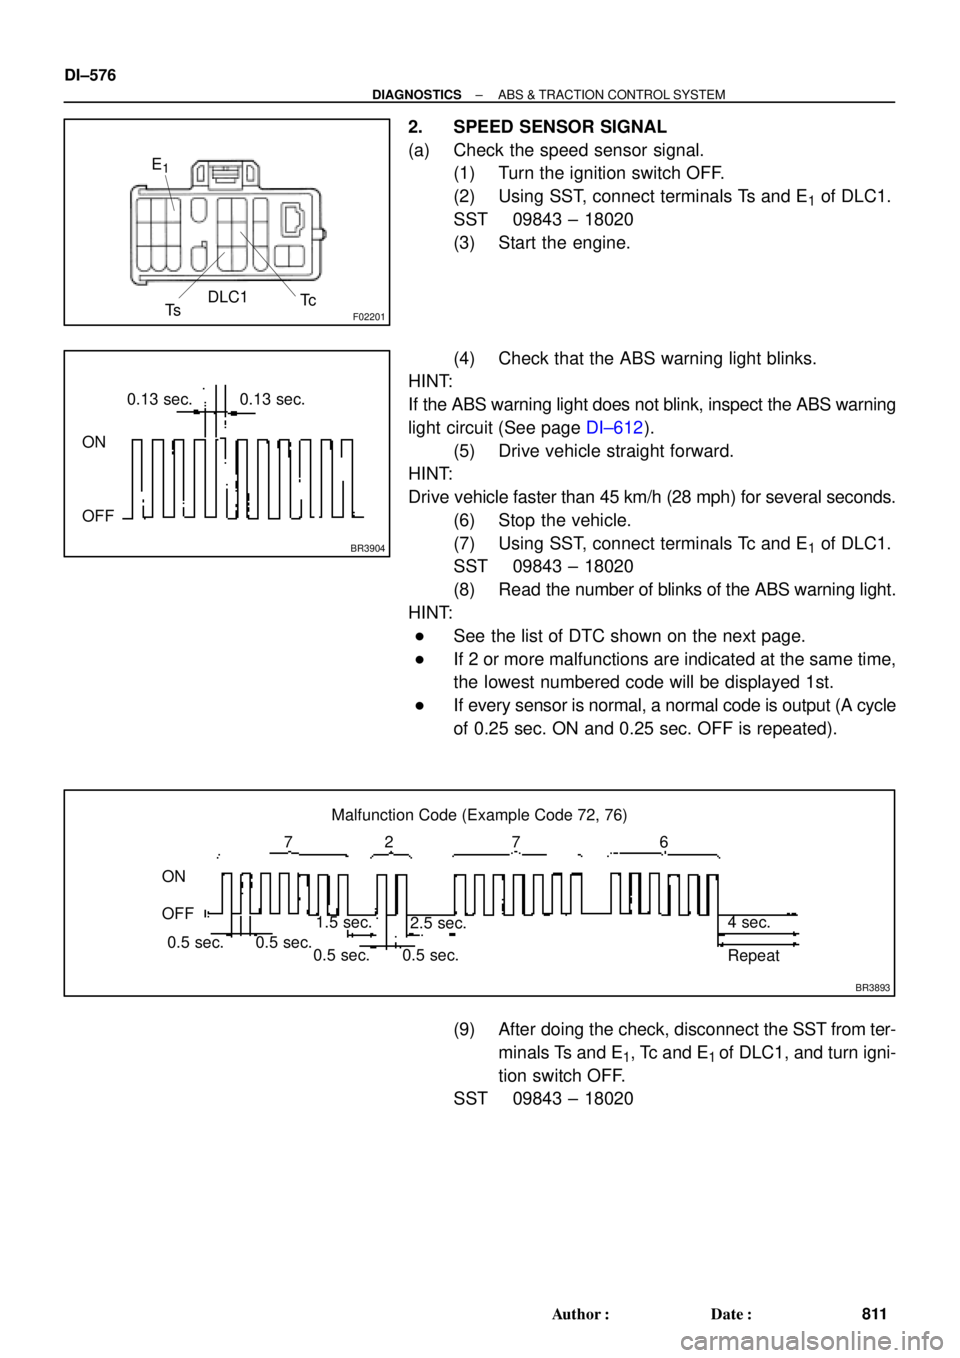
2. SPEED SENSOR SIGNAL
(a) Check the speed sensor signal.
(1) Turn the ignition switch OFF.
(2) Using SST, connect terminals Ts and E
1 of DLC1.
SST 09843 ± 18020
(3) Start the engine.
(4) Check that the ABS warning light blinks.
HINT:
If the ABS warning light does not blink, inspect the ABS warning
light circuit (See page DI±612).
(5) Drive vehicle straight forward.
HINT:
Drive vehicle faster than 45 km/h (28 mph) for several seconds.
(6) Stop the vehicle.
(7) Using SST, connect terminals Tc and E
1 of DLC1.
SST 09843 ± 18020
(8) Read the number of blinks of the ABS warning light.
HINT:
�See the list of DTC shown on the next page.
�If 2 or more malfunctions are indicated at the same time,
the lowest numbered code will be displayed 1st.
�If every sensor is normal, a normal code is output (A cycle
of 0.25 sec. ON and 0.25 sec. OFF is repeated).
(9) After doing the check, disconnect the SST from ter-
minals Ts and E
1, Tc and E1 of DLC1, and turn igni-
tion switch OFF.
SST 09843 ± 18020
Page 1792 of 4592
DI04G±04
F01177
SLIP Indicator Light
TRAC OFF Indicator Light
ABS Warning Light
DLC1
DLC2
Rear Speed Sensor
Sensor Rotor ABS & TRAC ActuatorABS & TRAC ECU
TRAC OFF Switch
ABS & TRAC
Solenoid Relay
ABS & TRAC
Motor RelaySensor Rotor
Front Speed Sensor
Stop Light Switch Front Speed Sensor
DI±580
± DIAGNOSTICSABS & TRACTION CONTROL SYSTEM
815 Author�: Date�:
PARTS LOCATION