1999 SUBARU LEGACY engine oil
[x] Cancel search: engine oilPage 572 of 1456

8. Time Lag Test
A: INSPECTION
1. GENERAL INFORMATION
If the shift lever is shifted while the engine is idling,
there will be a certain time elapse or lag before the
shock can be felt. This is used for checking the
condition of the low clutch, reverse clutch, low &
reverse brake and one-way clutch.
CAUTION:
IPerform the test at normal operation fluid
temperature 60 to 80ÉC (140 to 176ÉF).
IBe sure to allow a one minute interval
between tests.
IMake three measurements and take the aver-
age value.
2. TEST METHODS
1) Fully apply the parking brake.
2) Start the engine.
Check idling speed (A/C OFF).
ªNº range: 800±100 rpm
3) Shift the shift lever from ªNº to ªDº range.
Using a stop watch, measure the time it takes from
shifting the lever until the shock is felt.
Time lag: Less than 1.2 seconds
4) In same manner, measure the time lag for ªNº
®ªRº.
Time lag: Less than 1.5 seconds
3. EVALUATION
1) If ªNº®ªDº time lag is longer than specified:
ILine pressure too low
ILow clutch worn
IOne-way clutch not operating properly
2) If ªNº®ªRº time lag is longer than specified:
ILine pressure too low
IReverse clutch worn
ILow & reverse brake worn
9. Line Pressure Test
A: MEASUREMENT
1. GENERAL INFORMATION
If the clutch or the brake shows a sign of slippage
or shifting sensation is not correct, the line pres-
sure should be checked.
IExcessive shocks during upshifting or shifting
takes place at a higher point than under normal
circumstances, may be due to the line pressure
being too high.
ISlippage or inability to operate the vehicle may,
in most cases, be due to loss of oil pressure for the
operation of the clutch, brake or control valve.
1) Line pressure measurement (under no load)
CAUTION:
IBefore measuring line pressure, jack-up all
wheels.
IMaintain temperature of ATF at approxi-
mately 50ÉC (122ÉF) during measurement.
(ATF will reach the above temperature after
idling the engine for approximately 30 minutes
with select lever in ªNº or ªPº.)
2) Line pressure measurement (under heavy load)
CAUTION:
IBefore measuring line pressure, apply both
foot and parking brakes with all wheels
chocked (Same as for ªstallº test conditions).
IMeasure line pressure when select lever is in
ªRº, ª2º with engine under stall conditions.
IMeasure line pressure within 5 seconds after
shifting the select lever to each position. (If line
pressure needs to be measured again, allow
the engine to idle and then stop. Wait for at
least one minute before measurement.)
IMaintain the temperature of ATF at approxi-
mately 50ÉC (122ÉF) during measurement. (ATF
will reach the above temperature after idling
the engine for approximately 30 minutes with
the select lever in ªNº or ªPº.)
43
[W9A1]3-2SERVICE PROCEDURE
9. Line Pressure Test
Page 573 of 1456

2. TEST METHODS
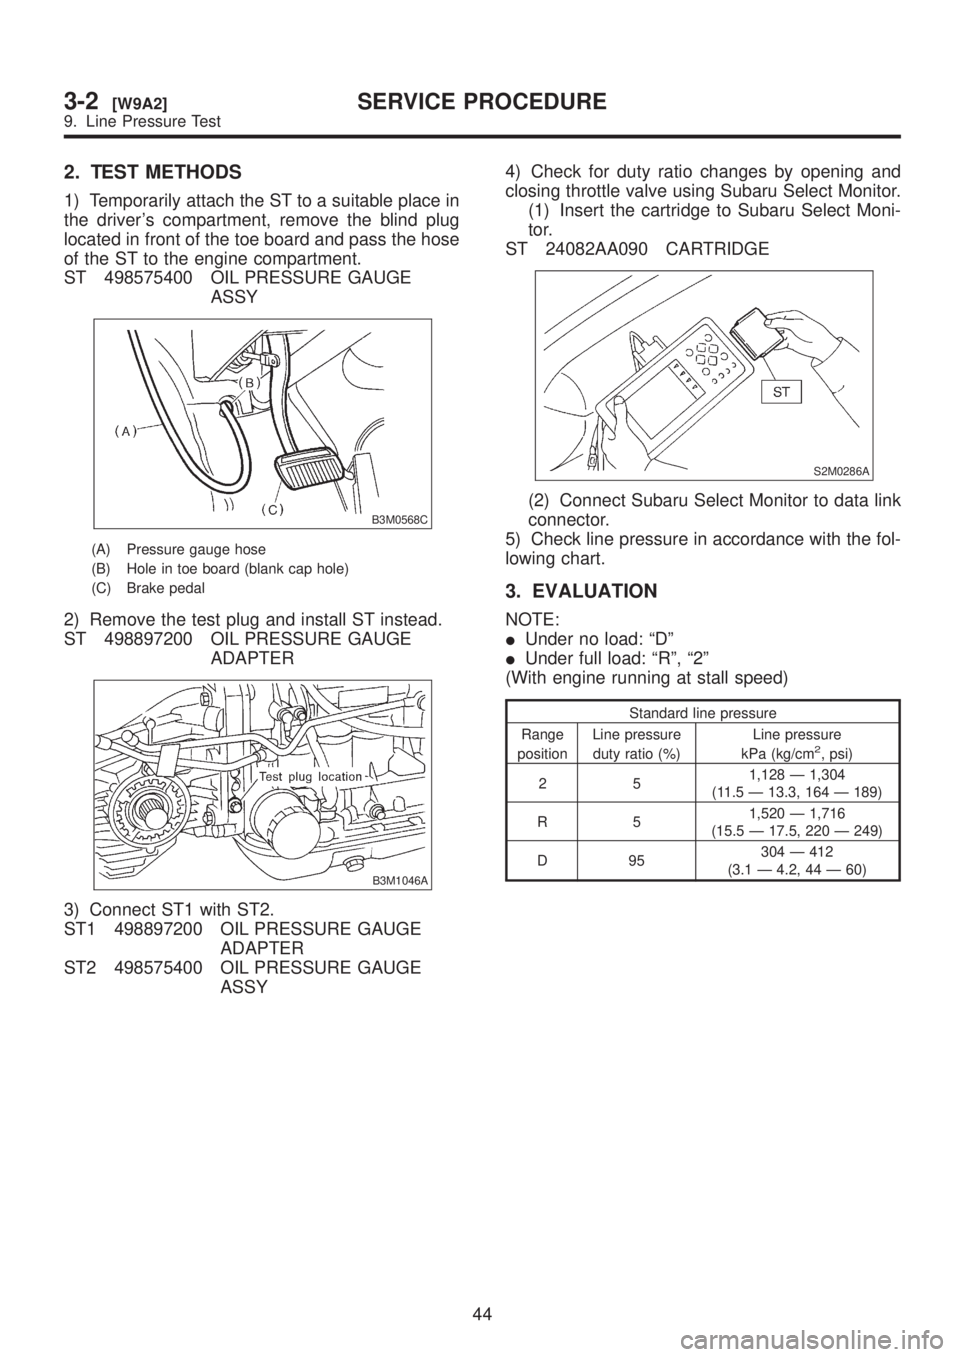
1) Temporarily attach the ST to a suitable place in
the driver's compartment, remove the blind plug
located in front of the toe board and pass the hose
of the ST to the engine compartment.
ST 498575400 OIL PRESSURE GAUGE
ASSY
B3M0568C
(A) Pressure gauge hose
(B) Hole in toe board (blank cap hole)
(C) Brake pedal
2) Remove the test plug and install ST instead.
ST 498897200 OIL PRESSURE GAUGE
ADAPTER
B3M1046A
3) Connect ST1 with ST2.
ST1 498897200 OIL PRESSURE GAUGE
ADAPTER
ST2 498575400 OIL PRESSURE GAUGE
ASSY4) Check for duty ratio changes by opening and
closing throttle valve using Subaru Select Monitor.
(1) Insert the cartridge to Subaru Select Moni-
tor.
ST 24082AA090 CARTRIDGE
S2M0286A
(2) Connect Subaru Select Monitor to data link
connector.
5) Check line pressure in accordance with the fol-
lowing chart.
3. EVALUATION
NOTE:
IUnder no load: ªDº
IUnder full load: ªRº, ª2º
(With engine running at stall speed)
Standard line pressure
Range
positionLine pressure
duty ratio (%)Line pressure
kPa (kg/cm
2, psi)
251,128 Ð 1,304
(11.5 Ð 13.3, 164 Ð 189)
R51,520 Ð 1,716
(15.5 Ð 17.5, 220 Ð 249)
D95304 Ð 412
(3.1 Ð 4.2, 44 Ð 60)
44
3-2[W9A2]SERVICE PROCEDURE
9. Line Pressure Test
Page 574 of 1456

10. Transfer Clutch Pressure
Test
A: MEASUREMENT
1. TEST METHODS
Check transfer clutch pressure in accordance with
the following chart in the same manner as with line
pressure.
ST 499897700 OIL PRESSURE ADAPTER
SET
ST 498575400 OIL PRESSURE GAUGE
ASSY
AWD mode: ªDº range
FWD mode: ªPº range, engine speed 2,000 rpm
CAUTION:
Before setting in FWD mode, install spare fuse
on FWD mode switch.
B3M1047
2. EVALUATION
NOTE:
If oil pressure is not produced or if it does not
change in the AWD mode, the duty solenoid C or
transfer valve assembly may be malfunctioning. If
oil pressure is produced in the FWD mode, the
problem is similar to that in the AWD mode.
Standard transfer clutch pressure kPa (kg/cm2, psi)
Duty ratio
(%)AWD mode FWD mode
5951 Ð 1,089
(9.7 Ð 11.1, 138 Ð 158)Ð
60226 Ð 294
(2.3 Ð 3.0, 33 Ð 43)Ð
95 Ð 0 (0, 0)
45
[W10A2]3-2SERVICE PROCEDURE
10. Transfer Clutch Pressure Test
Page 703 of 1456

2. Rear Differential
Symptom Possible cause Remedy
1. Oil leakage(1) Worn, scratched, or incorrectly seated front or
side oil seal. Scored, battered, or excessively worn
sliding surface of companion flange.Repair or replace.
(2) Clogged or damaged air breather. Clean, repair or replace.
(3) Loose bolts on differential spindle or side
retainer, or incorrectly fitted O-ring.Tighten bolts to specified torque.
Replace O-ring.
(4) Loose rear cover attaching bolts or damaged
gasket.Tighten bolts to specified torque.
Replace gasket and apply liquid
packing.
(5) Loose oil filler or drain plug. Retighten and apply liquid packing.
(6) Wear, damage or incorrectly fitting for spindle,
side retainer and oil seal.Repair or replace.
2. Seizure
NOTE:
Seized or damaged parts should
be replaced, and also other parts
should be thoroughly checked for
any defect and should be repaired
or replaced as required.(1) Insufficient backlash for hypoid gear. Readjust or replace.
(2) Excessive preload for side, rear, or front bearing. Readjust or replace.
(3) Insufficient or improper oil used. Replace seized part and fill with
specified oil to specified level.
3. Damage
NOTE:
Damaged parts should be
replaced, and also other parts
should be thoroughly checked for
any defect and should be repaired
or replaced as required.(1) Improper backlash for hypoid gear. Replace.
(2) Insufficient or excessive preload for side, rear, or
front bearing.Readjust or replace.
(3) Excessive backlash for differential gear. Replace gear or thrust washer.
(4) Loose bolts and nuts such as crown gear bolt. Retighten.
(5) Damage due to overloading. Replace.
4. Noises when starting or shift-
ing gears
NOTE:
Noises may be caused by differen-
tial assembly, universal joint, wheel
bearing, etc. Find out what is actu-
ally making noise before disassem-
bly.(1) Excessive backlash for hypoid gear. Readjust.
(2) Excessive backlash for differential gear. Replace gear or thrust washer.
(3) Insufficient preload for front or rear bearing. Readjust.
(4) Loose drive pinion nut. Tighten to specified torque.
(5) Loose bolts and nuts such as side bearing
retainer attaching bolt.Tighten to specified torque.
5. Noises when cornering(1) Damaged differential gear. Replace.
(2) Excessive wear or damage of thrust washer. Replace.
(3) Broken pinion mate shaft. Replace.
(4) Seized or damaged side bearing. Replace.
6. Gear noises
NOTE:
Since noises from engine, muffler,
transmission, propeller shaft, wheel
bearings, tires, and body are
sometimes mistaken for noises
from differential assembly, be care-
ful in checking them. Inspection
methods to locate noises include
coasting, accelerating, cruising,
and jacking-up all four wheels.
Perform these inspections accord-
ing to condition of trouble. When
listening to noises, shift gears into
four wheel drive and fourth speed
position, trying to pick up only dif-
ferential noise.(1) Improper tooth contact of hypoid gear. Readjust or replace hypoid gear
set.
(2) Improper backlash for hypoid gear. Readjust.
(3) Scored or chipped teeth of hypoid gear. Replace hypoid gear set.
(4) Seized hypoid gear. Replace hypoid gear set.
(5) Improper preload for front or rear bearings. Readjust.
(6) Seized, scored, or chipped front or rear bearing. Replace.
(7) Seized, scored, or chipped side bearing. Replace.
(8) Vibrating differential carrier. Replace.
52
3-4[K200]DIAGNOSTICS
2. Rear Differential
Page 793 of 1456

1. Steering System
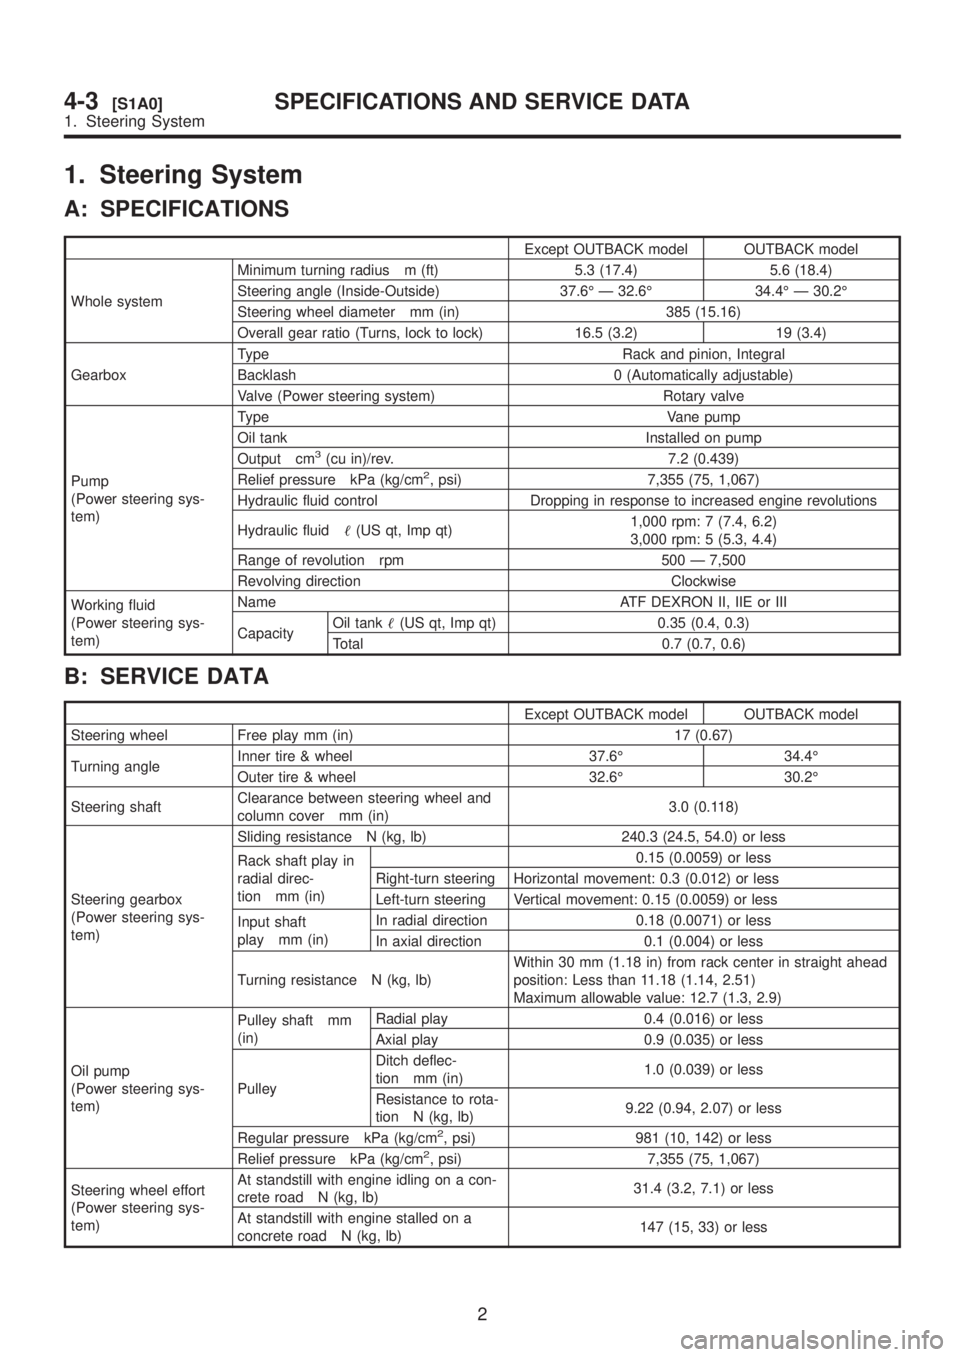
A: SPECIFICATIONS
Except OUTBACK model OUTBACK model
Whole systemMinimum turning radius m (ft) 5.3 (17.4) 5.6 (18.4)
Steering angle (Inside-Outside) 37.6É Ð 32.6É 34.4É Ð 30.2É
Steering wheel diameter mm (in) 385 (15.16)
Overall gear ratio (Turns, lock to lock) 16.5 (3.2) 19 (3.4)
GearboxType Rack and pinion, Integral
Backlash 0 (Automatically adjustable)
Valve (Power steering system) Rotary valve
Pump
(Power steering sys-
tem)Type Vane pump
Oil tank Installed on pump
Output cm
3(cu in)/rev. 7.2 (0.439)
Relief pressure kPa (kg/cm2, psi) 7,355 (75, 1,067)
Hydraulic fluid control Dropping in response to increased engine revolutions
Hydraulic fluid(US qt, Imp qt)1,000 rpm: 7 (7.4, 6.2)
3,000 rpm: 5 (5.3, 4.4)
Range of revolution rpm 500 Ð 7,500
Revolving direction Clockwise
Working fluid
(Power steering sys-
tem)Name ATF DEXRON II, IIE or III
CapacityOil tank(US qt, Imp qt) 0.35 (0.4, 0.3)
Total 0.7 (0.7, 0.6)
B: SERVICE DATA
Except OUTBACK model OUTBACK model
Steering wheel Free play mm (in) 17 (0.67)
Turning angleInner tire & wheel 37.6É 34.4É
Outer tire & wheel 32.6É 30.2É
Steering shaftClearance between steering wheel and
column cover mm (in)3.0 (0.118)
Steering gearbox
(Power steering sys-
tem)Sliding resistance N (kg, lb) 240.3 (24.5, 54.0) or less
Rack shaft play in
radial direc-
tion mm (in)0.15 (0.0059) or less
Right-turn steering Horizontal movement: 0.3 (0.012) or less
Left-turn steering Vertical movement: 0.15 (0.0059) or less
Input shaft
play mm (in)In radial direction 0.18 (0.0071) or less
In axial direction 0.1 (0.004) or less
Turning resistance N (kg, lb)Within 30 mm (1.18 in) from rack center in straight ahead
position: Less than 11.18 (1.14, 2.51)
Maximum allowable value: 12.7 (1.3, 2.9)
Oil pump
(Power steering sys-
tem)Pulley shaft mm
(in)Radial play 0.4 (0.016) or less
Axial play 0.9 (0.035) or less
PulleyDitch deflec-
tion mm (in)1.0 (0.039) or less
Resistance to rota-
tion N (kg, lb)9.22 (0.94, 2.07) or less
Regular pressure kPa (kg/cm
2, psi) 981 (10, 142) or less
Relief pressure kPa (kg/cm2, psi) 7,355 (75, 1,067)
Steering wheel effort
(Power steering sys-
tem)At standstill with engine idling on a con-
crete road N (kg, lb)31.4 (3.2, 7.1) or less
At standstill with engine stalled on a
concrete road N (kg, lb)147 (15, 33) or less
2
4-3[S1A0]SPECIFICATIONS AND SERVICE DATA
1. Steering System
Page 827 of 1456
![SUBARU LEGACY 1999 Service Repair Manual 5. Control Valve (Power Steering Gearbox) [LHD model]
A: CHECKING OIL LEAKING POINTS
B4M1132A
(1) Power cylinder
(2) Cylinder
(3) Rack piston
(4) Rack axle
(5) Input shaft(6) Torsion bar
(7) Valve hou SUBARU LEGACY 1999 Service Repair Manual 5. Control Valve (Power Steering Gearbox) [LHD model]
A: CHECKING OIL LEAKING POINTS
B4M1132A
(1) Power cylinder
(2) Cylinder
(3) Rack piston
(4) Rack axle
(5) Input shaft(6) Torsion bar
(7) Valve hou](/manual-img/17/57435/w960_57435-826.png)
5. Control Valve (Power Steering Gearbox) [LHD model]
A: CHECKING OIL LEAKING POINTS
B4M1132A
(1) Power cylinder
(2) Cylinder
(3) Rack piston
(4) Rack axle
(5) Input shaft(6) Torsion bar
(7) Valve housing
(8) Valve body
(9) Control valve
(10) Pipe B(11) Pipe A
(12) Pinion
(13) Pinion axle
1. OIL LEAKING POINTS
1) If leak point is other than a, b, c, or d, perform
check step 5) in ªOIL LEAK CHECK PROCEDURE
AND REPLACEMENT PARTSº before dismounting
gearbox from vehicle.
gearbox is dismounted without confirming where
the leak is, it must be mounted again to locate the
leak point.
2) Even if the location of the leak can be easily
found by observing the leaking condition, it is nec-
essary to thoroughly remove the oil from the sus-
pected portion and turn the steering wheel from
lock to lock about 30 to 40 times with engine
running, then make comparison of the suspected
portion between immediately after and several
hours after this operation.
3) Before starting oil leak repair work, be sure to
clean the gearbox, hoses, pipes, and surrounding
parts. After completing repair work, clean these
areas again.
2. OIL LEAK CHECK PROCEDURE AND
REPLACEMENT PARTS
NOTE:
Parts requiring replacement are described in the
smallest unit of spare parts including damaged
parts and spare parts damaged. In actual disas-sembly work, accidental damage as well as inevi-
table damage to some related parts must be taken
into account, and spare parts for them must also
be prepared. However, it is essential to pinpoint the
cause of trouble, and limit the number of replace-
ment parts as much as possible.
1) Leakage from ªaº
The oil seal is damaged. Replace valve assembly
with a new one.
2) Leakage from ªbº
The torsion bar O-ring is damaged. Replace valve
assembly with a new one.
3) Leakage from ªcº
The oil seal is damaged. Replace valve assembly
with a new one.
4) Leakage from ªdº
The pipe is damaged. Replace the faulty pipe or
O-ring.
5) If leak is other than a, b, c, or d, and if oil is
leaking from the gearbox, move the right and left
boots toward tie-rod end side, respectively, with the
gearbox mounted to the vehicle, and remove oil
from the surrounding portions. Then, turn the steer-
ing wheel from lock to lock 30 to 40 times with the
engine running, then make comparison of the
leaked portion immediately after and several hours
after this operation.
35
[W5A2]4-3SERVICE PROCEDURE
5. Control Valve (Power Steering Gearbox) [LHD model]
Page 828 of 1456

6) Leakage from ªeº
The cylinder seal is damaged. Replace rack bush
with a new one.
7) Leakage from ªfº
There are two possible causes. Take following step
first. Remove the pipe assembly B from the valve
housing, and close the circuit with ST.
ST 926420000 PLUG
Turn the steering wheel from lock to lock 30 to 40
times with the engine running, then make compari-
son of the leaked portion between immediately
after and several hours after this operation.
CAUTION:
IIf leakage from ªfº is noted again:
The oil seal of pinion and valve assembly is
damaged. Replace pinion and valve assembly
with a new one. Or replace the oil seal and the
parts that are damaged during disassembly
with new ones.
IIf oil stops leaking from ªfº:
The oil seal of rack housing is damaged.
Replace the oil seal and the parts that are dam-
aged during disassembly with new ones.
B: DISASSEMBLY
NOTE:
This section focuses on the disassembly and reas-
sembly of control valve. For the inspection and
adjustment and the service procedures for associ-
ated parts, refer to ªSteering Gearbox (Power
Steering System) [LHD model]º.
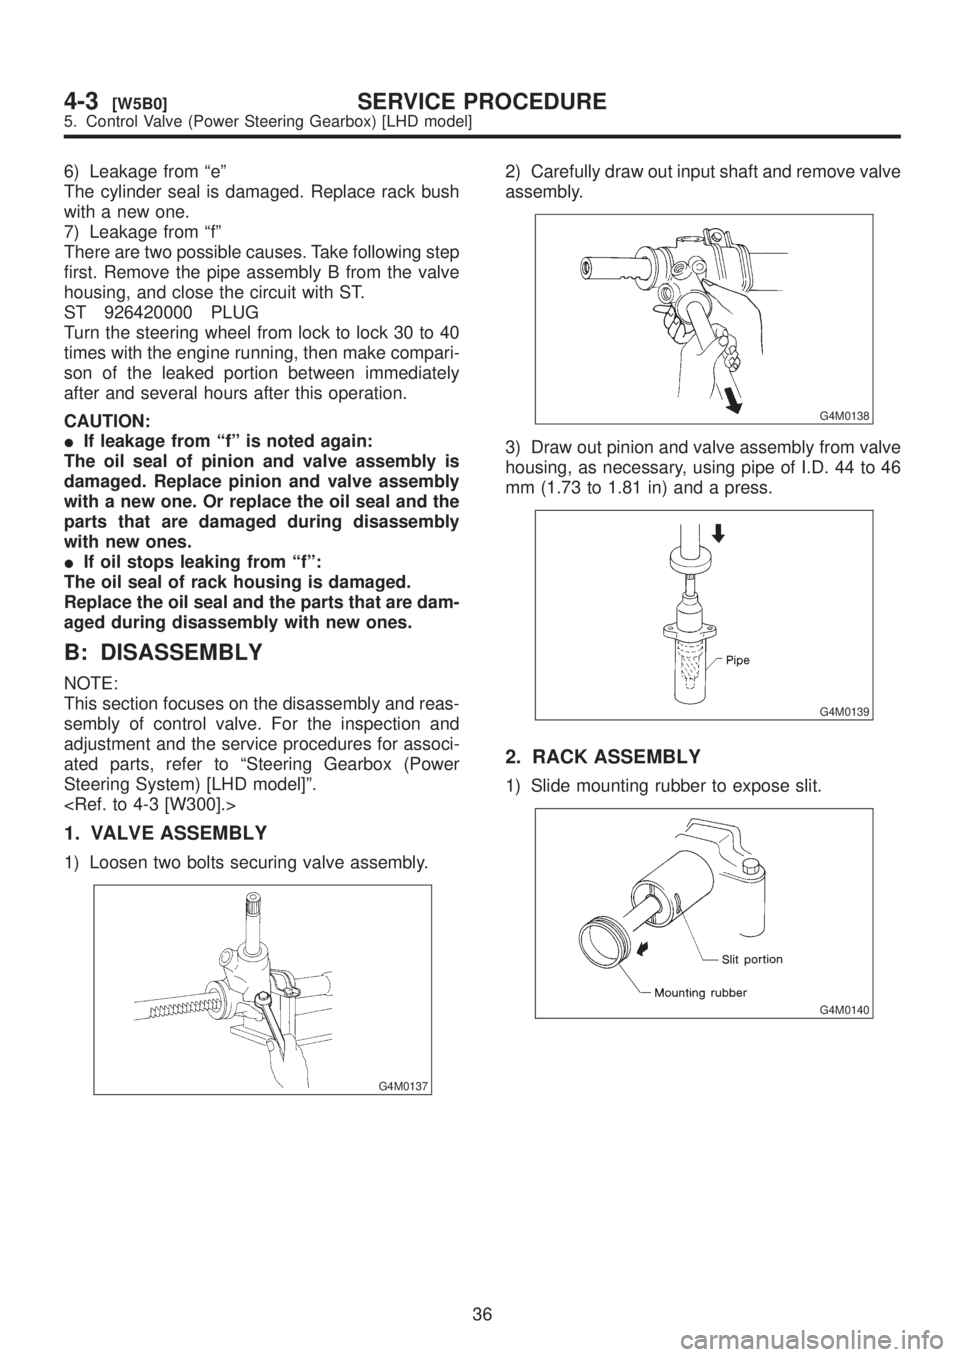
1. VALVE ASSEMBLY
1) Loosen two bolts securing valve assembly.
G4M0137
2) Carefully draw out input shaft and remove valve
assembly.
G4M0138
3) Draw out pinion and valve assembly from valve
housing, as necessary, using pipe of I.D. 44 to 46
mm (1.73 to 1.81 in) and a press.
G4M0139
2. RACK ASSEMBLY
1) Slide mounting rubber to expose slit.
G4M0140
36
4-3[W5B0]SERVICE PROCEDURE
5. Control Valve (Power Steering Gearbox) [LHD model]
Page 834 of 1456
![SUBARU LEGACY 1999 Service Repair Manual 6. Control Valve (Power Steering Gearbox) [RHD model]
A: CHECKING OIL LEAKING POINTS
B4M0668A
1. OIL LEAKING POINTS
1) If leak point is other than a, b, c, or d, perform
check step 5) in ªOIL LEAK CH SUBARU LEGACY 1999 Service Repair Manual 6. Control Valve (Power Steering Gearbox) [RHD model]
A: CHECKING OIL LEAKING POINTS
B4M0668A
1. OIL LEAKING POINTS
1) If leak point is other than a, b, c, or d, perform
check step 5) in ªOIL LEAK CH](/manual-img/17/57435/w960_57435-833.png)
6. Control Valve (Power Steering Gearbox) [RHD model]
A: CHECKING OIL LEAKING POINTS
B4M0668A
1. OIL LEAKING POINTS
1) If leak point is other than a, b, c, or d, perform
check step 5) in ªOIL LEAK CHECK PROCEDURE
AND REPLACEMENT PARTSº before dismounting
gearbox from vehicle.
gearbox is dismounted without confirming where
the leak is, it must be mounted again to locate the
leak point.
2) Even if the location of the leak can be easily
found by observing the leaking condition, it is nec-
essary to thoroughly remove the oil from the sus-
pected portion and turn the steering wheel from
lock to lock about 30 to 40 times with engine
running, then make comparison of the suspected
portion between immediately after and several
hours after this operation.
3) Before starting oil leak repair work, be sure to
clean the gearbox, hoses, pipes, and surrounding
parts. After completing repair work, clean these
areas again.
2. OIL LEAK CHECK PROCEDURE AND
REPLACEMENT PARTS
NOTE:
Parts requiring replacement are described in the
smallest unit of spare parts including damaged
parts and spare parts damaged. In actual disas-
sembly work, accidental damage as well as inevi-
table damage to some related parts must be taken
into account, and spare parts for them must also
be prepared. However, it is essential to pinpoint the
cause of trouble, and limit the number of replace-
ment parts as much as possible.
1) Leakage from ªaº
The oil seal is damaged. Replace valve assembly
with a new one.
2) Leakage from ªbº
The torsion bar O-ring is damaged. Replace valve
assembly with a new one.
3) Leakage from ªcº
The oil seal is damaged. Replace valve assembly
with a new one.
4) Leakage from ªdº
The pipe is damaged. Replace the faulty pipe or
O-ring.
5) If leak is other than a, b, c, or d, and if oil is
leaking from the gearbox, move the right and left
42
4-3[W6A0]SERVICE PROCEDURE
6. Control Valve (Power Steering Gearbox) [RHD model]