1999 NISSAN PICK-UP torque
[x] Cancel search: torquePage 250 of 666
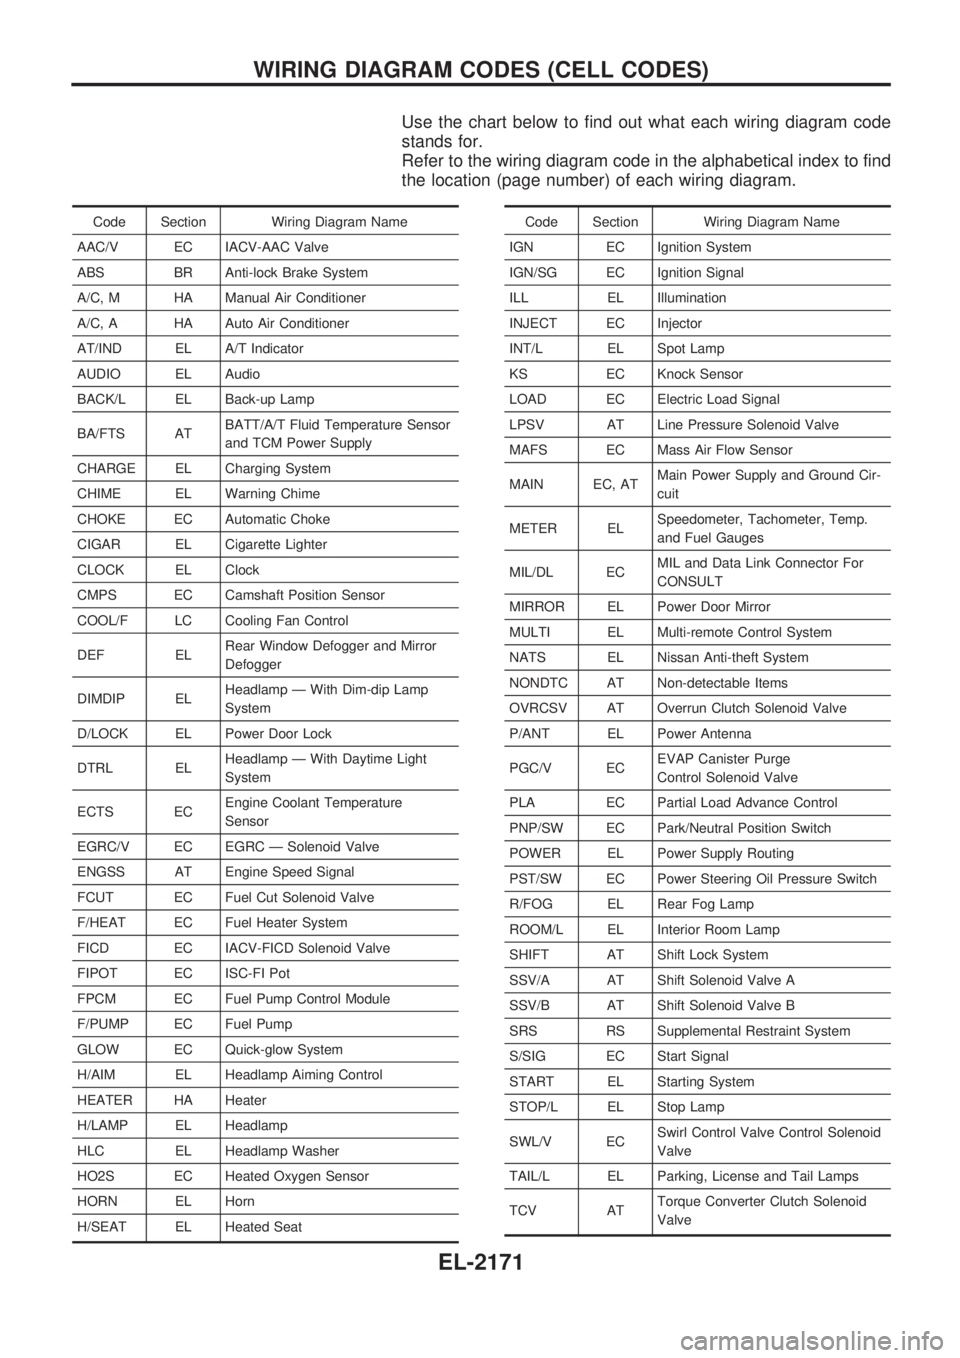
Use the chart below to find out what each wiring diagram code
stands for.
Refer to the wiring diagram code in the alphabetical index to find
the location (page number) of each wiring diagram.
Code Section Wiring Diagram Name
AAC/V EC IACV-AAC Valve
ABS BR Anti-lock Brake System
A/C, M HA Manual Air Conditioner
A/C, A HA Auto Air Conditioner
AT/IND EL A/T Indicator
AUDIO EL Audio
BACK/L EL Back-up Lamp
BA/FTS ATBATT/A/T Fluid Temperature Sensor
and TCM Power Supply
CHARGE EL Charging System
CHIME EL Warning Chime
CHOKE EC Automatic Choke
CIGAR EL Cigarette Lighter
CLOCK EL Clock
CMPS EC Camshaft Position Sensor
COOL/F LC Cooling Fan Control
DEF ELRear Window Defogger and Mirror
Defogger
DIMDIP ELHeadlamp Ð With Dim-dip Lamp
System
D/LOCK EL Power Door Lock
DTRL ELHeadlamp Ð With Daytime Light
System
ECTS ECEngine Coolant Temperature
Sensor
EGRC/V EC EGRC Ð Solenoid Valve
ENGSS AT Engine Speed Signal
FCUT EC Fuel Cut Solenoid Valve
F/HEAT EC Fuel Heater System
FICD EC IACV-FICD Solenoid Valve
FIPOT EC ISC-FI Pot
FPCM EC Fuel Pump Control Module
F/PUMP EC Fuel Pump
GLOW EC Quick-glow System
H/AIM EL Headlamp Aiming Control
HEATER HA Heater
H/LAMP EL Headlamp
HLC EL Headlamp Washer
HO2S EC Heated Oxygen Sensor
HORN EL Horn
H/SEAT EL Heated SeatCode Section Wiring Diagram Name
IGN EC Ignition System
IGN/SG EC Ignition Signal
ILL EL Illumination
INJECT EC Injector
INT/L EL Spot Lamp
KS EC Knock Sensor
LOAD EC Electric Load Signal
LPSV AT Line Pressure Solenoid Valve
MAFS EC Mass Air Flow Sensor
MAIN EC, ATMain Power Supply and Ground Cir-
cuit
METER ELSpeedometer, Tachometer, Temp.
and Fuel Gauges
MIL/DL ECMIL and Data Link Connector For
CONSULT
MIRROR EL Power Door Mirror
MULTI EL Multi-remote Control System
NATS EL Nissan Anti-theft System
NONDTC AT Non-detectable Items
OVRCSV AT Overrun Clutch Solenoid Valve
P/ANT EL Power Antenna
PGC/V ECEVAP Canister Purge
Control Solenoid Valve
PLA EC Partial Load Advance Control
PNP/SW EC Park/Neutral Position Switch
POWER EL Power Supply Routing
PST/SW EC Power Steering Oil Pressure Switch
R/FOG EL Rear Fog Lamp
ROOM/L EL Interior Room Lamp
SHIFT AT Shift Lock System
SSV/A AT Shift Solenoid Valve A
SSV/B AT Shift Solenoid Valve B
SRS RS Supplemental Restraint System
S/SIG EC Start Signal
START EL Starting System
STOP/L EL Stop Lamp
SWL/V ECSwirl Control Valve Control Solenoid
Valve
TAIL/L EL Parking, License and Tail Lamps
TCV ATTorque Converter Clutch Solenoid
Valve
WIRING DIAGRAM CODES (CELL CODES)
EL-2171
Page 422 of 666
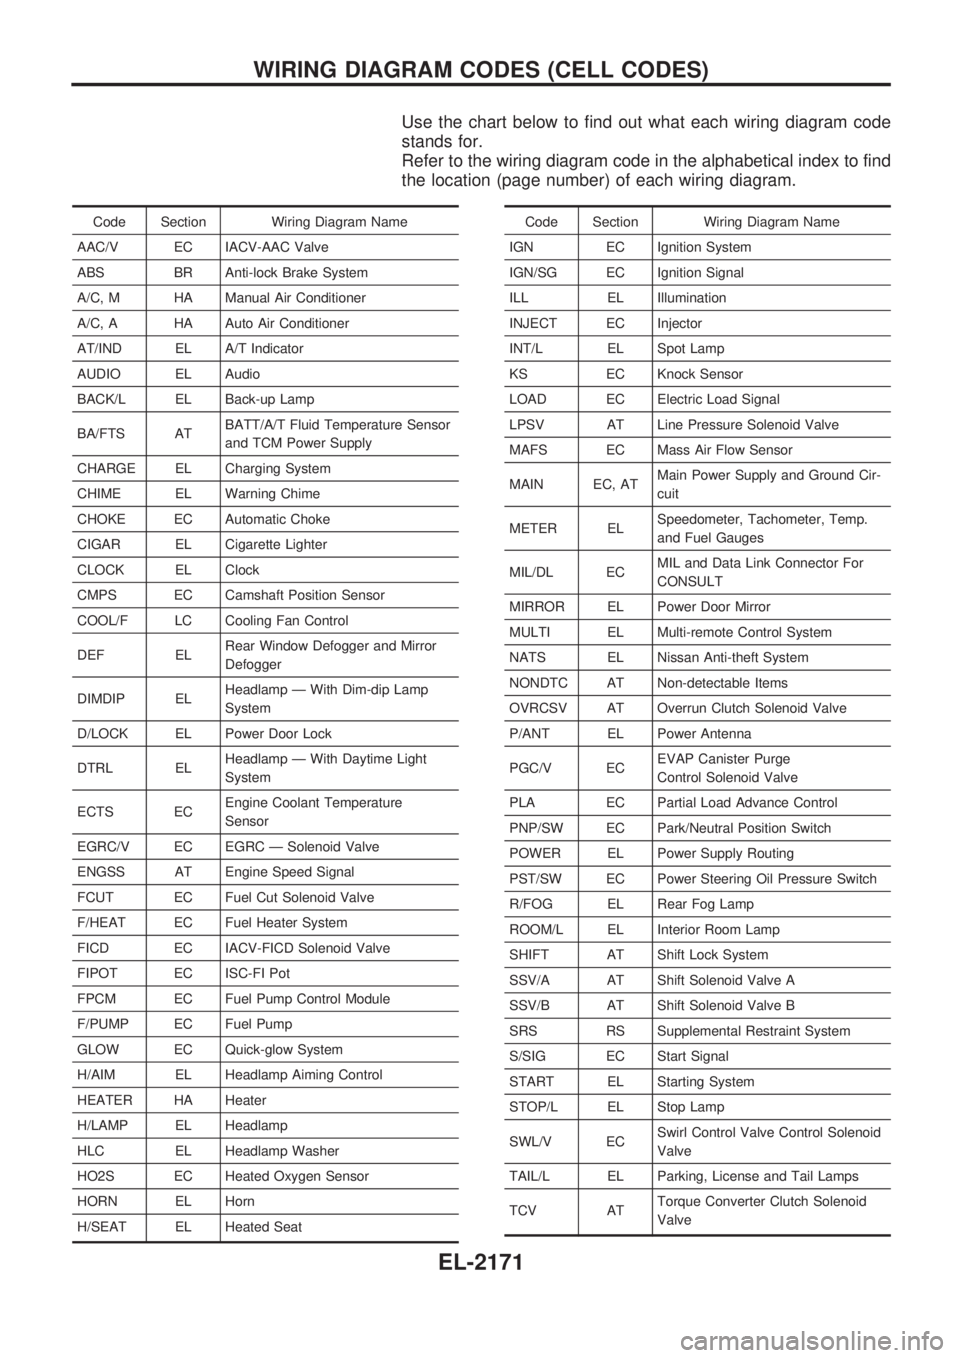
Use the chart below to find out what each wiring diagram code
stands for.
Refer to the wiring diagram code in the alphabetical index to find
the location (page number) of each wiring diagram.
Code Section Wiring Diagram Name
AAC/V EC IACV-AAC Valve
ABS BR Anti-lock Brake System
A/C, M HA Manual Air Conditioner
A/C, A HA Auto Air Conditioner
AT/IND EL A/T Indicator
AUDIO EL Audio
BACK/L EL Back-up Lamp
BA/FTS ATBATT/A/T Fluid Temperature Sensor
and TCM Power Supply
CHARGE EL Charging System
CHIME EL Warning Chime
CHOKE EC Automatic Choke
CIGAR EL Cigarette Lighter
CLOCK EL Clock
CMPS EC Camshaft Position Sensor
COOL/F LC Cooling Fan Control
DEF ELRear Window Defogger and Mirror
Defogger
DIMDIP ELHeadlamp Ð With Dim-dip Lamp
System
D/LOCK EL Power Door Lock
DTRL ELHeadlamp Ð With Daytime Light
System
ECTS ECEngine Coolant Temperature
Sensor
EGRC/V EC EGRC Ð Solenoid Valve
ENGSS AT Engine Speed Signal
FCUT EC Fuel Cut Solenoid Valve
F/HEAT EC Fuel Heater System
FICD EC IACV-FICD Solenoid Valve
FIPOT EC ISC-FI Pot
FPCM EC Fuel Pump Control Module
F/PUMP EC Fuel Pump
GLOW EC Quick-glow System
H/AIM EL Headlamp Aiming Control
HEATER HA Heater
H/LAMP EL Headlamp
HLC EL Headlamp Washer
HO2S EC Heated Oxygen Sensor
HORN EL Horn
H/SEAT EL Heated SeatCode Section Wiring Diagram Name
IGN EC Ignition System
IGN/SG EC Ignition Signal
ILL EL Illumination
INJECT EC Injector
INT/L EL Spot Lamp
KS EC Knock Sensor
LOAD EC Electric Load Signal
LPSV AT Line Pressure Solenoid Valve
MAFS EC Mass Air Flow Sensor
MAIN EC, ATMain Power Supply and Ground Cir-
cuit
METER ELSpeedometer, Tachometer, Temp.
and Fuel Gauges
MIL/DL ECMIL and Data Link Connector For
CONSULT
MIRROR EL Power Door Mirror
MULTI EL Multi-remote Control System
NATS EL Nissan Anti-theft System
NONDTC AT Non-detectable Items
OVRCSV AT Overrun Clutch Solenoid Valve
P/ANT EL Power Antenna
PGC/V ECEVAP Canister Purge
Control Solenoid Valve
PLA EC Partial Load Advance Control
PNP/SW EC Park/Neutral Position Switch
POWER EL Power Supply Routing
PST/SW EC Power Steering Oil Pressure Switch
R/FOG EL Rear Fog Lamp
ROOM/L EL Interior Room Lamp
SHIFT AT Shift Lock System
SSV/A AT Shift Solenoid Valve A
SSV/B AT Shift Solenoid Valve B
SRS RS Supplemental Restraint System
S/SIG EC Start Signal
START EL Starting System
STOP/L EL Stop Lamp
SWL/V ECSwirl Control Valve Control Solenoid
Valve
TAIL/L EL Parking, License and Tail Lamps
TCV ATTorque Converter Clutch Solenoid
Valve
WIRING DIAGRAM CODES (CELL CODES)
EL-2171
Page 425 of 666
ENGINE MECHANICAL
SECTION
EM
MODIFICATION NOTICE:
Diesel engine:
lThe main bearing clearance has been changed.
lThe tightening torque has been changed on bolts and nuts for the engine slinger, crankshaft pulley and
flywheel.
lA washer has been added between the glow plate and the glow plug.
CONTENTS
TD
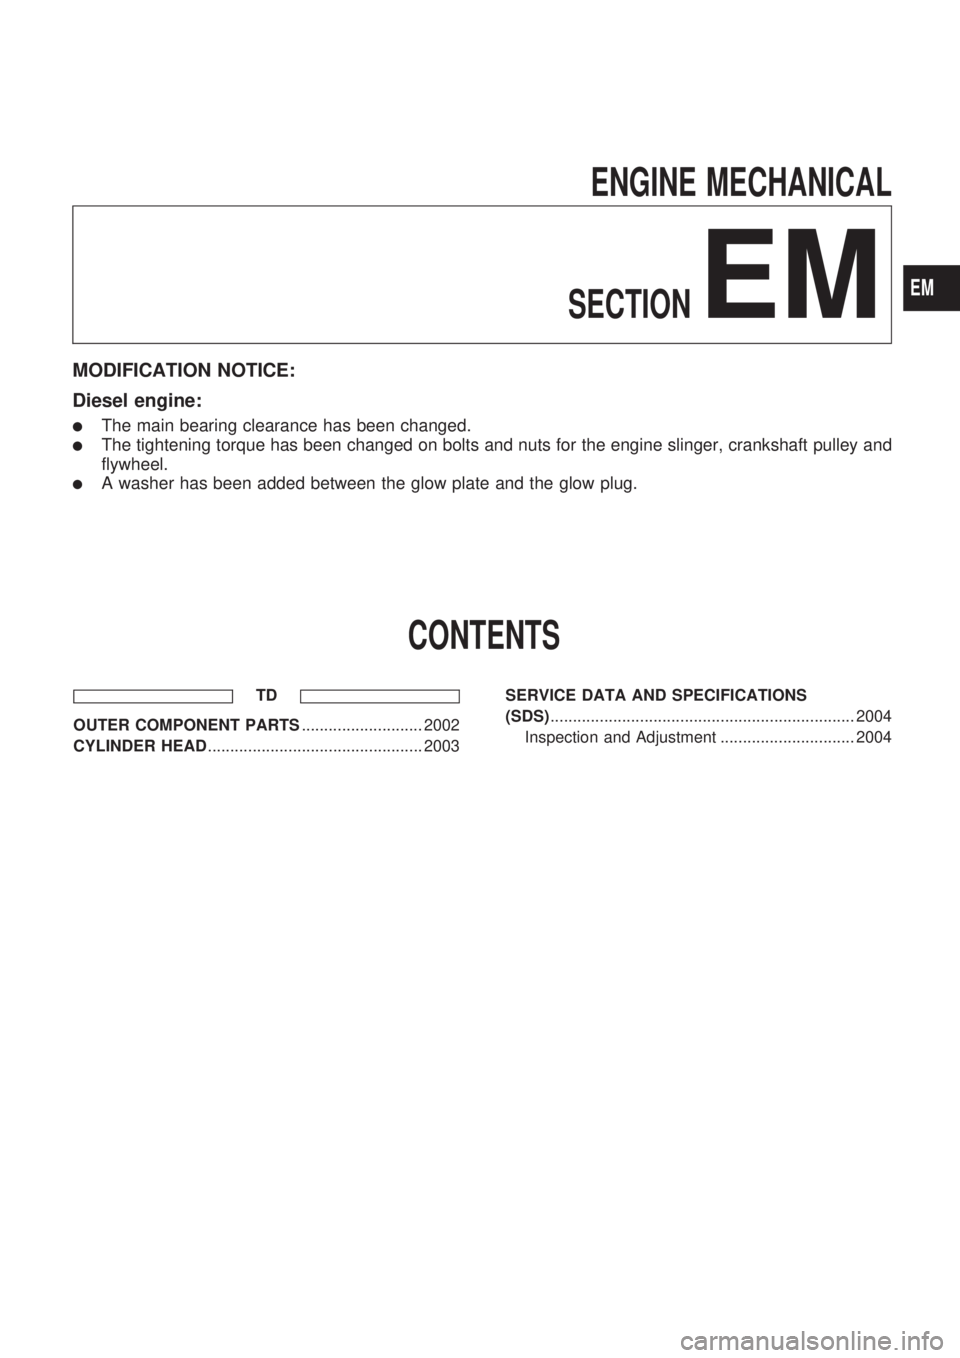
OUTER COMPONENT PARTS........................... 2002
CYLINDER HEAD................................................ 2003SERVICE DATA AND SPECIFICATIONS
(SDS).................................................................... 2004
Inspection and Adjustment .............................. 2004
EM
Page 430 of 666
Parts Requiring Angular Tightening
lUse an angle wrench for the final tightening of the following
engine parts:
(1) Cylinder head bolts
(2) Connecting rod cap nuts
lDo not use a torque value for final tightening.
lThe torque values for these parts are for a preliminary step.
lEnsure thread and seat surfaces are clean and coated with
engine oil.
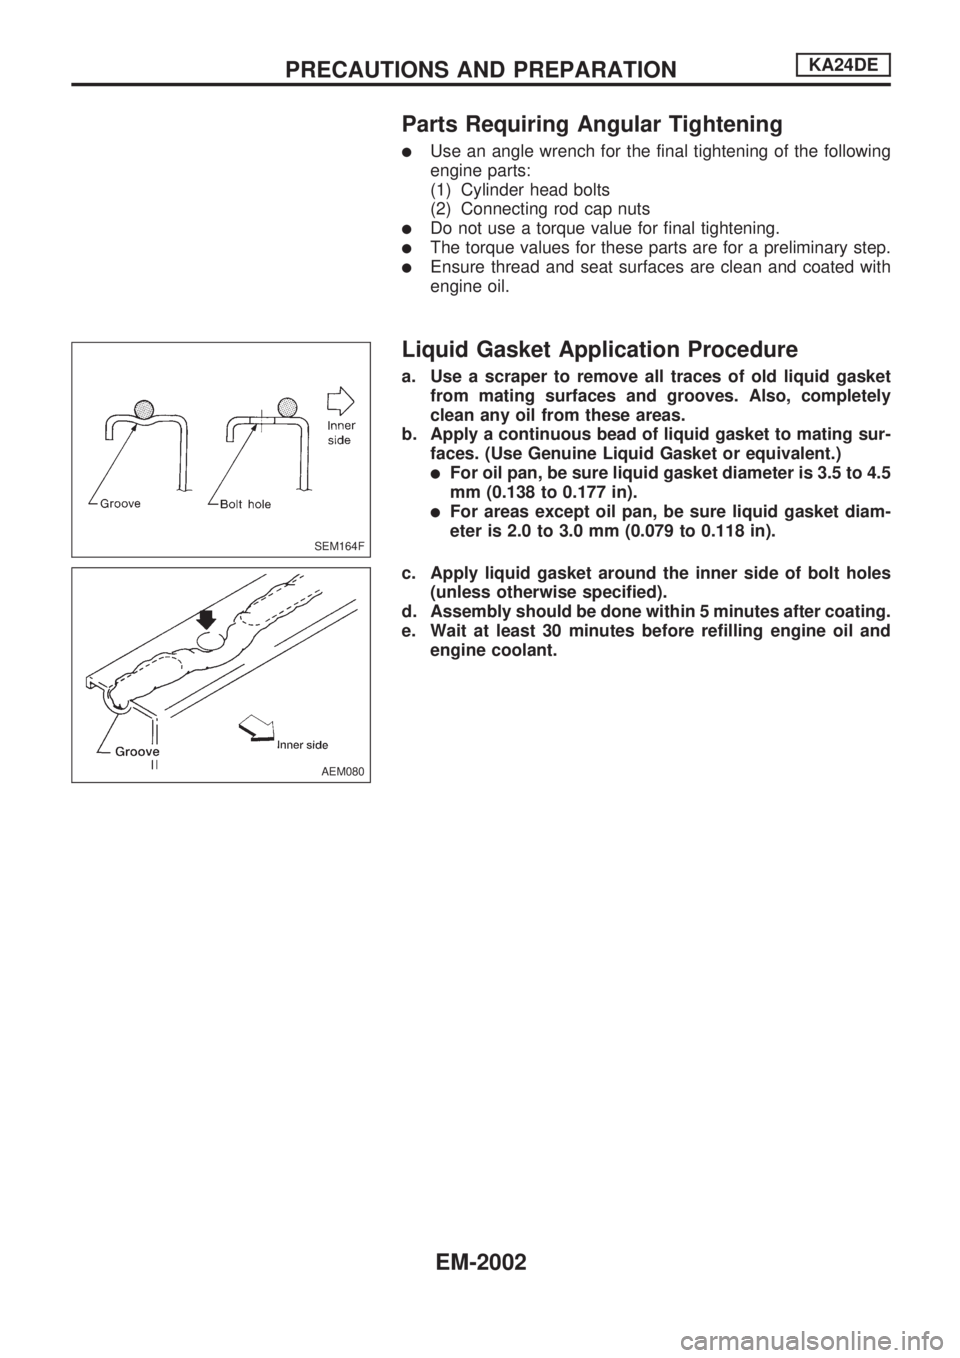
Liquid Gasket Application Procedure
a. Use a scraper to remove all traces of old liquid gasket
from mating surfaces and grooves. Also, completely
clean any oil from these areas.
b. Apply a continuous bead of liquid gasket to mating sur-
faces. (Use Genuine Liquid Gasket or equivalent.)
lFor oil pan, be sure liquid gasket diameter is 3.5 to 4.5
mm (0.138 to 0.177 in).
lFor areas except oil pan, be sure liquid gasket diam-
eter is 2.0 to 3.0 mm (0.079 to 0.118 in).
c. Apply liquid gasket around the inner side of bolt holes
(unless otherwise specified).
d. Assembly should be done within 5 minutes after coating.
e. Wait at least 30 minutes before refilling engine oil and
engine coolant.
SEM164F
AEM080
PRECAUTIONS AND PREPARATIONKA24DE
EM-2002
Page 455 of 666
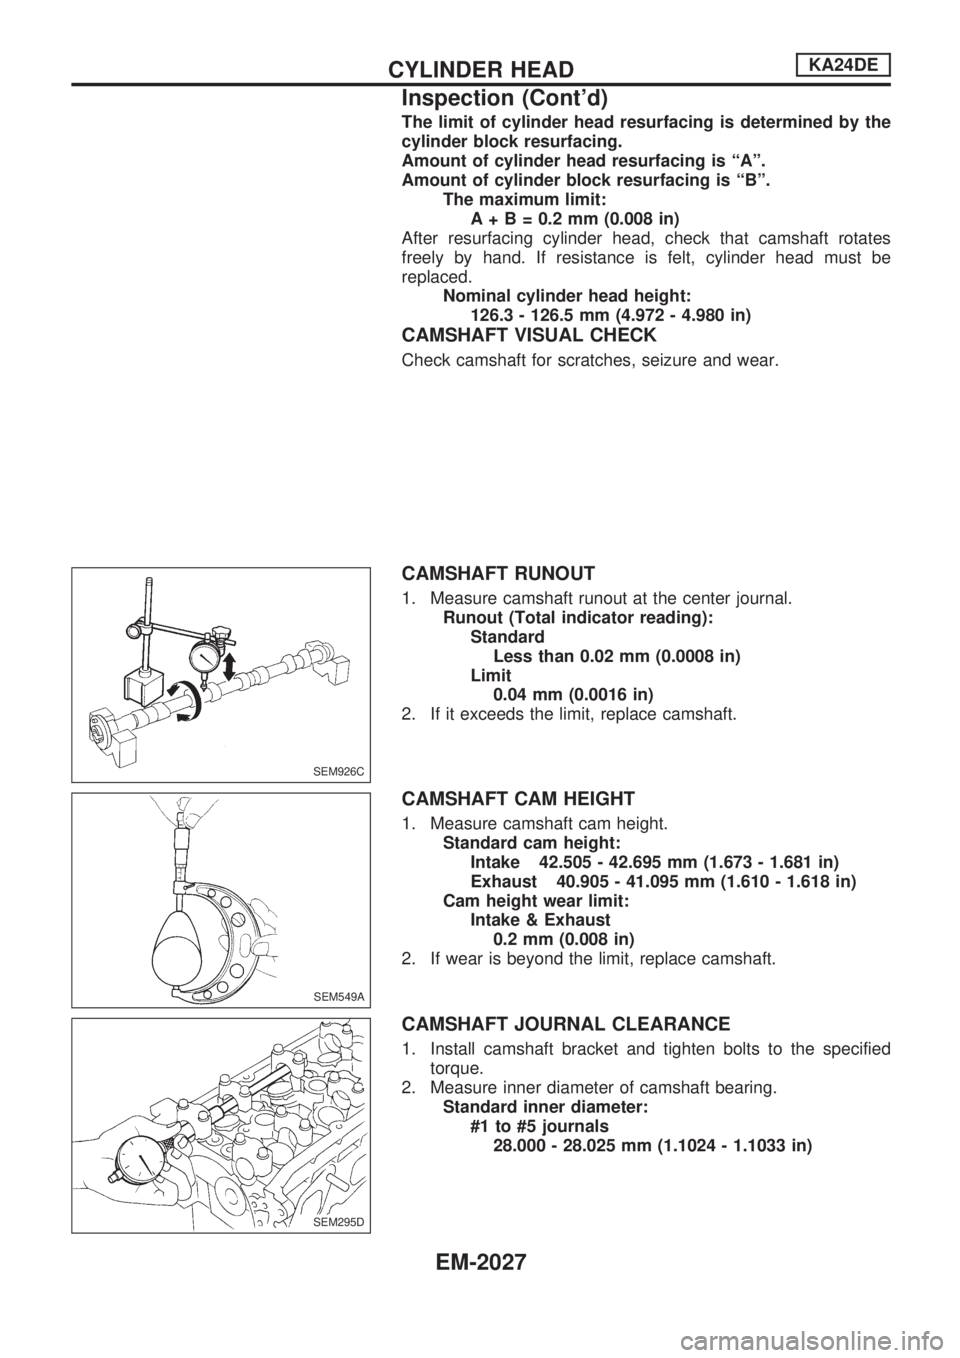
The limit of cylinder head resurfacing is determined by the
cylinder block resurfacing.
Amount of cylinder head resurfacing is ªAº.
Amount of cylinder block resurfacing is ªBº.
The maximum limit:
A+B=0.2mm(0.008 in)
After resurfacing cylinder head, check that camshaft rotates
freely by hand. If resistance is felt, cylinder head must be
replaced.
Nominal cylinder head height:
126.3 - 126.5 mm (4.972 - 4.980 in)
CAMSHAFT VISUAL CHECK
Check camshaft for scratches, seizure and wear.
CAMSHAFT RUNOUT
1. Measure camshaft runout at the center journal.
Runout (Total indicator reading):
Standard
Less than 0.02 mm (0.0008 in)
Limit
0.04 mm (0.0016 in)
2. If it exceeds the limit, replace camshaft.
CAMSHAFT CAM HEIGHT
1. Measure camshaft cam height.
Standard cam height:
Intake 42.505 - 42.695 mm (1.673 - 1.681 in)
Exhaust 40.905 - 41.095 mm (1.610 - 1.618 in)
Cam height wear limit:
Intake & Exhaust
0.2 mm (0.008 in)
2. If wear is beyond the limit, replace camshaft.
CAMSHAFT JOURNAL CLEARANCE
1. Install camshaft bracket and tighten bolts to the specified
torque.
2. Measure inner diameter of camshaft bearing.
Standard inner diameter:
#1 to #5 journals
28.000 - 28.025 mm (1.1024 - 1.1033 in)
SEM926C
SEM549A
SEM295D
CYLINDER HEADKA24DE
Inspection (Cont'd)
EM-2027
Page 470 of 666
6. Cylinder bore size is determined by adding piston-to-bore
clearance to piston diameter ªAº.
Rebored size calculation:
D=A+BþC
where,
D: Bored diameter
A: Piston diameter as measured
B: Piston-to-bore clearance
C: Honing allowance 0.02 mm (0.0008 in)
7. Install main bearing caps and tighten bolts to the specified
torque. This will prevent distortion of cylinder bores.
8. Cut cylinder bores.
lWhen any cylinder needs boring, all other cylinders
must also be bored.
lDo not cut too much out of cylinder bore at a time. Cut
only 0.05 mm (0.0020 in) or so at a time.
9. Hone cylinders to obtain specified piston-to-bore clearance.
10. Measure finished cylinder bore for out-of-round and taper.
lMeasurement should be done after cylinder bore cools
down.
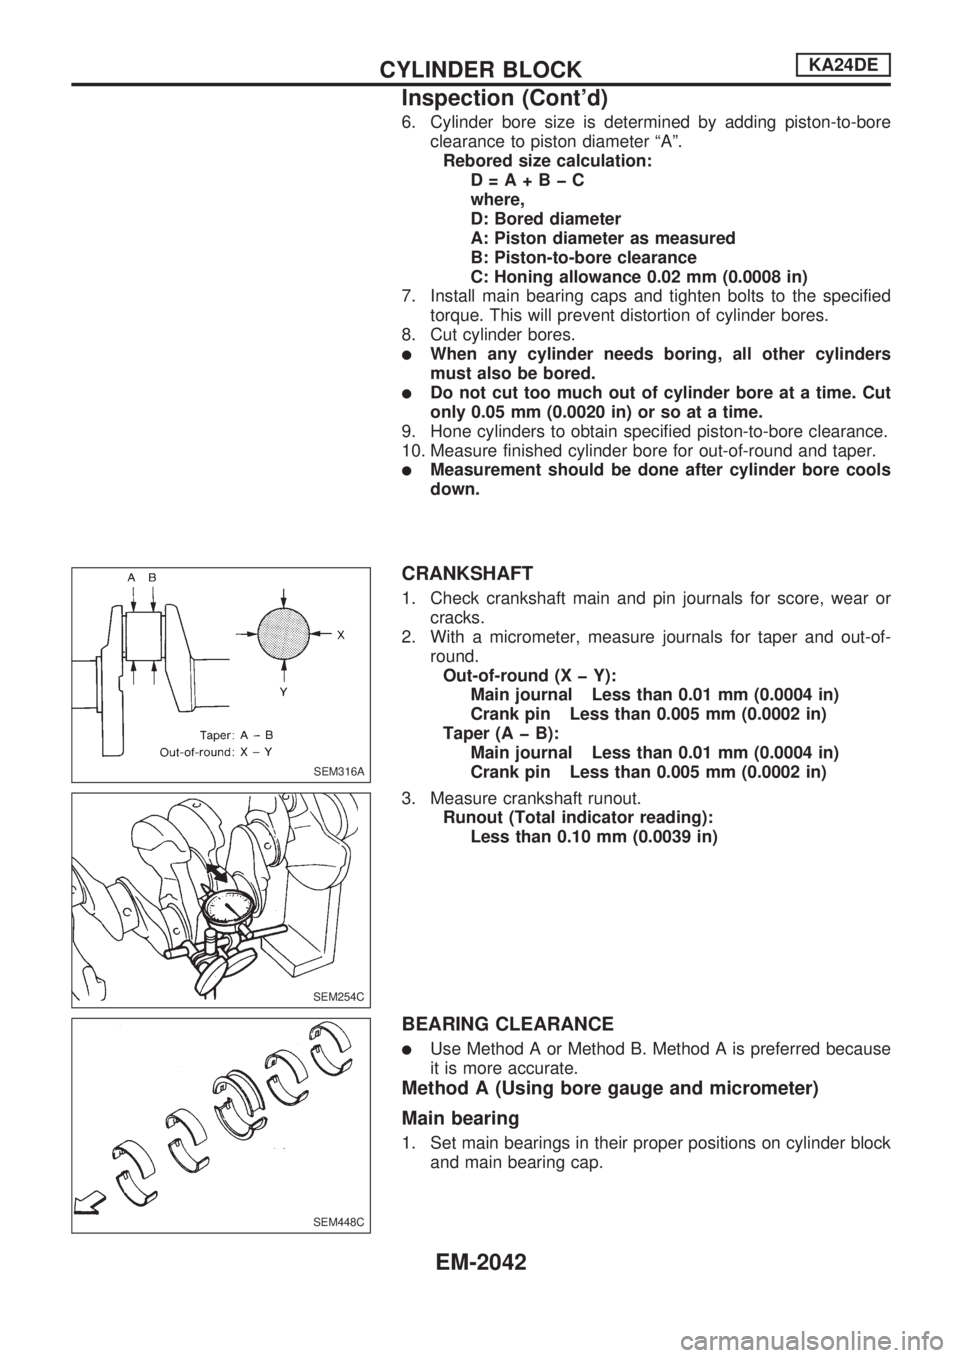
CRANKSHAFT
1. Check crankshaft main and pin journals for score, wear or
cracks.
2. With a micrometer, measure journals for taper and out-of-
round.
Out-of-round (X þ Y):
Main journal Less than 0.01 mm (0.0004 in)
Crank pin Less than 0.005 mm (0.0002 in)
Taper (A þ B):
Main journal Less than 0.01 mm (0.0004 in)
Crank pin Less than 0.005 mm (0.0002 in)
3. Measure crankshaft runout.
Runout (Total indicator reading):
Less than 0.10 mm (0.0039 in)
BEARING CLEARANCE
lUse Method A or Method B. Method A is preferred because
it is more accurate.
Method A (Using bore gauge and micrometer)
Main bearing
1. Set main bearings in their proper positions on cylinder block
and main bearing cap.
SEM316A
SEM254C
SEM448C
CYLINDER BLOCKKA24DE
Inspection (Cont'd)
EM-2042
Page 472 of 666
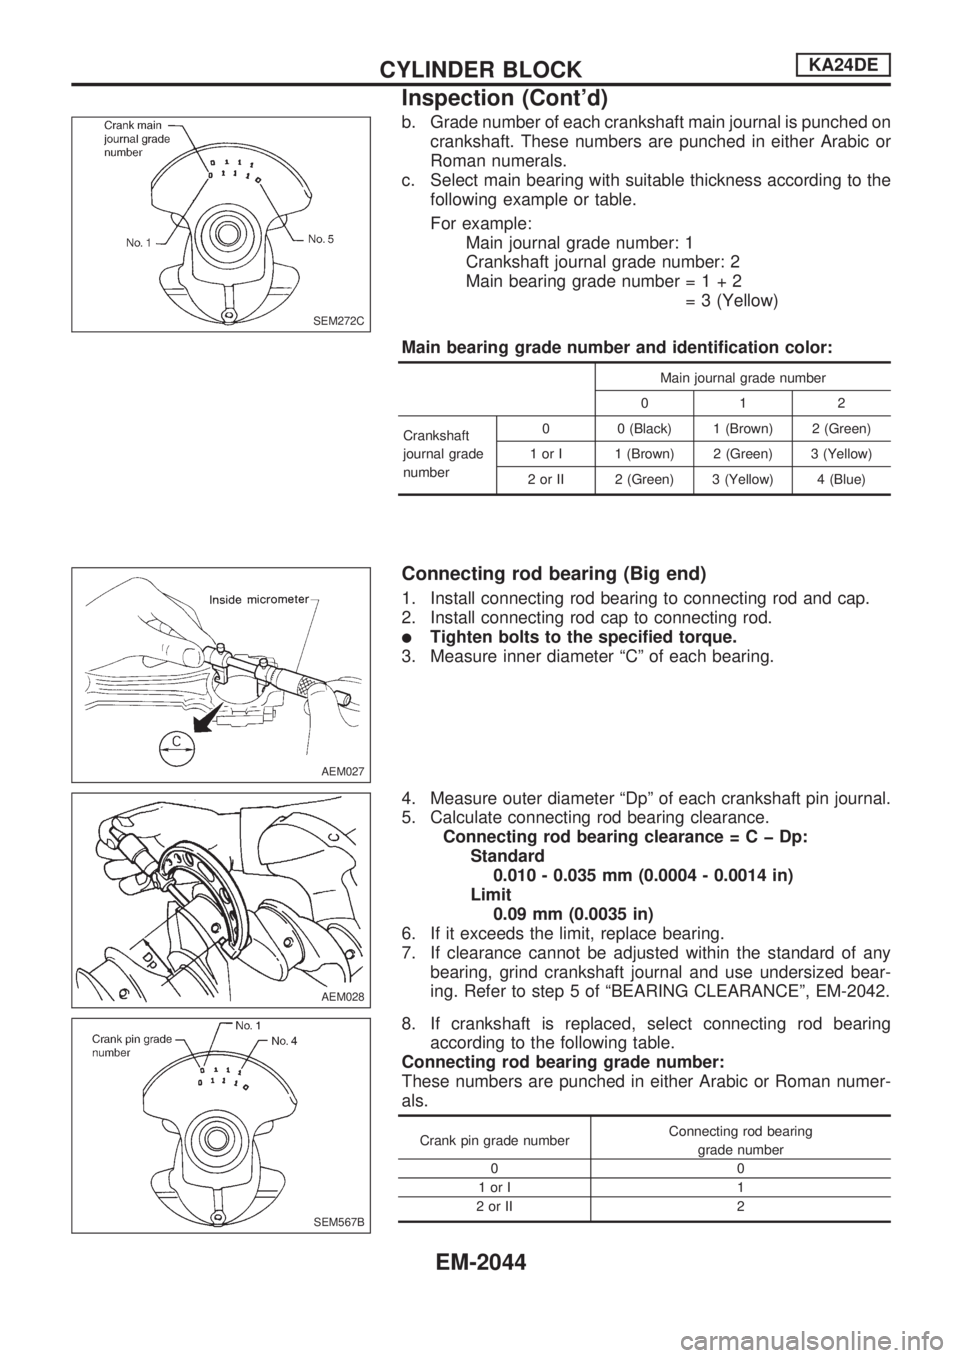
b. Grade number of each crankshaft main journal is punched on
crankshaft. These numbers are punched in either Arabic or
Roman numerals.
c. Select main bearing with suitable thickness according to the
following example or table.
For example:
Main journal grade number: 1
Crankshaft journal grade number: 2
Main bearing grade number=1+2
= 3 (Yellow)
Main bearing grade number and identification color:
Main journal grade number
012
Crankshaft
journal grade
number0 0 (Black) 1 (Brown) 2 (Green)
1 or I 1 (Brown) 2 (Green) 3 (Yellow)
2 or II 2 (Green) 3 (Yellow) 4 (Blue)
Connecting rod bearing (Big end)
1. Install connecting rod bearing to connecting rod and cap.
2. Install connecting rod cap to connecting rod.
lTighten bolts to the specified torque.
3. Measure inner diameter ªCº of each bearing.
4. Measure outer diameter ªDpº of each crankshaft pin journal.
5. Calculate connecting rod bearing clearance.
Connecting rod bearing clearance=CþDp:
Standard
0.010 - 0.035 mm (0.0004 - 0.0014 in)
Limit
0.09 mm (0.0035 in)
6. If it exceeds the limit, replace bearing.
7. If clearance cannot be adjusted within the standard of any
bearing, grind crankshaft journal and use undersized bear-
ing. Refer to step 5 of ªBEARING CLEARANCEº, EM-2042.
8. If crankshaft is replaced, select connecting rod bearing
according to the following table.
Connecting rod bearing grade number:
These numbers are punched in either Arabic or Roman numer-
als.
Crank pin grade numberConnecting rod bearing
grade number
00
1orI 1
2orII 2
SEM272C
AEM027
AEM028
SEM567B
CYLINDER BLOCKKA24DE
Inspection (Cont'd)
EM-2044
Page 474 of 666
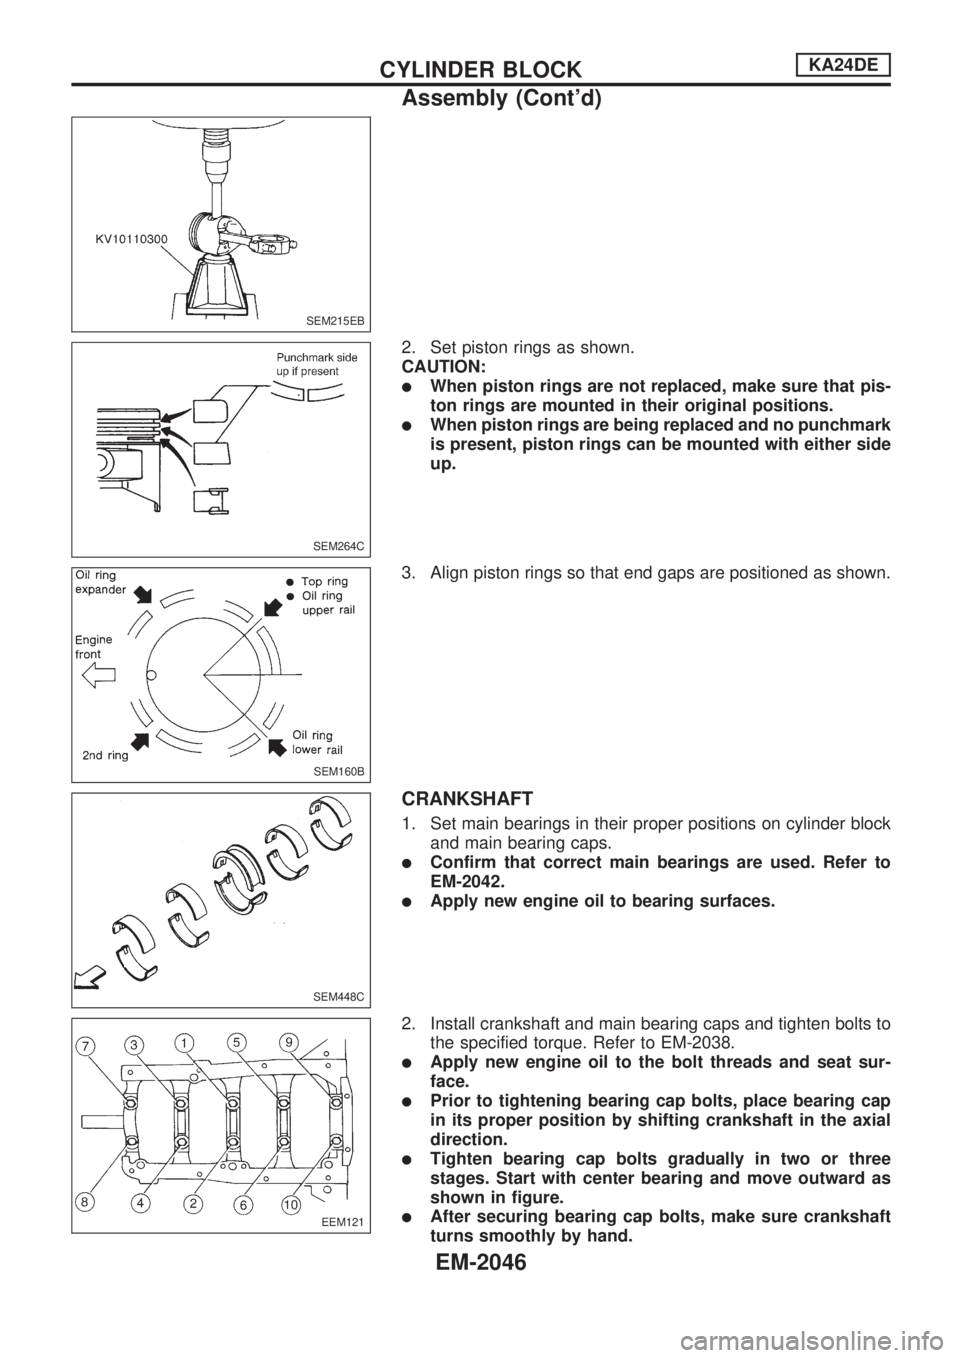
2. Set piston rings as shown.
CAUTION:
lWhen piston rings are not replaced, make sure that pis-
ton rings are mounted in their original positions.
lWhen piston rings are being replaced and no punchmark
is present, piston rings can be mounted with either side
up.
3. Align piston rings so that end gaps are positioned as shown.
CRANKSHAFT
1. Set main bearings in their proper positions on cylinder block
and main bearing caps.
lConfirm that correct main bearings are used. Refer to
EM-2042.
lApply new engine oil to bearing surfaces.
2. Install crankshaft and main bearing caps and tighten bolts to
the specified torque. Refer to EM-2038.
lApply new engine oil to the bolt threads and seat sur-
face.
lPrior to tightening bearing cap bolts, place bearing cap
in its proper position by shifting crankshaft in the axial
direction.
lTighten bearing cap bolts gradually in two or three
stages. Start with center bearing and move outward as
shown in figure.
lAfter securing bearing cap bolts, make sure crankshaft
turns smoothly by hand.
SEM215EB
SEM264C
SEM160B
SEM448C
EEM121
CYLINDER BLOCKKA24DE
Assembly (Cont'd)
EM-2046