1999 DODGE NEON engine oil
[x] Cancel search: engine oilPage 260 of 1200

ELECTRODE GAP BRIDGING
Loose deposits in the combustion chamber can
cause electrode gap bridging. The deposits accumu-
late on the spark plugs during continuous stop-
and-go driving. When the engine is suddenly
subjected to a high torque load, the deposits partially
liquefy and bridge the gap between the electrodes
(Fig. 23). This short circuits the electrodes.Spark
plugs with electrode gap bridging can be
cleaned and reused.
SCAVENGER DEPOSITS
Fuel scavenger deposits may be either white or yel-
low (Fig. 24). They may appear to be harmful, but
are a normal condition caused by chemical additives
in certain fuels. These additives are designed tochange the chemical nature of deposits and decrease
spark plug misfire tendencies. Notice that accumula-
tion on the ground electrode and shell area may be
heavy but the deposits are easily removed.Spark
plugs with scavenger deposits can be consid-
ered normal in condition, cleaned and reused.
CHIPPED ELECTRODE INSULATOR
A chipped electrode insulator usually results from
bending the center electrode while adjusting the
spark plug electrode gap. Under certain conditions,
severe detonation also can separate the insulator
from the center electrode (Fig. 25).Spark plugs
with chipped electrode insulators must be
replaced.
PREIGNITION DAMAGE
Excessive combustion chamber temperature can
cause preignition damage. First, the center electrode
dissolves and the ground electrode dissolves some-
what later (Fig. 26). Insulators appear relatively
deposit free. Determine if the spark plugs are the
correct type, as specified on the VECI label, or if
Fig. 22 Oil or Ash Encrusted
Fig. 23 Electrode Gap Bridging
Fig. 24 Scavenger Deposits
Fig. 25 Chipped Electrode Insulator
PLIGNITION SYSTEM 8D - 11
DIAGNOSIS AND TESTING (Continued)
Page 261 of 1200
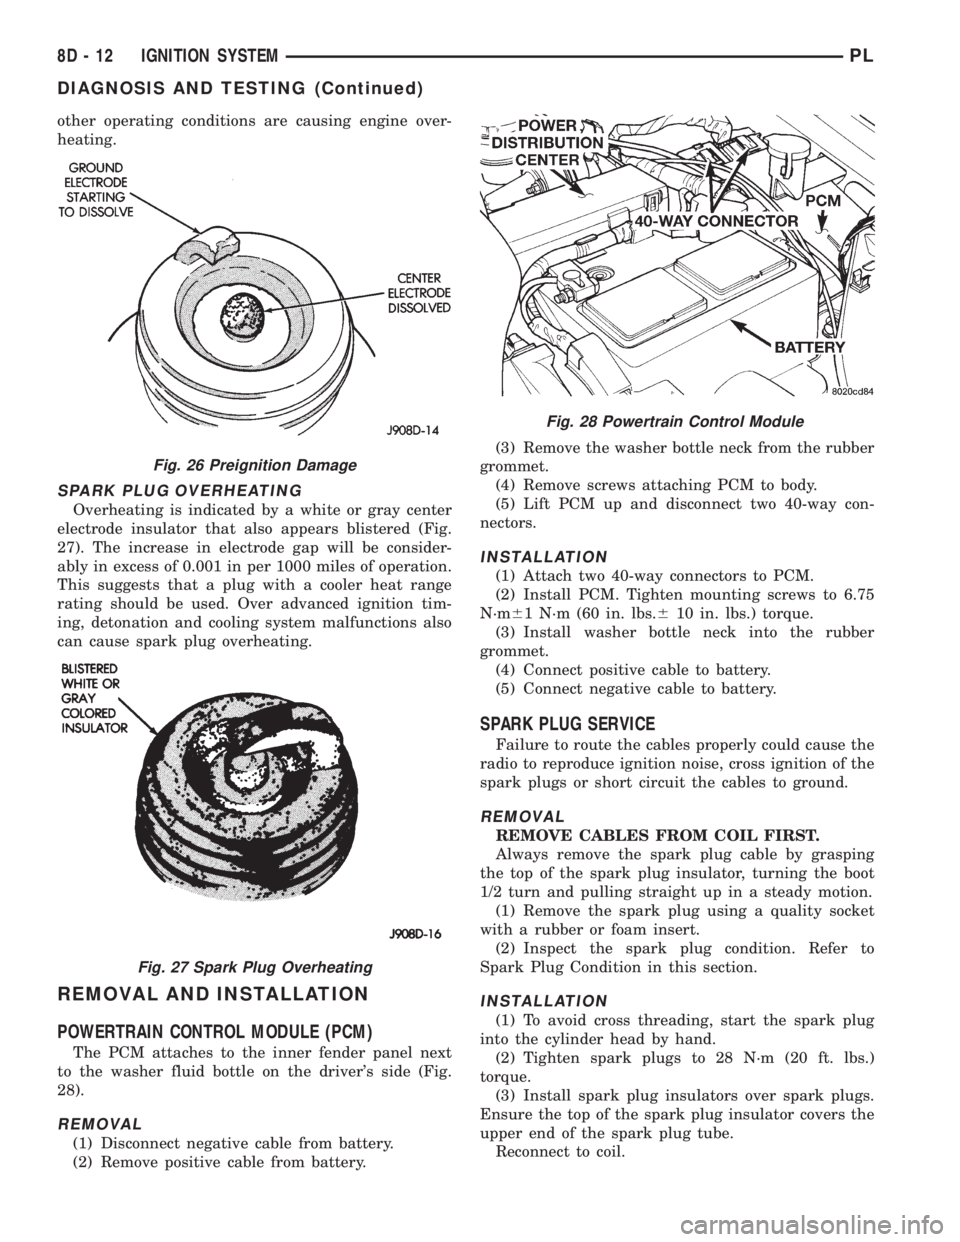
other operating conditions are causing engine over-
heating.
SPARK PLUG OVERHEATING
Overheating is indicated by a white or gray center
electrode insulator that also appears blistered (Fig.
27). The increase in electrode gap will be consider-
ably in excess of 0.001 in per 1000 miles of operation.
This suggests that a plug with a cooler heat range
rating should be used. Over advanced ignition tim-
ing, detonation and cooling system malfunctions also
can cause spark plug overheating.
REMOVAL AND INSTALLATION
POWERTRAIN CONTROL MODULE (PCM)
The PCM attaches to the inner fender panel next
to the washer fluid bottle on the driver's side (Fig.
28).
REMOVAL
(1) Disconnect negative cable from battery.
(2) Remove positive cable from battery.(3) Remove the washer bottle neck from the rubber
grommet.
(4) Remove screws attaching PCM to body.
(5) Lift PCM up and disconnect two 40-way con-
nectors.
INSTALLATION
(1) Attach two 40-way connectors to PCM.
(2) Install PCM. Tighten mounting screws to 6.75
N´m61 N´m (60 in. lbs.610 in. lbs.) torque.
(3) Install washer bottle neck into the rubber
grommet.
(4) Connect positive cable to battery.
(5) Connect negative cable to battery.
SPARK PLUG SERVICE
Failure to route the cables properly could cause the
radio to reproduce ignition noise, cross ignition of the
spark plugs or short circuit the cables to ground.
REMOVAL
REMOVE CABLES FROM COIL FIRST.
Always remove the spark plug cable by grasping
the top of the spark plug insulator, turning the boot
1/2 turn and pulling straight up in a steady motion.
(1) Remove the spark plug using a quality socket
with a rubber or foam insert.
(2) Inspect the spark plug condition. Refer to
Spark Plug Condition in this section.
INSTALLATION
(1) To avoid cross threading, start the spark plug
into the cylinder head by hand.
(2) Tighten spark plugs to 28 N´m (20 ft. lbs.)
torque.
(3) Install spark plug insulators over spark plugs.
Ensure the top of the spark plug insulator covers the
upper end of the spark plug tube.
Reconnect to coil.
Fig. 26 Preignition Damage
Fig. 27 Spark Plug Overheating
Fig. 28 Powertrain Control Module
8D - 12 IGNITION SYSTEMPL
DIAGNOSIS AND TESTING (Continued)
Page 262 of 1200
SPARK PLUG CABLE SERVICE
Failure to route the cables properly could cause the
radio to reproduce ignition noise, cross ignition of the
spark plugs or short circuit the cables to ground.
REMOVAL
Remove spark plug cable from coil frist.
Always remove the spark plug cable by grasping
the top of the spark plug insulator, turning the boot
1/2 turn and pulling straight up in a steady motion.
INSTALLATION
Install spark plug insulators over spark plugs.
Ensure the top of the spark plug insulator covers the
upper end of the spark plug tube.The connect the
other end to coil pack. OnSOHCengines, be sure
that dual plastic clip holds #1,#2 cables off of valve
cover and that PCV hose plastic clip holds #3 cable
away from metal PCV clamp and edge of air duct. On
DOHC, be sure that the plastic clip on PCV hose is
positioned so that cable clip is beneath hose, and that
#1 cable is snapped into this clip to protect it from
metal PCV clamp.
SPARK PLUG TUBES
The spark plugs tubes are pressed into the cylinder
head. Sealant is applied to the end of the tube before
installation. For engine information, refer to Group
9, Engines.
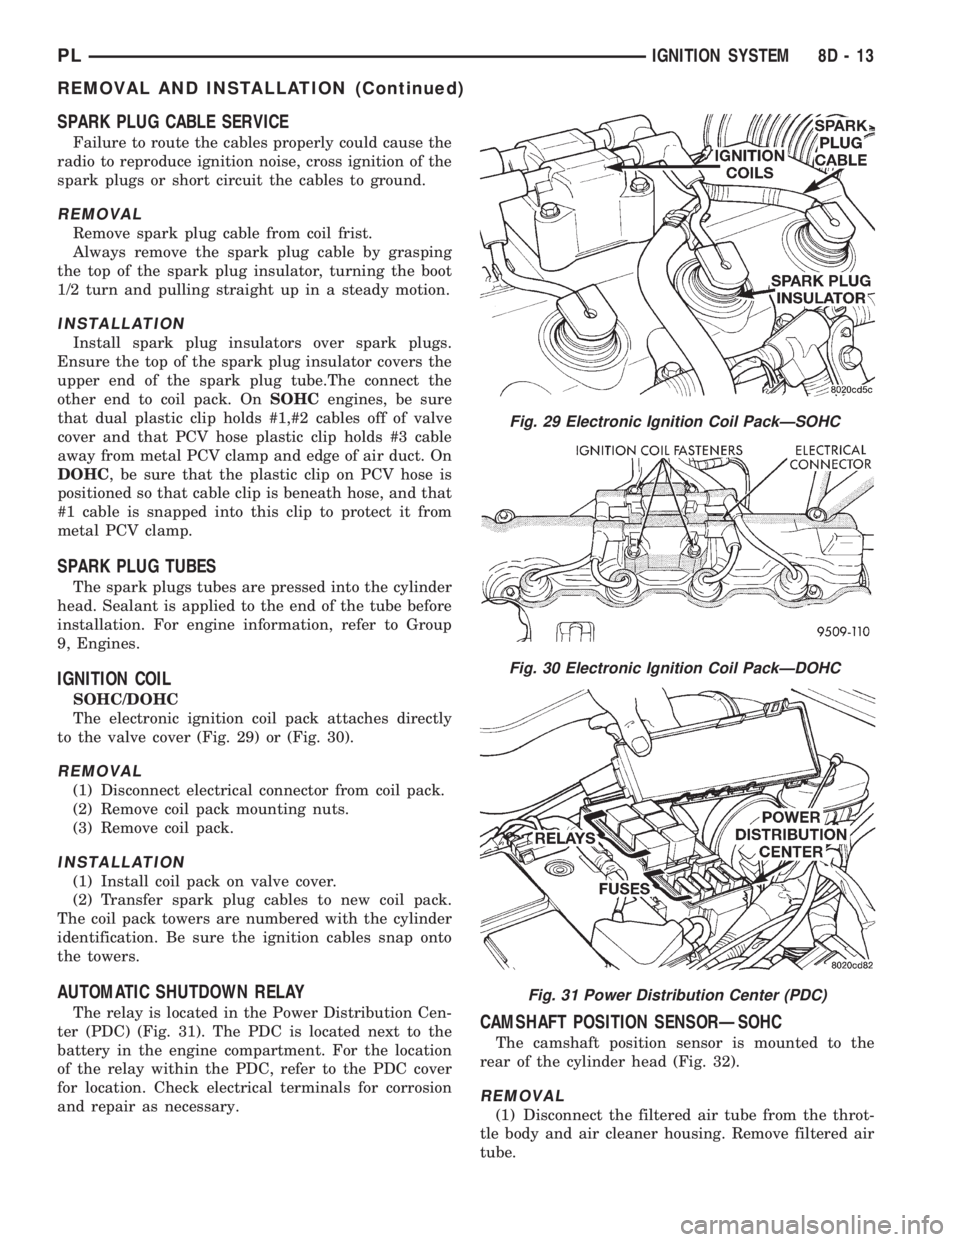
IGNITION COIL
SOHC/DOHC
The electronic ignition coil pack attaches directly
to the valve cover (Fig. 29) or (Fig. 30).
REMOVAL
(1) Disconnect electrical connector from coil pack.
(2) Remove coil pack mounting nuts.
(3) Remove coil pack.
INSTALLATION
(1) Install coil pack on valve cover.
(2) Transfer spark plug cables to new coil pack.
The coil pack towers are numbered with the cylinder
identification. Be sure the ignition cables snap onto
the towers.
AUTOMATIC SHUTDOWN RELAY
The relay is located in the Power Distribution Cen-
ter (PDC) (Fig. 31). The PDC is located next to the
battery in the engine compartment. For the location
of the relay within the PDC, refer to the PDC cover
for location. Check electrical terminals for corrosion
and repair as necessary.CAMSHAFT POSITION SENSORÐSOHC
The camshaft position sensor is mounted to the
rear of the cylinder head (Fig. 32).
REMOVAL
(1) Disconnect the filtered air tube from the throt-
tle body and air cleaner housing. Remove filtered air
tube.
Fig. 29 Electronic Ignition Coil PackÐSOHC
Fig. 30 Electronic Ignition Coil PackÐDOHC
Fig. 31 Power Distribution Center (PDC)
PLIGNITION SYSTEM 8D - 13
REMOVAL AND INSTALLATION (Continued)
Page 264 of 1200

(1) Install target magnet in end of camshaft.
Tighten mounting screw to 3 N´m (30 in. lbs.) torque.
(2) Install camshaft position sensor. Tighten sensor
mounting screws to 9 N´m (80 in. lbs.) torque.
(3) Carefully attach electrical connector to cam-
shaft position sensor. Installation at an angle may
damage the sensor pins.
(4) Install filtered air tube. Tighten clamps to 3
N´m61 (25 in. lbs.65) torque.
CRANKSHAFT POSITION SENSOR
The crankshaft position sensor mounts to the
engine block behind the generator, just above the oil
filter (Fig. 37).
REMOVAL
(1) Disconnect electrical connector from crankshaft
position sensor.
(2) Remove sensor mounting screw. Remove sensor.
INSTALLATION
Reverse procedure for installation.
COMBINATION ENGINE COOLANT TEMPERATURE
SENSORÐSOHC
The combination engine coolant sensor is located at
the rear of the cylinder head next to the camshaft
position sensor (Fig. 38). New sensors have sealant
applied to the threads.
REMOVAL
(1) With the engine cold, drain the cooling system
until coolant level drops below sensor. Refer to Group
7, Cooling System.
(2) Disconnect coolant sensor electrical connector.
(3) Remove coolant sensor
INSTALLATION
(1) Install coolant sensor. Tighten sensor to 18.6
N´m (165 in. lbs.) torque.
(2) Attach electrical connector to sensor.
(3) Fill cooling system. Refer to Group 7, Cooling
System.
COMBINATION ENGINE COOLANT TEMPERATURE
SENSORÐDOHC
The coolant sensor threads into the intake mani-
fold next to the thermostat housing (Fig. 39). New
sensors have sealant applied to the threads.
REMOVAL
(1) With the engine cold, drain coolant until level
drops below cylinder head. Refer to Group 7, Cooling
System.
(2) Disconnect coolant sensor electrical connector.
(3) Remove coolant sensor.
INSTALLATION
(1) Install coolant sensor. Tighten sensor to 18.6
N´m (165 in. lbs.) torque.
(2) Attach electrical connector to sensor.
(3) Fill cooling system. Refer to Group 7, Cooling
System.
Fig. 36 Target Magnet Installation
Fig. 37 Crankshaft Position Sensor
Fig. 38 Engine Coolant Temperature Sensor
PLIGNITION SYSTEM 8D - 15
REMOVAL AND INSTALLATION (Continued)
Page 267 of 1200
IGNITION INTERLOCK
Refer to Group 21, Transaxle for Shifter/Ignition
Interlock Service.
LOCK CYLINDER HOUSING
Refer to Steering Column in Group 19, Steering,
for Lock Cylinder Housing Service.
SPECIFICATIONS
VECI LABEL
If anything differs between the specifications found
on the Vehicle Emission Control Information (VECI)
label and the following specifications, use specifica-
tions on VECI label. The VECI label is located in the
engine compartment.
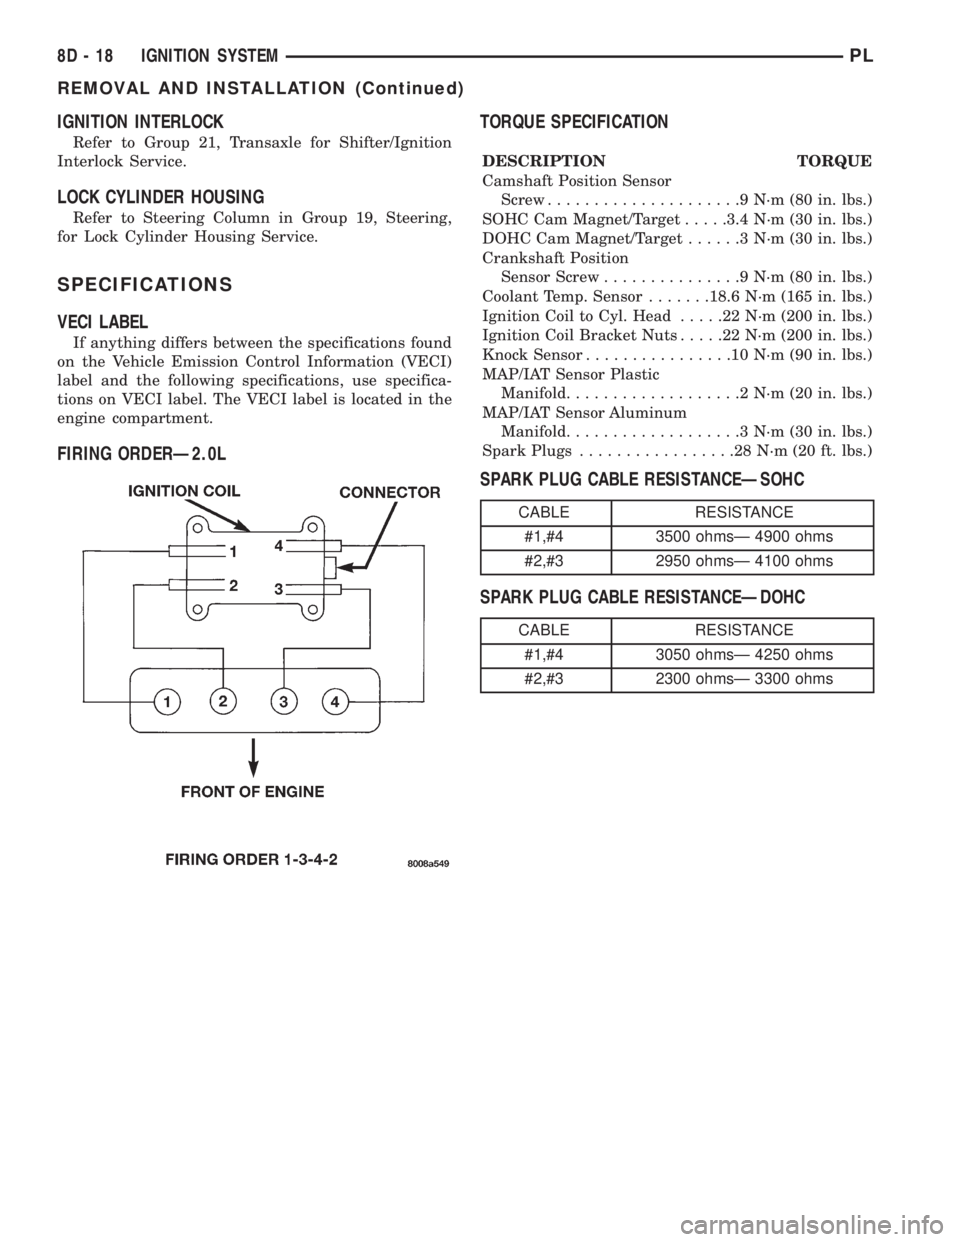
FIRING ORDERÐ2.0LTORQUE SPECIFICATION
DESCRIPTION TORQUE
Camshaft Position Sensor
Screw.....................9N´m(80in.lbs.)
SOHC Cam Magnet/Target.....3.4 N´m (30 in. lbs.)
DOHC Cam Magnet/Target......3N´m(30in.lbs.)
Crankshaft Position
Sensor Screw...............9N´m(80in.lbs.)
Coolant Temp. Sensor.......18.6 N´m (165 in. lbs.)
Ignition Coil to Cyl. Head.....22N´m(200 in. lbs.)
Ignition Coil Bracket Nuts.....22N´m(200 in. lbs.)
Knock Sensor................10N´m(90in.lbs.)
MAP/IAT Sensor Plastic
Manifold...................2N´m(20in.lbs.)
MAP/IAT Sensor Aluminum
Manifold...................3N´m(30in.lbs.)
Spark Plugs.................28N´m(20ft.lbs.)
SPARK PLUG CABLE RESISTANCEÐSOHC
SPARK PLUG CABLE RESISTANCEÐDOHC
CABLE RESISTANCE
#1,#4 3500 ohmsÐ 4900 ohms
#2,#3 2950 ohmsÐ 4100 ohms
CABLE RESISTANCE
#1,#4 3050 ohmsÐ 4250 ohms
#2,#3 2300 ohmsÐ 3300 ohms
8D - 18 IGNITION SYSTEMPL
REMOVAL AND INSTALLATION (Continued)
Page 268 of 1200
SPARK PLUG
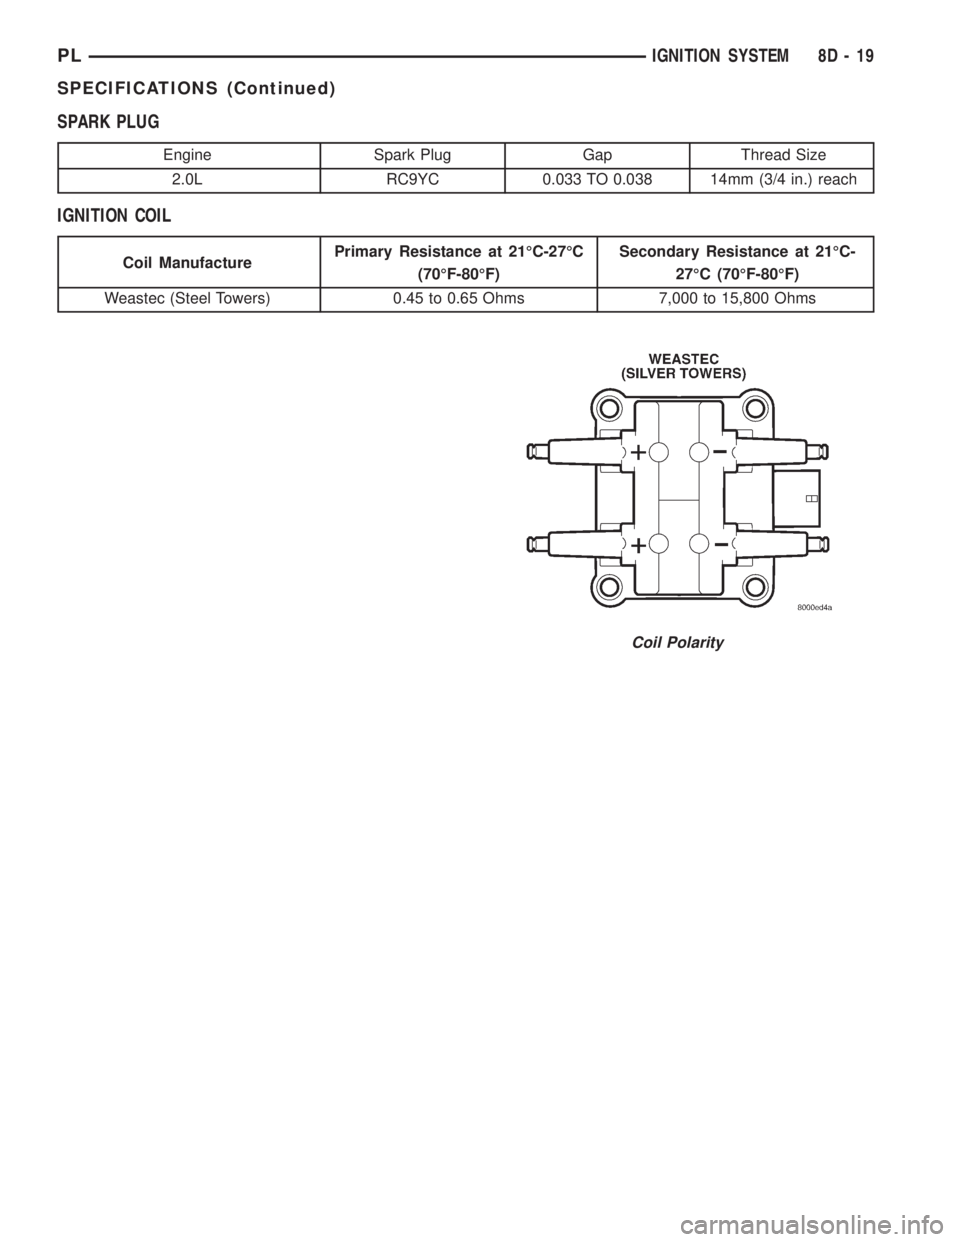
IGNITION COIL
Coil Polarity
Engine Spark Plug Gap Thread Size
2.0L RC9YC 0.033 TO 0.038 14mm (3/4 in.) reach
Coil ManufacturePrimary Resistance at 21ÉC-27ÉC
(70ÉF-80ÉF)Secondary Resistance at 21ÉC-
27ÉC (70ÉF-80ÉF)
Weastec (Steel Towers) 0.45 to 0.65 Ohms 7,000 to 15,800 Ohms
PLIGNITION SYSTEM 8D - 19
SPECIFICATIONS (Continued)
Page 270 of 1200
INSTRUMENT PANEL AND SYSTEMS
CONTENTS
page page
GENERAL INFORMATION
INTRODUCTION......................... 1
DESCRIPTION AND OPERATION
DOME LAMP............................ 1
ELECTRONIC DIGITAL CLOCK.............. 1
INSTRUMENT CLUSTER................... 2
WARNING AND INDICATOR LAMPS......... 2
DIAGNOSIS AND TESTING
AIRBAG WARNING SYSTEM............... 2
BRAKE SYSTEM WARNING LAMP TEST...... 2
FOG LAMP SWITCH TEST................. 2
FUEL TANK SENDING UNIT TEST........... 3
HEADLAMP SWITCH TEST................. 3
HEATER A/C BLOWER SWITCH TEST........ 3
HEATER BLOWER SWITCH TEST............ 3
INDIVIDUAL GAUGE INOPERATIVE.......... 4
INSTRUMENT PANEL AND COMPONENTS.... 4
LOW OIL PRESSURE WARNING LAMP TEST . . 4
MULTIPLE GAUGE INOPERATIVE TEST....... 4
SEAT BELT REMINDER SYSTEM TEST....... 6
SENDING UNIT......................... 6
SERVICE ENGINE SOON INDICATOR......... 6
VEHICLE SPEED SENSOR TEST............. 6
REMOVAL AND INSTALLATION
ASH RECEIVER RETAINER AND LAMP....... 6
CENTER BEZEL.......................... 6
CIGAR LIGHTER RECEPTACLE.............. 6
CLUSTER LAMP......................... 7
CLUSTER PRINTED CIRCUIT BOARD........ 7CLUSTER.............................. 7
DOME LENS/LAMP....................... 8
FLOOR CONSOLE........................ 8
GAUGE................................ 8
GLOVE BOX DOOR/BIN................... 8
GLOVE BOX SWITCH/LAMP................ 9
HEADLAMP SWITCH..................... 9
HEATER A/C CONTROL BLOWER SWITCH . . . 10
HEATER A/C CONTROL LAMP............ 10
HEATER A/C CONTROL................... 9
HEATER CONTROL BLOWER SWITCH....... 10
IGNITION KEY LAMP.................... 10
INSTRUMENT PANEL.................... 10
LEFT TRIM PANEL...................... 10
ODOMETER............................ 10
RADIO................................ 12
REAR WINDOW DEFOGGER AND/OR FOG
LAMP SWITCH....................... 12
RIGHT TRIM PANEL..................... 12
SHIFTER KNOB......................... 13
STEERING COLUMN COVER LINER......... 13
STEERING COLUMN COVER.............. 13
STEERING COLUMN SHROUDS............ 13
TOP COVER AND CLUSTER BEZEL
REMOVAL........................... 14
TRANSMISSION RANGE INDICATOR LAMP . . 14
TRUNK LAMP/LENS..................... 14
VEHICLE SPEED SENSOR................ 14
GENERAL INFORMATION
INTRODUCTION
The purpose of the dash gauges and indicator
lamps is to keep the driver informed about the oper-
ating condition of the vehicle. If an abnormal condi-
tion occurs, the driver is informed by indicator lamp.
The driver can seek service before damage occurs.
Indicator lamps use ON/OFF switch functions for
operation, while gauges use a sending unit or sensor.
DESCRIPTION AND OPERATION
DOME LAMP
The Dome Lamp operates when a door is open or
when the headlamp switch is placed in courtesy posi-
tion.
ELECTRONIC DIGITAL CLOCK
The electronic digital clock is in the radio. The
clock and radio each use the display panel built into
the radio. A digital readout indicates the time in
hours and minutes whenever the ignition switch is in
the ON or ACC position.
PLINSTRUMENT PANEL AND SYSTEMS 8E - 1
Page 271 of 1200
When the ignition switch is in the OFF position, or
when the radio frequency is being displayed, time
keeping is accurately maintained.
The procedure for setting the clock varies slightly
with each radio. The correct procedure is described in
the individual radio operating instructions. Refer to
the Owner's Manual supplied with the vehicle.
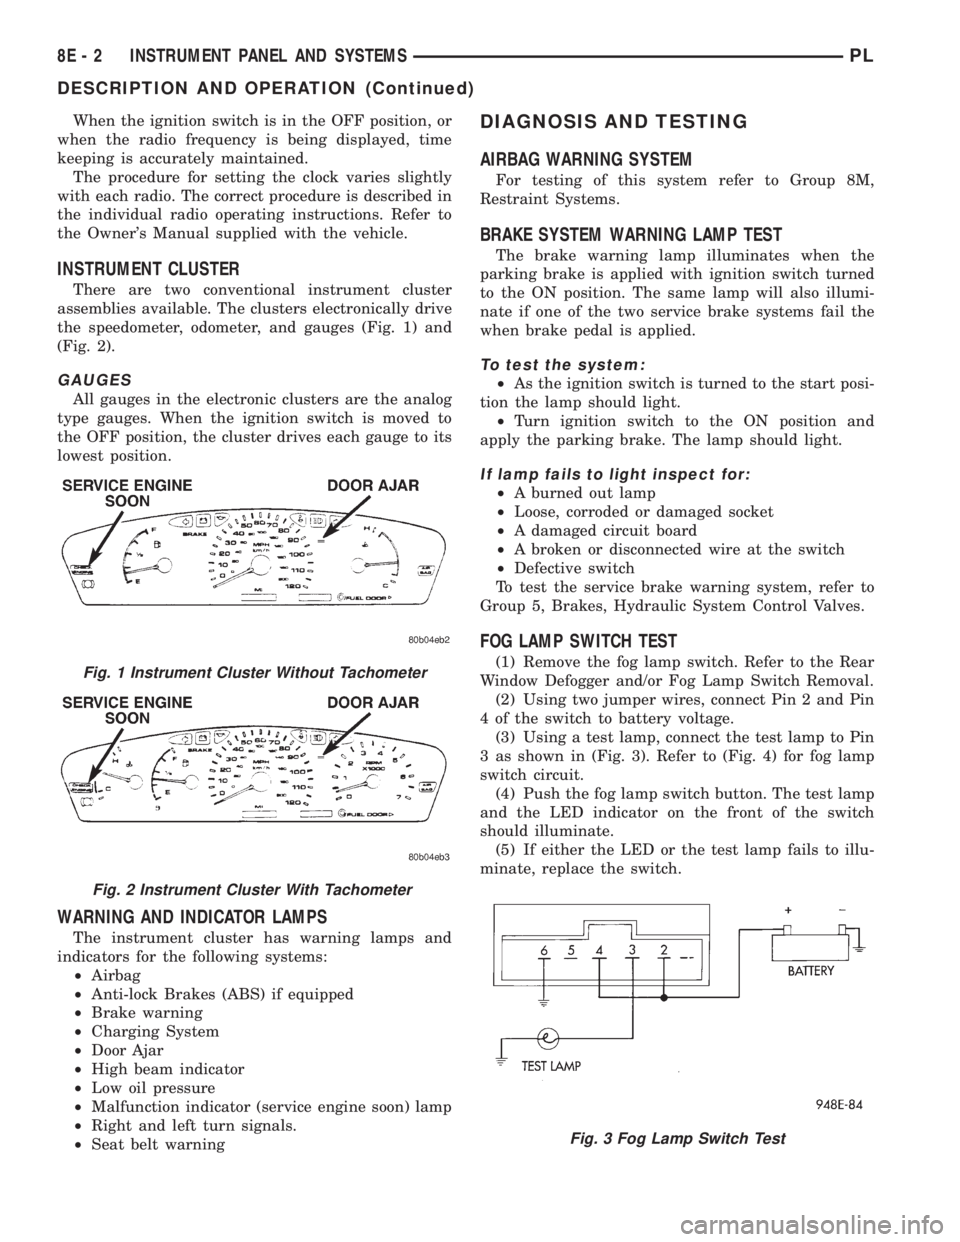
INSTRUMENT CLUSTER
There are two conventional instrument cluster
assemblies available. The clusters electronically drive
the speedometer, odometer, and gauges (Fig. 1) and
(Fig. 2).
GAUGES
All gauges in the electronic clusters are the analog
type gauges. When the ignition switch is moved to
the OFF position, the cluster drives each gauge to its
lowest position.
WARNING AND INDICATOR LAMPS
The instrument cluster has warning lamps and
indicators for the following systems:
²Airbag
²Anti-lock Brakes (ABS) if equipped
²Brake warning
²Charging System
²Door Ajar
²High beam indicator
²Low oil pressure
²Malfunction indicator (service engine soon) lamp
²Right and left turn signals.
²Seat belt warning
DIAGNOSIS AND TESTING
AIRBAG WARNING SYSTEM
For testing of this system refer to Group 8M,
Restraint Systems.
BRAKE SYSTEM WARNING LAMP TEST
The brake warning lamp illuminates when the
parking brake is applied with ignition switch turned
to the ON position. The same lamp will also illumi-
nate if one of the two service brake systems fail the
when brake pedal is applied.
To test the system:
²As the ignition switch is turned to the start posi-
tion the lamp should light.
²Turn ignition switch to the ON position and
apply the parking brake. The lamp should light.
If lamp fails to light inspect for:
²A burned out lamp
²Loose, corroded or damaged socket
²A damaged circuit board
²A broken or disconnected wire at the switch
²Defective switch
To test the service brake warning system, refer to
Group 5, Brakes, Hydraulic System Control Valves.
FOG LAMP SWITCH TEST
(1) Remove the fog lamp switch. Refer to the Rear
Window Defogger and/or Fog Lamp Switch Removal.
(2) Using two jumper wires, connect Pin 2 and Pin
4 of the switch to battery voltage.
(3) Using a test lamp, connect the test lamp to Pin
3 as shown in (Fig. 3). Refer to (Fig. 4) for fog lamp
switch circuit.
(4) Push the fog lamp switch button. The test lamp
and the LED indicator on the front of the switch
should illuminate.
(5) If either the LED or the test lamp fails to illu-
minate, replace the switch.Fig. 1 Instrument Cluster Without Tachometer
Fig. 2 Instrument Cluster With Tachometer
Fig. 3 Fog Lamp Switch Test
8E - 2 INSTRUMENT PANEL AND SYSTEMSPL
DESCRIPTION AND OPERATION (Continued)