Page 17 of 3115
I24787
Front Heater Unit
� Heater Radiator
� Air Mix Servomotor
� Air Outlet Servomotor Solar Sensor
Front Cooling Unit
� Expansion Valve
� Evaporator
� Evaporator Temperature Sensor Rear Heater Unit
� Blower Motor
� Power Transistor
� Heater Radiator
� Air Mix Servomotor
� Air Inlet Temperature Sensor
Room Temperature Sensor
(for Rear A/C)
Rear Cooling Unit
� Blower Motor
� Power Transister
� Evaporator
� Thermistor
� Expansion Valve with Magnetic Valve
Blower Unit
� Blower Motor
� Blower Motor Control Rela
y
� Air Inlet ServomotorA/C Amplifier
Integration Control Panel Room Temperature Sensor
(for Front A/C)
Rear A/C Control Switchw/ EMV:
w/o EMV:
A/C Control
�A/C Amplifier
Cowl Side J/B LH
� ACC Fuse
Cowl Side J/B RH
� RR A/C AC-14
- AIR CONDITIONINGAIR CONDITIONING SYSTEM
2739 Author�: Date�:
2004 LAND CRUISER (RM1071U)
Page 24 of 3115

- AIR CONDITIONINGAIR CONDITIONING SYSTEM
AC-9
2734 Author�: Date�:
2004 LAND CRUISER (RM1071U)
3. INSPECT IDLE-UP SPEED
(a) Warm up engine
(b) Inspect idle-up speed when following conditions are es-
tablished.
Test conditions:
�Fan speed selector at ºHIº position
�Temperature control dial at ºCOOLº position
�A/C switch ON
�Put gear shift in neutral
Magnetic clutch conditionIdle-up speed
Magnetic clutch not engaged700 ± 50 rpm
Magnetic clutch engaged780 ± 50 rpm
If idle speed is not as specified, check the idle control system.
4. INSPECT FOR LEAKAGE OF REFRIGERANT
(a) Stop engine.
(b) Secure good ventilation (The gas leak detector may not
react to volatile gases which are not refrigerant, such as
evaporated gasoline and exhaust gas)
(c) Repeat the test 2 or 3 times
(d) Make sure that there is some refrigerant remaining in the
refrigeration system.
When compressor is OFF: approx. 392 - 588 kPa (4 - 6
kgf´cm
2, 57 - 85 psi)
(e) Bring the gas leak detector close to the drain hose before
performing the test.
HINT:
�After the blower motor stops, leave the cooling for more
than 15 minutes.
�Expose the gas leak detector sensor under the drain
hose.
�When bring the gas leak detector close to the drain hose,
make sure that the gas leak detector does not react to the
volatile gases.
If gas leaks are detected, lift up the vehicle.
(f) If gas leaks are not detected on the drain hose, remove
the blower resistor from the cooling unit. Then insert the
gas leak detector sensor into the unit to perform the test.
(g) Disconnect the connector and leave the pressure switch
for approx. 20 minutes. Then bring the gas leak detector
close to the pressure switch to perform the test.
(h) Bring the gas leak detector close to the refrigerant lines.
Page 57 of 3115
AC1LC-02
I06698
I06699
AC-76
- AIR CONDITIONINGFRONT A/C EVAPORATOR
2801 Author�: Date�:
2004 LAND CRUISER (RM1071U)
DISASSEMBLY
1. PULL OUT EVAPORATOR TEMPERATURE SENSOR
2. REMOVE EXPANSION VALVE
Using a hexagon wrench (5.0mm, 0.20 in.), remove the 2 bolts
and separate the expansion valve and the evaporator.
Torque: 3.4 N´m (35 kgf´cm, 30 in.´lbf)
NOTICE:
Cap the open fittings immediately to keep moisture or dirt
out of the system.
HINT:
At the time of reassembly, lubricate 4 new O-rings with com-
pressor oil and install them to the valve. If evaporator is re-
placed, add compressor oil to the evaporator.
Add: 40 cc (1.4 fl.oz.)
Compressor oil: ND-OIL8 or equivalent
Page 60 of 3115
I06743
AC1L9-05
I06744
- AIR CONDITIONINGFRONT A/C EVAPORATOR
AC-73
2798 Author�: Date�:
2004 LAND CRUISER (RM1071U)
FRONT A/C EVAPORATOR
ON-VEHICLE INSPECTION
1. INSPECT FOR LEAKAGE OF REFRIGERANT
(a) Remove the glove compartment door.
(b) Remove the lower No. 2 finish panel
(See page BO-84).
(c) Remove the No. 1 cooler cover.
(1) Disconnect the connector clamp.
(2) Remove the 8 screws and No. 1 cooler cover.
(d) Using a gas leak detector, check for leaks of refrigerant.
If there is a leakage of refrigerant, check the tightening torque
at the joints or check the evaporator.
(e) Install the No. 1 cooler cover.
2. INSPECT EXPANSION VALVE
(a) Check amount of gas during refrigeration cycle.
(b) Set on manifold gauge set.
(c) Operate A/C system at ºMAX. COOLº for approx. 5 min-
utes.
(d) Check expansion valve.
Check the low pressure reading drops to 0 kPa (0
kgf/cm
2, 0 psi).
If the low pressure reading is not as specified, replace the ex-
pansion valve with the tubes.
Page 62 of 3115
AC1LB-04
I06745
I07899
- AIR CONDITIONINGFRONT A/C EVAPORATOR
AC-75
2800 Author�: Date�:
2004 LAND CRUISER (RM1071U)
REMOVAL
1. DISCHARGE REFRIGERANT FROM REFRIGERATION
SYSTEM
HINT:
At the time of installation, evacuate air from refrigeration system
and charge the system with the refrigerant and inspect for leaks
of the refrigerant.
Specified amount: 1,050 ± 50 g (37.03 ± 1.76 oz.)
2. DISCONNECT LIQUID AND SUCTION TUBES FROM
FRONT COOLING UNIT (See page AC-24)
3. REMOVE INSTRUMENT PANEL (See page BO-84)
4. REMOVE ANTENNA RELAY
(a) Disconnect the connector.
(b) Remove the 2 screws and the antenna relay.
5. REMOVE EVAPORATOR
(a) Disconnect the connector.
(b) Disconnect the connector clamp.
(c) Remove the 8 screws and the No .1 cooler cover.
(d) Pull out the evaporator.
Page 64 of 3115

AC1K7-06
I06697
I06698
I06699
AC-26
- AIR CONDITIONINGFRONT COOLING UNIT
2751 Author�: Date�:
2004 LAND CRUISER (RM1071U)
DISASSEMBLY
1. REMOVE EVAPORATOR
(a) Disconnect the connector clamp.
(b) Remove the 8 screws and No. 1 cooler cover.
(c) Pull out the evaporator
HINT:
At the time of reassembly, if evaporator is replaced, add com-
pressor oil to the evaporator.
Add: 40 cc (1.4 fl.oz.)
Compressor oil: ND-OIL 8 or equivalent
2. PULL OUT EVAPORATOR TEMPERATURE SENSOR
FROM EVAPORATOR
3. REMOVE EXPANSION VALVE
(a) Remove the grommet.
(b) Pry out the packing.
HINT:
At the time of reassembly, do not reuse the packing.
(c) Using a hexagon wrench (5.0 mm, 0.20 in.), remove the
2 bolts and separate the expansion valve, tube and evap-
orator.
Torque: 3.4 N´m (35 kgf´cm, 30 in.´lbf)
NOTICE:
Cap the open fittings immediately to keep moisture or dirt
out of the system.
HINT:
At the time of reassembly, lubricate 4 new O-rings with com-
pressor oil and install them in the tube.
4. REMOVE DRAIN HOSE
Page 91 of 3115

I06703
I06702
I06704
I06705
- AIR CONDITIONINGREAR COOLING UNIT
AC-35
2760 Author�: Date�:
2004 LAND CRUISER (RM1071U)
(c) Pull out the thermistor from the evaporator.
(d) Remove the screw and the piping clamp.
(e) Loosen the 2 nuts and remove the tube and accessory.
Torque:
Liquid line: 14 N´m (140 kgf´cm, 10 ft´lbf)
Suction line: 32 N´m (330 kgf´cm, 24 ft´lbf)
NOTICE:
Cap the open fittings immediately to keep moisture or dirt
out of the system.
HINT:
At the time of reassembly, lubricate 2 new O-rings with com-
pressor oil and install them in the tubes.
(f) Remove the evaporator.
HINT:
At the time of reassembly, if evaporator was replaced, add com-
pressor oil to the new evaporator.
Add 40 cc: (1.4 fl.oz.)
Compressor oil: ND-OIL 8 or equivalent
6. REMOVE EXPANSION VALVE
Using a hexagon wrench (5.0 mm, 0.20 in.), remove the 2 bolts
and separate the expansion valve and evaporator.
Torque: 5.4 N´m (55 kgf´cm, 48 in.´lbf)
HINT:
At the time of reassembly, lubricate 4 new O-rings with com-
pressor oil and install them in the tubes.
Page 94 of 3115
AC1KA-04
I06684
43
W
I06685
1 2
I06686
- AIR CONDITIONINGREAR COOLING UNIT
AC-29
2754 Author�: Date�:
2004 LAND CRUISER (RM1071U)
REAR COOLING UNIT
ON-VEHICLE INSPECTION
1. INSPECT EXPANSION VALVE
(a) Check amount of gas during refrigeration cycle.
(b) Set on manifold gauge set.
(c) Start the engine.
(d) Operate the A/C system.
(e) Inspect the expansion valve.
(1) Run the engine at 1,500 rpm for at least 5 minutes.
(2) Check the high pressure reading is 1.37 - 1.57 MPa
(14 - 16 kgf/cm
2, 199 - 288 psi).
(3) Check the low pressure reading.
If the low pressure reading is 0 kPa (0 kgf/cm
2, 0psi), replace
the expansion valve.
2. REMOVE REAR DOOR SCUFF PLATE RH
3. REMOVE REAR FLOOR MAT SUPPORT PLATE
4. REMOVE QUARTER TRIM PANEL RH
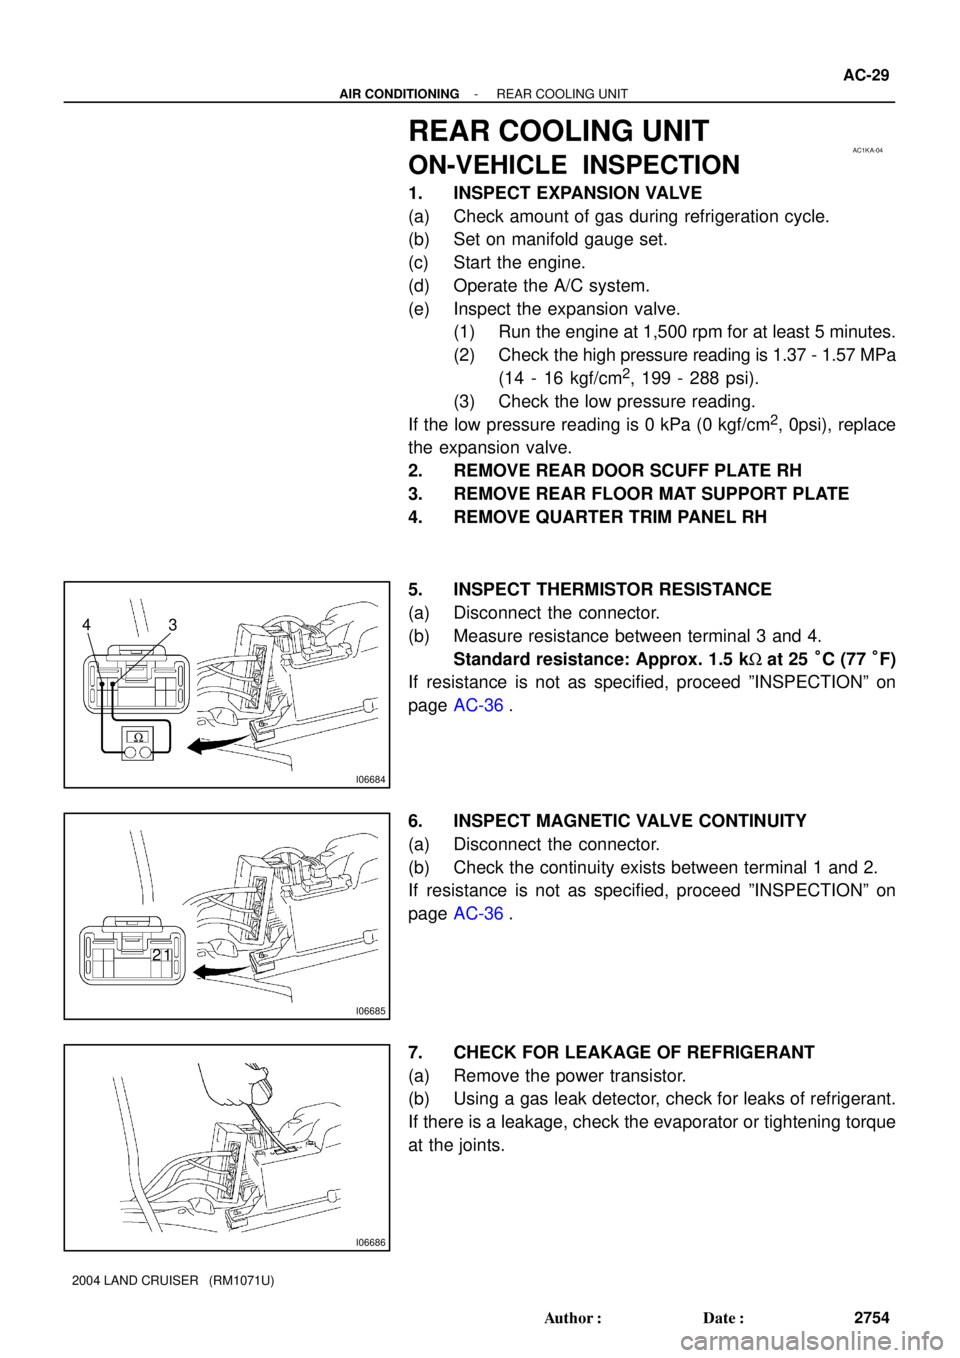
5. INSPECT THERMISTOR RESISTANCE
(a) Disconnect the connector.
(b) Measure resistance between terminal 3 and 4.
Standard resistance: Approx. 1.5 kW at 25 °C (77 °F)
If resistance is not as specified, proceed ºINSPECTIONº on
page AC-36.
6. INSPECT MAGNETIC VALVE CONTINUITY
(a) Disconnect the connector.
(b) Check the continuity exists between terminal 1 and 2.
If resistance is not as specified, proceed ºINSPECTIONº on
page AC-36.
7. CHECK FOR LEAKAGE OF REFRIGERANT
(a) Remove the power transistor.
(b) Using a gas leak detector, check for leaks of refrigerant.
If there is a leakage, check the evaporator or tightening torque
at the joints.