Page 74 of 3115
AC1KI-04
I06727
I25894
Second Ridge
View A
UpperHose Clip
Lower
MarkingRHLH Upper
LowerMarking
View A
I06728
I06729
AC-40
- AIR CONDITIONINGFRONT HEATER UNIT
2765 Author�: Date�:
2004 LAND CRUISER (RM1071U)
REMOVAL
1. DRAIN ENGINE COOLANT FROM RADIATOR
HINT:
It is not necessary to drain out all coolant.
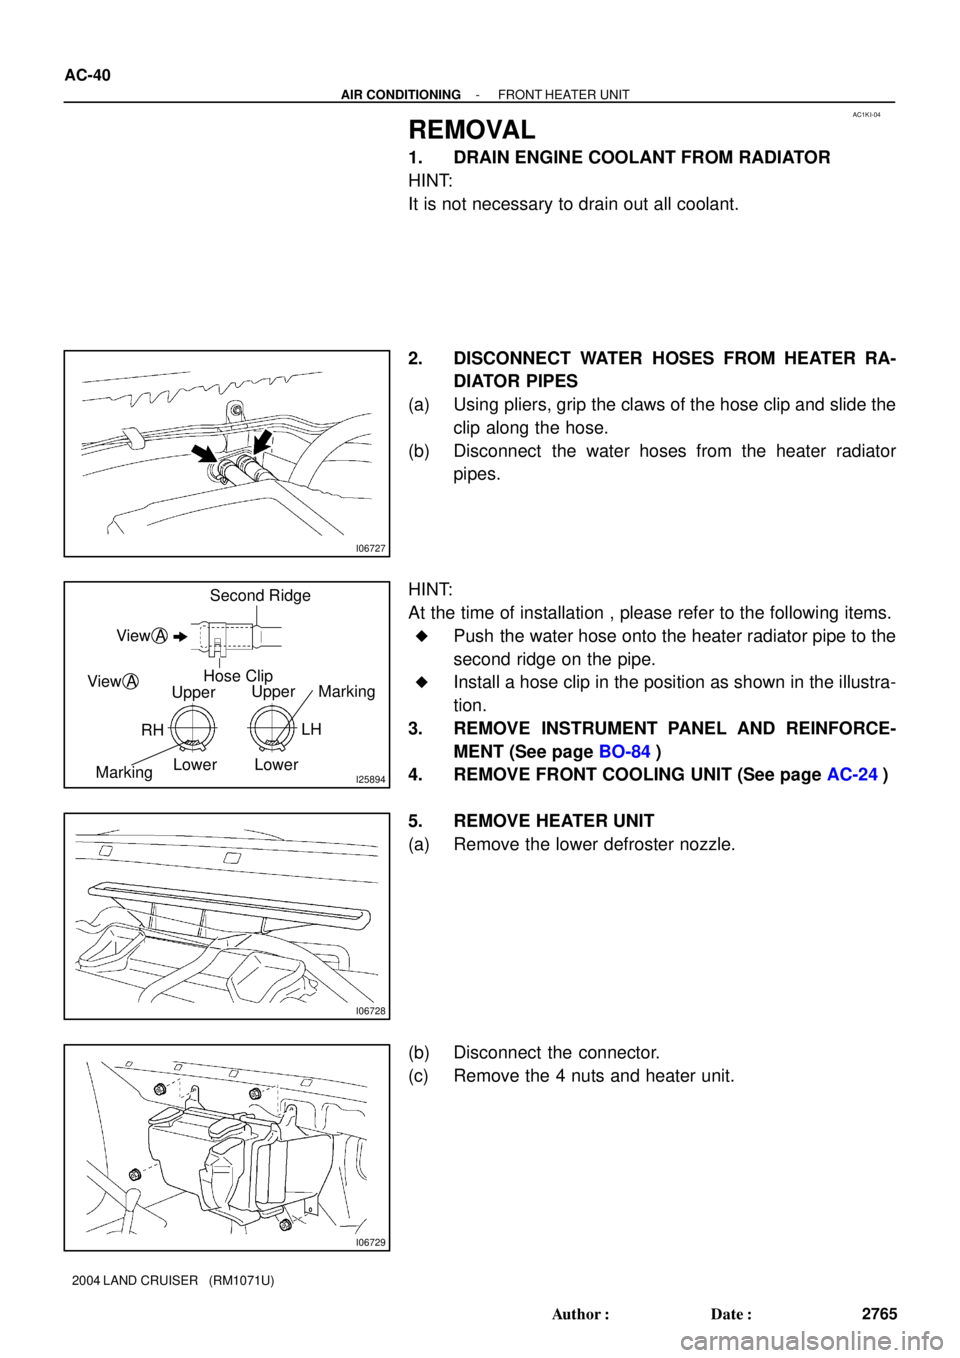
2. DISCONNECT WATER HOSES FROM HEATER RA-
DIATOR PIPES
(a) Using pliers, grip the claws of the hose clip and slide the
clip along the hose.
(b) Disconnect the water hoses from the heater radiator
pipes.
HINT:
At the time of installation , please refer to the following items.
�Push the water hose onto the heater radiator pipe to the
second ridge on the pipe.
�Install a hose clip in the position as shown in the illustra-
tion.
3. REMOVE INSTRUMENT PANEL AND REINFORCE-
MENT (See page BO-84)
4. REMOVE FRONT COOLING UNIT (See page AC-24)
5. REMOVE HEATER UNIT
(a) Remove the lower defroster nozzle.
(b) Disconnect the connector.
(c) Remove the 4 nuts and heater unit.
Page 109 of 3115
AC1KO-04
I03973
I05080
Second Ridge
Hose Clip
Water Hose
I03924
- AIR CONDITIONINGREAR HEATER UNIT
AC-47
2772 Author�: Date�:
2004 LAND CRUISER (RM1071U)
REMOVAL
1. DRAIN ENGINE COOLANT FROM RADIATOR
HINT:
It is not necessary to drain out all the coolant.
2. DISCONNECT WATER HOSES FROM HEATER RA-
DIATOR PIPES
(a) Using pliers, grip the claws of the clip and slide the clip
along the hose
(b) Disconnect the water hoses
HINT:
At the time of installation, push the water hose on to the heater
radiator pipe to the second ridge on the pipe.
3. REMOVE FRONT SEATS
4. REMOVE REAR CONSOLE BOX
5. REMOVE FRONT CONSOLE BOX COVER
6. REMOVE LOWER CENTER CLUSTER FINISH PANEL
7. REMOVE FRONT DOOR SCUFF PLATE
8. REMOVE COWL SIDE TRIMS
9. REMOVE REAR DOOR SCUFF PLATES
10. REMOVE CENTER PILLAR GARNISHES
11. SLIDE FLOOR CARPET BACKWARD
12. REMOVE COOLER BRACKET
Remove the 4 bolts and the cooler bracket.
Page 611 of 3115
CH06I-04
B00809
B16653
- CHARGINGGENERATOR
CH-7
1842 Author�: Date�:
2004 LAND CRUISER (RM1071U)
REMOVAL
1. DRAIN ENGINE COOLANT
(See page CO-2)
2. REMOVE GENERATOR DRIVE BELT
Loosen the belt tension by turning the belt tensioner counter-
clockwise, and remove the drive belt.
HINT:
The pulley bolt for the belt tensioner has a left - hand thread.
3. REMOVE ENGINE UNDER COVER NO.1
4. REMOVE RADIATOR ASSEMBLY
(See page CO-17)
5. REMOVE PS VANE PUMP PULLEY
(See page SR-40)
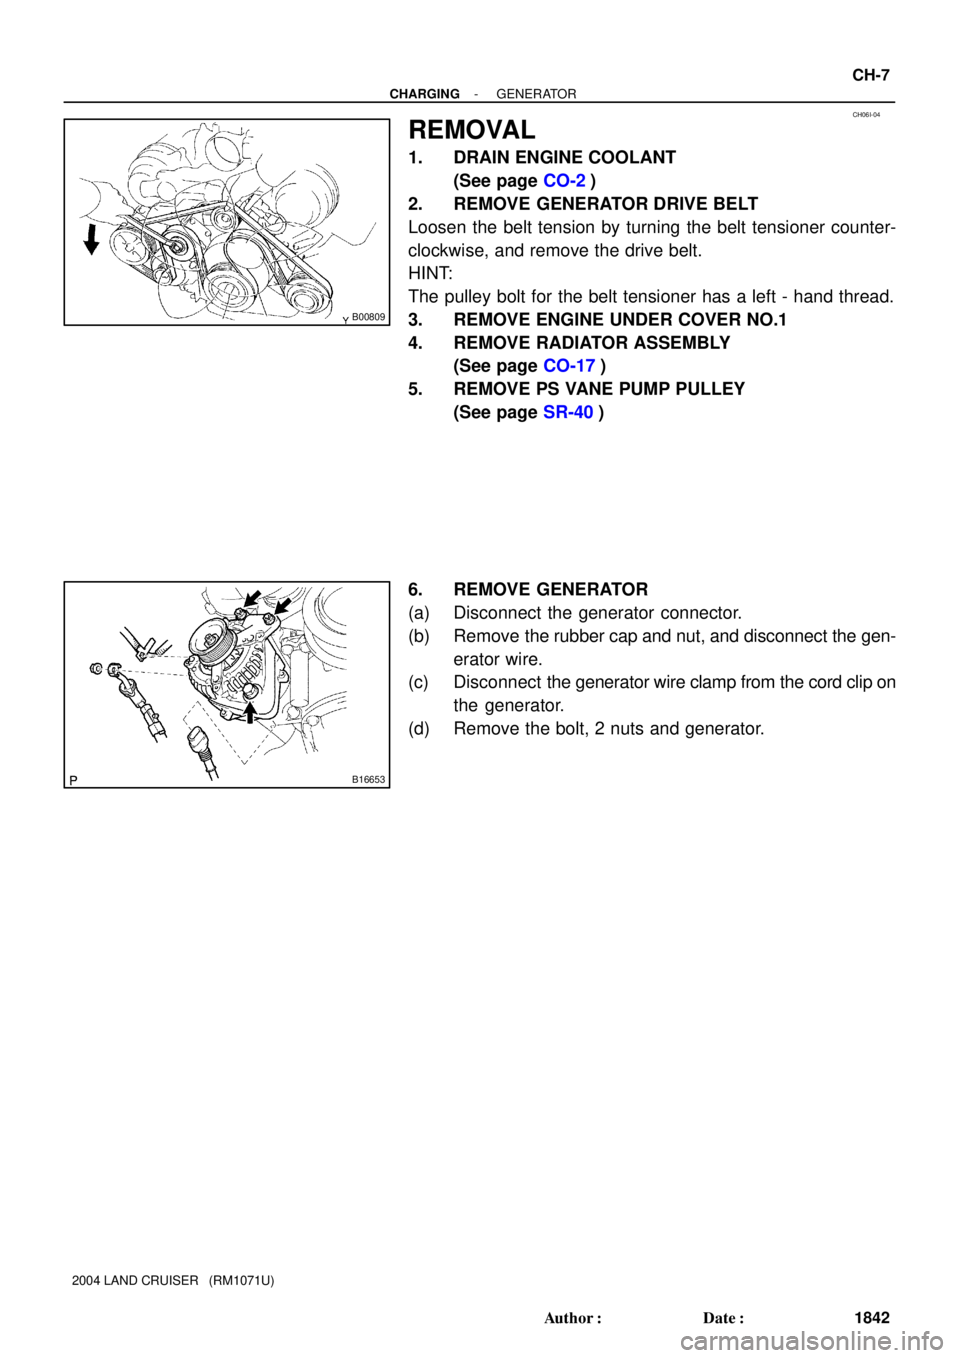
6. REMOVE GENERATOR
(a) Disconnect the generator connector.
(b) Remove the rubber cap and nut, and disconnect the gen-
erator wire.
(c) Disconnect the generator wire clamp from the cord clip on
the generator.
(d) Remove the bolt, 2 nuts and generator.
Page 745 of 3115

CO0IP-10
B04480Drain PlugDrain Plug Drain Plug
CO-2
- COOLINGCOOLANT
1763 Author�: Date�:
2004 LAND CRUISER (RM1071U)
REPLACEMENT
1. DRAIN ENGINE COOLANT
(a) Remove the radiator cap.
CAUTION:
To avoid the danger of being burned, do not remove the ra-
diator cap while the engine and radiator are still hot, as fluid
and steam can be blown out under pressure.
(b) Remove the 3 drain plugs on the engine and radiator, and
drain the coolant.
(c) Close the 3 drain plugs.
Torque: 12.7 N´m (130 kgf´cm, 9 ft´lbf) for engine
2. REFILL WITH ENGINE COOLANT
(a) Slowly fill the system with coolant.
Capacity:
w/ Front heater: 14.8 liters (15.6 US qts, 13.0 Imp. qts)
w/ Front heater and rear heater:
15.3 liters (16.2 US qts, 13.4 Imp. qts)
NOTICE:
Do not use plain water alone.
HINT:
�Use of improper coolants may damage the engine cooling
system.
�Use ºToyota Super Long Life Coolantº or similar high qual-
ity ethylene glycol based non-silicate, non-amine, non-
nitrite, and non-borate coolant with long-life hybrid or-
ganic acid technology.
�New Toyota vehicles are filled with Toyota Super Long
Life Coolant (color is pink, premixed ethylene glycol con-
centration is approximately 50 % and freezing tempera-
ture is -35°C (-31°F)). When replacing the coolant, Toyo-
ta Super long Life Coolant is recommended.
�Observe the coolant level inside the radiator by pressing
the inlet and outlet radiator hoses several times by hand.
if the coolant level goes down, add the coolant.
If the coolant level goes down, add the coolant.
(b) Install the radiator cap.
(c) Bleed the cooling system.
(1) Start the engine, and open the heater water valve.
(2) Maintain the engine speed at 2,000 - 2,500 rpm,
and warm up the engine.
(d) Stop the engine, and wait until the engine coolant cools
down.
(e) Refill coolant into the reservoir until it is ºFULLº.
3. CHECK FOR ENGINE COOLANT LEAKS
4. CHECK ENGINE COOLANT SPECIFIC GRAVITY COR-
RECTLY
Page 751 of 3115
CO0J1-02
B04474A/T Oil Cooler Hose
B04475
- COOLINGRADIATOR
CO-17
1778 Author�: Date�:
2004 LAND CRUISER (RM1071U)
REMOVAL
1. REMOVE ENGINE UNDER COVER NO.1
2. DRAIN ENGINE COOLANT
3. DISCONNECT RADIATOR UPPER HOSE FROM RA-
DIATOR
4. DISCONNECT RADIATOR LOWER HOSE FROM RA-
DIATOR
5. DISCONNECT A/T OIL COOLER HOSES FROM RA-
DIATOR
6. REMOVE RADIATOR RESERVOIR
(a) Disconnect the clamp on the wire from the radiator.
(b) Disconnect the resorvoir hose from the radiator.
(c) Remove the 2 bolts, resorvoir and grommet.
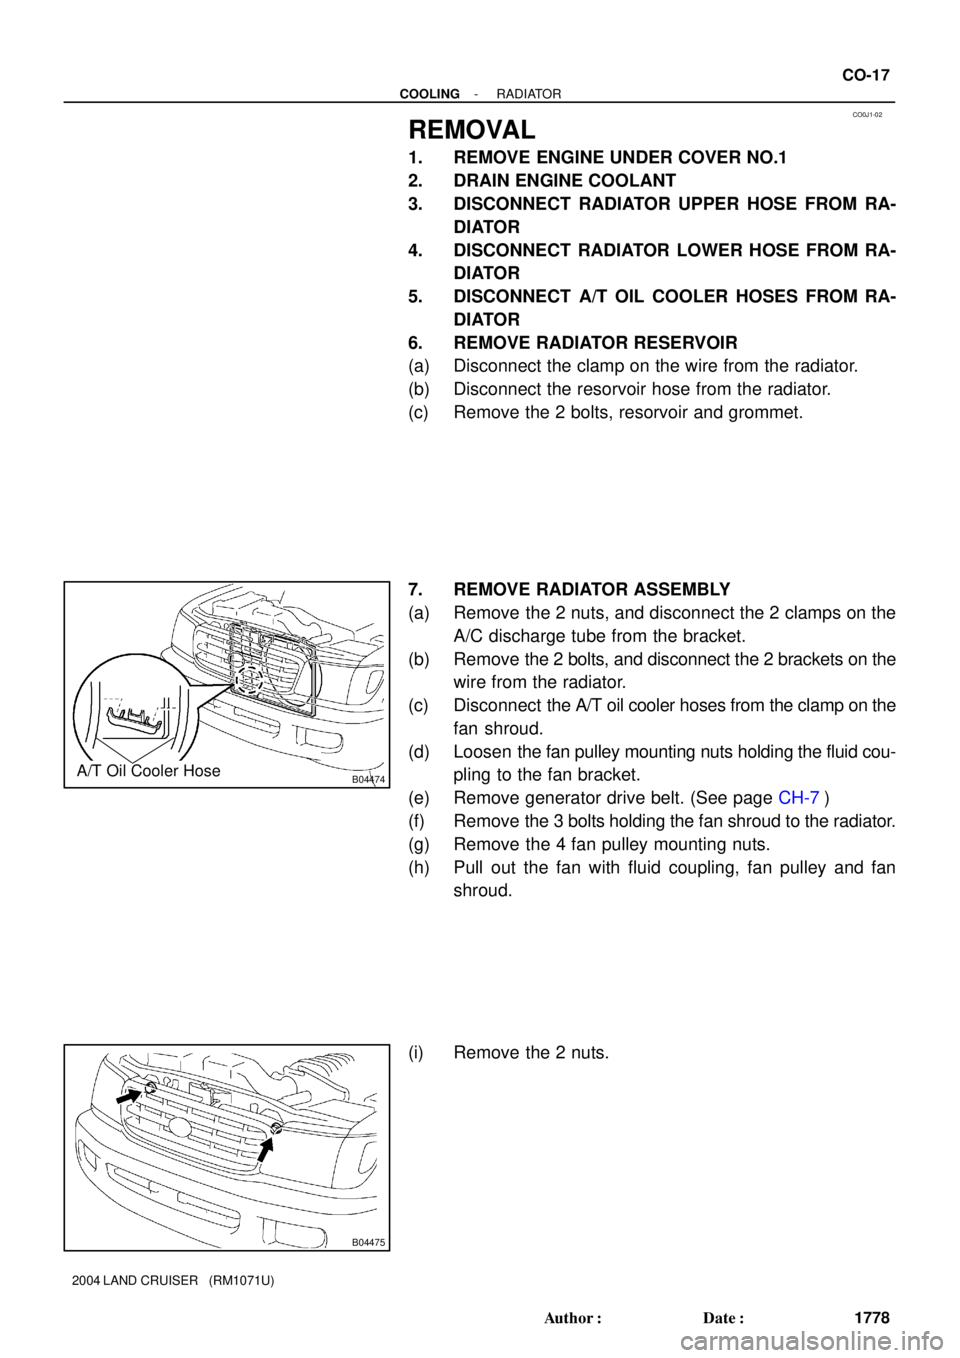
7. REMOVE RADIATOR ASSEMBLY
(a) Remove the 2 nuts, and disconnect the 2 clamps on the
A/C discharge tube from the bracket.
(b) Remove the 2 bolts, and disconnect the 2 brackets on the
wire from the radiator.
(c) Disconnect the A/T oil cooler hoses from the clamp on the
fan shroud.
(d) Loosen the fan pulley mounting nuts holding the fluid cou-
pling to the fan bracket.
(e) Remove generator drive belt. (See page CH-7)
(f) Remove the 3 bolts holding the fan shroud to the radiator.
(g) Remove the 4 fan pulley mounting nuts.
(h) Pull out the fan with fluid coupling, fan pulley and fan
shroud.
(i) Remove the 2 nuts.
Page 756 of 3115
CO0IV-01
B04465
- COOLINGTHERMOSTAT
CO-1 1
1772 Author�: Date�:
2004 LAND CRUISER (RM1071U)
REMOVAL
HINT:
Removal of the thermostat would have an adverse effect, caus-
ing a lowering of cooling efficiency. Do not remove the thermo-
stat, even if the engine tends to overheat.
1. DRAIN ENGINE COOLANT
2. DISCONNECT WATER INLET FROM WATER INLET
HOUSING
Remove the 3 nuts and disconnect the water inlet from the wa-
ter inlet housing.
3. REMOVE THERMOSTAT
(a) Remove the thermostat.
(b) Remove the gasket from the thermostat.
Page 763 of 3115
CO0IR-01
B04460
B04461
CO-6
- COOLINGWATER PUMP
1767 Author�: Date�:
2004 LAND CRUISER (RM1071U)
REMOVAL
1. DRAIN ENGINE COOLANT
2. REMOVE TIMING BELT (See page EM-15)
3. REMOVE NO.2 IDLER PULLEY (See page EM-15)
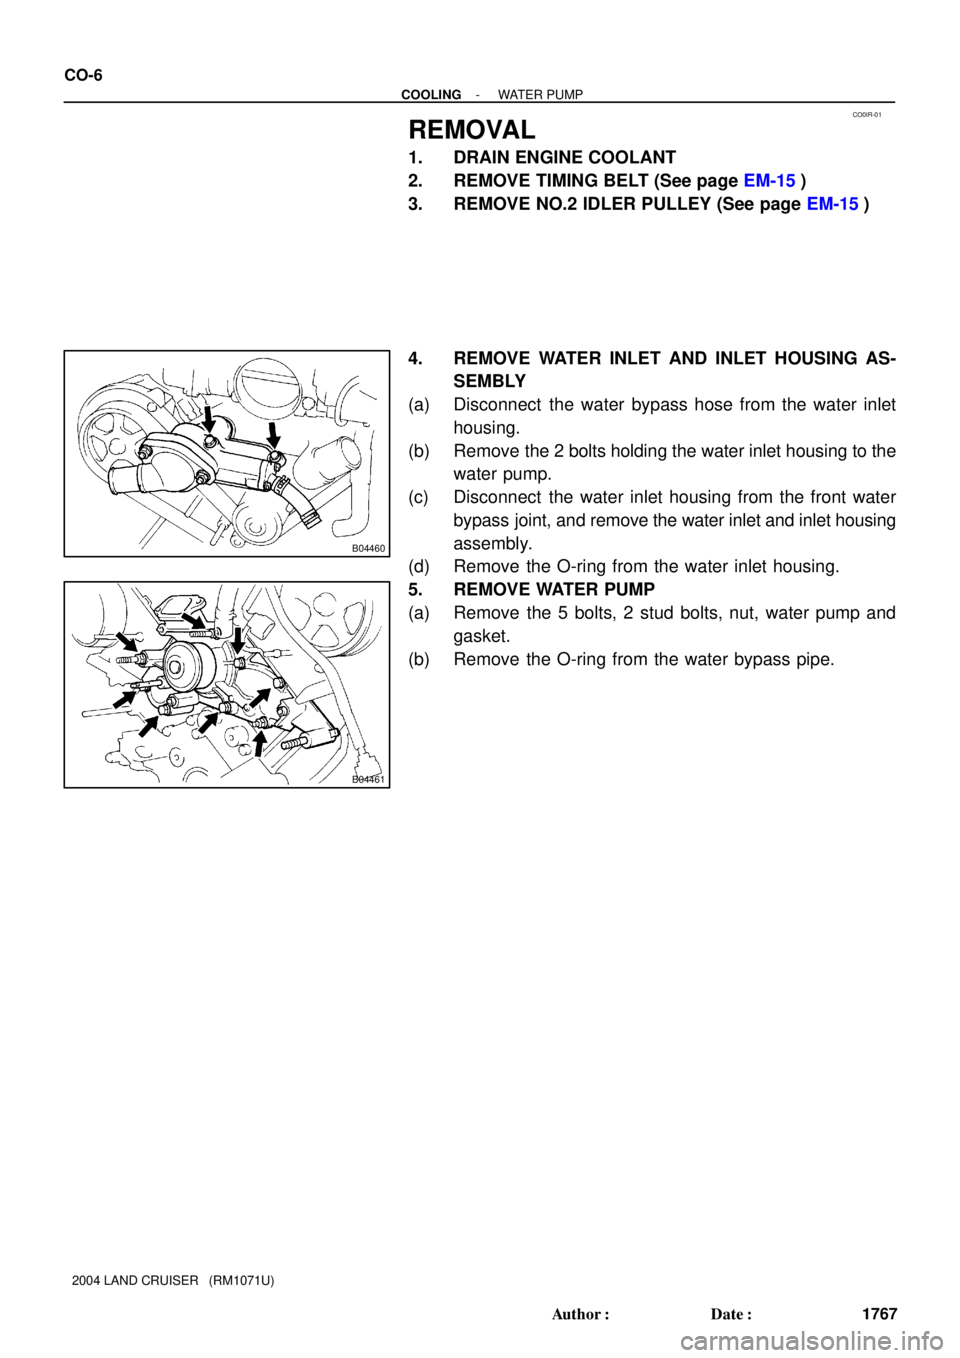
4. REMOVE WATER INLET AND INLET HOUSING AS-
SEMBLY
(a) Disconnect the water bypass hose from the water inlet
housing.
(b) Remove the 2 bolts holding the water inlet housing to the
water pump.
(c) Disconnect the water inlet housing from the front water
bypass joint, and remove the water inlet and inlet housing
assembly.
(d) Remove the O-ring from the water inlet housing.
5. REMOVE WATER PUMP
(a) Remove the 5 bolts, 2 stud bolts, nut, water pump and
gasket.
(b) Remove the O-ring from the water bypass pipe.
Page 1795 of 3115
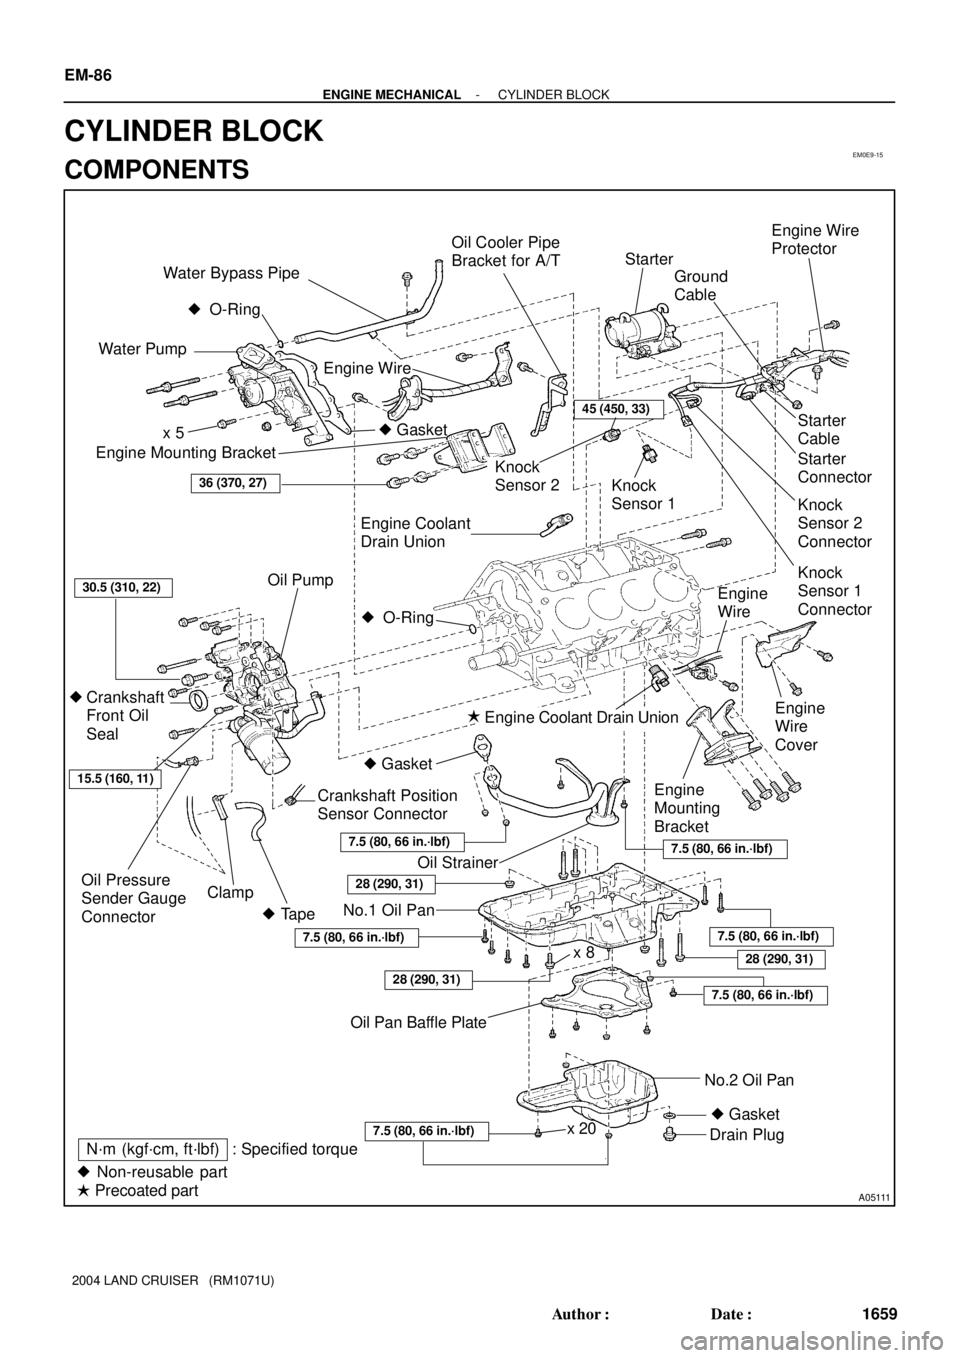
EM0E9-15
A05111
Engine Mounting Bracket
Oil Pump
Crankshaft
Front Oil
Seal
Crankshaft Position
Sensor Connector
No.1 Oil Pan
Drain Plug
� Non-reusable part
� Precoated partEngine Wire
Oil StrainerEngine
Mounting
BracketStarter
Cable
Knock
Sensor 2
Connector Knock
Sensor 1Knock
Sensor 2
Engine Coolant Drain UnionStarter
No.2 Oil Pan Oil Pan Baffle Platex 8 Water Pump
� Gasket � O-Ring
Engine
Wire
Engine
Wire
CoverKnock
Sensor 1
Connector Engine Coolant
Drain Union
45 (450, 33)
36 (370, 27)
30.5 (310, 22)
15.5 (160, 11)
28 (290, 31)
x 5
Oil Pressure
Sender Gauge
Connector
7.5 (80, 66 in.´lbf)
7.5 (80, 66 in.´lbf)
7.5 (80, 66 in.´lbf)
N´m (kgf´cm, ft´lbf) : Specified torque �
�
x 20
Ground
Cable
Clamp
Engine Wire
Protector
� Tape
28 (290, 31)
� Gasket
7.5 (80, 66 in.´lbf)
28 (290, 31)
7.5 (80, 66 in.´lbf)
Water Bypass Pipe
Oil Cooler Pipe
Bracket for A/T
7.5 (80, 66 in.´lbf)
� O-Ring
Starter
Connector
� Gasket
EM-86
- ENGINE MECHANICALCYLINDER BLOCK
1659 Author�: Date�:
2004 LAND CRUISER (RM1071U)
CYLINDER BLOCK
COMPONENTS