Page 1805 of 6000
6A – 72 ENGINE MECHANICAL
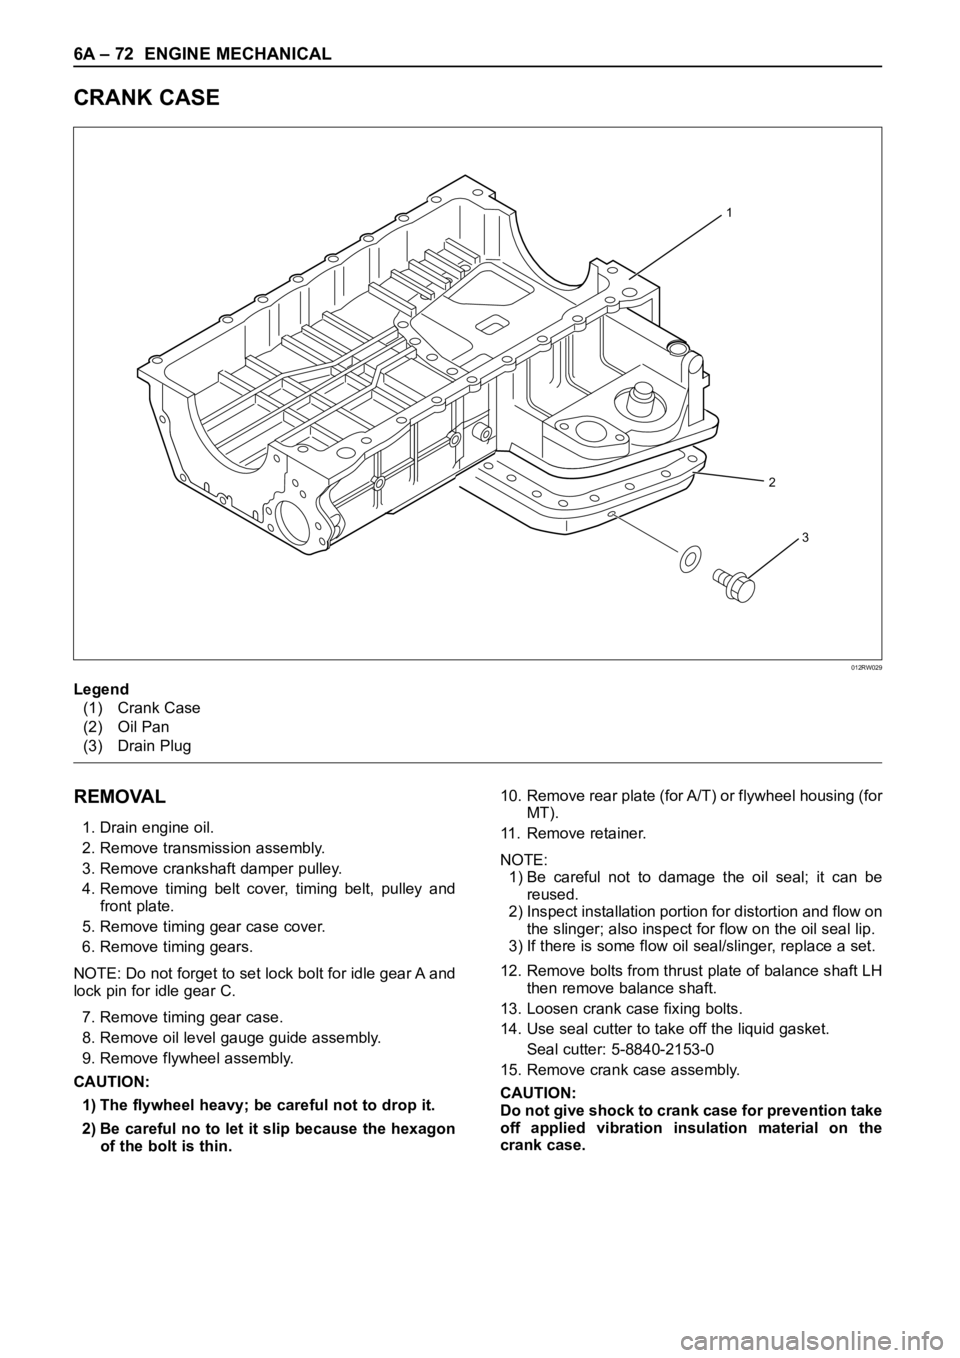
CRANK CASE
REMOVAL
1. Drain engine oil.
2. Remove transmission assembly.
3. Remove crankshaft damper pulley.
4. Remove timing belt cover, timing belt, pulley and
front plate.
5. Remove timing gear case cover.
6. Remove timing gears.
NOTE: Do not forget to set lock bolt for idle gear A and
lock pin for idle gear C.
7. Remove timing gear case.
8. Remove oil level gauge guide assembly.
9. Remove flywheel assembly.
CAUTION:
1) The flywheel heavy; be careful not to drop it.
2) Be careful no to let it slip because the hexagon
of the bolt is thin.10. Remove rear plate (for A/T) or flywheel housing (for
MT).
11. Remove retainer.
NOTE:
1) Be careful not to damage the oil seal; it can be
reused.
2) Inspect installation portion for distortion and flow on
the slinger; also inspect for flow on the oil seal lip.
3) If there is some flow oil seal/slinger, replace a set.
12. Remove bolts from thrust plate of balance shaft LH
then remove balance shaft.
13. Loosen crank case fixing bolts.
14. Use seal cutter to take off the liquid gasket.
Seal cutter: 5-8840-2153-0
15. Remove crank case assembly.
CAUTION:
Do not give shock to crank case for prevention take
off applied vibration insulation material on the
crank case.
1
2
3
012RW029
Legend
(1) Crank Case
(2) Oil Pan
(3) Drain Plug
Page 1831 of 6000
6A – 98 ENGINE MECHANICAL
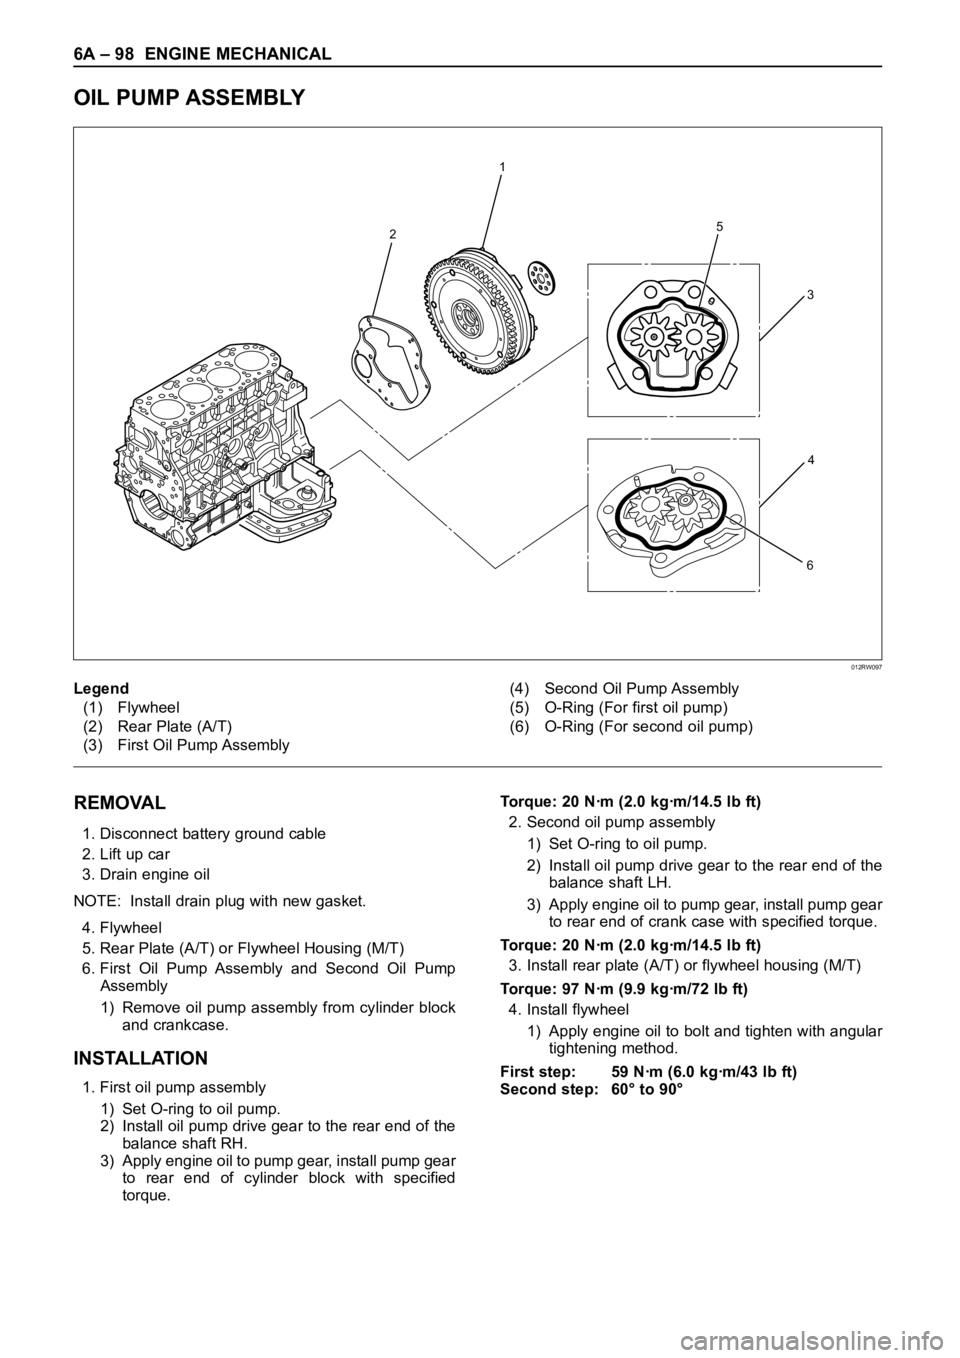
OIL PUMP ASSEMBLY
2
1
5
6
3
4
012RW097
Legend
(1) Flywheel
(2) Rear Plate (A/T)
(3) First Oil Pump Assembly(4) Second Oil Pump Assembly
(5) O-Ring (For first oil pump)
(6) O-Ring (For second oil pump)
REMOVAL
1. Disconnect battery ground cable
2. Lift up car
3. Drain engine oil
NOTE: Install drain plug with new gasket.
4. Flywheel
5. Rear Plate (A/T) or Flywheel Housing (M/T)
6. First Oil Pump Assembly and Second Oil Pump
Assembly
1) Remove oil pump assembly from cylinder block
and crankcase.
INSTALLATION
1. First oil pump assembly
1) Set O-ring to oil pump.
2) Install oil pump drive gear to the rear end of the
balance shaft RH.
3) Apply engine oil to pump gear, install pump gear
to rear end of cylinder block with specified
torque.Torque: 20 Nꞏm (2.0 kgꞏm/14.5 lb ft)
2. Second oil pump assembly
1) Set O-ring to oil pump.
2) Install oil pump drive gear to the rear end of the
balance shaft LH.
3) Apply engine oil to pump gear, install pump gear
to rear end of crank case with specified torque.
Torque: 20 Nꞏm (2.0 kgꞏm/14.5 lb ft)
3. Install rear plate (A/T) or flywheel housing (M/T)
Torque: 97 Nꞏm (9.9 kgꞏm/72 lb ft)
4. Install flywheel
1) Apply engine oil to bolt and tighten with angular
tightening method.
First step: 59 Nꞏm (6.0 kgꞏm/43 lb ft)
Second step: 60° to 90°
Page 1833 of 6000
6A – 100 ENGINE MECHANICAL
REMOVAL
1. Disconnect battery ground cable
2. Drain engine coolant
3. Remove front exhaust pipe
4. Remove heat protector
5. Remove exhaust valve assembly
6. Oil cooler assembly
1) Remove water hoses from inlet and outlet pipe.
2) Put rag beneath side of oil cooler to prevent oil
leaking.
3) Remove fixing bolts and oil cooler assembly.
INSTALLATION
1. Oil Cooler
1) Tighten oil cooler fixing bolt to the specified
torque and connect water hose.
Torque: 29 Nꞏm (3.0 kgꞏm/22 lb ft)
2. Exh. Valve Assembly
1) Install exhaust valve assembly with gasket and
tighten fixing bolts to the specified torque.
Torque: 27 Nꞏm (2.7 kgꞏm/20 lb ft)
3. Heat Protector
4. Front Exhaust Pipe
1) Install front exhaust pipe and tighten fixing bolts
to the specified torque.
Exh. Valve Side: 67 Nꞏm (6.8 kgꞏm/50 lb ft)
Intermediate Pipe Side: 43 Nꞏm (4.4 kgꞏm/32 lb ft)
5. Fill engine coolant.
6. Connect battery ground cable.
7. Start engine and check for oil and water leakage
carefully.
Page 1839 of 6000

6B – 6 ENGINE COOLING
REMOVAL
1. Drain coolant.
2. AC Generator Drive Belt
1) Loosen AC Generator mounting bolt, adjust
plate lock bolt, and remove the drive belt.
3. Cooling Fan Assembly
1) Remove lock nut and take out cooling fan
assembly with cooling fan clutch.
4. Water Pump Assembly
INSPECTION
Make necessary repair and parts replacement if
excessive wear or damage is found during inspection.
Should any of the following problems occur, the entire
water pump assembly must be replaced.
1) Cracks in the water pump body
2) Coolant leakage from the seal unit
3) Excessive play in radial direction or abnormal noise
4) Excessive play in thrust direction
5) Cracks or corrosion in the impeller
INSTALLATION
1. Gasket
1) Set gasket to gear case.
2. Water Pump Assembly
1) Install water pump assembly, and tighten to
specified torque.Torque: 20 Nꞏm (2.0 kgꞏm/14.5 lb ft)
3. Cooling Fan Assembly
1) Install cooling fan assembly, and tighten to
specified torque.
Torque: 8 Nꞏm (0.8 kgꞏm/5.8 lb ft)
4. AC Generator Drive Belt
1) Install AC Generator drive belt and adjust belt
tension.
Torque: 40 Nꞏm (4.1 kgꞏm/29.7 lb ft)
For ACG to bracket
20 Nꞏm (2.0 kgꞏm/14.5 lb ft)
For ACG to adjust plate
5. Fill coolant to specified capacity.
12
Legend
(1) Fan Pulley
(2) Water Pump Assembly
030RW009
ON-VEHICLE SERVICE
WAT E R P U M P
Page 1840 of 6000
ENGINE COOLING 6B – 7
THERMOSTAT
REMOVAL
1. Disconnect battery ground cable.
2. Drain coolant from the radiator and engine.
3. Thermostat housing
1) Remove mounting bolt and remove thermostat
housing together with radiator hose.
4. Gasket
5. Thermostat
INSPECTION
Make necessary repair and parts replacement if
excessive wear or damage is found during inspection.
Submerge the thermostat assembly in the water.
Place wooden blocks on the bottom of the water
container.
Do not heat the thermostat directly.
Gradually increase the water temperature. Stir the
water so that the entire water is the same temperature.
1) Make sure that valve begins to open at the
specified temperature.
Valve Opening Temperature: 85°C (185°F)
2) Make sure that valve opens fully at the specified
temperature.
Valve Full Open Temperature: 100°C (212°F)
1
2
3
4
Legend
(1) Bolt
(2) Thermostat Housing
(3) Thermostat
(4) Intake Manifold
035RW002
031RS003
Page 1852 of 6000
ENGINE FUEL 6C – 7
ON-VEHICLE SERVICE
FUEL FILTER ASSEMBLY
REMOVAL
1. Disconnect battery ground cable.
2. Fuel Filler cap
3. Fuel Hose
1) Disconnect fuel hose from filter body.
Plug the hose ends to prevent fuel spillage.
4. Remove the Bolt on Fuel Filter Bracket
5. Remove Fuel Filter Assembly
INSTALLATION
1. Install the fuel filter assembly
2. Tighten the Fuel Filter Bracket Fixing Bolt
3. Fuel Hose
1) Connect hoses to filter body.
4. Fuel Filler Cap
1) Connect the battery ground cable.
2) Feed fuel to the fuel pump by priming, and bleed
the air from fuel system.
FUEL FILTER CARTRIDGE
DISASSEMBLY
1. Drain fuel completely from the fuel filter.
2. Protect the filter body with cloth and lightly grip with
a vise.
3. Remove the cartridge using a filter wrench.
Filter wrench: 5-8840-0203-0
1
Legend
(1) Priming Pump
012RW111
012RW112
Page 1855 of 6000
6C – 10 ENGINE FUEL
REMOVAL
Prior to removal, be sure to confirm and record the
group code of the injector installed using Tech2.
1. Disconnect battery ground cable.
2. Remove air cleaner cover and air duct.
3. Remove intercooler.
Refer to “Intercooler” in this manual.
4. Remove PCV hose and pipe.
5. Remove cylinder head noise insulator cover.
6. Remove high pressure oil pipe.
CAUTION:
1) Sleeve nut should be loosened with cloth tied
around to prevent oil from spurting due to the
remaining pressure.
2) High oil pressure pipe should be disconnected
with cloth tied around the intake manifold glow
plug to prevent oil from flowing out of the oil
rail.
7. Loosen eye bolt of fuel pipe at fuel pump side.
NOTE: Cloth should be put around the loosened eye
bolt to prevent fuel from flowing out.
8. Remove fuel return hose at chassis side.
9. Remove PCV hose to cylinder head cover.
10. Remove cylinder head cover.
11. Drain the oil from oil rail assembly.
NOTE: Do not drop O-ring
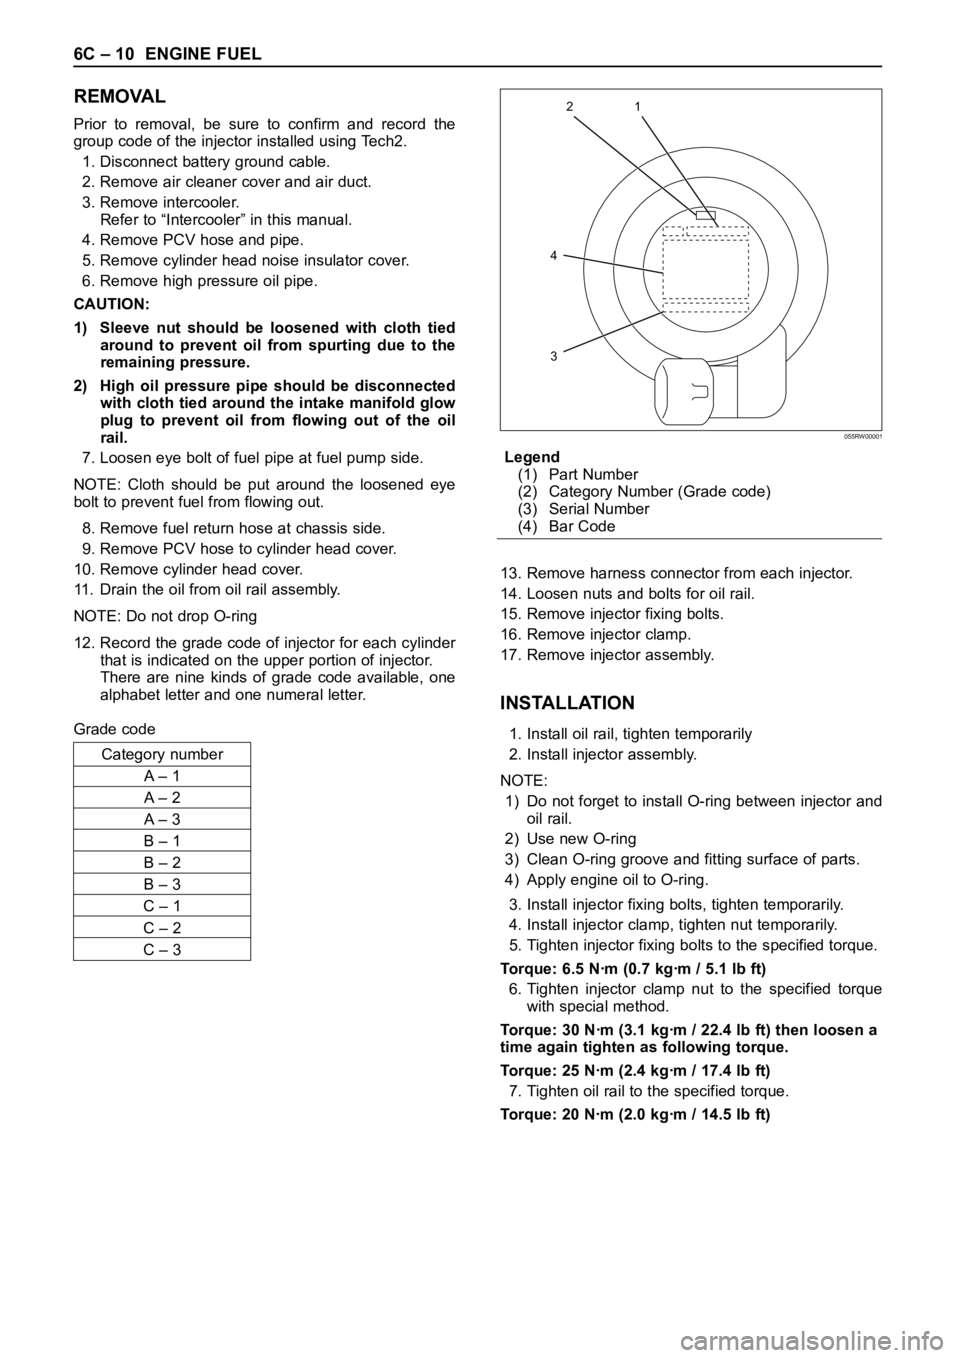
12. Record the grade code of injector for each cylinder
that is indicated on the upper portion of injector.
There are nine kinds of grade code available, one
alphabet letter and one numeral letter.
Grade codeLegend
(1) Part Number
(2) Category Number (Grade code)
(3) Serial Number
(4) Bar Code
13. Remove harness connector from each injector.
14. Loosen nuts and bolts for oil rail.
15. Remove injector fixing bolts.
16. Remove injector clamp.
17. Remove injector assembly.
INSTALLATION
1. Install oil rail, tighten temporarily
2. Install injector assembly.
NOTE:
1) Do not forget to install O-ring between injector and
oil rail.
2) Use new O-ring
3) Clean O-ring groove and fitting surface of parts.
4) Apply engine oil to O-ring.
3. Install injector fixing bolts, tighten temporarily.
4. Install injector clamp, tighten nut temporarily.
5. Tighten injector fixing bolts to the specified torque.
Torque: 6.5 Nꞏm (0.7 kgꞏm / 5.1 lb ft)
6. Tighten injector clamp nut to the specified torque
with special method.
Torque: 30 Nꞏm (3.1 kgꞏm / 22.4 lb ft) then loosen a
time again tighten as following torque.
Torque: 25 Nꞏm (2.4 kgꞏm / 17.4 lb ft)
7. Tighten oil rail to the specified torque.
Torque: 20 Nꞏm (2.0 kgꞏm / 14.5 lb ft)
1
4
32
055RW00001
Category number
A– 1
A– 2
A– 3
B – 1
B – 2
B – 3
C – 1
C – 2
C – 3
Page 1865 of 6000
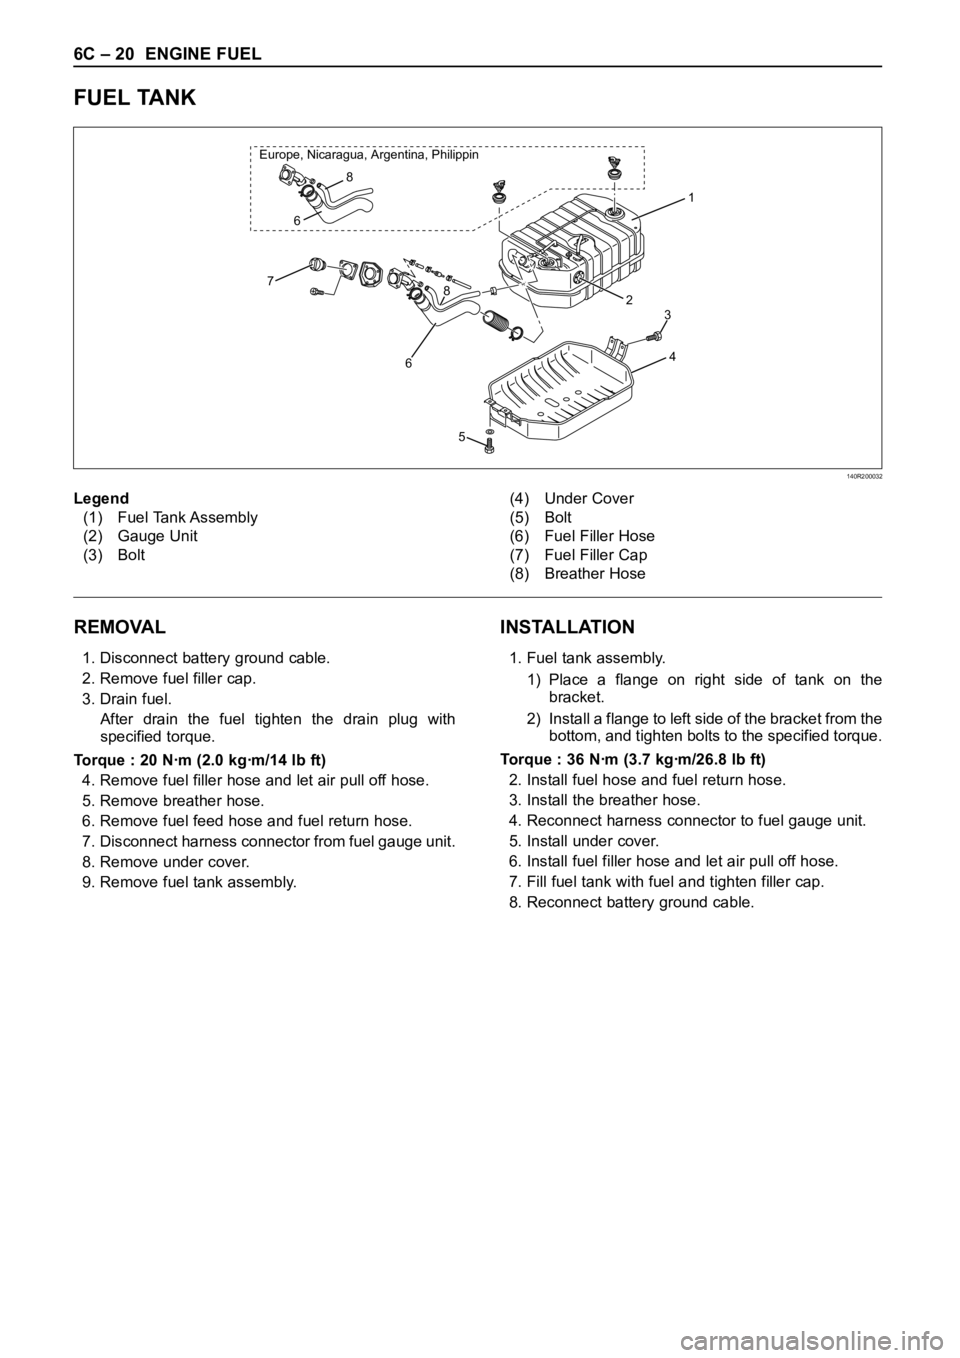
6C – 20 ENGINE FUEL
FUEL TANK
REMOVAL
1. Disconnect battery ground cable.
2. Remove fuel filler cap.
3. Drain fuel.
After drain the fuel tighten the drain plug with
specified torque.
Torque : 20 Nꞏm (2.0 kgꞏm/14 lb ft)
4. Remove fuel filler hose and let air pull off hose.
5. Remove breather hose.
6. Remove fuel feed hose and fuel return hose.
7. Disconnect harness connector from fuel gauge unit.
8. Remove under cover.
9. Remove fuel tank assembly.
INSTALLATION
1. Fuel tank assembly.
1) Place a flange on right side of tank on the
bracket.
2) Install a flange to left side of the bracket from the
bottom, and tighten bolts to the specified torque.
Torque : 36 Nꞏm (3.7 kgꞏm/26.8 lb ft)
2. Install fuel hose and fuel return hose.
3. Install the breather hose.
4. Reconnect harness connector to fuel gauge unit.
5. Install under cover.
6. Install fuel filler hose and let air pull off hose.
7. Fill fuel tank with fuel and tighten filler cap.
8. Reconnect battery ground cable.
1
2
4
8
678 Europe, Nicaragua, Argentina, Philippin
6
5
3
Legend
(1) Fuel Tank Assembly
(2) Gauge Unit
(3) Bolt(4) Under Cover
(5) Bolt
(6) Fuel Filler Hose
(7) Fuel Filler Cap
(8) Breather Hose
140R200032