1998 OPEL FRONTERA width
[x] Cancel search: widthPage 697 of 6000
4C–31 DRIVE SHAFT SYSTEM
Sleeve Condition
Check and see that there is no wear, damage, or cracking
in the sleeve.
NOTE: Close inspection of the groove and inner gear are
required because those are important parts.
Sleeve Function
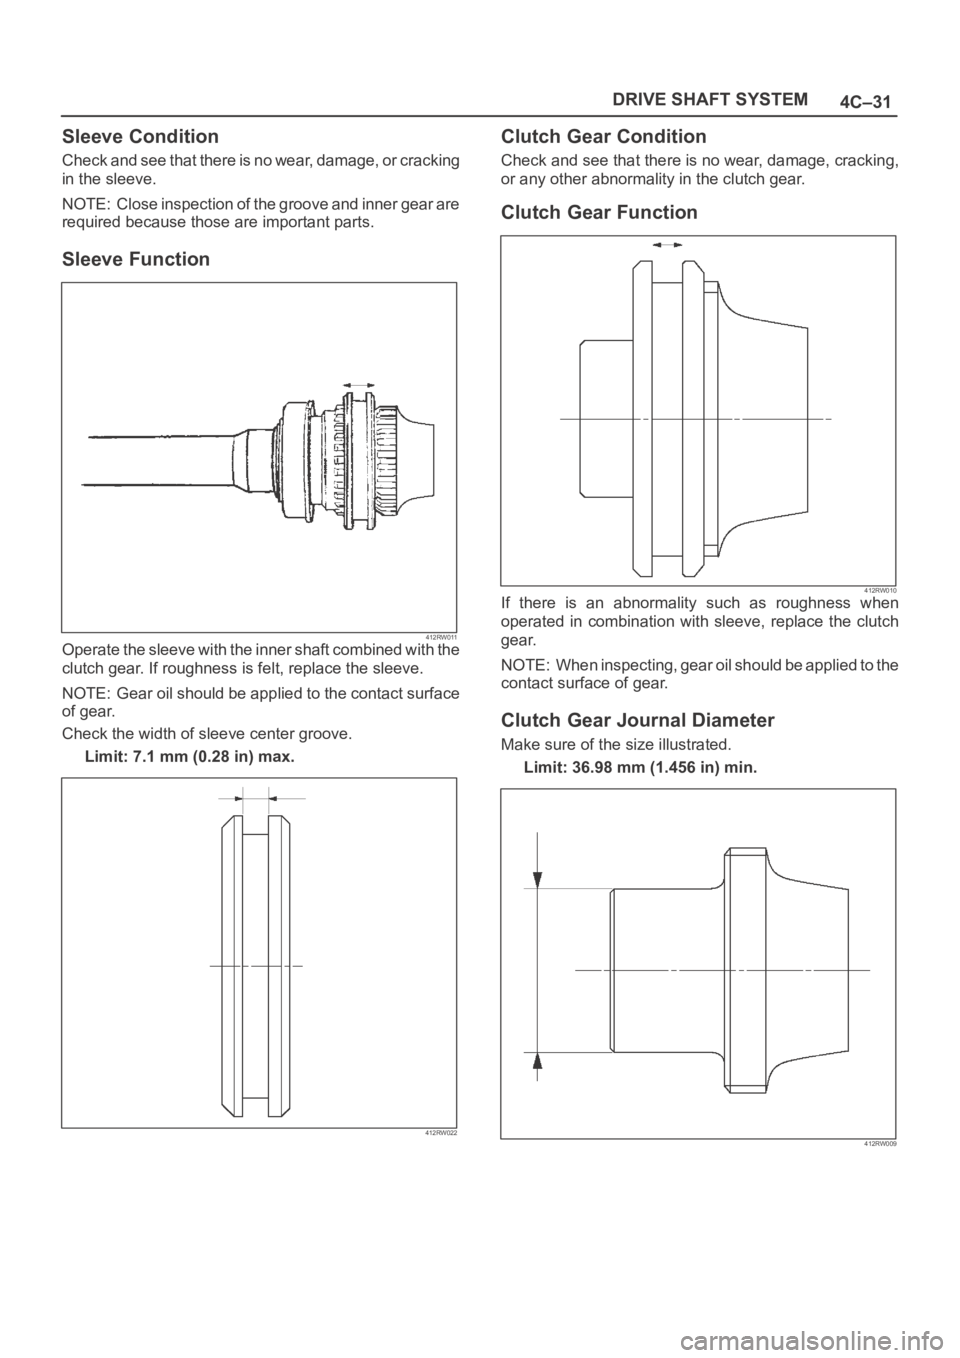
412RW011Operate the sleeve with the inner shaft combined with the
clutch gear. If roughness is felt, replace the sleeve.
NOTE: Gear oil should be applied to the contact surface
of gear.
Check the width of sleeve center groove.
Limit: 7.1 mm (0.28 in) max.
412RW022
Clutch Gear Condition
Check and see that there is no wear, damage, cracking,
or any other abnormality in the clutch gear.
Clutch Gear Function
412RW010If there is an abnormality such as roughness when
operated in combination with sleeve, replace the clutch
gear.
NOTE: When inspecting, gear oil should be applied to the
contact surface of gear.
Clutch Gear Journal Diameter
Make sure of the size illustrated.
Limit: 36.98 mm (1.456 in) min.
412RW009
Page 959 of 6000
6A–3
ENGINE MECHANICAL
General Description
Engine Cleanliness And Care
An automobile engine is a combination of many
machined, honed, polished and lapped surfaces with
tolerances that are measured in the thousandths of a
millimeter (ten thousandths of an inch). Accordingly,
when any internal engine parts are serviced, care and
cleanliness are important. Throughout this section, it
should be understood that proper cleaning and protection
of machined surfaces and friction areas is part of the
repair procedure. This is considered standard shop
practice even if not specifically stated.
A liberal coating of engine oil should be applied to all
friction areas during assembly to protect and lubricate
the surfaces on initial operation.
Whenever valve train components, pistons, piston
rings, connecting rods, rod bearings, and crankshaft
journal bearings are removed for service, they should
be retained in order.
At the time of installation, they should be installed in
the same locations and with the same mating
surfaces as when removed.
Battery cables should be disconnected before any
major work is performed on the engine. Failure to
disconnect cables may result in damage to wire
harness or other electrical parts.
The six cylinders of this engine are identified by
numbers; Right side cylinders 1, 3 and 5, Left side
cylinders 2, 4 and 6, as counted from crankshaft
pulley side to flywheel side.
General Information on Engine Service
The following information on engine service should be
noted carefully, as it is important in preventing damage
and contributing to reliable engine performance:
When raising or supporting the engine for any reason,
do not use a jack under the oil pan. Due to the small
clearance between the oil pan and the oil pump
strainer, jacking against the oil pan may cause
damage to the oil pick–up unit.
The 12–volt electrical system is capable of damaging
circuits. When performing any work where electrical
terminals could possibly be grounded, the ground
cable of the battery should be disconnected at the
battery.
Any time the intake air duct or air cleaner is removed,
the intake opening should be covered. This will
protect against accidental entrance of foreign
material into the cylinder which could cause extensive
damage when the engine is started.
Cylinder Block
The cylinder block is made of aluminum die–cast casting
for 75
V–type six cylinders. It has a rear plate integrated
structure and employs a deep skint. The cylinder liner is
cast and the liner inner diameter and crankshaft journal
diameter are classified into grades. The crankshaft is
supported by four bearings of which width of No.3 bearing
on the body side is different in order to support the thrust
bearing. The bearing cap is made of nodular cast iron and
each bearing cap uses four bolts and two side bolts.
Cylinder Head
The cylinder head, made of aluminum alloy casting
employs a pent–roof type combustion chamber with a
spark plug in the center. The intake and exhaust valves
are placed in V–type design. The ports are cross–flow
type.
Va l v e Tr a i n
Intake and exhaust camshaft on the both side of banks
are driven through an camshaft drive gear by timing belt.
The valves are operated by the camshaft and the valve
clearance is adjusted to select suitable thickness shim.
Intake Manifold
The intake manifold system is composed of the aluminum
cast common chamber and intake manifold attached with
six fuel injectors.
Exhaust Manifold
The exhaust manifold is made of nodular cast iron.
Pistons and Connecting Rods
Aluminum pistons are used after selecting the grade that
meets the cylinder bore diameter. Each piston has two
compression rings and one oil ring. The piston pin is made
of chromium steel is offset 1mm toward the thrust side,
and the thrust pressure of piston to the cylinder wall varies
gradually as the piston travels. The connecting rods are
made of forged steel. The connecting rod bearings are
graded for correct seze selection.
Crankshaft and Bearings
The crankshaft is made of Ductile cast–iron. Pins and
journals are graded for correct size selection for their
bearing.
Engine Lubrication
The oil discharged by a trochoid–type oil pump driven by
the crankshaft is fed through full–flow oil filter and to the oil
gallery provided under the crankshaft bearing cap. The oil
is then led to the crankshaft journals and cylinder head.
The crank pins are lubricated with oil from crankshaft
journals through oil holes. Also, an oil jet is fed to each
cylinder from crankshaft juornals on the connecting rod
for piston cleaning. The oil pan flange is dealed with liquid
packing only; do not deform or damage the flange surface
during removal or installation.
Page 1015 of 6000
6A–59
ENGINE MECHANICAL
Limit: 39.47 mm (1.5539 in)
Exhaust
Standard: 39.30 mm (1.5472 in)
Limit: 39.45 mm (1.5531 in)
014RW047
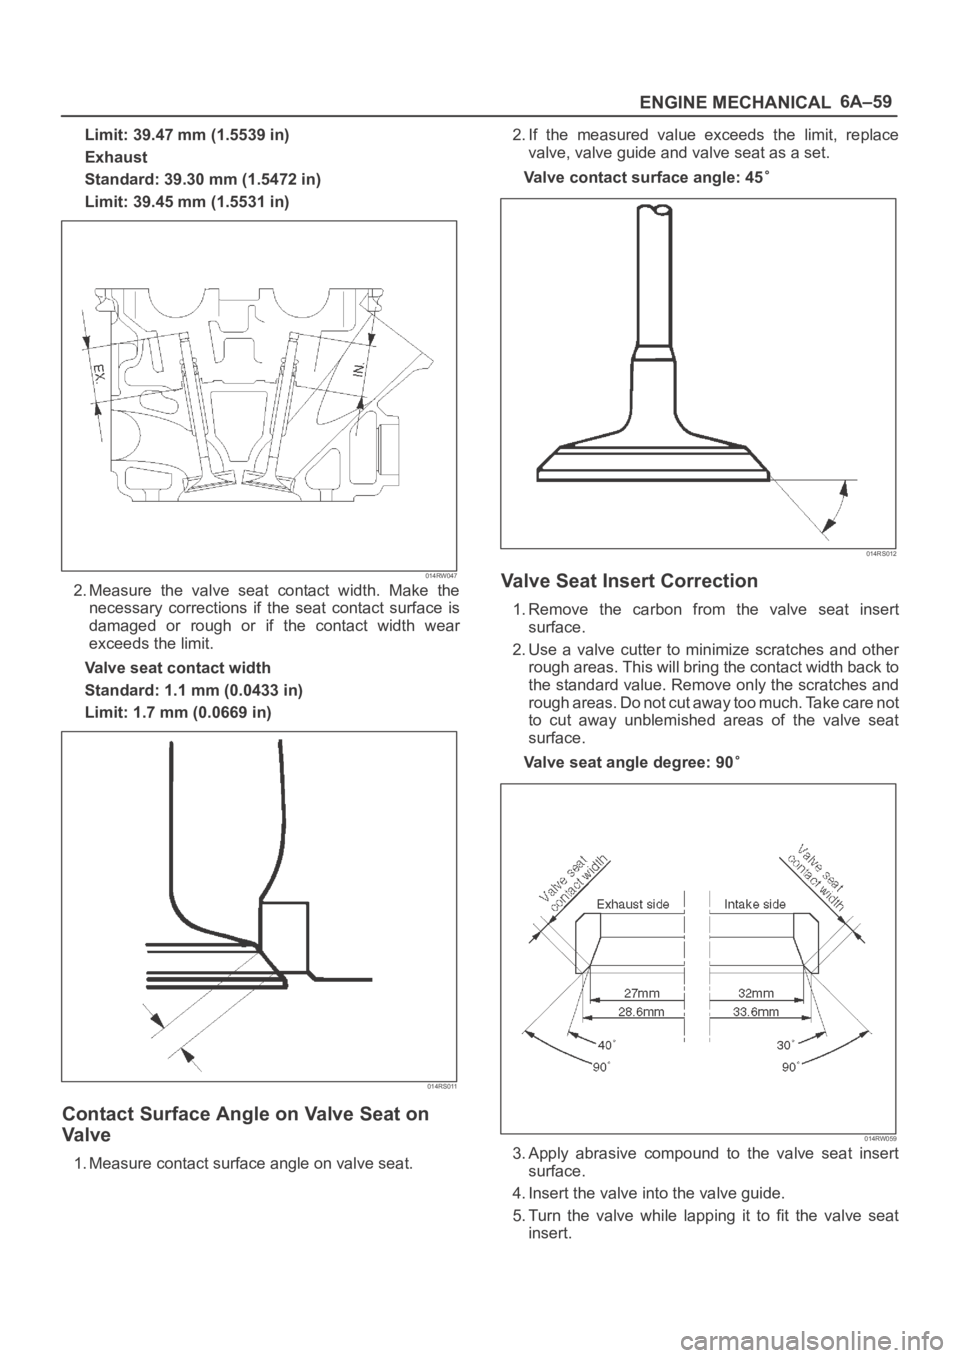
2. Measure the valve seat contact width. Make the
necessary corrections if the seat contact surface is
damaged or rough or if the contact width wear
exceeds the limit.
Valve seat contact width
Standard: 1.1 mm (0.0433 in)
Limit: 1.7 mm (0.0669 in)
014RS011
Contact Surface Angle on Valve Seat on
Va l v e
1. Measure contact surface angle on valve seat.2. If the measured value exceeds the limit, replace
valve, valve guide and valve seat as a set.
Valve contact surface angle: 45
014RS012
Valve Seat Insert Correction
1. Remove the carbon from the valve seat insert
surface.
2. Use a valve cutter to minimize scratches and other
rough areas. This will bring the contact width back to
the standard value. Remove only the scratches and
rough areas. Do not cut away too much. Take care not
to cut away unblemished areas of the valve seat
surface.
Valve seat angle degree: 90
014RW059
3. Apply abrasive compound to the valve seat insert
surface.
4. Insert the valve into the valve guide.
5.Turn the valve while lapping it to fit the valve seat
insert.
Page 1016 of 6000
6A–60
ENGINE MECHANICAL
6. Check that the valve contact width is correct.
7. Check that the valve seat insert surface is in contact
with the entire circumference of the valve.
014RS014
Valve Seat Insert Replacement
1. Arc weld the rod at several points. Be careful not to
damage the aluminum section.
2. Allow the rod to cool for a few minutes. This will cause
the valve seat to shrink.
3. Strike the rod and pull it out.
014RS015
4. Carefully clean the valve seat press–fit section on the
cylinder head side.
5. Heat the press–fit section with steam or some other
means to cause expansion. Cool the valve seat with
dry ice or some other means.
6. Insert the press–fit section into the valve seat
horizontally.
Standard fitting interference: 0.14 mm–0.09 mm
(0.0055 in–0.0035 in)7. After insertion, use a seat grinder to grind finish the
seating face. Carefully note the seating angle, the
contact width, and the depression.
8. Lap the valve and the seat.
Reassembly
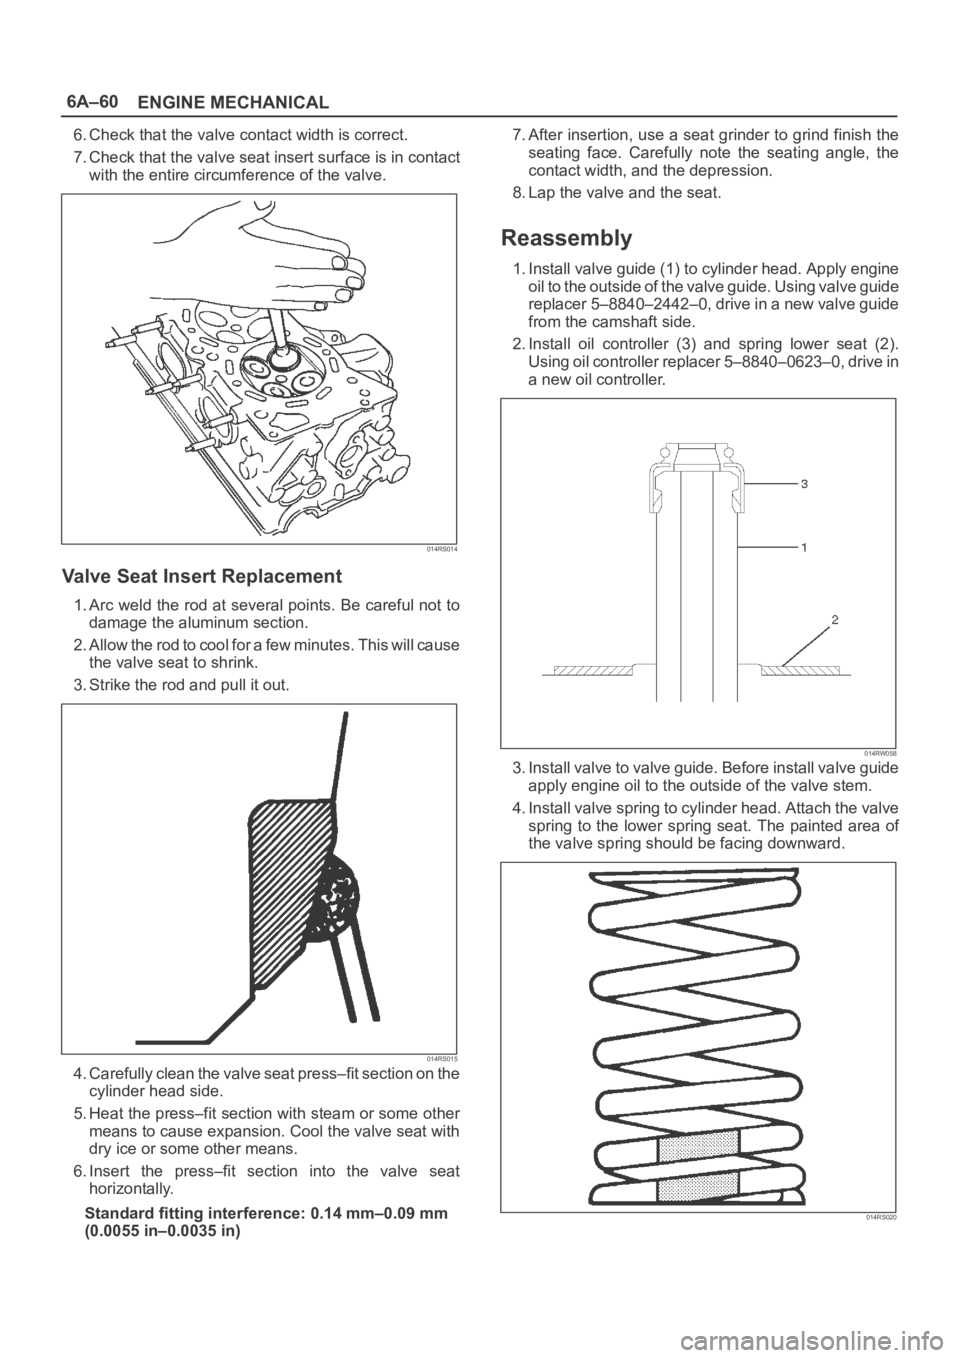
1. Install valve guide (1) to cylinder head. Apply engine
oil to the outside of the valve guide. Using valve guide
replacer 5–8840–2442–0, drive in a new valve guide
from the camshaft side.
2. Install oil controller (3) and spring lower seat (2).
Using oil controller replacer 5–8840–0623–0, drive in
a new oil controller.
014RW058
3. Install valve to valve guide. Before install valve guide
apply engine oil to the outside of the valve stem.
4. Install valve spring to cylinder head. Attach the valve
spring to the lower spring seat. The painted area of
the valve spring should be facing downward.
014RS020
Page 1027 of 6000
6A–71
ENGINE MECHANICAL
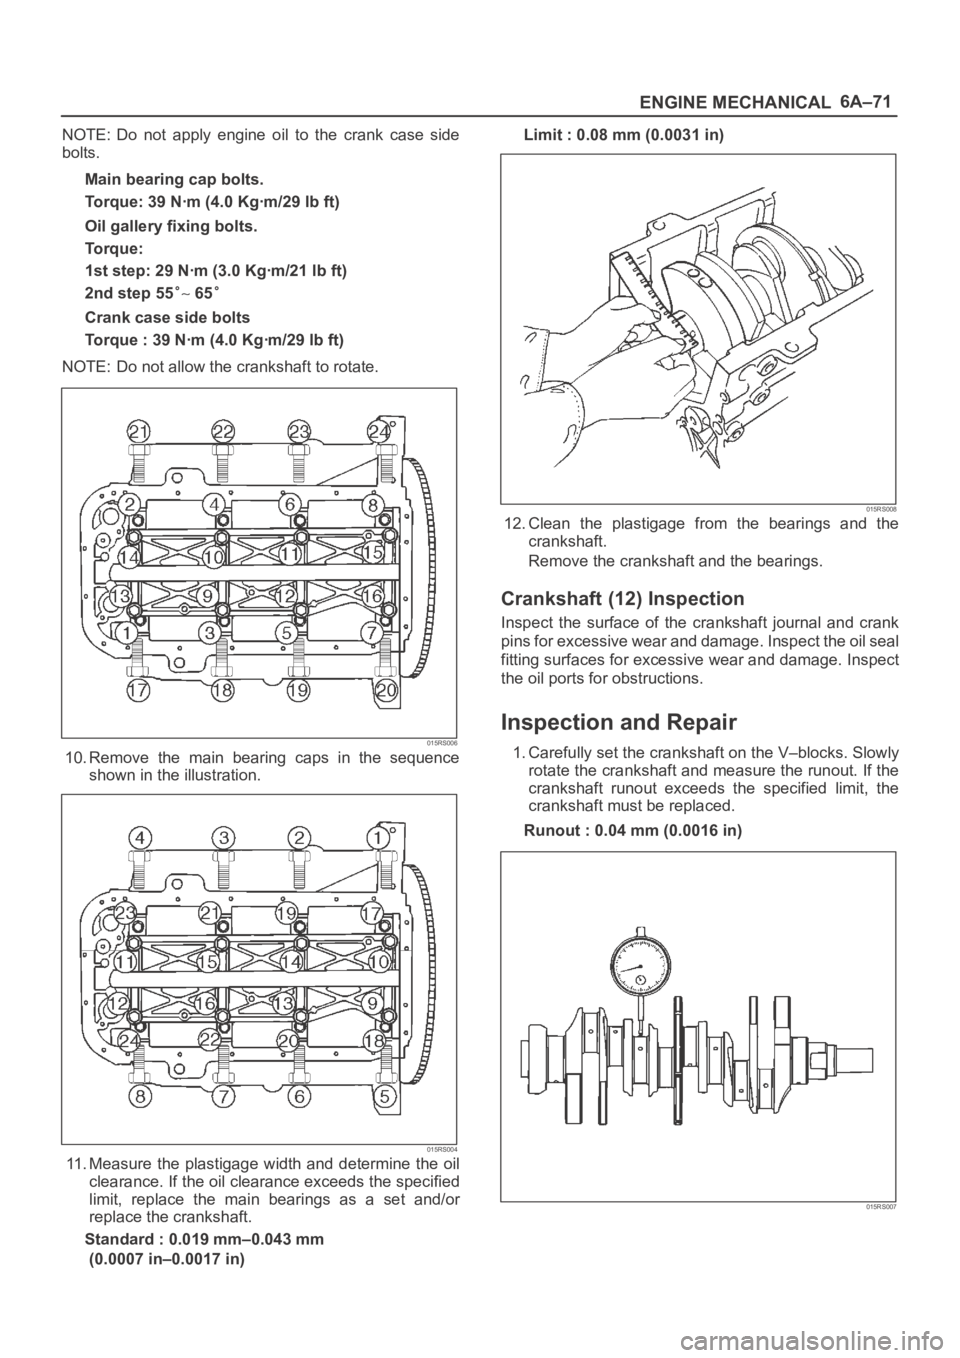
NOTE: Do not apply engine oil to the crank case side
bolts.
Main bearing cap bolts.
Torque: 39 Nꞏm (4.0 Kgꞏm/29 lb ft)
Oil gallery fixing bolts.
Torque:
1st step: 29 Nꞏm (3.0 Kgꞏm/21 lb ft)
2nd step 55
65
Crank case side bolts
Torque : 39 Nꞏm (4.0 Kgꞏm/29 lb ft)
NOTE: Do not allow the crankshaft to rotate.
015RS006
10. Remove the main bearing caps in the sequence
shown in the illustration.
015RS004
11. Measure the plastigage width and determine the oil
clearance. If the oil clearance exceeds the specified
limit, replace the main bearings as a set and/or
replace the crankshaft.
Standard : 0.019 mm–0.043 mm
(0.0007 in–0.0017 in)Limit : 0.08 mm (0.0031 in)
015RS008
12. Clean the plastigage from the bearings and the
crankshaft.
Remove the crankshaft and the bearings.
Crankshaft (12) Inspection
Inspect the surface of the crankshaft journal and crank
pins for excessive wear and damage. Inspect the oil seal
fitting surfaces for excessive wear and damage. Inspect
the oil ports for obstructions.
Inspection and Repair
1. Carefully set the crankshaft on the V–blocks. Slowly
rotate the crankshaft and measure the runout. If the
crankshaft runout exceeds the specified limit, the
crankshaft must be replaced.
Runout : 0.04 mm (0.0016 in)
015RS007
Page 1032 of 6000
6A–76
ENGINE MECHANICAL
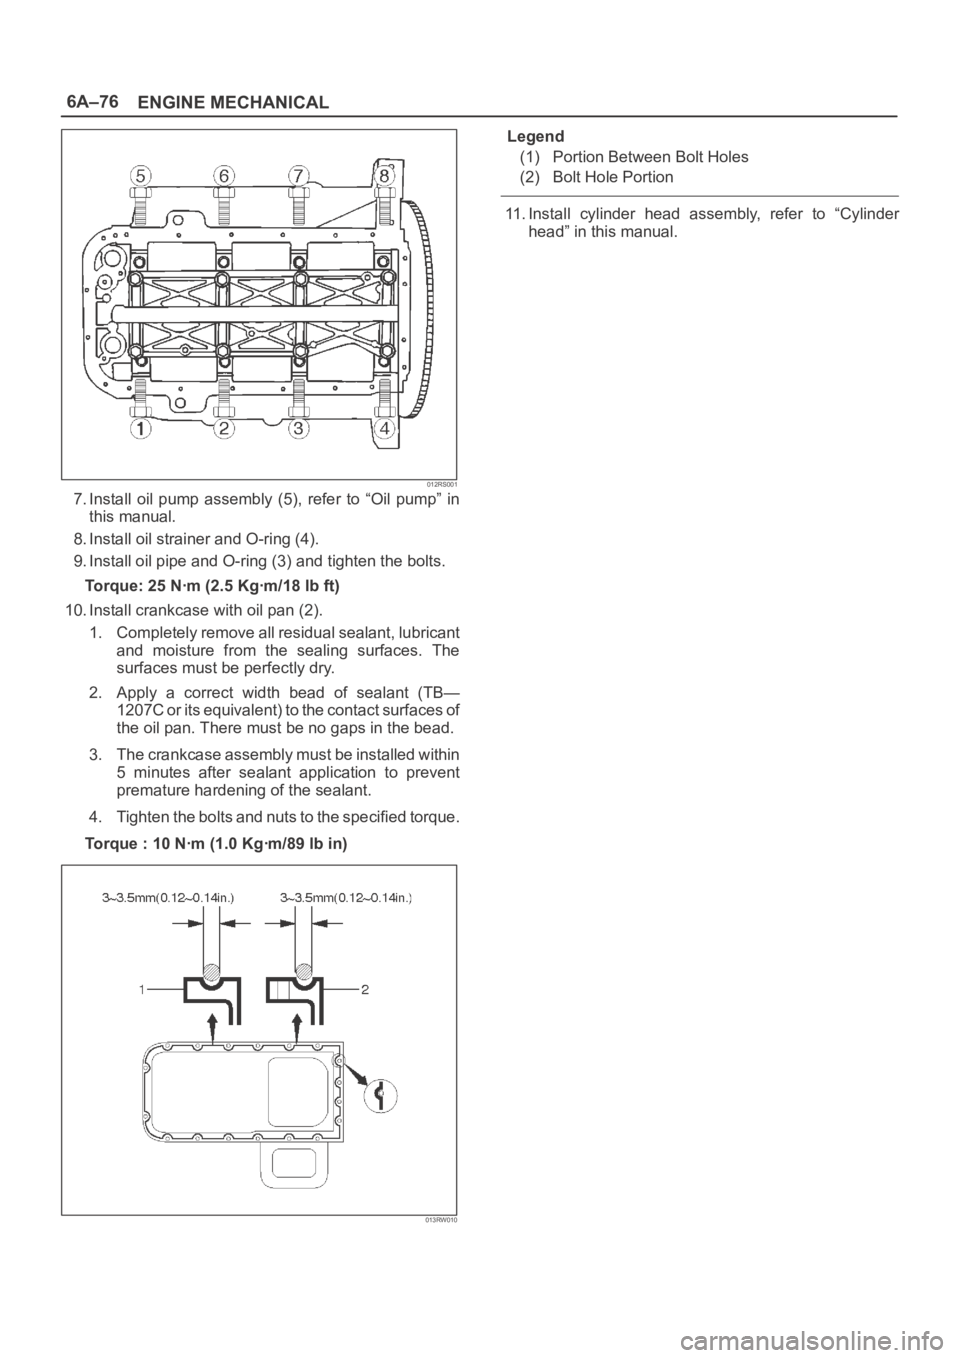
012RS001
7. Install oil pump assembly (5), refer to “Oil pump” in
this manual.
8. Install oil strainer and O-ring (4).
9. Install oil pipe and O-ring (3) and tighten the bolts.
Torque: 25 Nꞏm (2.5 Kgꞏm/18 lb ft)
10. Install crankcase with oil pan (2).
1. Completely remove all residual sealant, lubricant
and moisture from the sealing surfaces. The
surfaces must be perfectly dry.
2. Apply a correct width bead of sealant (TB—
1207C or its equivalent) to the contact surfaces of
the oil pan. There must be no gaps in the bead.
3. The crankcase assembly must be installed within
5 minutes after sealant application to prevent
premature hardening of the sealant.
4. Tighten the bolts and nuts to the specified torque.
Torque : 10 Nꞏm (1.0 Kgꞏm/89 lb in)
013RW010
Legend
(1) Portion Between Bolt Holes
(2) Bolt Hole Portion
11. Install cylinder head assembly, refer to “Cylinder
head” in this manual.
Page 1038 of 6000
6A–82
ENGINE MECHANICAL
4. Reinstall the rod caps (12) to their original
positions.
Tighten the rod cap nuts.
Torque: 54 Nꞏm (5.5 Kgꞏm/40 lb ft)
NOTE: Do not allow the crankshaft to rotate.
5. Remove the rod caps.
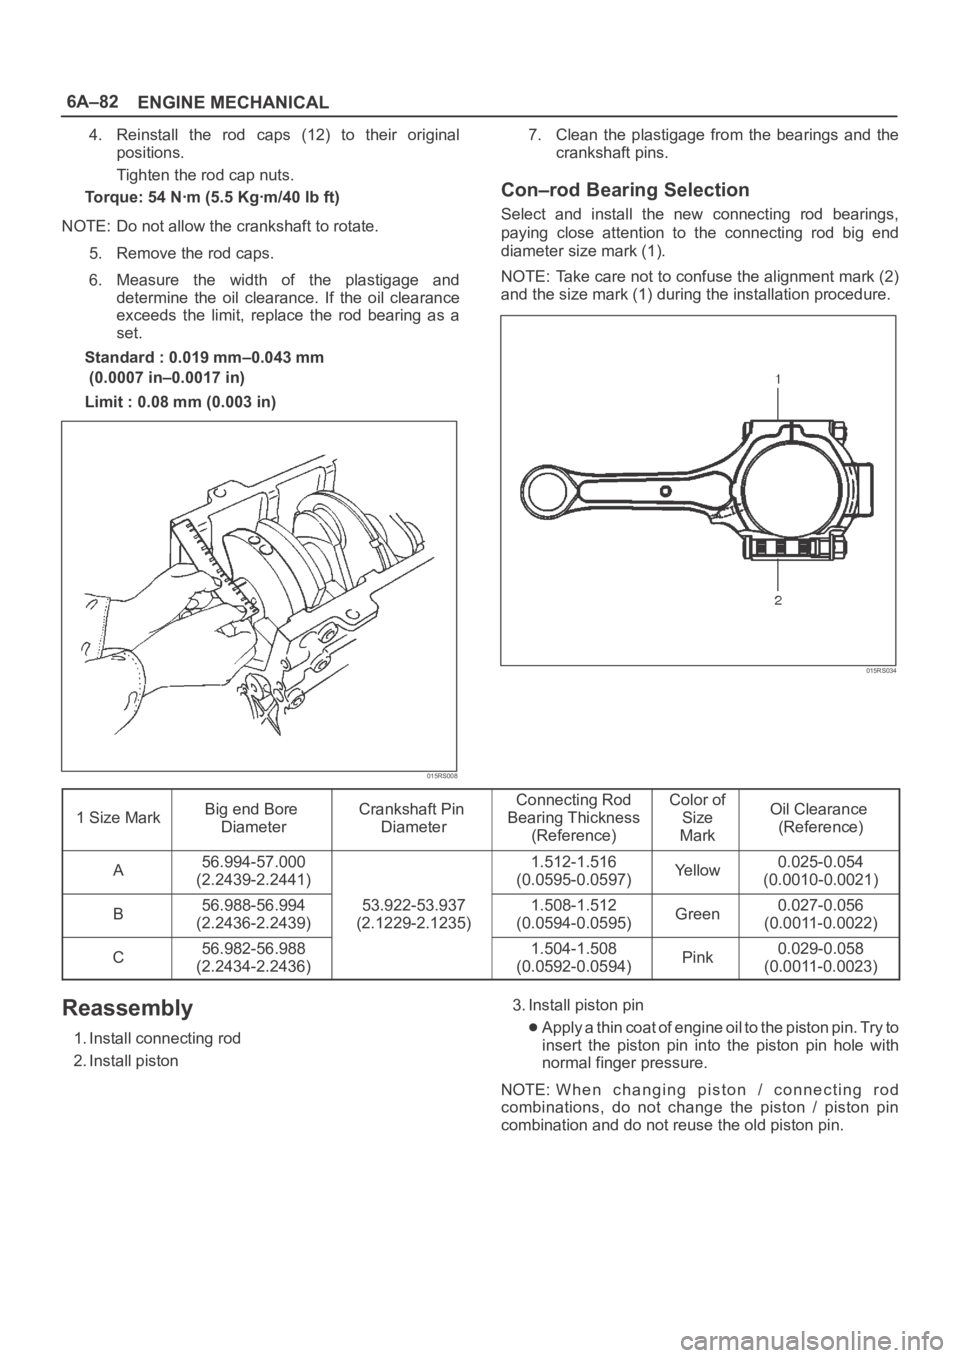
6. Measure the width of the plastigage and
determine the oil clearance. If the oil clearance
exceeds the limit, replace the rod bearing as a
set.
Standard : 0.019 mm–0.043 mm
(0.0007 in–0.0017 in)
Limit : 0.08 mm (0.003 in)
015RS008
7. Clean the plastigage from the bearings and the
crankshaft pins.
Con–rod Bearing Selection
Select and install the new connecting rod bearings,
paying close attention to the connecting rod big end
diameter size mark (1).
NOTE: Take care not to confuse the alignment mark (2)
and the size mark (1) during the installation procedure.
015RS034
1 Size MarkBig end Bore
DiameterCrankshaft Pin
DiameterConnecting Rod
Bearing Thickness
(Reference)Color of
Size
MarkOil Clearance
(Reference)
A56.994-57.000
(2.2439-2.2441)1.512-1.516
(0.0595-0.0597)Ye l l o w0.025-0.054
(0.0010-0.0021)
B56.988-56.994
(2.2436-2.2439)53.922-53.937
(2.1229-2.1235)1.508-1.512
(0.0594-0.0595)Green0.027-0.056
(0.0011-0.0022)
C56.982-56.988
(2.2434-2.2436)1.504-1.508
(0.0592-0.0594)Pink0.029-0.058
(0.0011-0.0023)
Reassembly
1. Install connecting rod
2. Install piston3. Install piston pinApply a thin coat of engine oil to the piston pin. Try to
insert the piston pin into the piston pin hole with
normal finger pressure.
NOTE: When changing piston / connecting rod
combinations, do not change the piston / piston pin
combination and do not reuse the old piston pin.
Page 1045 of 6000
6A–89
ENGINE MECHANICAL
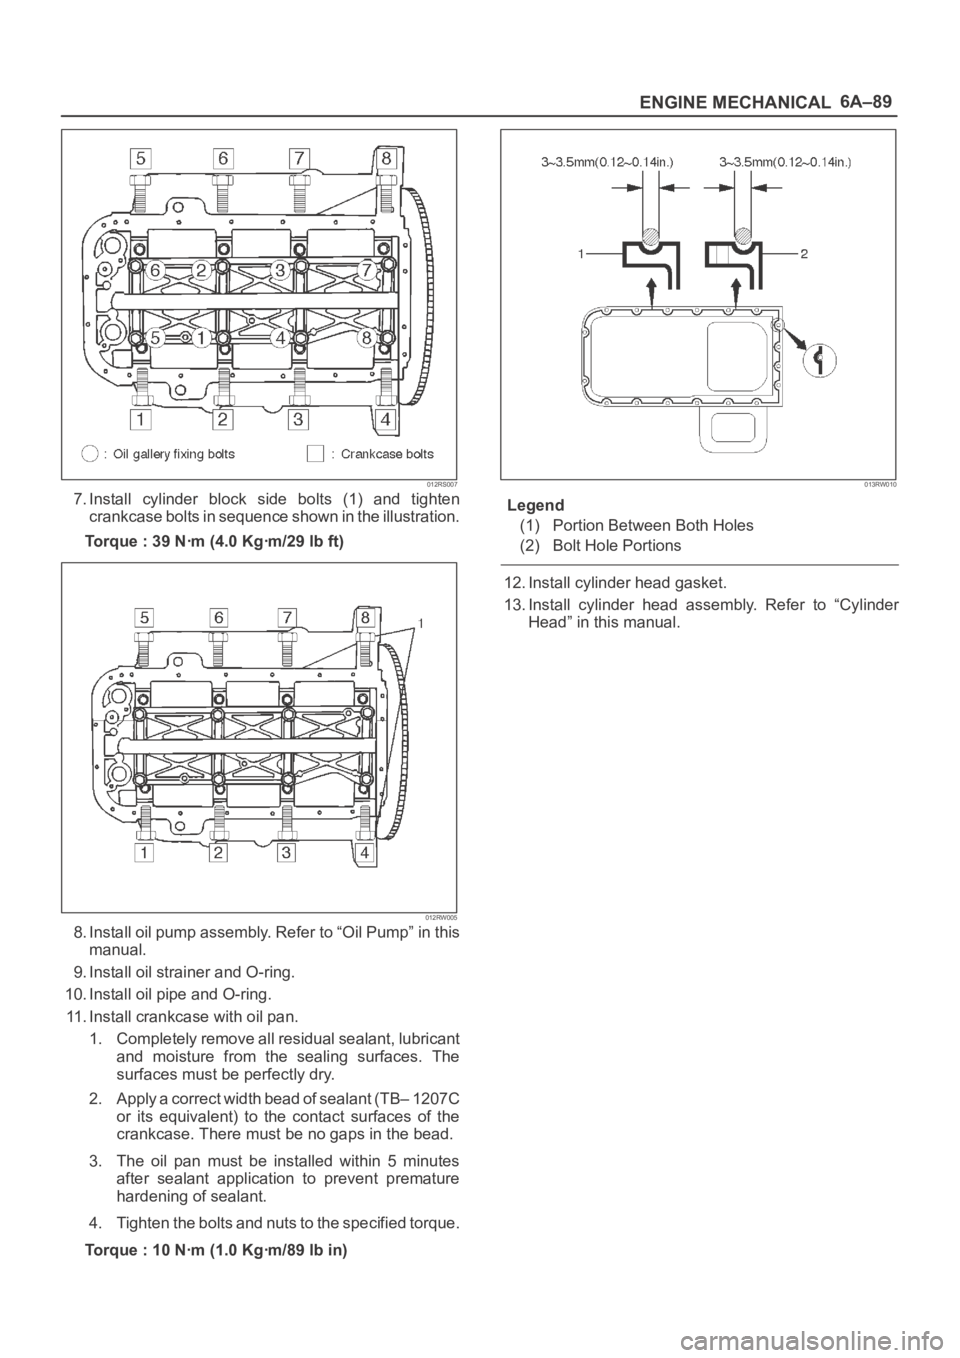
012RS007
7. Install cylinder block side bolts (1) and tighten
crankcase bolts in sequence shown in the illustration.
Torque : 39 Nꞏm (4.0 Kgꞏm/29 lb ft)
012RW005
8. Install oil pump assembly. Refer to “Oil Pump” in this
manual.
9. Install oil strainer and O-ring.
10. Install oil pipe and O-ring.
11. Install crankcase with oil pan.
1. Completely remove all residual sealant, lubricant
and moisture from the sealing surfaces. The
surfaces must be perfectly dry.
2. Apply a correct width bead of sealant (TB– 1207C
or its equivalent) to the contact surfaces of the
crankcase. There must be no gaps in the bead.
3. The oil pan must be installed within 5 minutes
after sealant application to prevent premature
hardening of sealant.
4. Tighten the bolts and nuts to the specified torque.
Torque : 10 Nꞏm (1.0 Kgꞏm/89 lb in)
013RW010
Legend
(1) Portion Between Both Holes
(2) Bolt Hole Portions
12. Install cylinder head gasket.
13. Install cylinder head assembly. Refer to “Cylinder
Head” in this manual.