Page 4088 of 6000
4B2–5 DRIVE LINE CONTROL SYSTEM (TOD)
Front and Rear Speed Sensors
The sensors are built in the transfer case, detect the
rotation of rotors directly coupled to the propeller shafts.
Thirty rectangular pulses are output per one rotation of
the propeller shaft.
261RW045
Electromagnetic Coil
Receives the duty signals from the TOD control unit and
controls the pressing force of the clutch pressure cam.
261RW044
Multi Plate Disk Clutch Pack
Transmits the torque determined by the clutch pressing
force to the front propeller shaft via the front drive chain.
262RW029
Mechanical Lock Sleeve
Couples the front and rear propeller shaft mechanically
when the transfer shaft is in the 4L position.
262RW028
Page 4143 of 6000

DRIVE LINE CONTROL SYSTEM (TOD) 4B2–60
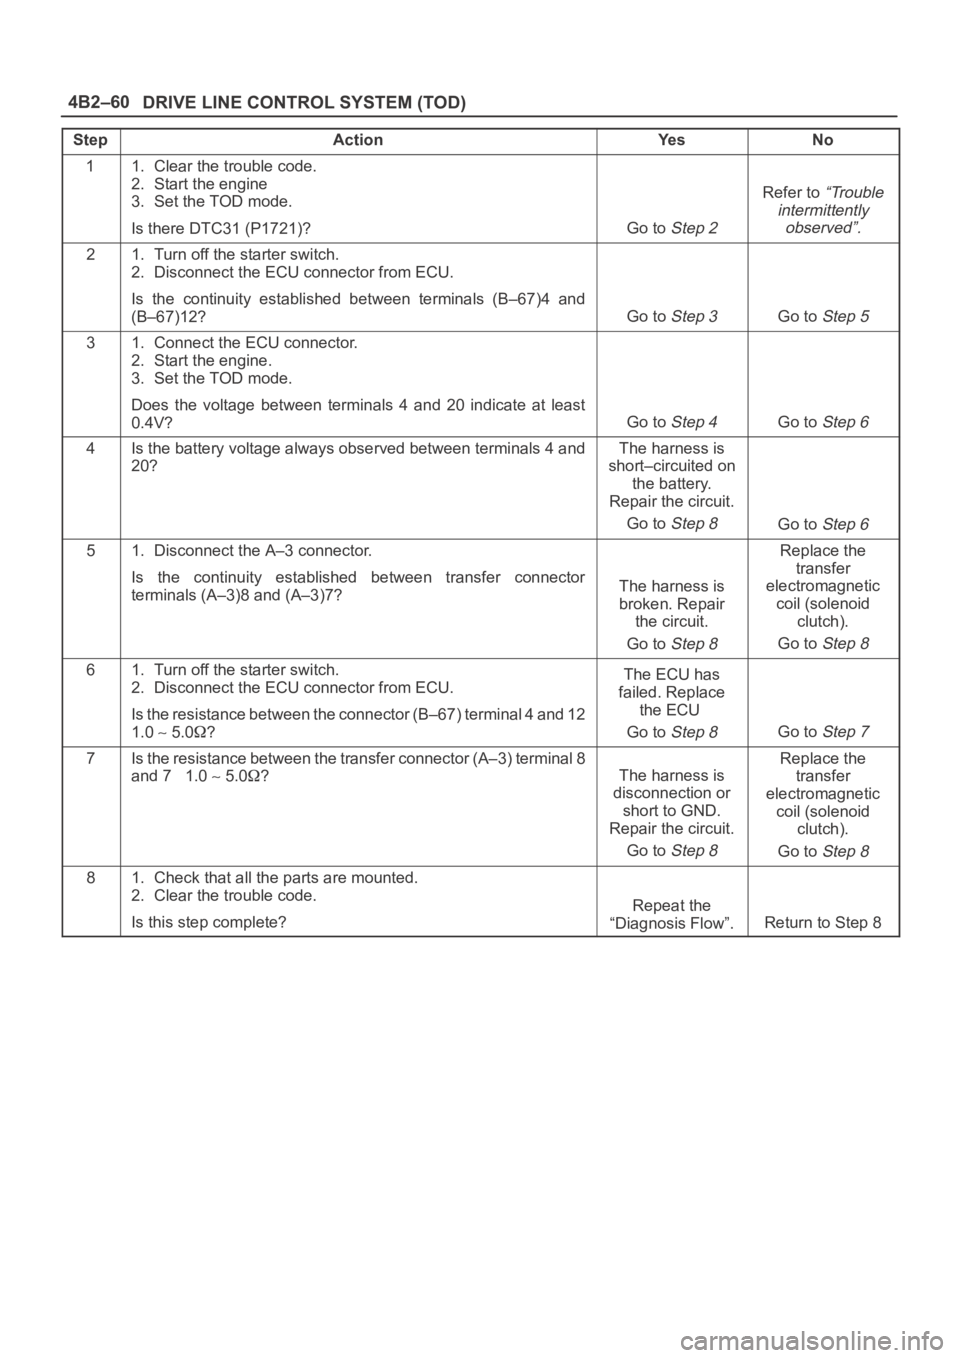
StepActionYe sNo
11. Clear the trouble code.
2. Start the engine
3. Set the TOD mode.
Is there DTC31 (P1721)?
Go to Step 2
Refer to “Trouble
intermittently
observed”.
21. Turn off the starter switch.
2. Disconnect the ECU connector from ECU.
Is the continuity established between terminals (B–67)4 and
(B–67)12?
Go to Step 3Go to Step 5
31. Connect the ECU connector.
2. Start the engine.
3. Set the TOD mode.
Does the voltage between terminals 4 and 20 indicate at least
0.4V?
Go to Step 4Go to Step 6
4Is the battery voltage always observed between terminals 4 and
20?The harness is
short–circuited on
the battery.
Repair the circuit.
Go to
Step 8Go to Step 6
51. Disconnect the A–3 connector.
Is the continuity established between transfer connector
terminals (A–3)8 and (A–3)7?
The harness is
broken. Repair
the circuit.
Go to
Step 8
Replace the
transfer
electromagnetic
coil (solenoid
clutch).
Go to
Step 8
61. Turn off the starter switch.
2. Disconnect the ECU connector from ECU.
Is the resistance between the connector (B–67) terminal 4 and 12
1.0
5.0?
The ECU has
failed. Replace
the ECU
Go to
Step 8Go to Step 7
7Is the resistance between the transfer connector (A–3) terminal 8
and 7 1.0
5.0?The harness is
disconnection or
short to GND.
Repair the circuit.
Go to
Step 8
Replace the
transfer
electromagnetic
coil (solenoid
clutch).
Go to
Step 8
81. Check that all the parts are mounted.
2. Clear the trouble code.
Is this step complete?
Repeat the
“Diagnosis Flow”.
Return to Step 8
Page 4202 of 6000

4B2–119 DRIVE LINE CONTROL SYSTEM (TOD)
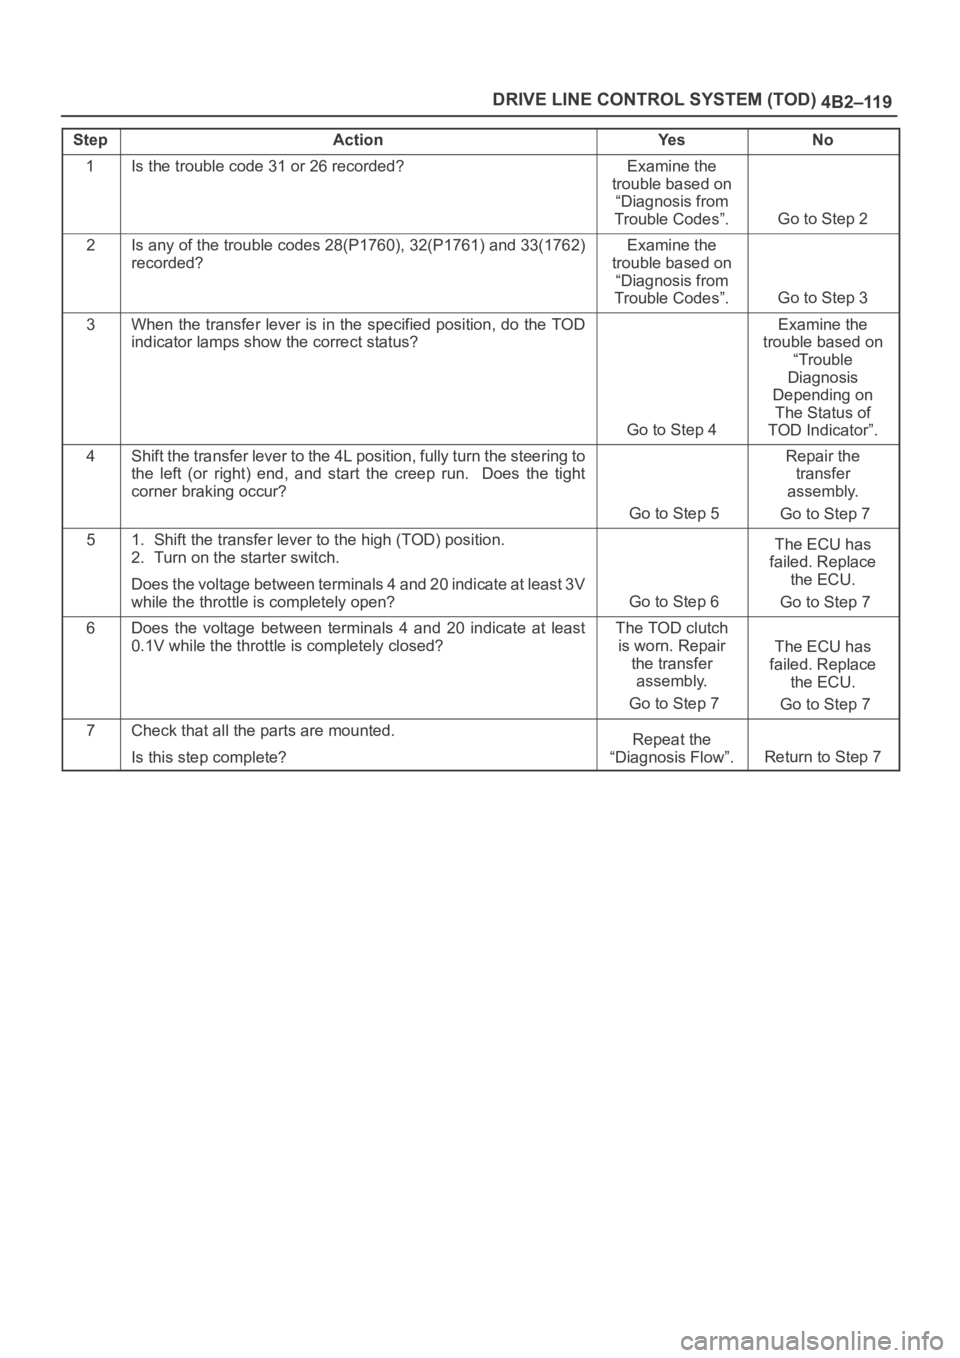
StepActionYe sNo
1Is the trouble code 31 or 26 recorded?Examine the
trouble based on
“Diagnosis from
Trouble Codes”.
Go to Step 2
2Is any of the trouble codes 28(P1760), 32(P1761) and 33(1762)
recorded?Examine the
trouble based on
“Diagnosis from
Trouble Codes”.
Go to Step 3
3When the transfer lever is in the specified position, do the TOD
indicator lamps show the correct status?
Go to Step 4
Examine the
trouble based on
“Trouble
Diagnosis
Depending on
The Status of
TOD Indicator”.
4Shift the transfer lever to the 4L position, fully turn the steering to
the left (or right) end, and start the creep run. Does the tight
corner braking occur?
Go to Step 5
Repair the
transfer
assembly.
Go to Step 7
51. Shift the transfer lever to the high (TOD) position.
2. Turn on the starter switch.
Does the voltage between terminals 4 and 20 indicate at least 3V
while the throttle is completely open?
Go to Step 6
The ECU has
failed. Replace
the ECU.
Go to Step 7
6Does the voltage between terminals 4 and 20 indicate at least
0.1V while the throttle is completely closed?The TOD clutch
is worn. Repair
the transfer
assembly.
Go to Step 7
The ECU has
failed. Replace
the ECU.
Go to Step 7
7Check that all the parts are mounted.
Is this step complete?Repeat the
“Diagnosis Flow”.
Return to Step 7
Page 4220 of 6000
4C–14
DRIVE SHAFT SYSTEM
Front Hub and Disc with Manual Locking Hub
Disassembled View
411RW009
Legend
(1) Bolt
(2) Cover Assembly
(3) Gasket
(4) Knob
(5) X–ring
(6) Detent Ball and Spring
(7) Snap Ring
(8) Clutch Assembly
(9) Compression Spring
(10) Follower
(11) Retaining Spring
(12) Snap Ring and Shim(13) Body Assembly
(14) Inner Assembly
(15) Spacer
(16) Ring
(17) Snap Ring
(18) Snap Ring
(19) Lock Washer and Lock Screw
(20) Hub Nut
(21) Hub and Disc Assembly
(22) Outer Bearing Outer Race
(23) ABS Sensor Ring (if so equipped)
(24) Inner Bearing Outer Race
(25) Oil Seal
Disassembly
1. Before disassembly, jack up the front of vehicle and
support frame with jack stands.2. Remove the disc brake caliper assembly and hang it
on the frame with wires. Refer to Front Disk Brake
Caliper Assembly in Brakes section.
Page 4221 of 6000

4C–15 DRIVE SHAFT SYSTEM
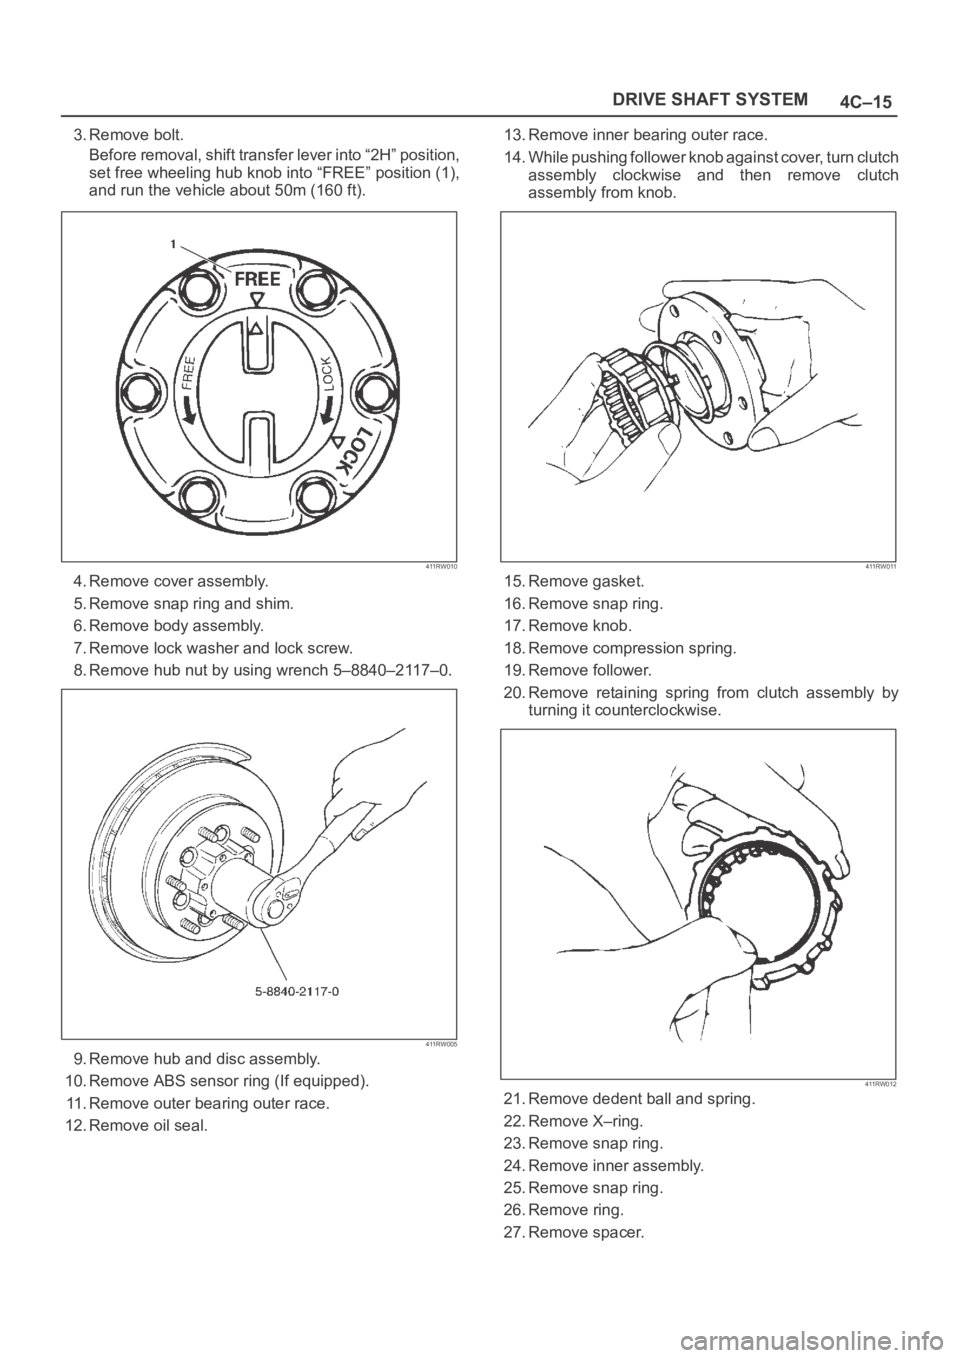
3. Remove bolt.
Before removal, shift transfer lever into “2H” position,
set free wheeling hub knob into “FREE” position (1),
and run the vehicle about 50m (160 ft).
411RW010
4. Remove cover assembly.
5. Remove snap ring and shim.
6. Remove body assembly.
7. Remove lock washer and lock screw.
8. Remove hub nut by using wrench 5–8840–2117–0.
411RW005
9. Remove hub and disc assembly.
10. Remove ABS sensor ring (If equipped).
11. Remove outer bearing outer race.
12. Remove oil seal.13. Remove inner bearing outer race.
14. While pushing follower knob against cover, turn clutch
assembly clockwise and then remove clutch
assembly from knob.
411RW011
15. Remove gasket.
16. Remove snap ring.
17. Remove knob.
18. Remove compression spring.
19. Remove follower.
20. Remove retaining spring from clutch assembly by
turning it counterclockwise.
411RW012
21. Remove dedent ball and spring.
22. Remove X–ring.
23. Remove snap ring.
24. Remove inner assembly.
25. Remove snap ring.
26. Remove ring.
27. Remove spacer.
Page 4222 of 6000

4C–16
DRIVE SHAFT SYSTEM
Inspection and Repair
Make necessary correction or parts replacement if wear,
damage, corrosion or any other abnormal condition are
found through inspection.
Check the following parts.
Hub
Hub bearing, oil seal
Knuckle spindle
Disc
Caliper
Free wheeling hub parts (Clutch, knob, follower,
inner, ring and spring)
ABS sensor ring (if so equipped)
For inspection and servicing of disc caliper, and relative
parts, refer to Brakes section.
Reassembly
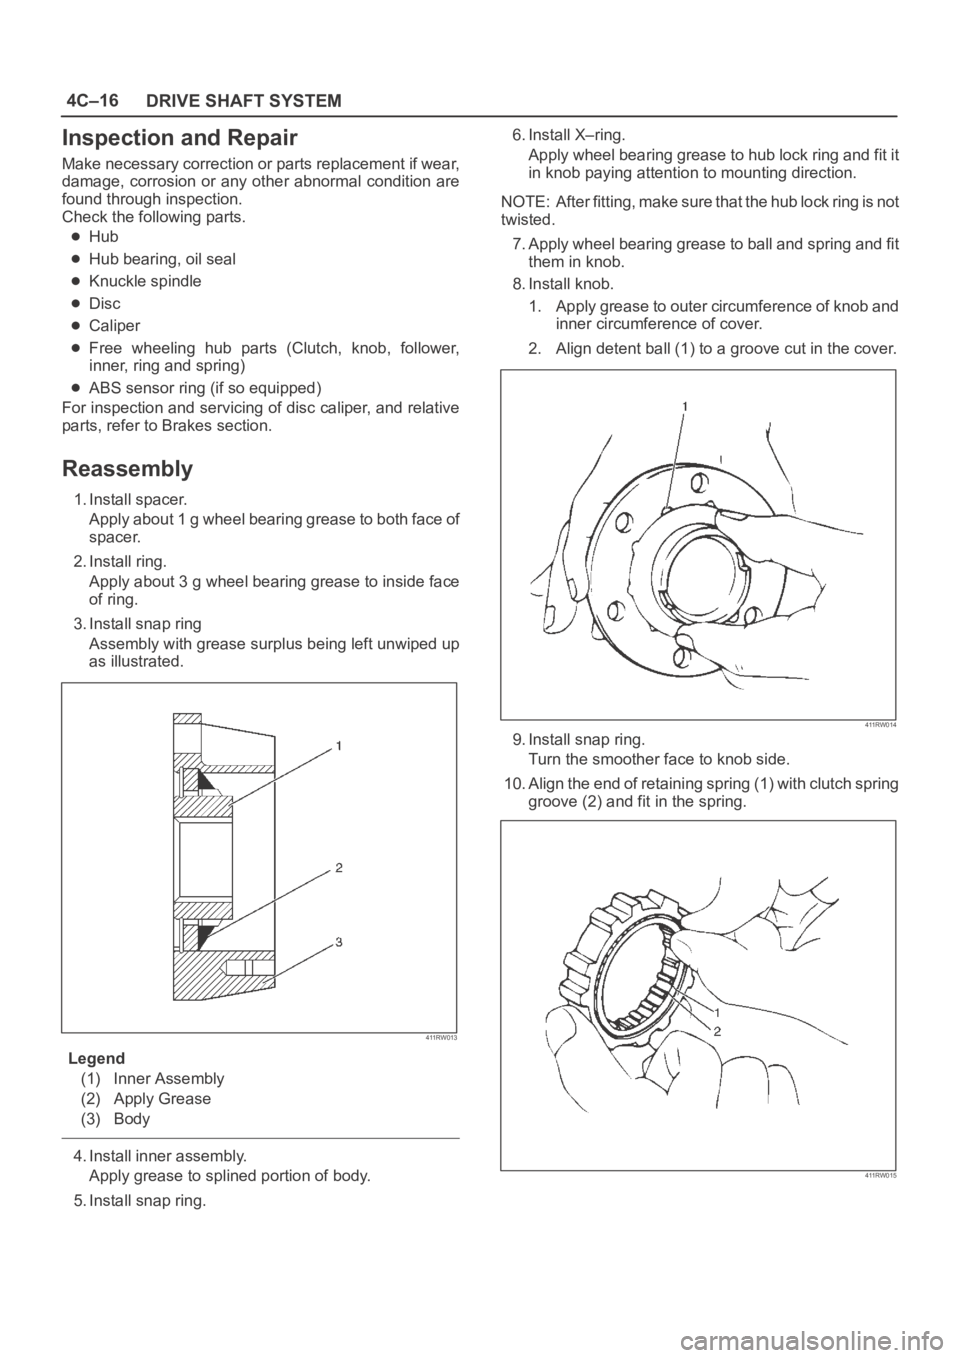
1. Install spacer.
Apply about 1 g wheel bearing grease to both face of
spacer.
2. Install ring.
Apply about 3 g wheel bearing grease to inside face
of ring.
3. Install snap ring
Assembly with grease surplus being left unwiped up
as illustrated.
411RW013
Legend
(1) Inner Assembly
(2) Apply Grease
(3) Body
4. Install inner assembly.
Apply grease to splined portion of body.
5. Install snap ring.6. Install X–ring.
Apply wheel bearing grease to hub lock ring and fit it
in knob paying attention to mounting direction.
NOTE: After fitting, make sure that the hub lock ring is not
twisted.
7. Apply wheel bearing grease to ball and spring and fit
them in knob.
8. Install knob.
1. Apply grease to outer circumference of knob and
inner circumference of cover.
2. Align detent ball (1) to a groove cut in the cover.
411RW014
9. Install snap ring.
Turn the smoother face to knob side.
10. Align the end of retaining spring (1) with clutch spring
groove (2) and fit in the spring.
411RW015
Page 4223 of 6000
4C–17 DRIVE SHAFT SYSTEM
11. Install follower to clutch so that follower nails (large)
(1) will come closer to the bent portion of retaining
spring by aligning follower stopper nail with outer
teeth of clutch. Then, fit in with follower’s nails (small)
(2) caught in spring.
411RW016
12. Install compression ring.
Turn the smaller diameter side toward follower and fit
spring in clutch.
13. Align follower nail (1) to handle groove (2). and then
assemble clutch with knob by pushing and turning
clutch counterclockwise to knob.
411RW017
14. Install gasket.
Make sure that there is no breakage, etc.
15. Install outer bearing outer race by driving it into the
hub, by using installer 5–8522–2118–0 and grip
5–8840–0007–0.
411RW007
16. Install inner bearing outer race by driving it into the
hub, by using installer 5–8840–2119–0 and grip
5–8840–0007–0.
411RW006
Page 4234 of 6000
4C–28
DRIVE SHAFT SYSTEM
Shift On The Fly System
Shift On The Fly System and Associated Parts
412RW004
Legend
(1) Filler Plug
(2) Bolt
(3) Oil Seal
(4) Snap Ring(External)
(5) Inner Shaft Bearing
(6) Snap Ring(Internal)
(7) Inner Shaft(8) Needle Bearing
(9) Clutch Gear
(10) Sleeve
(11) Housing
(12) Front Axle Drive Shaft (LH side)with Bracket
(13) Bolt
(14) Actuator Assembly
(15) Bolt
Disassembly
1. Remove filler plug and gasket, drain oil.
2. Loosen mounting bracket fitting bolts and remove
front axle drive shaft from front axle case.3. Remove Actuator Assembly and draw out actuator
ASM.
4. Remove housing.
5. Remove sleeve.
6. Remove clutch gear.