Page 22 of 396

ENGINE – Crankshaft Oil Seal11-16
REMOVAL SERVICE POINT
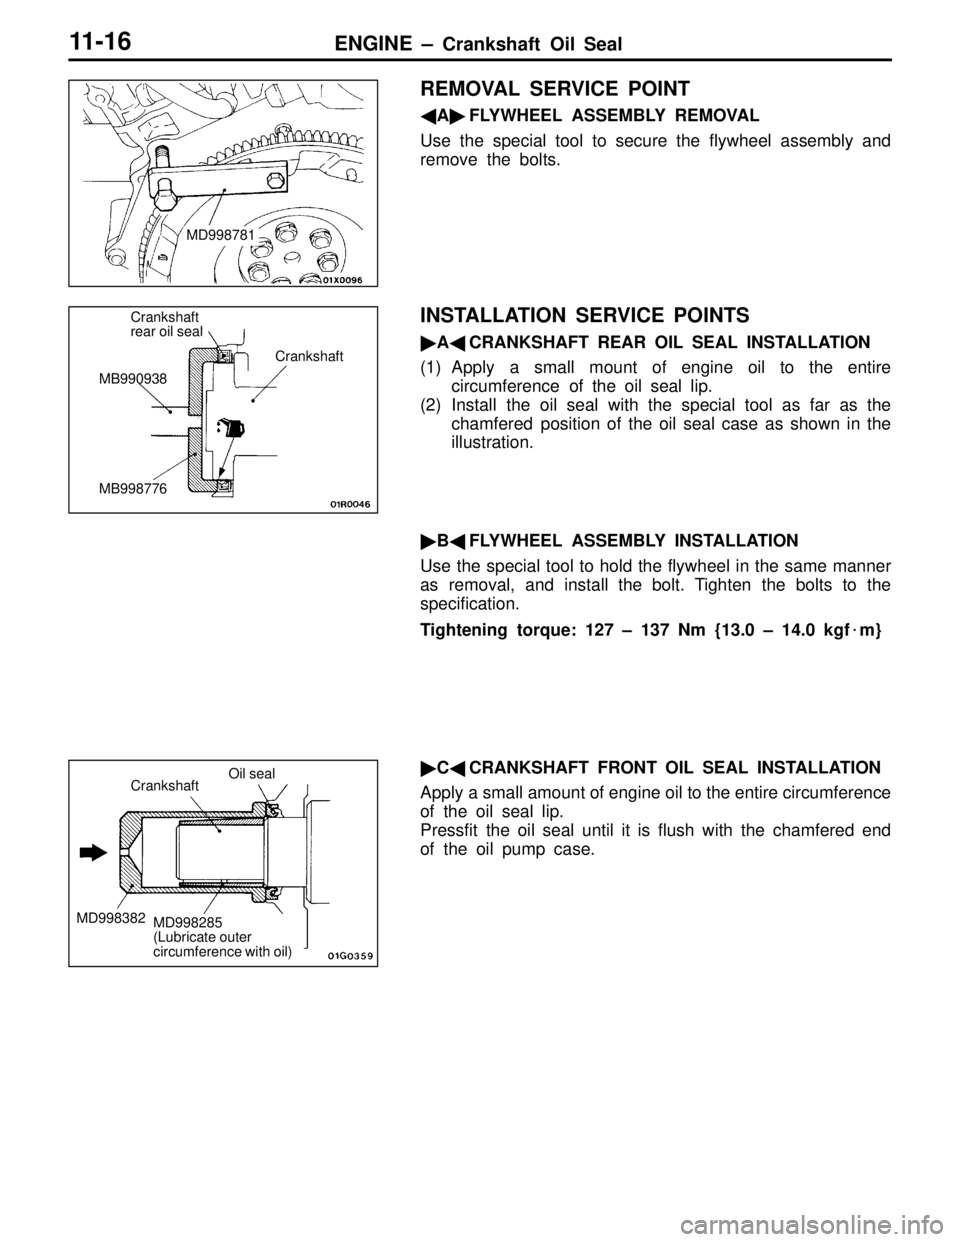
�A�FLYWHEEL ASSEMBLY REMOVAL
Use the special tool to secure the flywheel assembly and
remove the bolts.
INSTALLATION SERVICE POINTS
�A�CRANKSHAFT REAR OIL SEAL INSTALLATION
(1) Apply a small mount of engine oil to the entire
circumference of the oil seal lip.
(2) Install the oil seal with the special tool as far as the
chamfered position of the oil seal case as shown in the
illustration.
�B�FLYWHEEL ASSEMBLY INSTALLATION
Use the special tool to hold the flywheel in the same manner
as removal, and install the bolt. Tighten the bolts to the
specification.
Tightening torque: 127 – 137 Nm {13.0 – 14.0 kgf�m}
�C�CRANKSHAFT FRONT OIL SEAL INSTALLATION
Apply a small amount of engine oil to the entire circumference
of the oil seal lip.
Pressfit the oil seal until it is flush with the chamfered end
of the oil pump case.
MD998781
Crankshaft
rear oil seal
MB990938
MB998776Crankshaft
Crankshaft
MD998382
Oil seal
MD998285
(Lubricate outer
circumference with oil)
Page 190 of 396
REAR AXLE – Special Tools27-4
Tool UseName Number
AB
MB990241
A: MB990242
B: MB990244Rear axle shaft
puller
A: Puller shaft
B: Puller bar�Removal of drive shaft
�Removal of rear hub assembly
MB991354Puller body
A: MB991017
B: MB990998
C: MB991000A, B: Front hub
remover &
installer
C: Spacer�Temporary fixing of unit bearing
�Measurement of wheel bearing rotation
starting torque
�Measurement of wheel bearing axial play
Use MB991000 (component
of MB990998) for the spacer.
MB990326Preload socket�Measurement of wheel bearing rotation
starting torque
�Measurement of drive pinion preload
MB991406,
MB990635, or
MB991113Steering linkage
puller�Disconnection of ball joint
�Removal of hub bolt
MB991460PlugPrevention of differential oil from being dis-
charged and entry of foreign matter
tial>
MB990988Side gear holding
tool setMeasurement of clutch plate preload
without AYC>
MB990850End yoke holderRemoval and installation of companion flange
Page 241 of 396
POWER PLANT MOUNT – Roll Stopper and Centermember32-2
ROLL STOPPER AND CENTERMEMBER
REMOVAL AND INSTALLATION
Caution
When tightening the portion marked with *, first
temporarily tighten it, then torque to specification
with the engine weight applied to the body.
1
2 34
5
Unit: Nm {kgf�m}
52 {5.3}*
22
34 {3.5}34 {3.5}
93 {9.5}
69 {7.0} 93 {9.5}
2
Removal steps
1. Front crossmember bar
with 17’ wheels>
2. Bolt
�B�3. Front roll stopper bracket assembly
�A�4. Rear roll stopper bracket assembly
5. CentermemberNOTE
The conventional service procedures apply for the
installation service points.
Page 246 of 396
FRONT SUSPENSION – Lower Arm 33A-5
LOWER ARM
REMOVAL AND INSTALLATION
Post-installation Operation
(1) Push the Dust Cover of the Lower Arm and Stabilizer
Link Ball Joint with a Finger to Check for Possible
Cracks or Damage.
(2) Wheel Alignment Check and Adjustment
12
3
45
6
Unit: Nm {kgf�m}
39 {4.0}113 {11.5}
Molybdenum disulfide-base chassis
grease:
SHOWA SHELL SEKIYU SUNLITE
MB2, NISSEKI CLAKNOCK FL, or
equivalent
137 {14.0}
88 {9.0} 106 {10.8}*
6
Removal steps
1. Stabilizer link mounting nut
�A�2. Lower arm to knuckle coupling bolt
3. Bolt
4. Stabilizer bracket
�A�5. Bushing assembly
6. Lower arm assemblyCaution
The part marked with * should be first temporarily
tightened, then torqued to specification with the
vehicle on the ground in unloaded condition.
NOTE
Follow the conventional procedures for removal service
points.
Page 248 of 396
FRONT SUSPENSION – Lower Arm 33A-7
LOWER ARM
REMOVAL AND INSTALLATION
Caution
To prevent bushing from being galled, the part
marked with * should be first temporarily tightened,
then torqued to specification with the vehicle on
the ground in unloaded condition.Post-installation Operation
(1) Push the Dust Cover of the Lower Arm and Stabilizer
Link Ball Joint with a Finger to Check for Possible
Cracks or Damage.
(2) Wheel Alignment Check and Adjustment
(Refer to P.33A-3.)
12
3
456
Unit: Nm {kgf�m} Molybdenum disulfide-base chassis
grease:
SHOWA SHELL SEKIYU SUNLITE
MB2, NISSEKI CLAKNOCK FL, or
equivalent
39 {4.0}108 {11.0}
137 {14.0}
88 {9.0} 106 {10.8}*
6
Removal steps
1. Stabilizer link mounting nut
�A��B�2. Lower arm to knuckle coupling bolt
3. Bolt
4. Stabilizer bracket
�A�5. Bushing assembly
6. Lower arm assemblyNOTE
Follow the conventional procedures for removal service
points.
Page 254 of 396

REAR SUSPENSION – On-vehicle Service34-3
ON-VEHICLE SERVICE
1. REAR WHEEL ALIGNMENT CHECK AND
ADJUSTMENT
(1) The rear suspension and wheels should be serviced to
the normal condition prior to measurement of wheel
alignment.
(2) Measure the wheel alignment with the vehicle parked
on level ground.
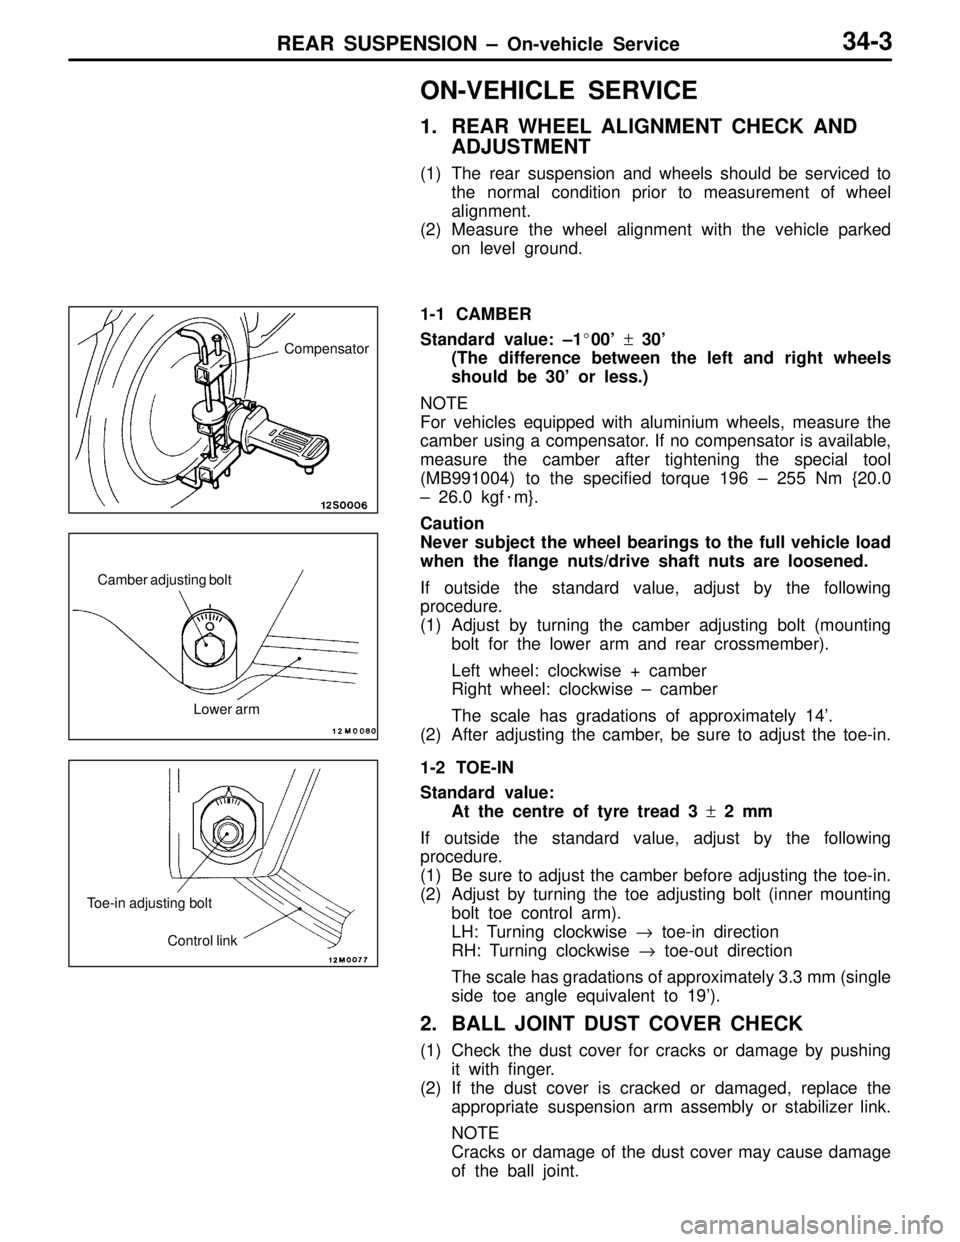
1-1 CAMBER
Standard value: –1�00’ ± 30’
(The difference between the left and right wheels
should be 30’ or less.)
NOTE
For vehicles equipped with aluminium wheels, measure the
camber using a compensator. If no compensator is available,
measure the camber after tightening the special tool
(MB991004) to the specified torque 196 – 255 Nm {20.0
– 26.0 kgf�m}.
Caution
Never subject the wheel bearings to the full vehicle load
when the flange nuts/drive shaft nuts are loosened.
If outside the standard value, adjust by the following
procedure.
(1) Adjust by turning the camber adjusting bolt (mounting
bolt for the lower arm and rear crossmember).
Left wheel: clockwise + camber
Right wheel: clockwise – camber
The scale has gradations of approximately 14’.
(2) After adjusting the camber, be sure to adjust the toe-in.
1-2 TOE-IN
Standard value:
At the centre of tyre tread 3 ± 2 mm
If outside the standard value, adjust by the following
procedure.
(1) Be sure to adjust the camber before adjusting the toe-in.
(2) Adjust by turning the toe adjusting bolt (inner mounting
bolt toe control arm).
LH: Turning clockwise → toe-in direction
RH: Turning clockwise → toe-out direction
The scale has gradations of approximately 3.3 mm (single
side toe angle equivalent to 19’).
2. BALL JOINT DUST COVER CHECK
(1) Check the dust cover for cracks or damage by pushing
it with finger.
(2) If the dust cover is cracked or damaged, replace the
appropriate suspension arm assembly or stabilizer link.
NOTE
Cracks or damage of the dust cover may cause damage
of the ball joint.
Compensator
Camber adjusting bolt
Lower arm
Toe-in adjusting bolt
Control link
Page 255 of 396

REAR SUSPENSION – Rear Suspension Assembly34-4
REAR SUSPENSION ASSEMBLY
REMOVAL AND INSTALLATION
Pre-removal Operation
(1) Center Exhaust Pipe Removal
(Refer to GROUP 15.)
(2) Trunk Room Side Trim Removal
(3) AYC Fluid Draining
(Refer to GROUP 27 – On-vehicle Service.)Post-installation Operation
(1) AYC Fluid Refilling and Bleeding
(Refer to GROUP 27 – On-vehicle Service.)
(2) Center Exhaust Pipe Installation
(Refer to GROUP 15.)
(3) AYC Operation Check
(4) Parking Brake Cable Stroke Check
(Refer to GROUP 36 – On-vehicle Service.)
(5) Wheel Alignment Check and Adjustment
(Refer to P.34-3.)
1
34
5
6
7 9 10
1112
1314
15 1617
Unit: Nm {kgf�m}
44 {4.5}
108 – 127 {11.0 – 13.0}
54 {5.5}
88 {9.0}
93 {9.5}*88 {9.0}
158 2
15
29 – 34
{3.0 – 3.5}
25 {2.6}34 {3.5}25 {2.5}
69
{7.0} Toe control bar
EVOLUTION-V RS
137 – 156 {14.0 – 16.0}*59 – 68 {6.0 – 7.0}*
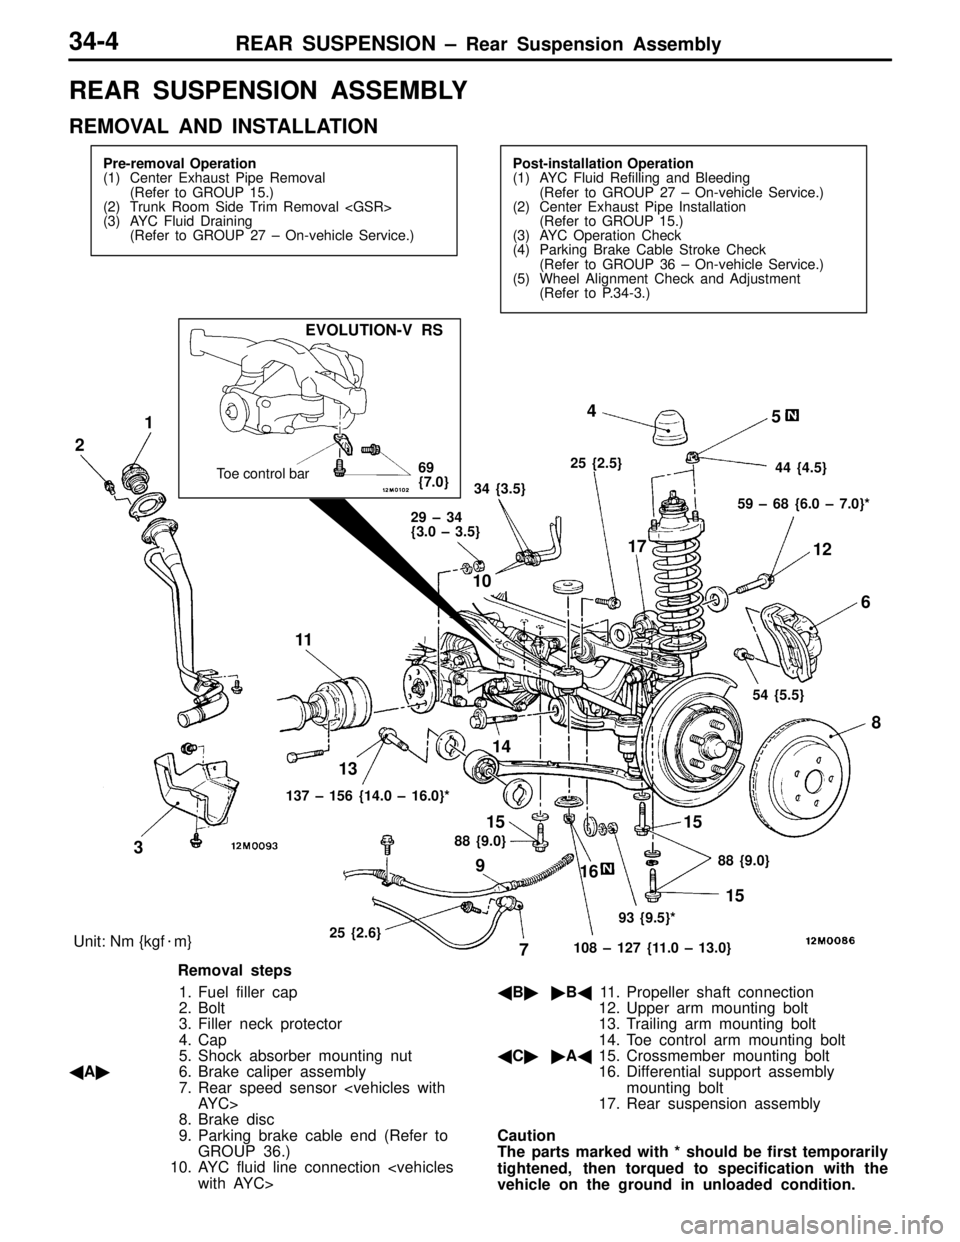
Removal steps
1. Fuel filler cap
2. Bolt
3. Filler neck protector
4. Cap
5. Shock absorber mounting nut
�A�6. Brake caliper assembly
7. Rear speed sensor
AYC>
8. Brake disc
9. Parking brake cable end (Refer to
GROUP 36.)
10. AYC fluid line connection
with AYC>�B��B�11. Propeller shaft connection
12. Upper arm mounting bolt
13. Trailing arm mounting bolt
14. Toe control arm mounting bolt
�C��A�15. Crossmember mounting bolt
16. Differential support assembly
mounting bolt
17. Rear suspension assembly
Caution
The parts marked with * should be first temporarily
tightened, then torqued to specification with the
vehicle on the ground in unloaded condition.
Page 257 of 396

REAR SUSPENSION – Upper Arm Assembly34-6
UPPER ARM ASSEMBLY
REMOVAL AND INSTALLATION
Post-installation Operation
(1) Push the Dust Cover of the Upper Arm Ball Joint
with a Finger to Check for Possible Cracks or
Damage.
(2) Wheel Alignment Check and Adjustment
(Refer to P.34-3.)
1
2
345
6
7
Unit: Nm {kgf�m}
49 {5.0}59 – 69 {6.0 – 7.0}*
74 – 87 {7.5 – 8.9}39 {4.0}
Removal steps
1. Fuel filler cap
�
2. Bolt�
3. Filler neck protector�
�A�4. Upper arm assembly to knuckle
coupling
5. Upper arm assembly mounting bolt
6. Stopper
7. Upper arm assemblyNOTE
Parts marked with
� apply only when RH side is removed
and installed.
Caution
The part marked with * should be first temporarily
tightened, then torqued to specification with the
vehicle on the ground in unloaded condition.
REMOVAL SERVICE POINT
�A�UPPER ARM ASSEMBLY DISCONNECTION
FROM KNUCKLE
Caution
(1) Only loosen the nut, and not remove it from the ball
joint, and use the special tool.
(2) Hang the special tool with a string to prevent the
parts including the tool from falling apart.
MB990635,
MB991113 or
MB991406
Nut
StringBall joint