Page 145 of 176
Replacing the tires
Replace the tires when the wear
band is visible through the tire
treads.
Failure to follow these precautions may adversely affect the
handling of the vehicle and make it easier to lose control and roll
over.
Tires that are larger or smaller than your vehicle's original tires may also
affect the accuracy of your speedometer.
SNOW TIRES AND CHAINS
Driving too fast for conditions creates the possibility of loss of
vehicle control. Driving at very high speeds for extended periods
of time may result in damage to vehicle components.
Snow tires must be the same size and grade as the tires you
currently have on your vehicle.
Do not use any type of tire chains on this vehicle. This includes both
conventional and cable-type chains.
The tires on your vehicle have all-weather treads that provide traction in
rain or snow. However, during the winter months in some climates, you
may need to use snow tires.
Maintenance and care
145
Page 146 of 176

WHAT YOU SHOULD KNOW ABOUT AUTOMOTIVE FUELS
Important safety precautions
Do not overfill the fuel tank. The pressure in an overfilled tank
may cause leakage and lead to fuel spray and fire.
If you do not use the proper fuel cap, the pressure in the fuel
tank can damage the fuel system or cause it to work improperly
in a collision.
The fuel system may be under pressure. If the fuel cap is venting
vapor or if you hear a hissing sound, wait until it stops before
completely removing the cap.
Automotive fuels can cause serious injury or death if misused or
mishandled.
Observe the following guidelines when handling automotive fuel:
²Extinguish all smoking materials
and any open flames before
fueling your vehicle.
²Always turn off the vehicle before
fueling.
²Automotive fuels can be harmful
or fatal if swallowed. If fuel is
swallowed, call a physician
immediately, even if no symptoms
are immediately apparent. The
toxic effects of fuel may not be visible for hours.
²Fuels can also be harmful if absorbed through the skin. If fuel is
splashed on the skin, promptly remove contaminated clothing and
wash skin thoroughly with soap and water.
²If fuel is splashed in the eyes, remove contact lenses, flush with water
for 15 minutes and seek medical attention.
Maintenance and care
146
Page 147 of 176

²Be particularly careful if you are taking ªAntabuseº or other forms of
disulfiram for the treatment of alcoholism. Breathing gasoline vapors
or skin contact could cause an adverse reaction. Consult a physician
immediately.
Choosing the right fuel
Use only UNLEADED FUEL. The use of leaded fuel is prohibited by law
and could damage your vehicle.
Your vehicle was not designed to use fuel or fuel additives with metallic
compounds, including manganese-based compounds containing MMT.
Vehicles certified to California emission standards (indicated on the
underhood Vehicle Emissions Control Information label) are designed to
operate on California reformulated gasolines. If California reformulated
gasoline is not available when you refuel, your vehicle can be operated
on non-California fuels. However, even though your engine will perform
adequately on other gasolines, the performance of the emission control
devices and systems may be adversely affected.
Repair of damage caused by using a fuel that your vehicle was not
designed for may not be covered by your warranty.
Octane recommendations
Your vehicle is designed to use
ªPremiumº gasoline for optimum
performance with an (R+M)/2
octane rating of 91 or higher.
Gasolines with lower octane ratings
can be used, but performance may decrease. We do not recommend
gasolines labeled as ªPremiumº in high altitude areas that are sold with
octane ratings less than 91.
Do not be concerned if your vehicle sometimes knocks lightly. However,
if it knocks heavily under most driving conditions on fuel with the
recommended octane, see your dealer or a qualified service technician to
prevent any engine damage.
Fuel quality
If you are experiencing starting, rough idle or hesitation driveability
problems during a cold start, try a different brand of gasoline. If the
problems persist, see your dealer or a qualified service technician.
91(R+M)/2 METHOD
Maintenance and care
147
Page 148 of 176
 issued a
gasoline specification to provide information on high quality fuels that
optimize the performance of your vehicle. We recommend the us")
The American Automobile Manufacturers Association (AAMA) issued a
gasoline specification to provide information on high quality fuels that
optimize the performance of your vehicle. We recommend the use of
gasolines that meet the AAMA specification if they are available.
It should not be necessary to add any aftermarket products to your fuel
tank if you continue to use a high-quality fuel.
Cleaner air
Ford approves the use of gasolines to improve air quality, including
reformulated gasolines that contain oxygenates up to 10% ethanol or
15% MTBE.
Do not use gasolines containing methanol, which can damage critical fuel
system components. Damage resulting from the use of methanol may not
be covered by your warranty.
Running out of fuel
Avoid running out fuel because this situation may have an adverse affect
on modern powertrain components.
You may need to crank the engine several times before the system starts
to pump fuel from the tank to the engine. If you run out of fuel, your
Service Engine Soon light may come on. For more information on the
Service Engine Soon light, refer to theInstrumentationchapter.
Calculating fuel economy
To accurately calculate your vehicle's fuel economy:
1. Fill the tank completely and record the initial odometer reading.
2. Each time you fill the tank, record the amount of fuel added
(in liters or gallons).
3. After at least three to five fuel tank fill-ups, fill the fuel tank and
record the current mileage reading.
4. Use one of the following equations to calculate fuel economy.
Liters used x 1004Total kilometers traveled
Total miles traveled4Total gallons used
Keep a record for at least one month. This will provide an accurate
estimate of the vehicle's fuel economy.
Maintenance and care
148
Page 149 of 176

EMISSION CONTROL SYSTEM
Your vehicle is equipped with various emission control components and a
catalytic converter which will enable your vehicle to comply with
applicable exhaust emission standards. To make sure that the catalytic
converter and other emission control components continue to work
properly:
²Use only unleaded fuel.
²Avoid running out of fuel.
²Do not turn off the ignition while your vehicle is moving, especially at
high speeds.
²Have the services listed in your ªService Guideº performed according
to the specified schedule.
The Scheduled Maintenance Services listed in the ªService Guideº are
required because they are considered essential to the life and
performance of your vehicle and to its emissions system.
If other than Ford, Motorcraft or Ford authorized parts are used for
maintenance replacements or for service of components affecting
emission control such non-Ford parts should be equivalent to genuine
Ford Motor Company parts in performance and durability.
Do not park, idle, or drive your vehicle in dry grass or other dry
ground cover. The emission system heats up the engine
compartment and exhaust system, which can start a fire.
Watch for fluid leaks, strange odors, smoke, loss of oil pressure, the
charging system warning light, the ªService Engine Soonº light or the
temperature warning light. These events could indicate that the emission
control system is not working properly.
If you smell exhaust fumes of any kind inside your vehicle, have
the dealer inspect and fix your vehicle immediately. Do not drive
if you smell exhaust fumes. These fumes are harmful and could kill
you.
Do not make any unauthorized changes to your vehicle or engine. By
law, vehicle owners and anyone who manufactures, repairs, services,
sells, leases, trades vehicles, or supervises a fleet of vehicles are not
permitted to intentionally remove an emission control device or prevent
it from working. Information about your vehicle's emission system is on
Maintenance and care
149
Page 150 of 176

the Vehicle Emission Control Information Decal located on or near the
engine. This decal identifies engine displacement and gives some tune up
specifications.
Please consult your ªWarranty Guideº for complete emission warranty
information.
Readiness for inspection/maintenance (I/M) testing
In some localities, it may be a legal requirement to pass an I/M test of
the on-board diagnostic (OBD-II) system. If your ªcheck engine/service
engine soonº light is on, reference the applicable light description in the
Warning Lights and Chimessection of your owners guide. Your vehicle
may not pass the I/M test with the ªcheck engine/service engine soonº
light on.
If the vehicle's powertrain system or its battery has just been serviced,
the OBD-II system is reset to a ªnot ready for I/M testº condition. To
ready the OBD-II system for I/M testing, a minimum of 30 minutes of city
and highway driving is necessary as described below:
²First, at least 10 minutes of driving on an expressway or highway.
²Next, at least 20 minutes driving in stop and go, city type traffic with
at least four idle periods.
Allow the vehicle to sit for at least eight hours without starting the
engine. Then, start the engine and complete the above driving cycle. The
engine must warm up to its normal operating temperature. Once started,
do not turn off the engine until the above driving cycle is complete.
EXTERIOR BULBS
Replacing headlamp bulbs
Handle a halogen headlamp bulb carefully and keep out of
children's reach. Grasp the bulb only by its plastic base and do
not touch the glass. The oil from your hand could cause the bulb to
break the next time the headlamps are operated.
To remove the headlamp bulb:
1. Make sure headlamp switch is in OFF position.
2. Lift the hood and remove the plastic sight shield covering the back of
the headlamps by lifting up on the rear corners to release the velcro
attachments. Lift the shield and pull towards the windshield.
Maintenance and care
150
Page 151 of 176

3. At the back of the headlamp, pull back and up slightly on the two
right angle brackets to release the headlamp assembly from the vehicle.
4. Carefully pull the headlamp assembly away from the vehicle to expose
the back of the bulb and wiring connector.
5. Disconnect the electrical
connector from the bulb by pulling
the connector rearward.
6. Remove the bulb retaining ring by
rotating it counterclockwise (when
viewed from the rear) about an
eighth of a turn to free it from the
bulb socket, and by sliding the ring
off the plastic base. Keep the ring
because it will be used again to
retain the new bulb.
7. Remove the old bulb from its socket by gently pulling it straight back
out of the socket. Do not turn the bulb while removing it.
To install the new bulb:
1. With the flat side of the bulb's
plastic base facing upward, insert
the glass end of the bulb into the
socket. You may need to turn the
bulb left or right to line up the
grooves in the plastic base with the
tabs in the socket. When the
grooves are aligned, push the bulb into the socket until the plastic base
contacts the rear of the socket.
2. Slip the bulb retaining ring over the plastic base until it contacts the
rear of the socket by rotating it clockwise until you feel a ªstop.º
3. Push the electrical connector into the rear of the plastic base until it
snaps, locking it into position.
4. Before reinstalling the plastic sight shield, make sure the sight shield
tabs are properly seated under the grille molding.
Maintenance and care
151
Page 152 of 176

5. Turn the headlamps on and make sure they work properly. If the
headlamp was correctly aligned before you changed the bulb, you should
not need to align it again.
AIMING THE HEADLAMPS
Your vehicle is equipped with a Vehicle Headlamp Aim Device (VHAD)
on each headlamp. Each headlamp may be properly aimed in the vertical
(up/down) and the horizontal (left/right) directions using your VHAD
system. The headlamps on your vehicle are properly aimed at the
assembly plant.
A bubble (vertical indicator) that is not centered between the two red
lines does not necessarily indicate out-of-aim headlamps. If your vehicle
is not positioned on a level surface, the slope will be included in the
vertical indication. Therefore, vertical and horizontal headlamp
adjustment should be performed only when the beam direction appears
to be incorrect.
You will need one 4 mm wrench or socket to make the adjustments.
If the vehicle has been in an accident, the vehicle's front structure
should be properly aligned before aiming the headlamps.
Horizontal aim adjustment
1. With the hood open remove the
protective cover, locate the
horizontal indicator and adjusting
screw. They are located below the
viewing hole at the rear of the
headlamp assembly.
U
D
Maintenance and care
152
 1
1 2
2 3
3 4
4 5
5 6
6 7
7 8
8 9
9 10
10 11
11 12
12 13
13 14
14 15
15 16
16 17
17 18
18 19
19 20
20 21
21 22
22 23
23 24
24 25
25 26
26 27
27 28
28 29
29 30
30 31
31 32
32 33
33 34
34 35
35 36
36 37
37 38
38 39
39 40
40 41
41 42
42 43
43 44
44 45
45 46
46 47
47 48
48 49
49 50
50 51
51 52
52 53
53 54
54 55
55 56
56 57
57 58
58 59
59 60
60 61
61 62
62 63
63 64
64 65
65 66
66 67
67 68
68 69
69 70
70 71
71 72
72 73
73 74
74 75
75 76
76 77
77 78
78 79
79 80
80 81
81 82
82 83
83 84
84 85
85 86
86 87
87 88
88 89
89 90
90 91
91 92
92 93
93 94
94 95
95 96
96 97
97 98
98 99
99 100
100 101
101 102
102 103
103 104
104 105
105 106
106 107
107 108
108 109
109 110
110 111
111 112
112 113
113 114
114 115
115 116
116 117
117 118
118 119
119 120
120 121
121 122
122 123
123 124
124 125
125 126
126 127
127 128
128 129
129 130
130 131
131 132
132 133
133 134
134 135
135 136
136 137
137 138
138 139
139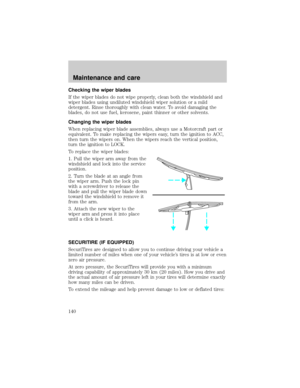 140
140 141
141 142
142 143
143 144
144 145
145 146
146 147
147 148
148 149
149 150
150 151
151 152
152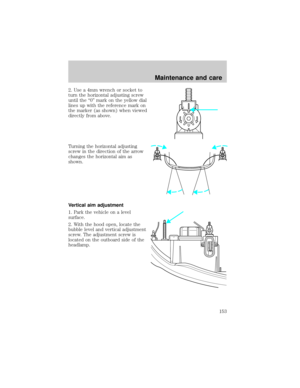 153
153 154
154 155
155 156
156 157
157 158
158 159
159 160
160 161
161 162
162 163
163 164
164 165
165 166
166 167
167 168
168 169
169 170
170 171
171 172
172 173
173 174
174 175
175