Page 275 of 2490
R
equire no adjustment and are non-serviceable items.
Accelerometers
The three accelerometers:
Sense veh
icle body movement.
Gen
erate an analogue voltag
e (maximum +5 volts) proportional to body movement.
Pr
ovide inputs to the adapti
ve damping control module.
The two vertical acce lerometers are mounted on the bulkhead and in the trunk.
The lateral accelerometer is mounted in the ECM housing.
Ada
ptive Damping Control Module (ADCM)
The ADCM
:
Is
mounted on the fascia support bracket.
Controls the four adaptiv
e dampers in re
sponse to analogue and digital inputs.
It
em
De
scription
1Battery su
pply
2Ignition su
pply
3Ground
4Input from verti
cal accelerometer, front
5Input from verti
cal accelerometer, rear
6Input from later
al accelerometer
7F
ootbrake operation signal
8Vehi
cle speed input
9D
amper control signals
10Ou
tput to message center
11D
iagnostic connector serial link
Page 276 of 2490

Is hard-wi
red to the instrume
nt cluster message center.
Is hard
-wired to the J1962 diagnostic connector.
Op
era
tion
Th
e
system selects the soft or
firm damper setting according to the current ro ad and driving conditions, to optimise vehicle
ride and handling.
With the vehicle stationary, the dampers are in the firm setting, but will normally switch to the soft setting when the vehicle
exceeds 8 km/h (5 mile/h); all dampers are switched simultaneously.
Sudden movement of the vehicle body, in response to road inputs, is detected by the vertical accelerometers, and the ADCM
switches the dampers to the firm setting to give improved damping of the resultant oscillations.
When cornering forces are detected by th e lateral accelerometer, the ADCM switches the dampers to the firm setting to
reduce the roll rate an d improve wheel control.
After the event has passed, the dampers revert to the soft setting.
When the footbrake is applied, the ADCM re ceives a signal and calculates the rate of vehicle deceleration. If the deceleration
rate is greater than a certain threshold, the dampers are switched to the firm setting to reduce the pitch rate and improve
wheel control.
If a system failure occurs, the ADCM grounds the output line to the instrument cluster message center, which displays a
text warning SUSPENSION FAULT and illuminates the amber warning lamp. Under fault conditions the system always fails to
the firm setting, so that the vehicle will be safe to drive un der all road and driving conditions.
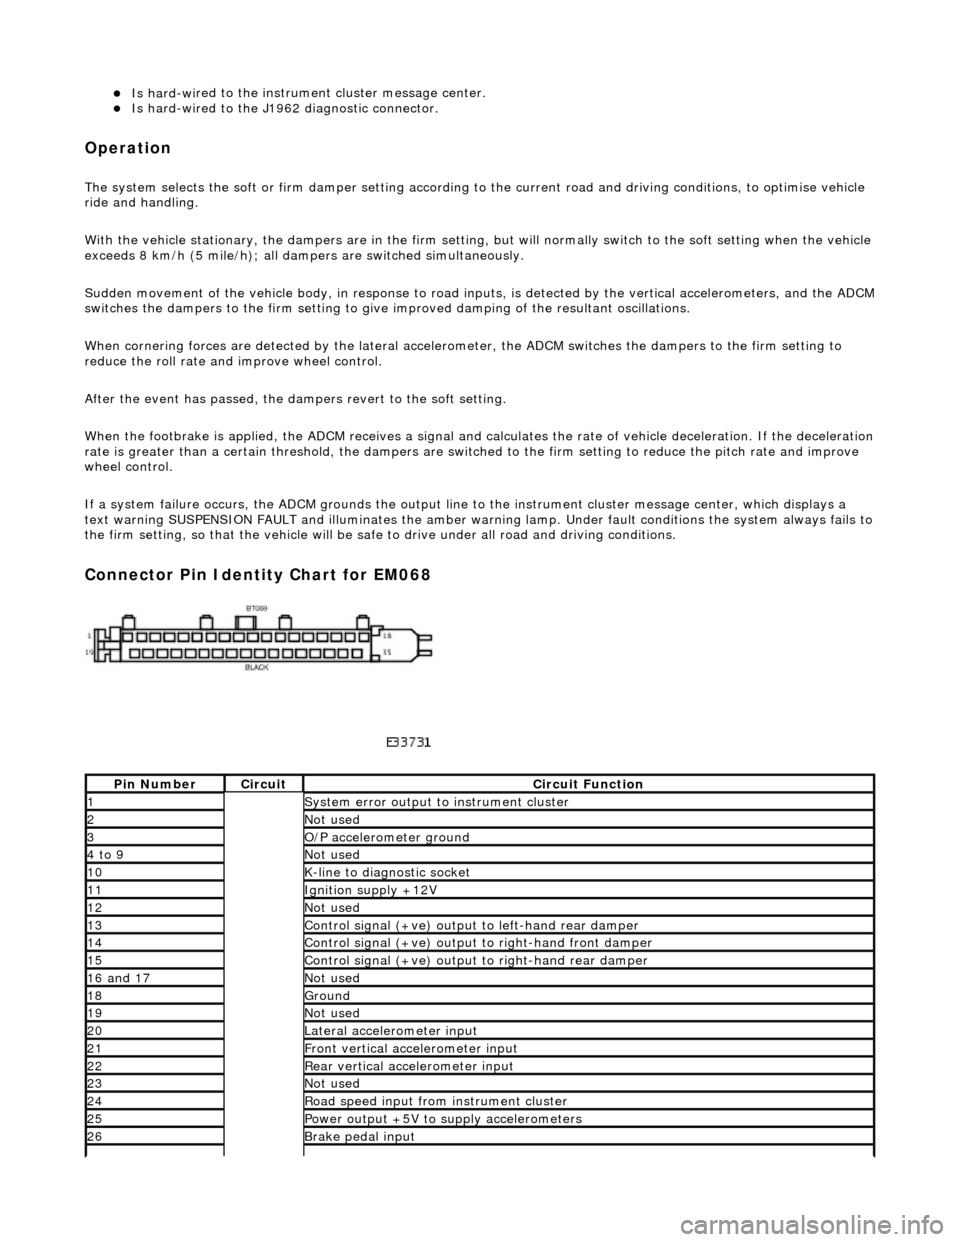
Connector Pin Identity Chart for EM068
Pin
Number
Ci
rcui
t
Circuit Functi
on
1System erro
r output to instrument
cluster
2Not
used
3O/
P a
ccelerometer ground
4 to
9
Not
used
10K-
li
ne to diagnostic socket
11Ignition su
pply +12V
12Not
used
13Control signal (+ve) output
to l
eft-hand rear damper
14Control signal (+ve) output
to right-hand front damp
er
15Control signal (+ve) output
to right-hand rear
damper
16
a
nd 17
No
t
used
18Ground
19No
t
used
20Lateral
accelerometer i
nput
21Front vertical ac
celerometer in
put
22Rear vertical
acce
lerometer input
23No
t
used
24R
o
ad speed input from
instrument cluster
25Power output +5V to suppl y accelerometers
26Brake peda
l input
Page 278 of 2490

Vehicle Dynamic Suspension - Vehicle Dynamic Suspension
Diagn
osis and Testing
Refer to the PDU User Guide for details of diagnosing and testing the Adaptive Damping System. The PDU interrogates the
ADCM directly via the K and L lines to the J1962 diagnostic socket.
The PDU will give an indication of the integrity of each electron ic and electrical component. It will indicate, for example, that
the accelerometers are not broken, but not that they functionin g correctly when the vehicle is in motion. However, it is
exceptional for an accelero meter to function incorrectly in its dynamic mode if it is proved to be functioning when static.
Basic Checks
The accele
rometers have the following ch
aracteristics. At 0g (no movement of the body) each vertical accelerometer
outputs approximately 2.5V steady voltage; the lateral acce lerometer outputs approximately 1.5V. The voltage output due
to body movement is proportional to acceleration in the acceleration axis, up to approximately 4.5V and down to
approximately 0.5V.
Before changing any component, refer to the circuit diagrams and check the cont inuity of relevant harness circuits; in some
instances, the PDU will not different iate between a faulty component an d a damaged connection or wiring.
Check the following fuses:
En
gine compartment fuse
box, fuse F5 (10A).
Engine m
anagement fuse
box, fuse F1 (20A).
Check the following ADCM input/output lines:
Sy stem erro
r output from the ADCM
to the instrument cluster.
Vehicl
e speed output from the inst
rument cluster to the ADCM.
Foo
tbrake signal to the ADCM.
Check any relevant connections to confirm that the connection is electrically sound and that a terminal pin has not been
pushed back into the connector shell, ie. not ma king a connection to its mating pin or socket.
Page 280 of 2490
Driveshaft -
Torques
Comp
onent
Nm
Bol
t
M12 - Jurid flexible coupling to
transmission and final drive flanges
75
-
88
Screw
-
Centre bearing to underbody
19
,5
- 26,5
Screw
-
Parking brake relay mounting bracket to underbody
19
,5
- 26,5_
Page 282 of 2490

Driveshaft - Driveshaft
Remo
val and Installation
Remov
a
l
CAUTI
O
N: To preserve 'drive line' refine
ment, individual parts, other than fixings, MUST NOT be renewed. In the event
of any balance or driveshaft component related problem, the complete assembly must be renewed. Under no circumstances
may the flexible (Jurid) coupling be remo ved from the driveshaft (or its fixings be loosened). Do not drop or subject the
driveshaft to damage.
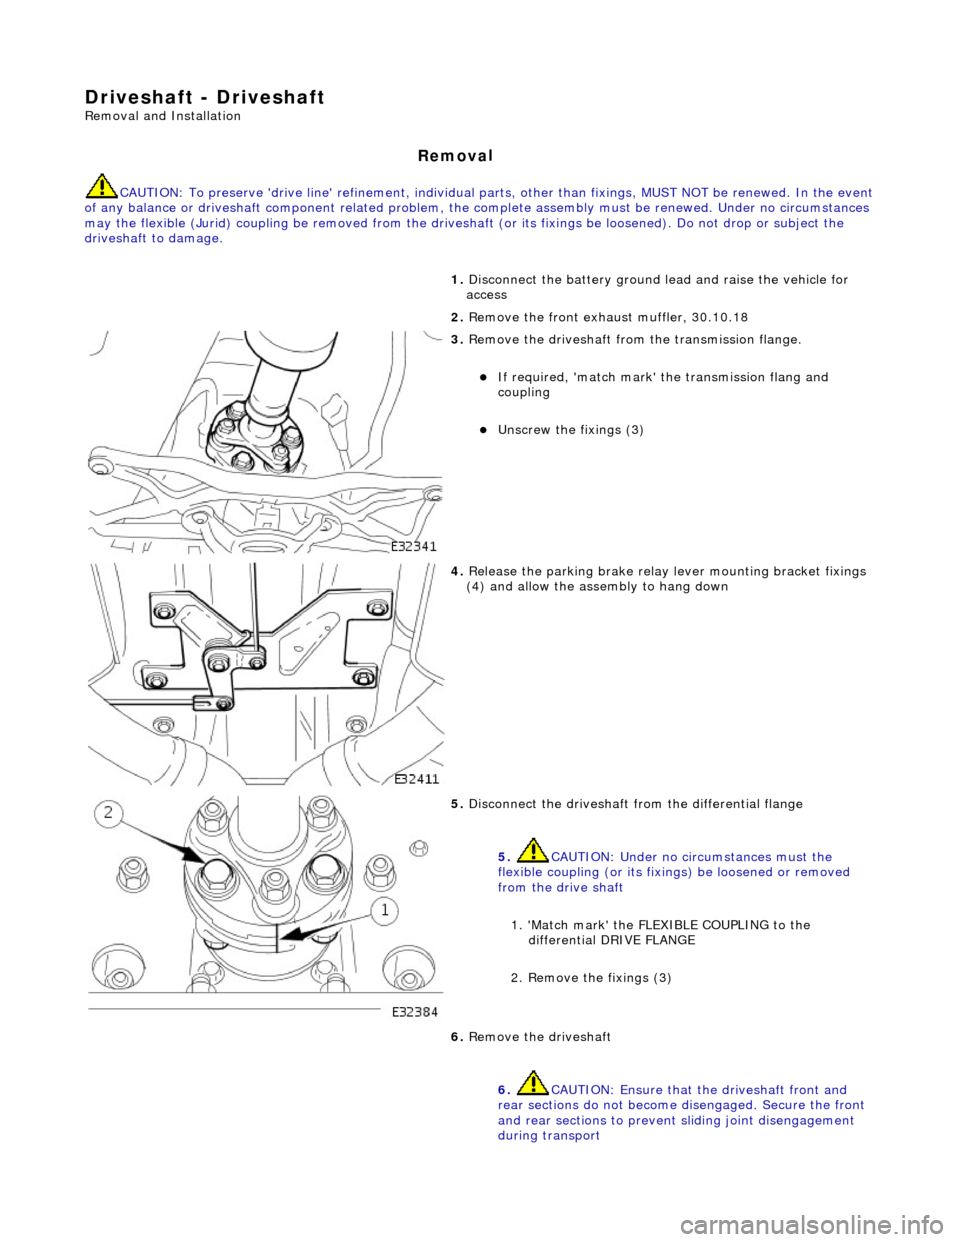
1. Disc
onnect the battery ground
lead and raise the vehicle for
access
2. Remove the front exha ust muffler, 30.10.18
3. Re
move the driveshaft from
the transmission flange.
If required, 'match mark'
the transmissi on flang and
coupling
Unscrew the fi xings (3)
4. Relea s
e the parking brake relay
lever mounting bracket fixings
(4) and allow the assembly to hang down
5. Disc onne
ct the driveshaft fr
om the differential flange
5. CAUTION: Under no circumstances must the
flexible coupling (or its fixings) be loosened or removed
from the drive shaft
1. 'Match mark' the FLEX IBLE COUPLING to the
differential DRIVE FLANGE
2. Remove the fixings (3)
6. Re
move the driveshaft
6. CAUTION: Ensure that the driveshaft front and
rear sections do not become disengaged. Secure the front
and rear sections to preven t sliding joint disengagement
during transport
Page 288 of 2490
Re
ar Drive Axle/Differential - Axle Shaft
In-v
ehic
le Repair
Remov
a
l
S
p
ecial Tool(s)
Hub remover
2
04-011
Thread protector
JD
1D
/ 7
1. Disc
onnect the battery ground lead.
2. Support the vehicle at the rear and remove the appropriate
rear road wheel.
3. Remove and discard the hub nut, apply the brakes to prevent
rotation.
4. Remove the brake caliper in acco rdance with 70.55.03, but do
not disconnect the hydraulics.
5. Pr
epare the hub carrier.
1. 'Match mark' the hub carr ier fulcrum bolt head and
the carrier.
6. Prepare the hub carrier.
1. Slacken the hub ca rrier fulcrum nut.
2. Disconnect the ABS sensor multiplug at the hub
Page 295 of 2490
R
ear Drive Axle/Differential - Drive Pinion Flange and Drive Pinion Seal
In-v
ehicle Repair
Remov
al
S
pecial Tool(s)
Drive sh
aft flange wrench
205-053
D
rive shaft flange remover replacer.
205-272
1. Di
sconnect the battery ground lead.
2. Raise the vehicle for access.
3. Disconnect the main parking br ake c
able at the compensator.
4. Release the parking brake relay lever mounting bracket and
allow the assembly to hang down.
R
emove the fixings (4).
Page 301 of 2490
7. Re
move the damper assembly
1. Mark the tool position on the spring with adhesive
tape
2. Remove the damper lower fixing
3. Remove the damper assembly
8. Repeat for the opposite hand spring / damper unit
9. Relea
se the parking brake cable
1. Disconnect the cable in-line connector
2. Remove the outer cable to frame clips (2)
3. Clear the cable through the frame
10
.
Remove the LH hub and axle shaft assembly
1. Remove the lower fulcrum shaft nut (1)
2. Remove and discard the axle shaft to drive flange nuts (4)
3. Turn the axle-shaft for ac cess to access the fixings for
step 2
4. Support the axle shaft a ssembly and remove the hub
fulcrum
5. Remove the hub and axle shaft assembly
6. Note the position of and remove the camber adjustment spacer
11. Repeat for the opposite hand