Page 2336 of 2490

Installation
1. Synchronise control module gears. Refer to 76.82.48.
2. Exercising care to avoid da maging edge, lower front of
headlining for access.
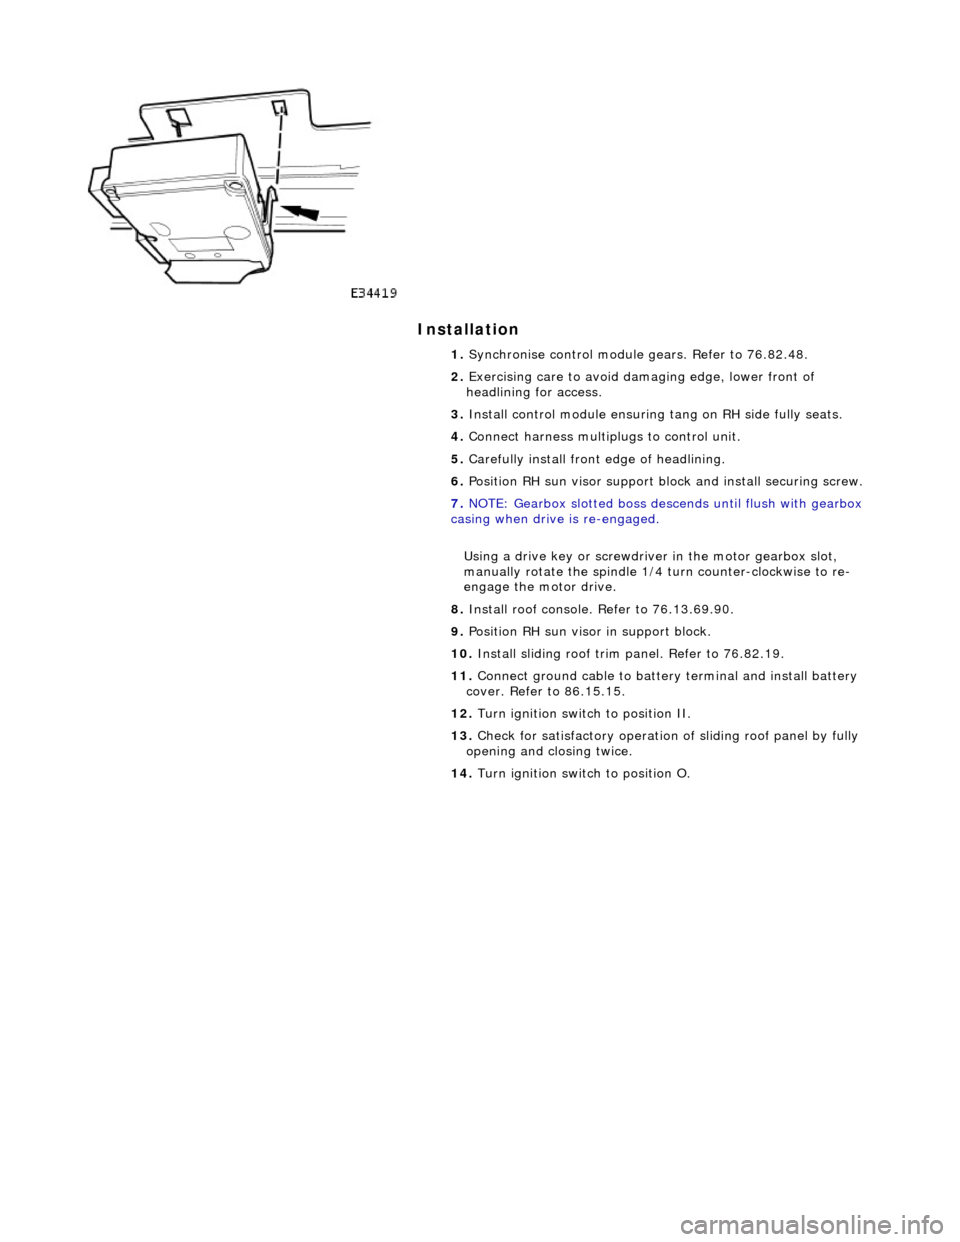
3. Install control module ensuring tang on RH side fully seats.
4. Connect harness multiplugs to control unit.
5. Carefully install front edge of headlining.
6. Position RH sun visor support bl ock and install securing screw.
7. NOTE: Gearbox slotted boss descends until flush with gearbox
casing when drive is re-engaged.
Using a drive key or screwdriver in the motor gearbox slot,
manually rotate the spindle 1/4 turn counter-clockwise to re-
engage the motor drive.
8. Install roof console. Refer to 76.13.69.90.
9. Position RH sun visor in support block.
10. Install sliding roof trim panel. Refer to 76.82.19.
11. Connect ground cable to batter y terminal and install battery
cover. Refer to 86.15.15.
12. Turn ignition switch to position II.
13. Check for satisfactory operation of sliding roof panel by fully
opening and closing twice.
14. Turn ignition switch to position O.
Page 2337 of 2490
Roof Opening Panel - Roof Opening Panel Motor
Removal and Installation
Removal
Installation
1. Remove battery cover and disc onnect ground cable from
battery terminal. Refer to 86.15.19.
2. Remove roof console for ac cess. Refer to 76.13.69.90.
3. Disconnect sliding roof panel motor multiplug from control
module.
4. slacken and remove sliding roof panel motor securing screws.
5. Withdraw motor assembly and remove plastic mountings.
1. Fit plastic mountings to motor.
2. Position and align motor in slid ing roof frame, ensuring that
motor body locates in outer tubes and gear engages inner
cables.
Page 2338 of 2490
3. Fit and tighten motor securing screws.
4. Connect motor harness multiplug to control module.
5. Using a drive key or screwdriver in the motor gearbox slot,
manually rotate the spindle 1/4 turn counter-clockwise to re-
engage the motor drive.
6. Fit roof console. Refer to 76.13.69.90.
7. Connect ground cable to battery terminal and fit battery cover.
Refer to 86.15.15.
Page 2359 of 2490
Safety Belt System -
Torques
ComponentNm
Screws, front seat belt height adjuster to B/C post LH and RH24 - 26
Nut, seat belt upper anchor to height adjuster LH and RH30 - 40
Bolt, LH and RH rear seat belt lower anchor to BIW30 - 40
Bolt, centre rear seat belt lower anchor to BIW30 - 40
Bolts, rear seat belt automatic locking re tractor LH, RH and centre to squab panel30 - 40
Bolt, rear seat belt buckle LH, RH and centre to BIW30 - 40
Bolt, front seat belt buckle LH and RH to seat rail30 - 40
Bolt, front seat belt lower an chor LH and RH to seat rail30 - 40
Bolts, front seat belt automatic lock ing retractor/pretensioner to B post30 - 40
Bolts, side airbag to seat frame9 - 11
Screws, front seat belt guide to B/C post8 - 10
Screws, single point sensor to tunnel5 - 7
Screws, side impact sens ing module to 'B' post5 - 7
Page 2368 of 2490
Supplemental Restraint System -
Torques
ComponentNm
Screws, front seat belt height adjuster to B/C post LH and RH24 - 26
Nut, seat belt upper anchor to height adjuster LH and RH30 - 40
Bolt, LH and RH rear seat belt lower anchor to BIW30 - 40
Bolt, centre rear seat belt lower anchor to BIW30 - 40
Bolts, rear seat belt automatic locking re tractor LH, RH and centre to squab panel30 - 40
Bolt, rear seat belt buckle LH, RH and centre to BIW30 - 40
Bolt, front seat belt buckle LH and RH to seat rail30 - 40
Bolt, front seat belt lower an chor LH and RH to seat rail30 - 40
Bolts, front seat belt automatic lock ing retractor/pretensioner to B post30 - 40
Bolts, side airbag to seat frame9 - 11
Screws, front seat belt guide to B/C post8 - 10
Screws, single point sensor to tunnel5 - 7
Screws, side impact sens ing module to 'B' post5 - 7
Page 2369 of 2490

Supplemental Restraint System - Air Bag Supplemental Restraint System
(SRS)
Description and Operation
Supplementary Restraint Air Bag System
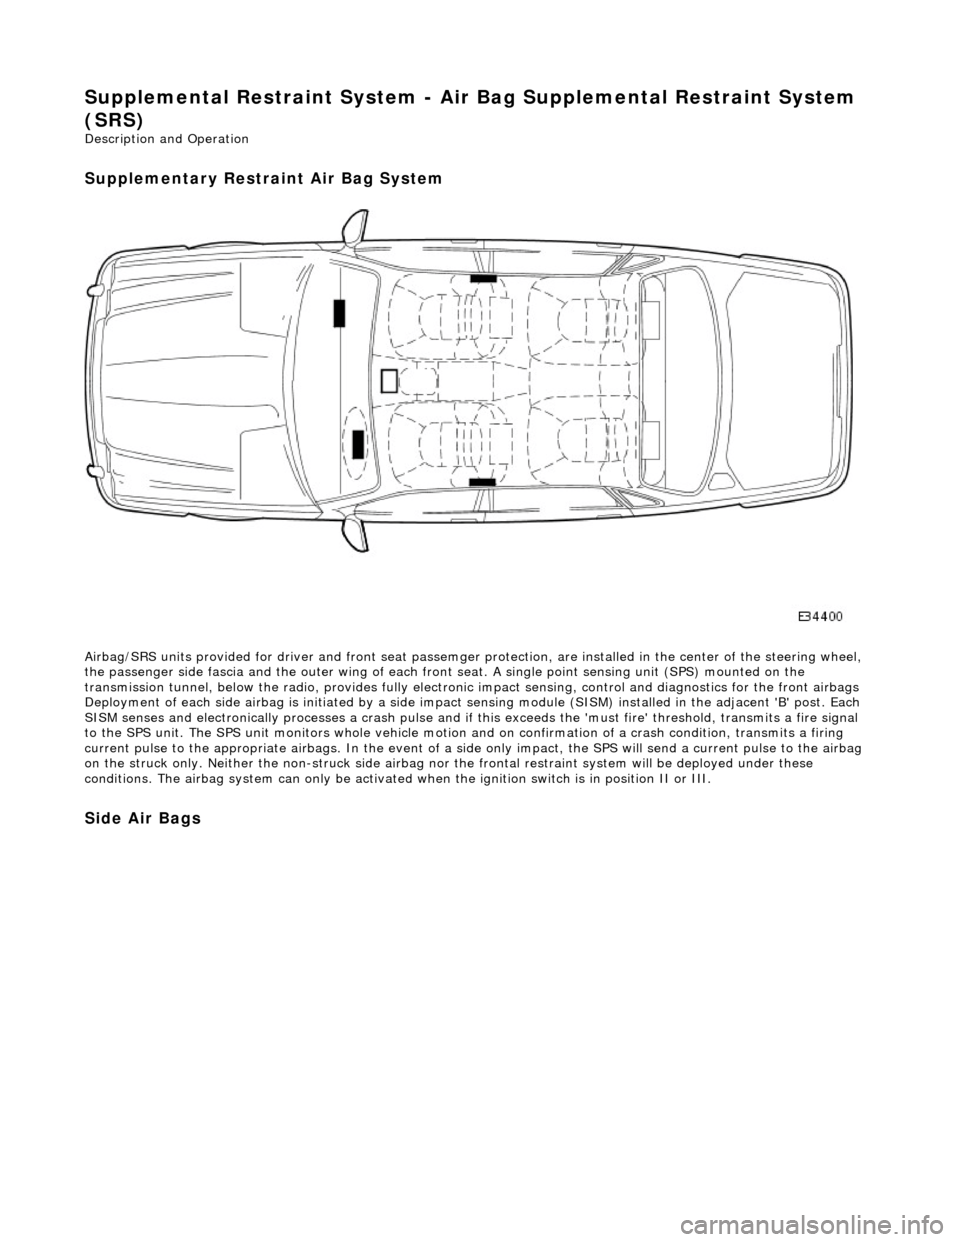
Airbag/SRS units provided for driver and fro nt seat passemger protection, are installed in the center of the steering wheel,
the passenger side fascia and the oute r wing of each front seat. A single point sensing unit (SPS) mounted on the
transmission tunnel, below the ra dio, provides fully electronic impact sensing, control and diagnostics for the front airbags
Deployment of each side airbag is initia ted by a side impact sensing module (SISM) installed in the adjacent 'B' post. Each
SISM senses and electronically processes a crash pulse and if this exceeds the 'must fire' threshold, transmits a fire signal
to the SPS unit. The SPS unit monitors wh ole vehicle motion and on confirmation of a crash condition, transmits a firing
current pulse to the appropriate airbags. In the event of a side only impact, the SPS will send a current pulse to the airbag
on the struck only. Neither th e non-struck side airbag nor the frontal restraint system will be deployed under these
conditions. The airbag system can only be activated wh en the ignition switch is in position II or III.
Side Air Bags
Page 2371 of 2490

Supplemental Restraint System - Air Bag Control Module
Removal and Installation
Removal
Installation
1.
WARNING: FOLLOWING DISCONNECTION OF THE
BATTERY, A PERIOD OF AT LEAST ONE MINUTE MUST BE
ALLOWED TO ELAPSE BEFORE ANY WORK IS CARRIED OUT ON
AN AIR BAG SYSTEM COMPONENT.
Remove battery cover and disc onnect ground cable from
battery terminal. Refer to 86.15.19.
2. Remove 'J' gate surroun d. Refer to 76.25.24.
3. Remove centre console veneer panel. Refer to 76.47.26.
4. Remove radio. Re fer to 86.50.03.
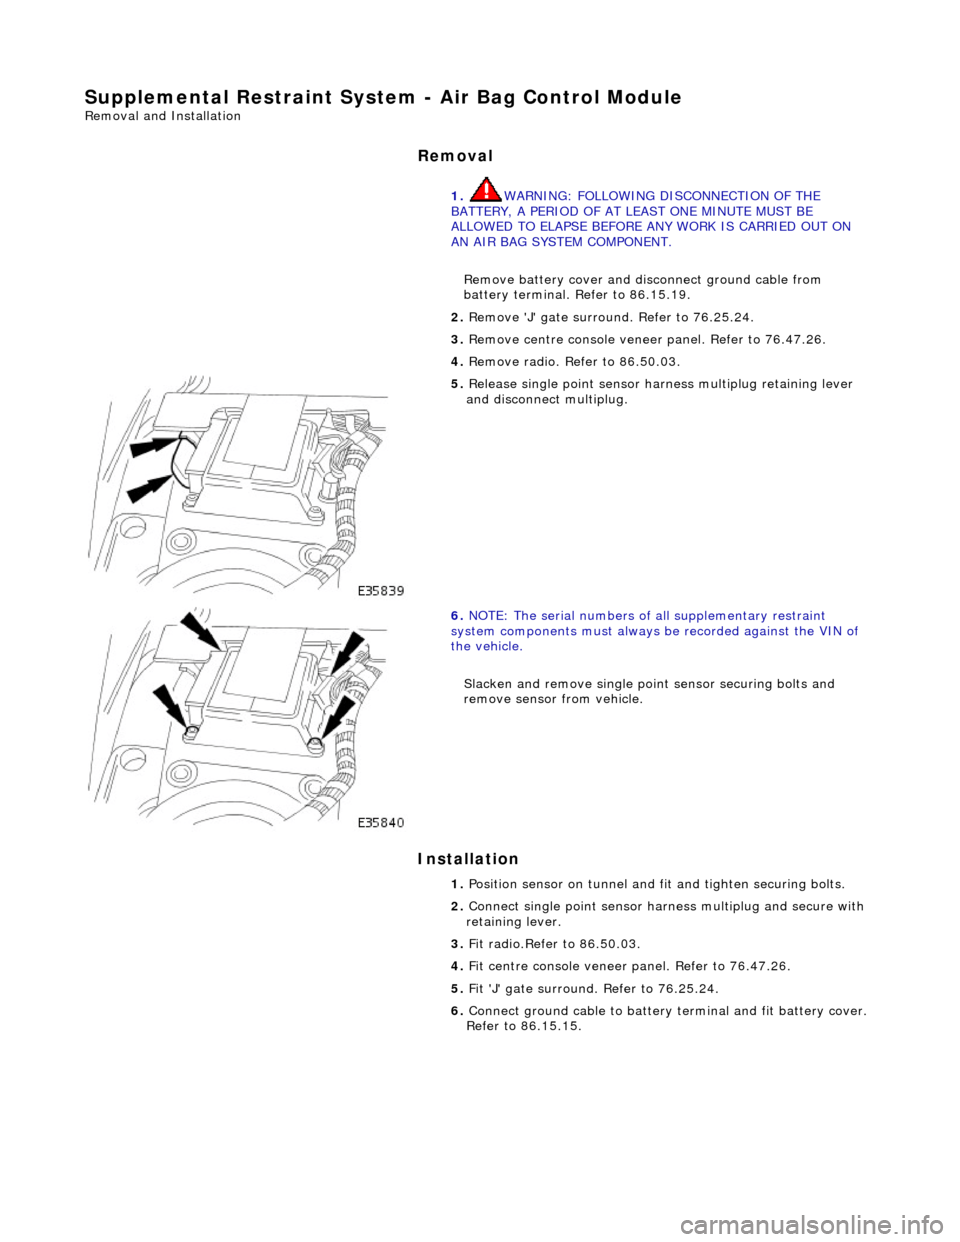
5. Release single point sensor ha rness multiplug retaining lever
and disconnect multiplug.
6. NOTE: The serial num bers of all supplementary restraint
system components must always be recorded against the VIN of
the vehicle.
Slacken and remove single point sensor securing bolts and
remove sensor from vehicle.
1. Position sensor on tunnel and fit and tighten securing bolts.
2. Connect single point sensor harn ess multiplug and secure with
retaining lever.
3. Fit radio.Refer to 86.50.03.
4. Fit centre console veneer panel. Refer to 76.47.26.
5. Fit 'J' gate surround. Refer to 76.25.24.
6. Connect ground cable to battery terminal and fit battery cover.
Refer to 86.15.15.
Page 2372 of 2490

Supplemental Restraint System - Driver Air Bag Module
Removal and Installation
Removal
• WARNINGS:
FOLLOWING DISCONNECTION OF THE BATTERY, A PERIOD OF AT LEAST ONE MINUTE MUST BE ALLOWED TO ELAPSE
BEFORE ANY WORK IS CARRIED OUT ON AN AIR BAG MODULE.
FOLLOWING TEN YEARS IN SERVICE, AN AIR BAG MO DULE MUST BE REMOVED AND DISPOSED OF IN THE
APPROVED MANNER, AND A NEW AIR BAG MUST BE FITTED.
AIR BAGS CONTAIN A CHEMICAL IRRITANT. IF AN AIR BAG IS RENEWED, THE ORIGINAL UNIT MUST BE DISPOSED
OF IN ACCORDANCE WITH CURRENT SAFETY PROCEDURES.
IN THE EVENT OF A FAULT RUPTURING THE 10A BATTERY SUPPLY FUSE (F4 LOCATED IN THE FUSE-BOX AT THE
DRIVER'S END OF THE FASCIA), THE FUSE MUST NOT BE RENEWED UNTIL THE AIRBAG/SRS SYSTEM HAS BEEN DE-
ACTIVATED. FUSES OF ANY OTHER VALUE MUST NEVER BE USED, AS THIS CAN CAUSE DISARM FAILURE.
Installation
1. Remove battery cover and disc onnect ground cable from
battery terminal. Refer to 86.15.19.
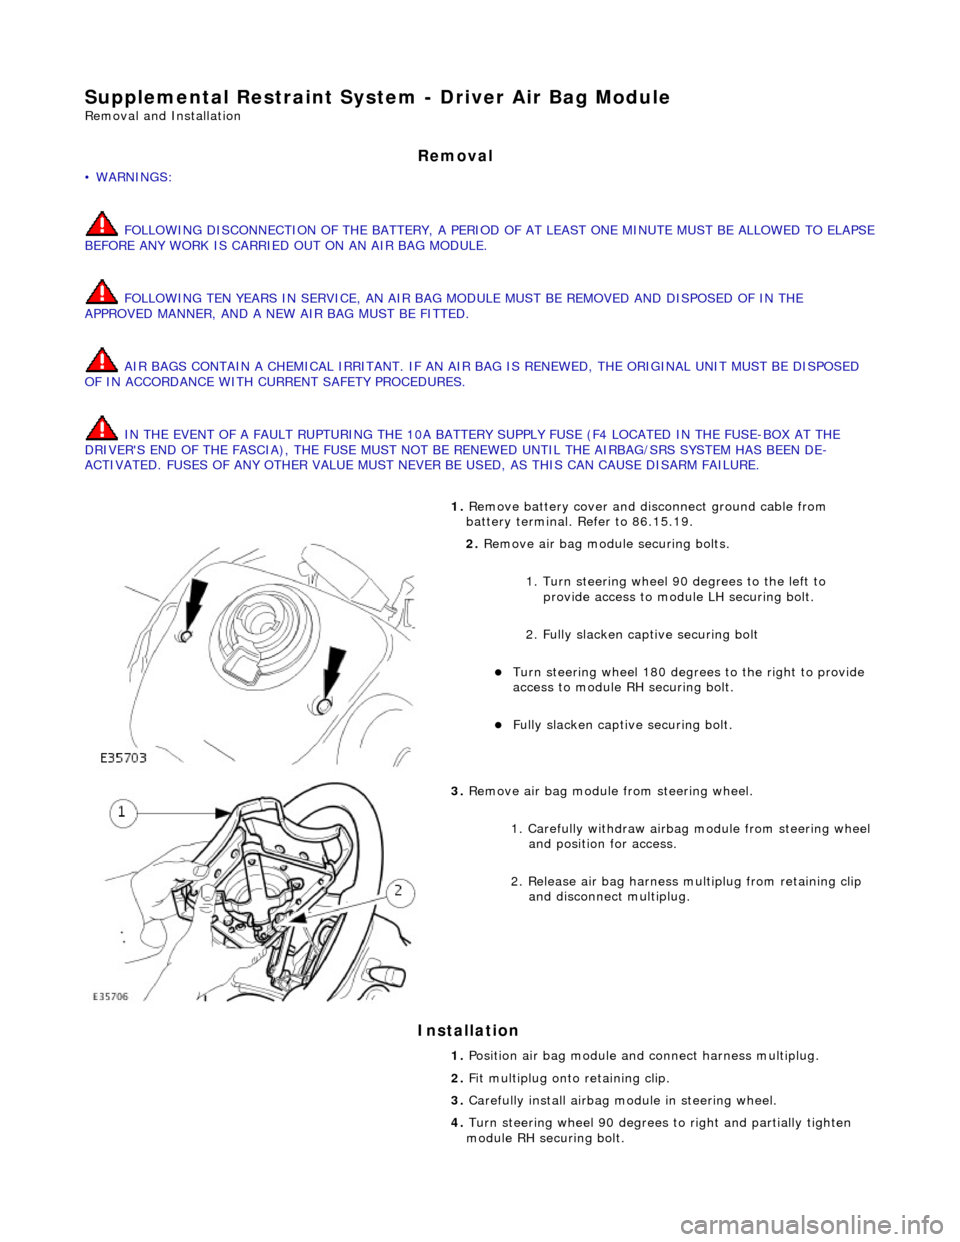
2. Remove air bag module securing bolts.
1. Turn steering wheel 90 degrees to the left to
provide access to module LH securing bolt.
2. Fully slacken captive securing bolt
Turn steering whee l 180 degrees to the right to provide
access to module RH securing bolt.
Fully slacken captive securing bolt.
3. Remove air bag module from steering wheel.
1. Carefully withdraw airbag module from steering wheel
and position for access.
2. Release air bag harness mu ltiplug from retaining clip
and disconnect multiplug.
1. Position air bag module and connect harness multiplug.
2. Fit multiplug onto retaining clip.
3. Carefully install airbag mo dule in steering wheel.
4. Turn steering wheel 90 degrees to right an d partially tighten
module RH securing bolt.